> For the complete documentation index, see [llms.txt](https://docs.zata.ai/llms.txt). Markdown versions of documentation pages are available by appending `.md` to page URLs; this page is available as [Markdown](https://docs.zata.ai/knowledgebase/integration-of-zata.ai-with-rclone-gui.md).
# Integration of Zata.ai with Rclone GUI
**1. Introduction**
Zata.ai provides **S3-compatible object storage** that allows users to store and manage unstructured data such as files, images, backups, and logs.
Rclone is an open-source command-line program used to manage files on cloud storage systems.
In this setup, we connect **Zata Object Storage with Rclone GUI** to manage buckets and objects through a graphical interface.
***
**2. Prerequisites**
Before starting the configuration, ensure the following resources are available:
| Requirement | Description |
| --------------- | -------------------------------------------- |
| Zata.ai Account | Active account with access to object storage |
| Bucket | At least one bucket created |
| Access Keys | Access Key ID and Secret Access Key |
| S3 Endpoint | Zata S3 service URL |
***
**3. Create Zata Object Storage Bucket**
Login to **Zata.ai dashboard** and create a new bucket.
Steps:
1. Open Zata Storage Dashboard
2. Navigate to **Buckets**
3. Click **Create Bucket**
4. Enter bucket name
5. Select region
6. Create bucket
Example bucket name:
```
testing-bucket-001
```
***
**4. Generate Access Keys**
To allow external tools like Rclone to connect, access keys must be generated.
Steps:
1. Go to **Access Keys**
2. Click **Create Access Key**
3. Copy the following credentials:
```
Access Key ID
Secret Access Key
```
These credentials are used for **authentication with the S3 API**.
***
**5. Identify Zata S3 Service Endpoint**
Zata provides region-specific S3 endpoints.
For this setup the endpoint used is:
```
https://idr01.zata.ai (Central India) or https://bom01.zata.ai (Southern India)
```
Region:
```
us-east-1
```
This endpoint is required to connect S3-compatible clients like **Rclone**.
***
**6. Install Rclone**
Download and install the latest version of Rclone from the official website:
#### Step 1: Verify the Installation
Open **Windows PowerShell** or any **Terminal** and run:
```
rclone version
```
If Rclone is installed successfully, the installed version will be displayed.
#### Step 2: Launch the Rclone Web GUI
Run the following command in **Windows PowerShell** or **Terminal**:
```
rclone gui
```
This starts the Rclone Web GUI locally and automatically opens it in your default web browser.
#### Step 3: Create a New Remote
1. Open the **Remotes** tab.
2. Click **Add New Remote**.
#### Step 4: Configure the Remote
Fill in the following fields:
| Field | Value |
| -------- | ------------ |
| **Name** | `Zata Cloud` |
| **Type** | `s3` |
When you choose **Type = s3**, a list of S3-compatible providers will appear. Select Amazon S3 Compliant Storage Providers from the list.
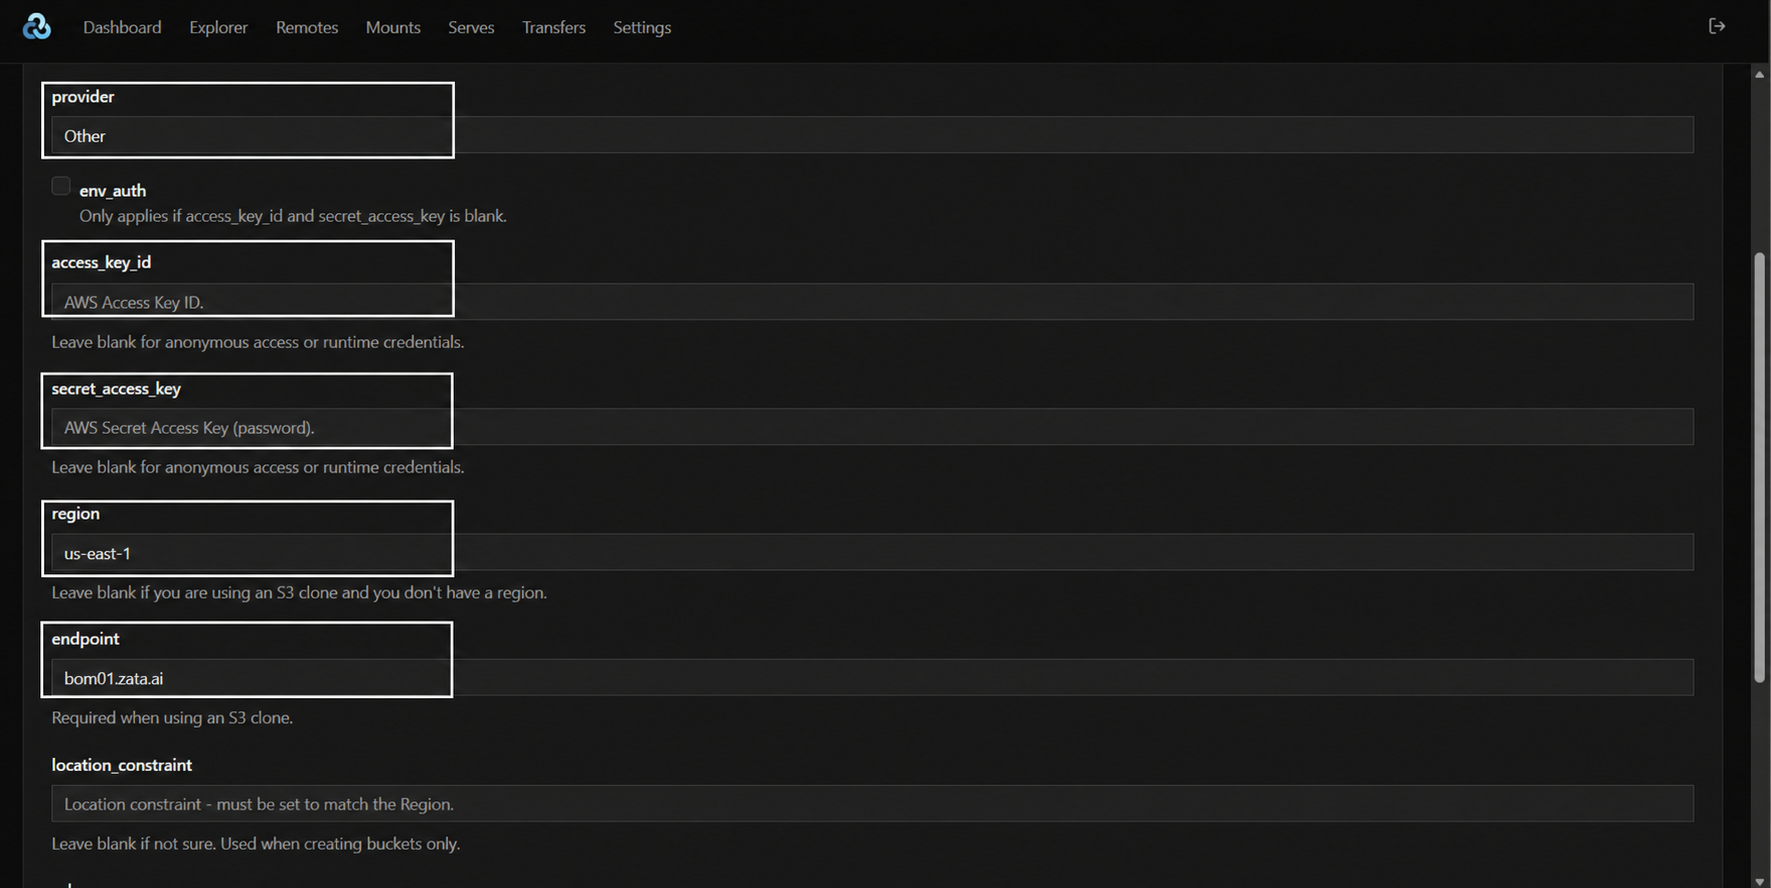
#### Step 5: Enter Your Credentials
Provide your Zata Cloud credentials.
| Field | Value |
| --------------------- | ------------------------------------ |
| **Provider** | Select Other |
| **Access Key ID** | Your Zata Access Key |
| **Secret Access Key** | Your Zata Secret Key |
| **Region** | `us-east-1` |
| **Endpoint** | `idr01.zata.ai` (or `bom01.zata.ai`) |
#### Step 6: Configure Advanced Options
Scroll down and expand **More Options**.
Enable the following options:
* ✅ **force\_path\_style**
* ✅ **v2\_auth**
> **Important**
>
> These two options **must be enabled** for successful integration with Zata Cloud.
#### Step 7: Create the Remote
Scroll to the bottom of the page and click **Create Remote**.
#### Step 8: Verify the Connection
If the configuration is correct, the new remote named **Zata Cloud** will appear in the **Remotes** list.
Your Rclone integration with Zata Cloud is now complete and ready to use.
#### Configuration Summary
Setting
Value
Name
Zata Cloud
Type
s3
Provider
Other
Access Key
Your Access Key
Secret Key
Your Secret Key
Region
us-east-1
Endpoint
idr01.zata.ai (or bom01.zata.ai)
force_path_style
Enabled ✅
v2_auth
Enabled ✅
***
**7.** Create a Bucket and Upload Files
After successfully configuring the **Zata Cloud** remote, you can create buckets and upload files directly from the Rclone Web GUI.
#### Step 1: Open the Zata Cloud Remote
Under **Remotes**, click **Zata Cloud**.
The existing buckets in your Zata Object Storage will be displayed.
#### Step 2: Create a New Bucket
* Click **New Folder**.
* Enter a unique bucket name (for example, `testing-bucket-002`).
* Click **OK**.
#### Step 3: Verify Bucket Creation
After the bucket is created successfully, it will appear in the Explorer.
#### Step 4: Open the Bucket
Click the newly created bucket to open it.
Since it is a new bucket, it will initially be empty.
#### Step 5: Upload Files
* Inside the bucket, click **Upload**.
* Select the file(s) you want to upload from your local system.
* Click **Open** to begin the upload.
#### Step 6: Verify the Uploaded File
After the upload completes successfully, the uploaded file will appear inside the bucket.
***
**8. Verify in Zata Dashboard**
Now go to your **Zata dashboard**
Open: Buckets → testing-bucket-002
You should see the uploaded file.
This confirms: Rclone, Zata Object Storage working
***
**9. Conclusion**
In this setup, **Zata Object Storage was successfully integrated with Rclone GUI**.
This integration enables:
* Easy file uploads
* Bucket management
* Backup storage
Using Rclone with Zata provides a flexible and efficient way to interact with S3-compatible storage systems.