# Getting Started with Zata.ai

This is a comprehensive documentation that provides invaluable assistance to clients during their on-boarding process, **s3-bucket creation**, and **s3-bucket operations**.

This concise and user-friendly guide equips clients with step-by-step instructions and best practices to navigate through the setup of their cloud instances smoothly.

The documentation offers clear and concise insights, ensuring clients can fully utilize the platform's capabilities. With detailed explanations and practical examples, clients can confidently leverage **Zata.ai** resources to optimize their cloud experience and maximize productivity.


# Create & Activate Account

This guide explains how to create and activate a new account on **Zata**.\
To ensure security and compliance, **both your email address and phone number must be verified** during signup.

### Overview

Creating a Zata account enables you to:

* Access the Zata web console
* Create and manage storage buckets
* Generate access and secret keys
* Use Zata with S3-compatible tools and applications

Account activation requires **successful verification of both email and phone number**.

### Prerequisites

Before starting, ensure that:

* You have a valid and accessible email address
* You have an active phone number that can receive OTPs
* You can access your email inbox and mobile device during signup
* You are using a supported web browser (Chrome, Firefox, Safari, or Edge)

### Sign Up for a Zata Account

#### 1. Visit the Zata signup page:

[**https://zata.ai/signup**](https://zata.ai/signup)

#### 2. Enter your Personal Details:

<figure><img src="https://2683631041-files.gitbook.io/~/files/v0/b/gitbook-x-prod.appspot.com/o/spaces%2FPPVG4W649TwXN8OejRhb%2Fuploads%2Fn8RaWOOkyPD9ReNbP5YW%2FScreenshot%202025-12-29%20at%2011.14.53%E2%80%AFAM.png?alt=media&amp;token=281489b1-d07d-4bb2-96ac-0d55f4404041" alt=""><figcaption></figcaption></figure>

* Fill in the required details
* Verify your email address
* Click **Next**

#### 3. Verification:

<figure><img src="https://2683631041-files.gitbook.io/~/files/v0/b/gitbook-x-prod.appspot.com/o/spaces%2FPPVG4W649TwXN8OejRhb%2Fuploads%2FKu2GG1cg6LsH7h4aaahv%2FScreenshot%202025-12-29%20at%2011.19.27%E2%80%AFAM.png?alt=media&amp;token=78ad30ad-3af8-4087-91d8-17e241bd9ce2" alt=""><figcaption></figcaption></figure>

* Fill in the required details
* Verify your phone number using OTP
* Accept the **Privacy Policy**
* Click **Start Free Trial**

### Account Activation Confirmation

Once **both your email address and phone number are successfully verified**, your Zata account is **automatically activated**.

You will see an on-screen confirmation message, after which you will be **redirected to the login page**.

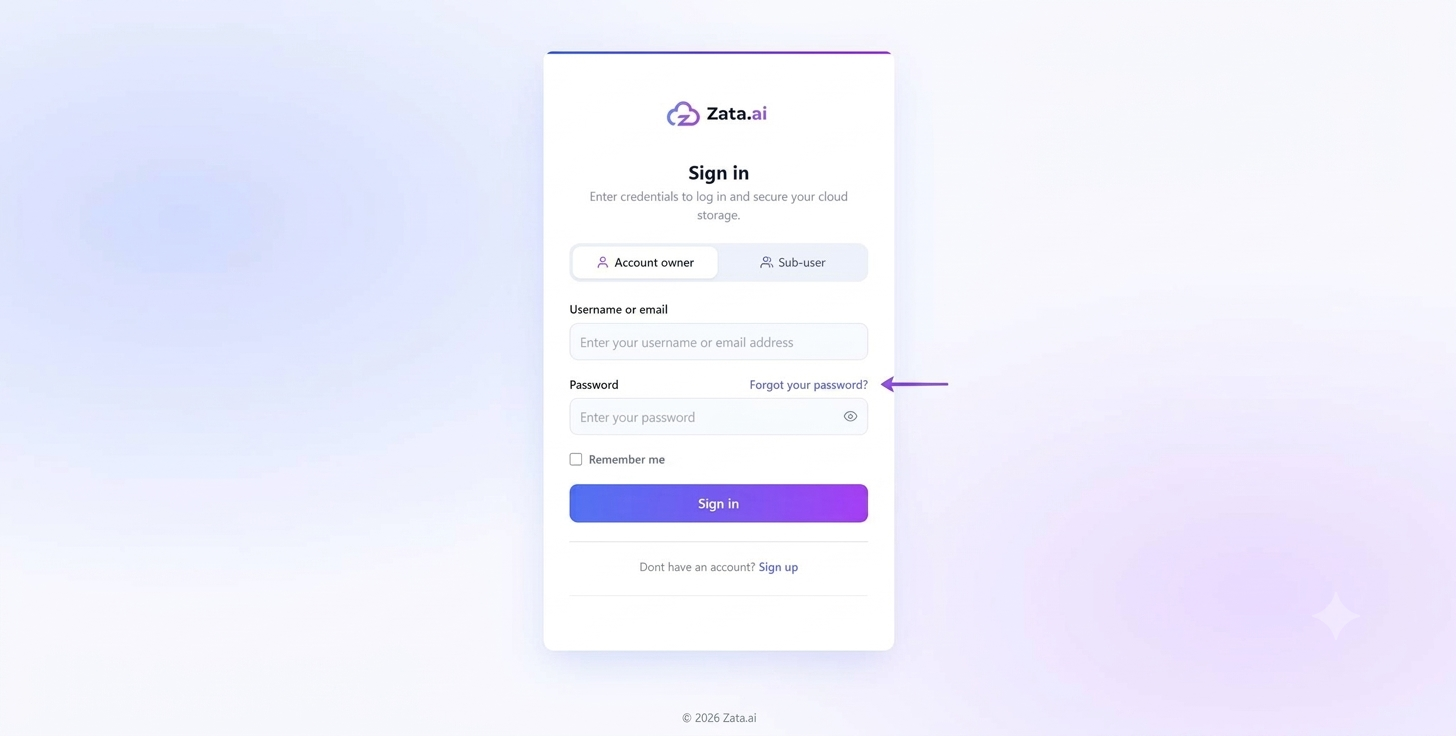
You can log in and access your account using **either your username or registered email address**, along with your password, to access the Zata console.


# Dashboard

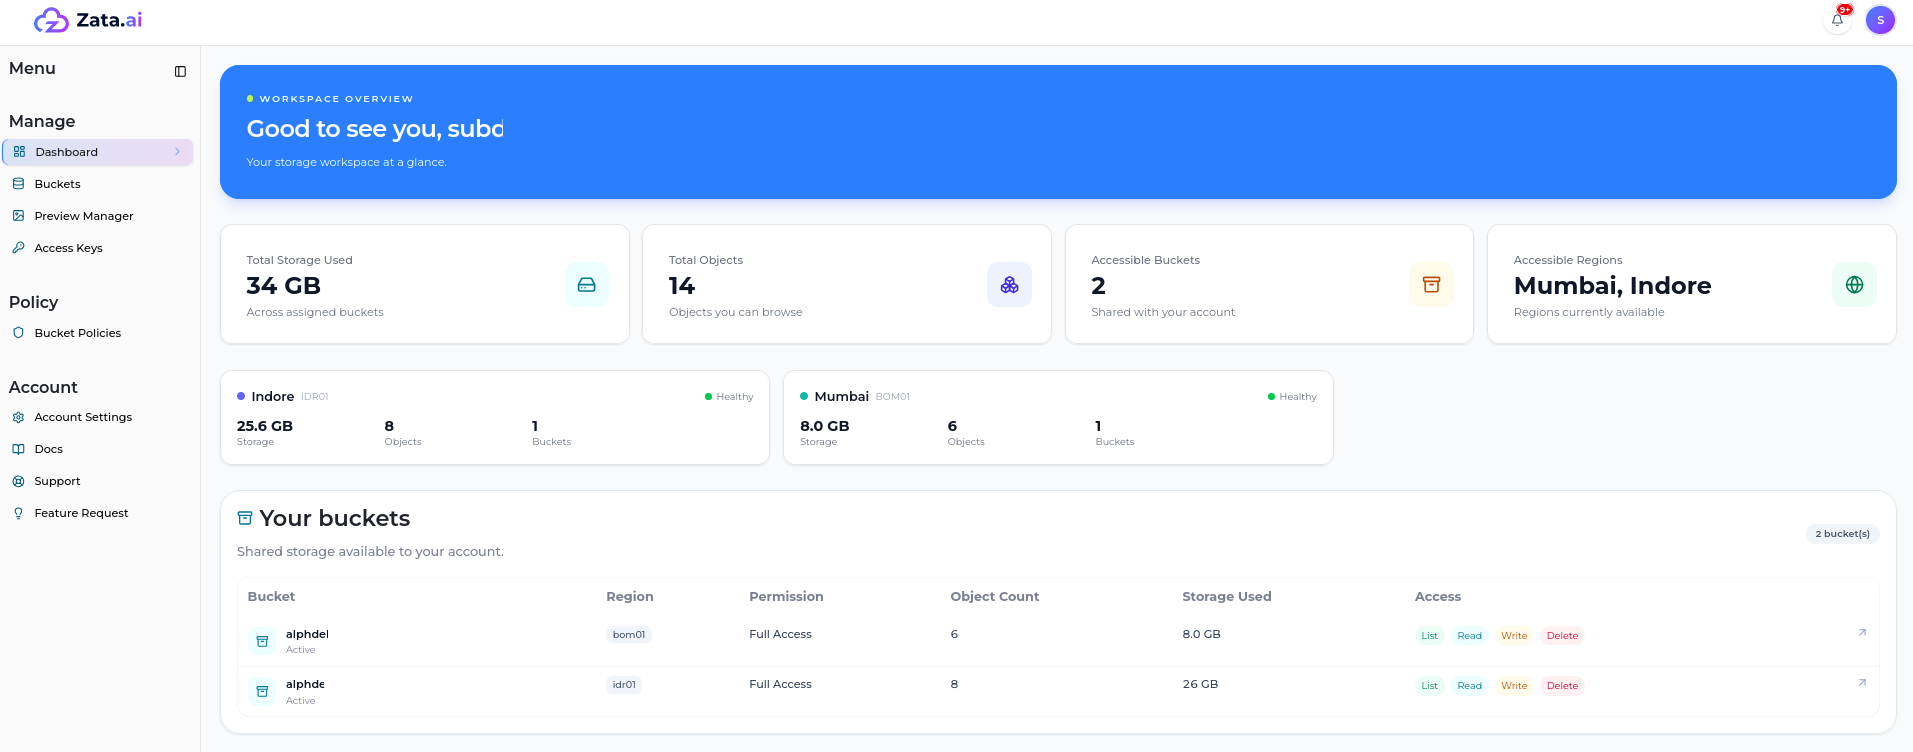
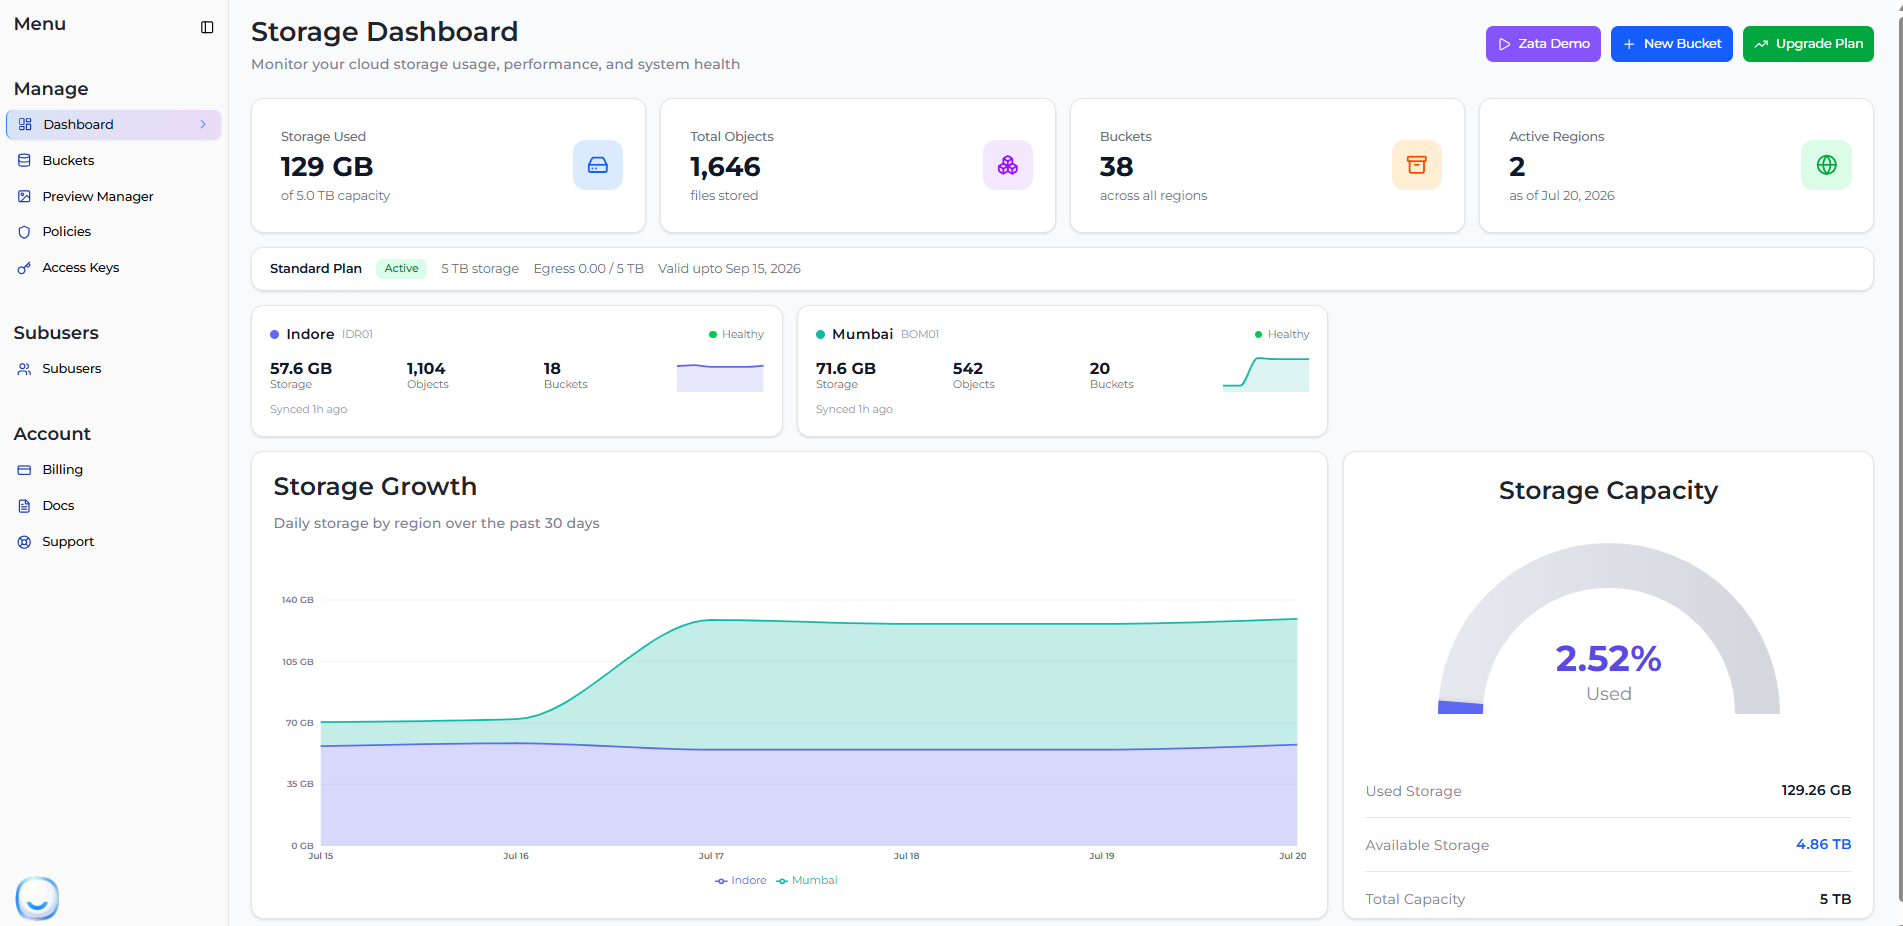
The **Storage Dashboard** provides a centralized view of your storage usage, capacity, and activity within **Zata**. It helps you monitor consumption, manage resources, and take quick actions from a single screen.

<figure><img src="https://2683631041-files.gitbook.io/~/files/v0/b/gitbook-x-prod.appspot.com/o/spaces%2FPPVG4W649TwXN8OejRhb%2Fuploads%2Fgit-blob-cbc8cd82ea82226f6d34ed5c997e94f8f10795f7%2Fnew-dashboard.png?alt=media" alt="Zata Storage Dashboard"><figcaption></figcaption></figure>

### Dashboard Overview

Once you log in to the Zata console, the dashboard displays real-time insights into your storage environment, including usage metrics, object counts, and bucket information.

### Key Metrics

At the top of the dashboard, you will find the following summary cards:

* **Storage Used**\
  Displays the total amount of storage currently in use against your capacity limit.
* **Total Objects**\
  Indicates the total number of objects (files) stored across your account.
* **Buckets**\
  Shows the total number of buckets created across all regions.
* **Active Regions**\
  Displays the number of active regions you have data in (e.g., Indore, Mumbai).

Each metric is updated regularly to reflect the latest available data.

### Region-Specific Metrics & Health

Below the plan details, you will find cards dedicated to each active region (e.g., **Indore IDR01** and **Mumbai BOM01**). These cards display real-time system health along with region-specific storage usage, object counts, and bucket quantities.

### Storage Growth

The **Storage Growth** section visualizes your daily storage consumption by region over the last 30 days.

* Helps track growth patterns and usage spikes across different regions
* Useful for capacity planning and forecasting
* Data can be exported using the download option

### Storage Capacity

The **Storage Capacity** gauge provides a quick snapshot of how much storage you are using relative to your total available capacity.

* **Used Storage** – Displays the exact storage consumed
* **Available Storage** – Shows remaining storage under your plan
* **Total Capacity** – Your total subscribed capacity
* **Usage Percentage** – Visual indicator of overall utilization

This section helps you decide when to upgrade your plan.

### Quick Actions

From the dashboard, you can perform common actions instantly:

* **New Bucket** – Create a new storage bucket
* **Upgrade Plan** – Increase storage capacity as your needs grow

These actions are accessible from the top-right corner of the dashboard.


# Managing Profile Settings

#### Overview

The **Profile Settings** section allows users to manage their personal account information, update contact details, and configure security options such as password changes and multi-factor authentication (MFA).

Users can access profile settings from the **account menu** available in the top-right corner of the dashboard.

***

#### Procedure

**Step 1: Open Profile Settings**

1. Log in to the **Zata.ai Dashboard**.
2. Click on the **Profile icon** located at the **top-right corner** of the dashboard.
3. From the dropdown menu, select **Profile**.

This will open the **Profile Settings** page.

<figure><img src="https://2683631041-files.gitbook.io/~/files/v0/b/gitbook-x-prod.appspot.com/o/spaces%2FPPVG4W649TwXN8OejRhb%2Fuploads%2FqHnAqZP3U0Gt6UFHrUH8%2Fimage.png?alt=media&amp;token=0ee3a40c-642e-41ff-b8b3-ee3b4c2993d5" alt=""><figcaption></figcaption></figure>

***

### Step 2: Edit Profile Information

1. On the **Profile Settings** page, click **Edit Profile**.
2. The profile fields will become editable.

Users can update the following details:

* **First Name**
* **Last Name**

Note:

* The **Username cannot be changed** from this page.

After making the changes, click **Save Changes**.

<figure><img src="https://2683631041-files.gitbook.io/~/files/v0/b/gitbook-x-prod.appspot.com/o/spaces%2FPPVG4W649TwXN8OejRhb%2Fuploads%2F9hrQzC3ZNOQ0Ci7p3ijW%2Fimage.png?alt=media&amp;token=ec8b4a70-cb43-4ca9-a756-53e7d60eb520" alt=""><figcaption></figcaption></figure>

***

### Step 3: Manage Contact Information

The **Contact Information** section displays the user's registered email address and mobile number.

Fields include:

* **Email Address**
* **Mobile Number**

Important:

* The **Email Address cannot be changed** for security reasons.
* To update the **mobile number**, users must contact support.

***

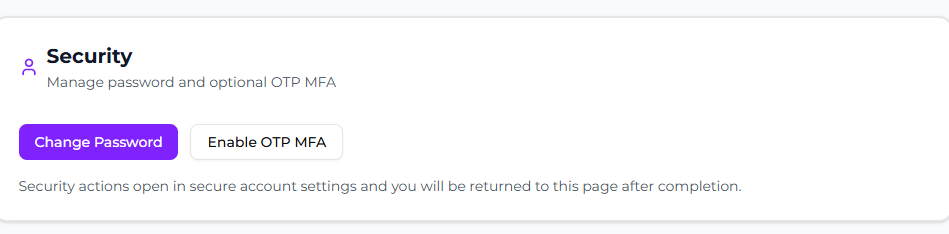
### Step 4: Change Account Password

Users can update their account password from the **Security** section.

1. Navigate to the **Security** section.
2. Click **Change Password**.
3. Follow the instructions in the secure account settings page.
4. After completion, you will be redirected back to the profile page.

<figure><img src="https://2683631041-files.gitbook.io/~/files/v0/b/gitbook-x-prod.appspot.com/o/spaces%2FPPVG4W649TwXN8OejRhb%2Fuploads%2FbMsCM2mjX5hFxG2RQJZj%2Fimage.png?alt=media&amp;token=9a30f2df-59bf-4cb3-ae7a-26a39e961f67" alt=""><figcaption></figcaption></figure>

***

### Step 5: Enable OTP Multi-Factor Authentication (MFA)

For additional security, users can enable **OTP-based Multi-Factor Authentication (MFA)**.

1. Click **Enable OTP MFA** in the Security section.
2. A **Mobile Authenticator Setup** page will appear.
3. Install an authenticator application on your mobile device.

Supported applications include:

* Google Authenticator
* Microsoft Authenticator
* FreeOTP

4. Open the authenticator app and **scan the QR code** displayed on the screen.
5. Enter the **one-time code generated by the application**.
6. Provide a **Device Name** for the authenticator.
7. Click **Submit** to complete the setup.

![](https://2683631041-files.gitbook.io/~/files/v0/b/gitbook-x-prod.appspot.com/o/spaces%2FPPVG4W649TwXN8OejRhb%2Fuploads%2FYu0ntTvgqYQWQK9cL5uE%2Fimage.png?alt=media\&token=45f6822c-2fe3-423c-b04e-d9442051b444)

***

**Result**

After completing these steps:

* Personal information will be updated successfully.
* Users can maintain secure access to their account.
* Multi-factor authentication provides an additional layer of security.


# Manage

The **Manage** section is the central control area of the Zata.ai dashboard where all storage resources and access settings are handled. From here, you can monitor your system, manage buckets, preview stored data, control access policies, and generate API keys. It provides complete administrative control over your object storage environment.

* **Dashboard** – Gives an overall view of storage usage, buckets, and system activity.
* **Buckets** – Used to create, manage, and organize storage buckets and their objects.
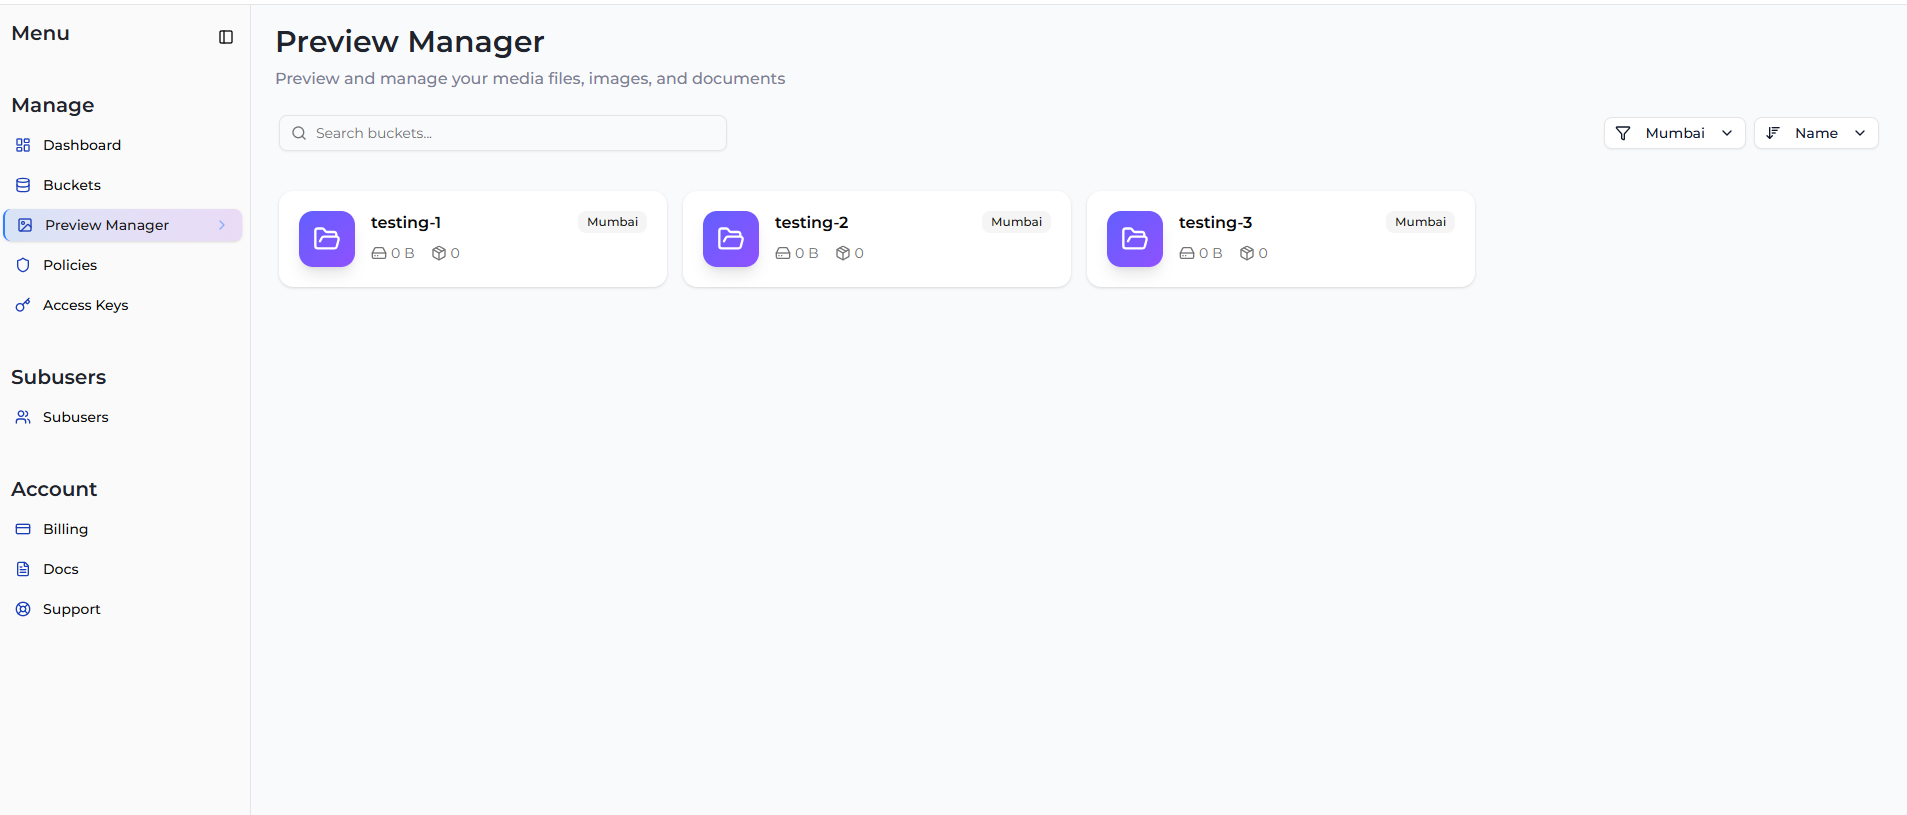
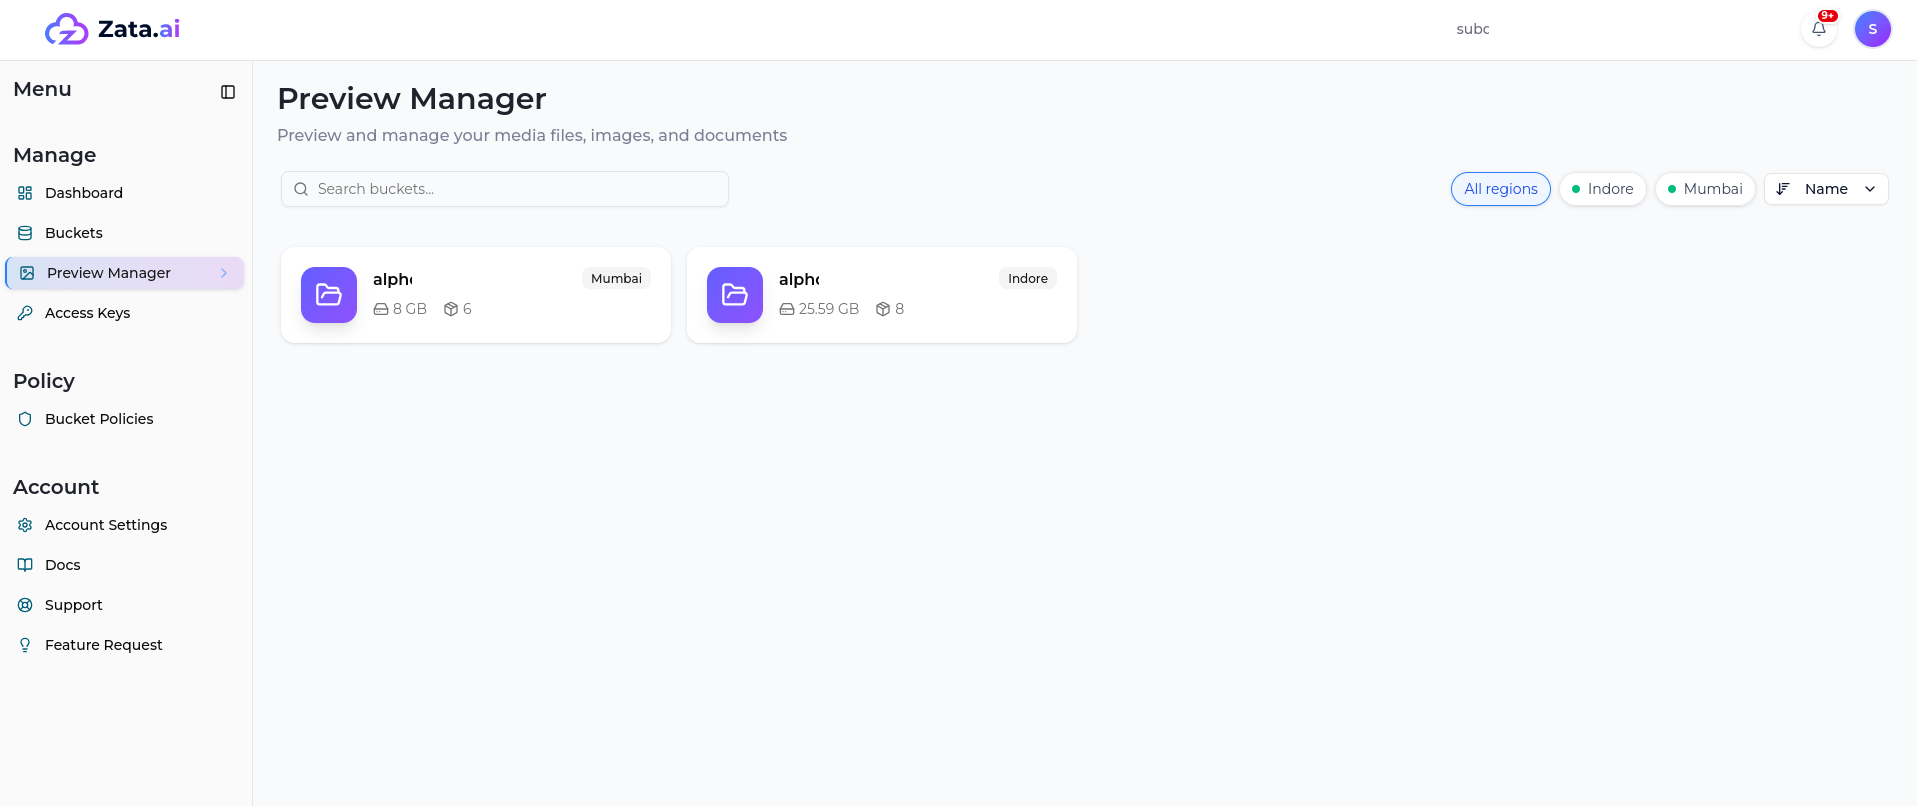
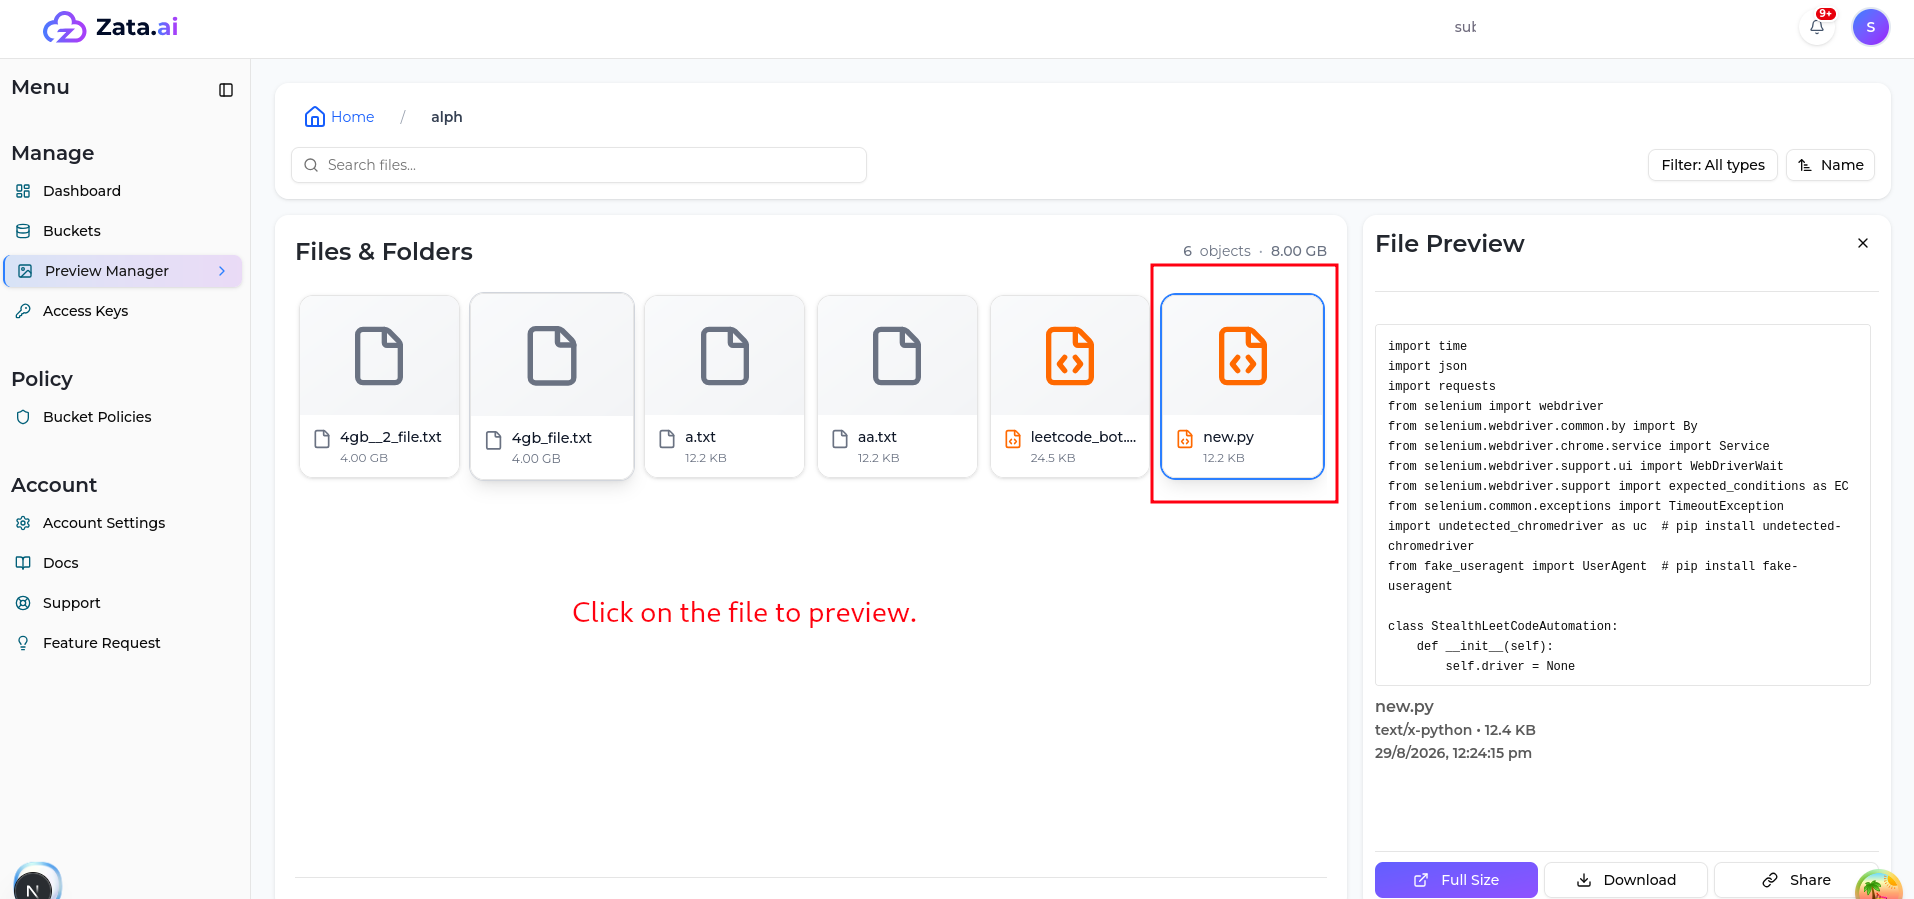
* **Preview Manager** – Allows you to preview and verify files such as images, videos, and documents without downloading them.
* **Policies** – Used to define and manage access control policies for buckets and objects.
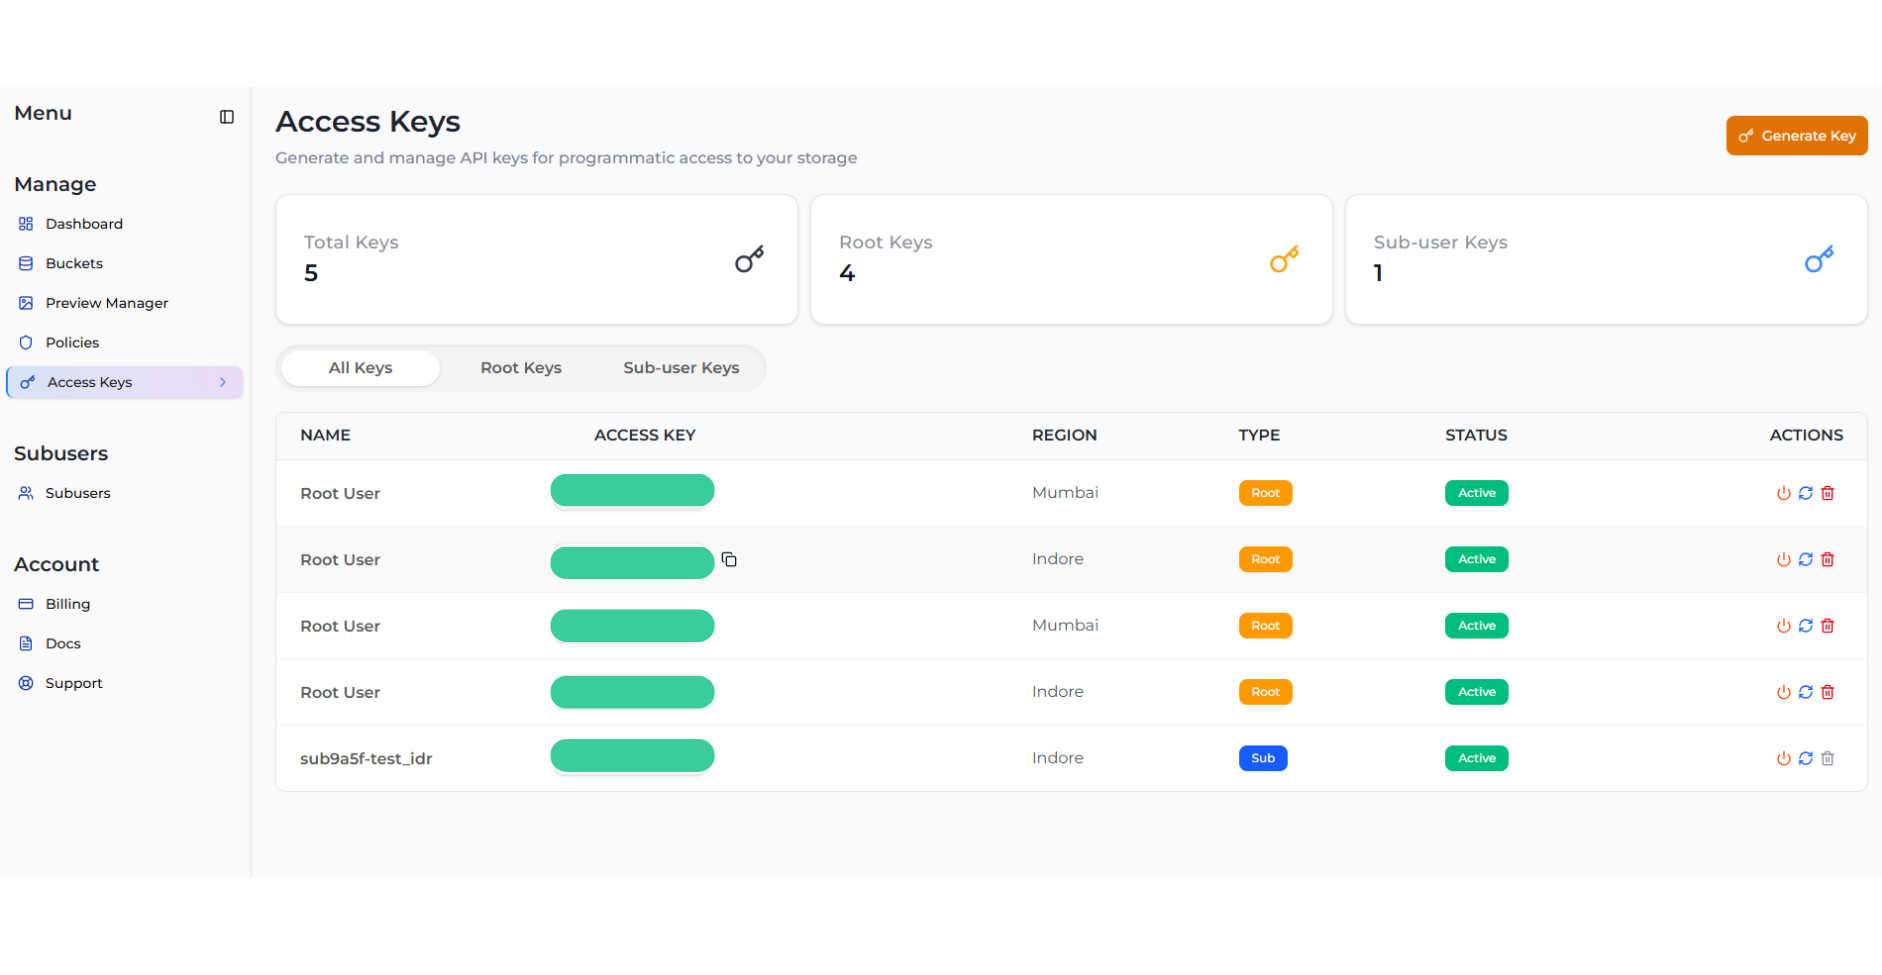
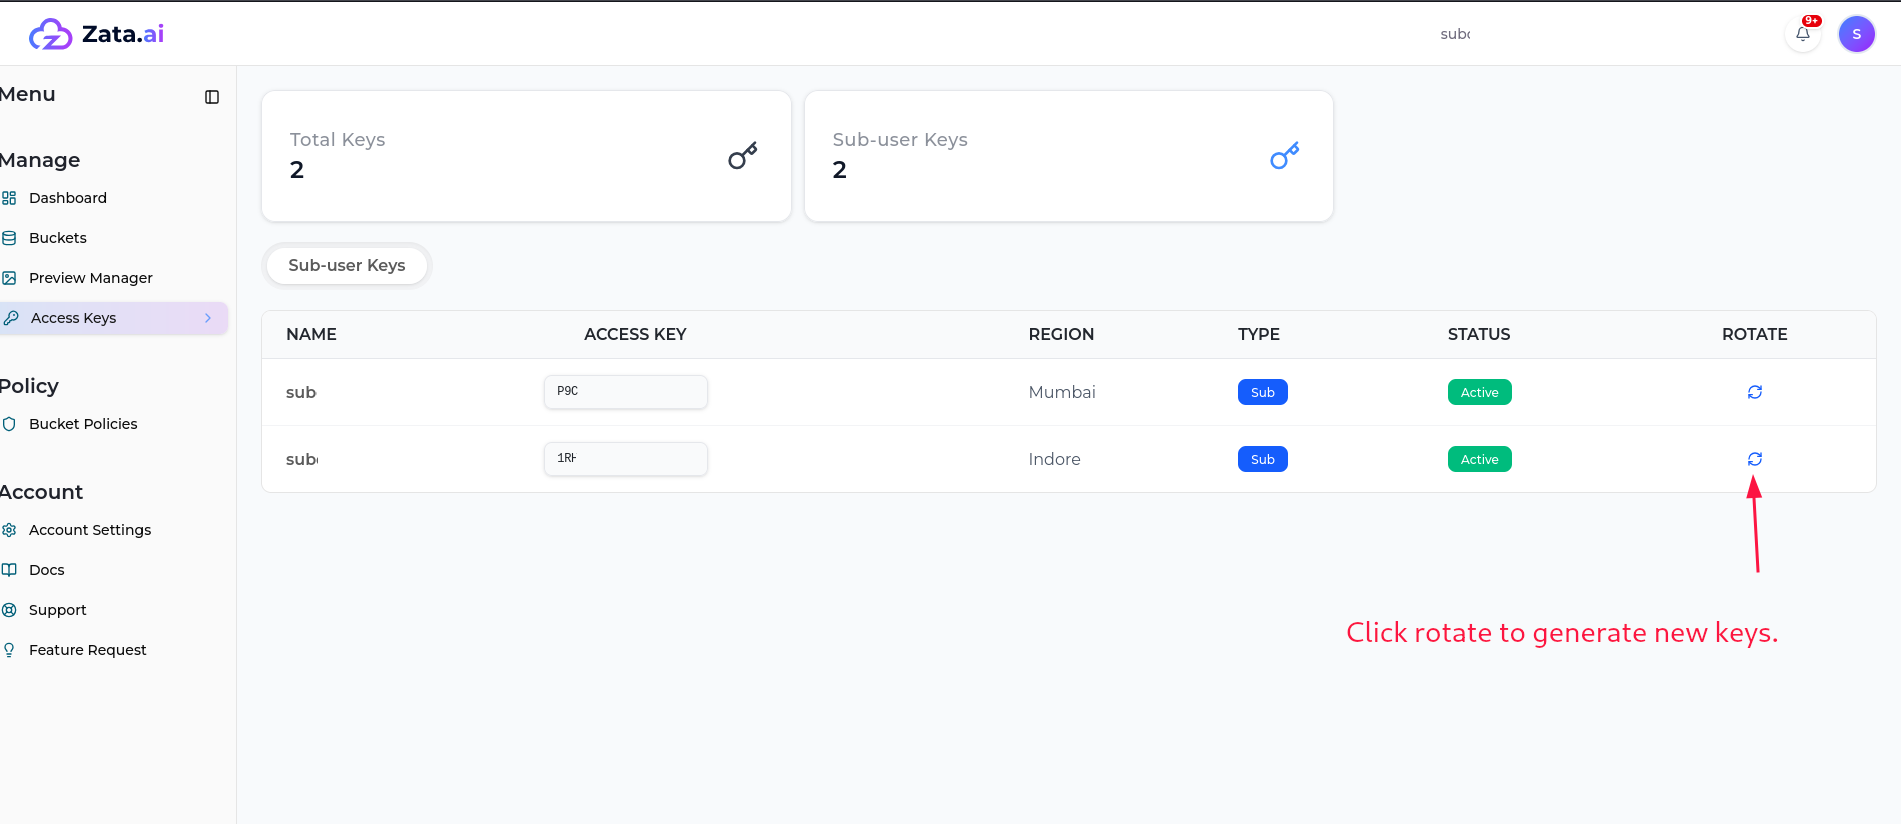
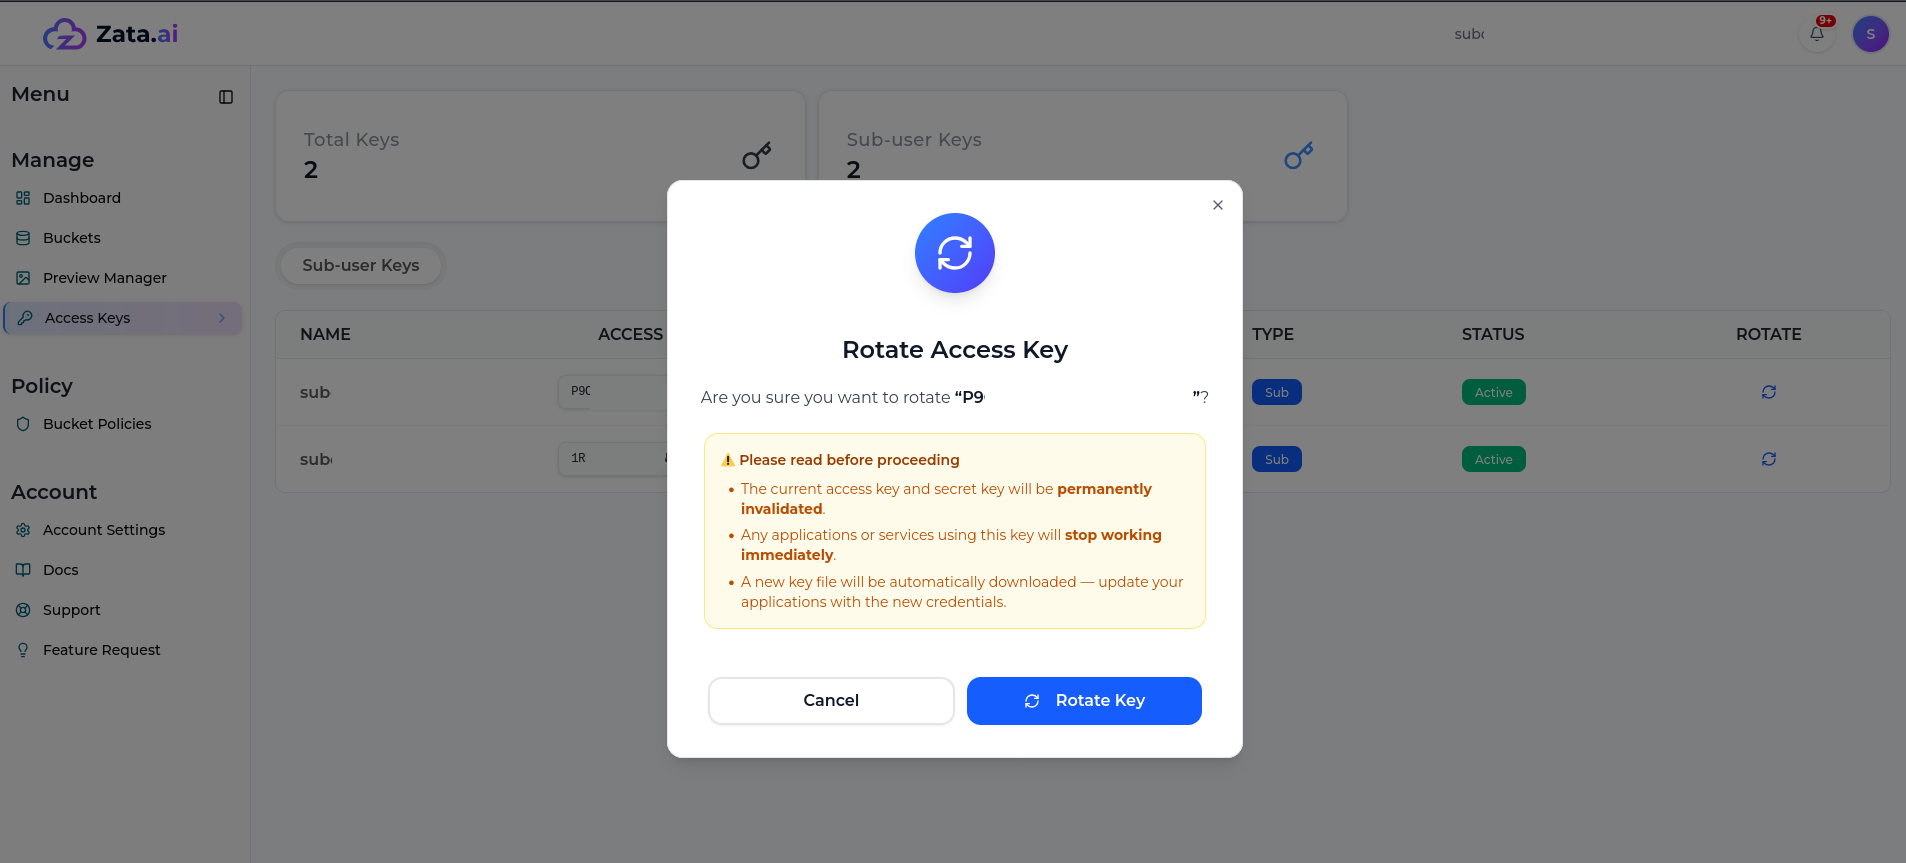
* **Access Keys** – Used to generate and manage API keys for programmatic access to Zata.ai storage.

This section helps in managing storage operations, security, and user access in a structured and efficient way.


# Bucket

#### Overview

Buckets are the core storage containers in Zata, used to organize and store all data within the platform. A bucket acts as a logical container for objects such as files, backups, media, and application data. Each object stored in a bucket is identified by a unique object key, enabling structured and efficient data management.

Zata buckets are **S3-compatible** and support standard object storage behavior, allowing seamless integration with commonly used S3 tools, SDKs, and applications. Access to buckets is managed through access keys and bucket policies, ensuring secure, controlled, and role-based data access.

Buckets provide a **scalable, durable, and reliable** solution for storing and managing data across a wide range of use cases, including application storage, backups, analytics, and media management.


# Create Bucket

A **Bucket** in cloud computing is a **container** used to store data.

* A bucket acts as a storage container that enables efficient storage, organization, and management of data.

Bucket > Create Bucket > Give Bucket Name > Click Create Bucket

* Click on the Create bucket

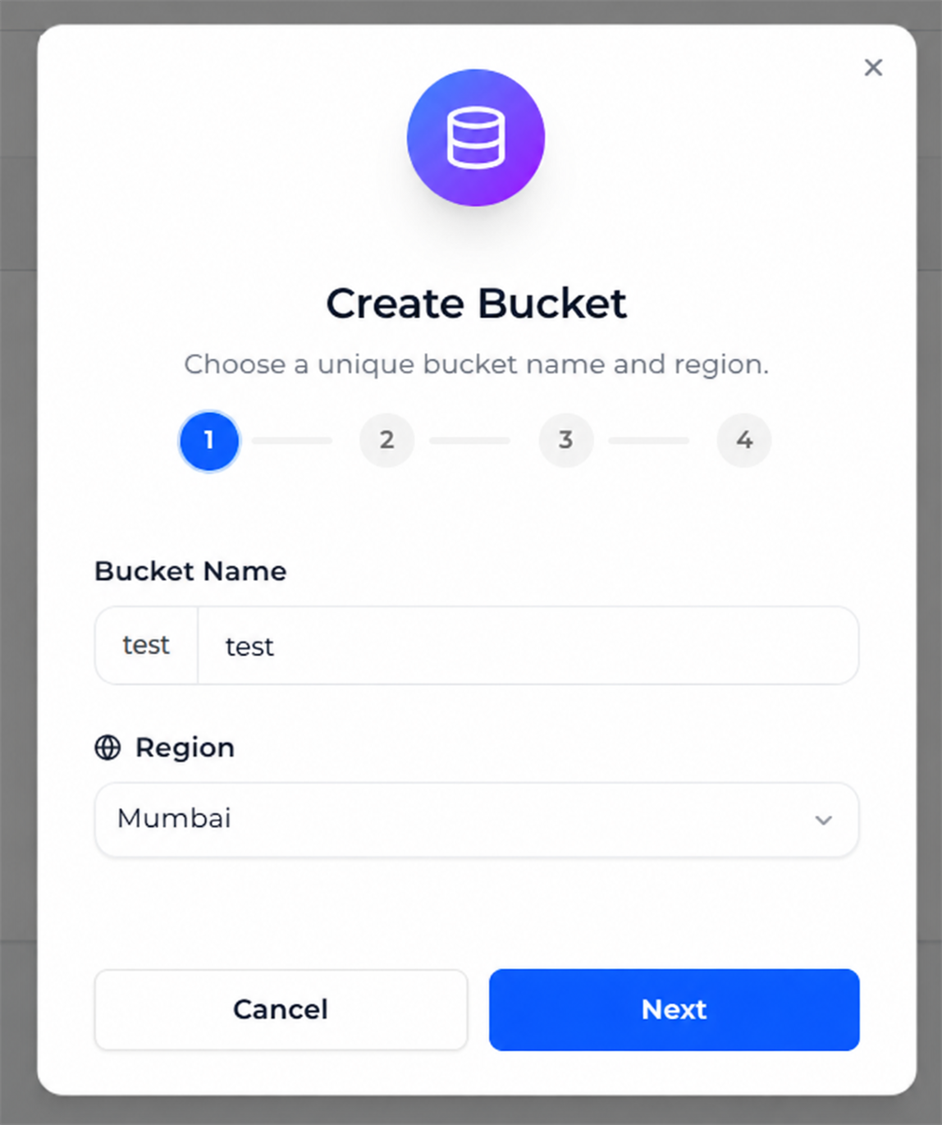
Note:- Bucket names can be between 3 and 63 characters long including the \<USER\_NAME>.

<figure><img src="https://2683631041-files.gitbook.io/~/files/v0/b/gitbook-x-prod.appspot.com/o/spaces%2FPPVG4W649TwXN8OejRhb%2Fuploads%2F1lcajqSBsgccQLvTXgez%2Fimage.png?alt=media&amp;token=922aa910-20d0-4ca6-a114-9bd89cfd5f18" alt=""><figcaption></figcaption></figure>

Set the unique name.\
Select a region for your bucket. You can choose from available regions such as **Indore** or **Mumbai**.

<figure><img src="https://2683631041-files.gitbook.io/~/files/v0/b/gitbook-x-prod.appspot.com/o/spaces%2FPPVG4W649TwXN8OejRhb%2Fuploads%2F6jGsvrF0tRDJ7UwNeshw%2Fimage.png?alt=media&amp;token=c39df915-669c-41e2-b47a-603545fc721e" alt="Create Bucket - Indore Region"><figcaption></figcaption></figure>

You can also create a bucket in the **Mumbai** region by selecting it from the Region dropdown.

<figure><img src="https://2683631041-files.gitbook.io/~/files/v0/b/gitbook-x-prod.appspot.com/o/spaces%2FPPVG4W649TwXN8OejRhb%2Fuploads%2Fgit-blob-7991bd8ae6d292ee20800a7cb96b0e479200b4cf%2Fcreate-bucket-bom.png?alt=media" alt="Create Bucket - Mumbai Region" width="500"><figcaption></figcaption></figure>

After this, we can see the Review information like (User name, Bucket name, Region, Versioning, encryption)

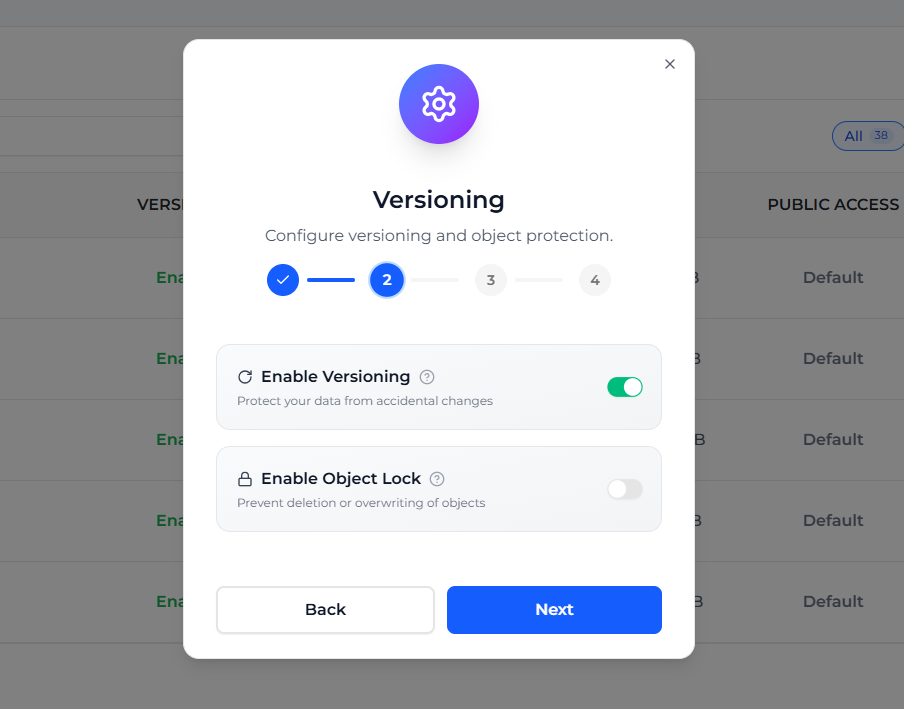
**Bucket versioning :**

* Stores multiple versions of an object (file)
* Tracks changes made to an object over time
* Allows recovery of deleted or overwritten objects
* All versions are stored and can be recovered or reverted to.

<figure><img src="https://2683631041-files.gitbook.io/~/files/v0/b/gitbook-x-prod.appspot.com/o/spaces%2FPPVG4W649TwXN8OejRhb%2Fuploads%2Fgit-blob-e0c2785811564049c057e71d344a38e1181c6555%2Fversioning.png?alt=media" alt="Bucket Versioning"><figcaption></figcaption></figure>

**Object Lock (WORM) :**

* Prevents objects from being deleted or overwritten for a fixed amount of time or indefinitely.
* **Important:** Object Lock can ONLY be enabled when creating the bucket.
* Enabling Object Lock automatically and permanently enables Bucket Versioning.

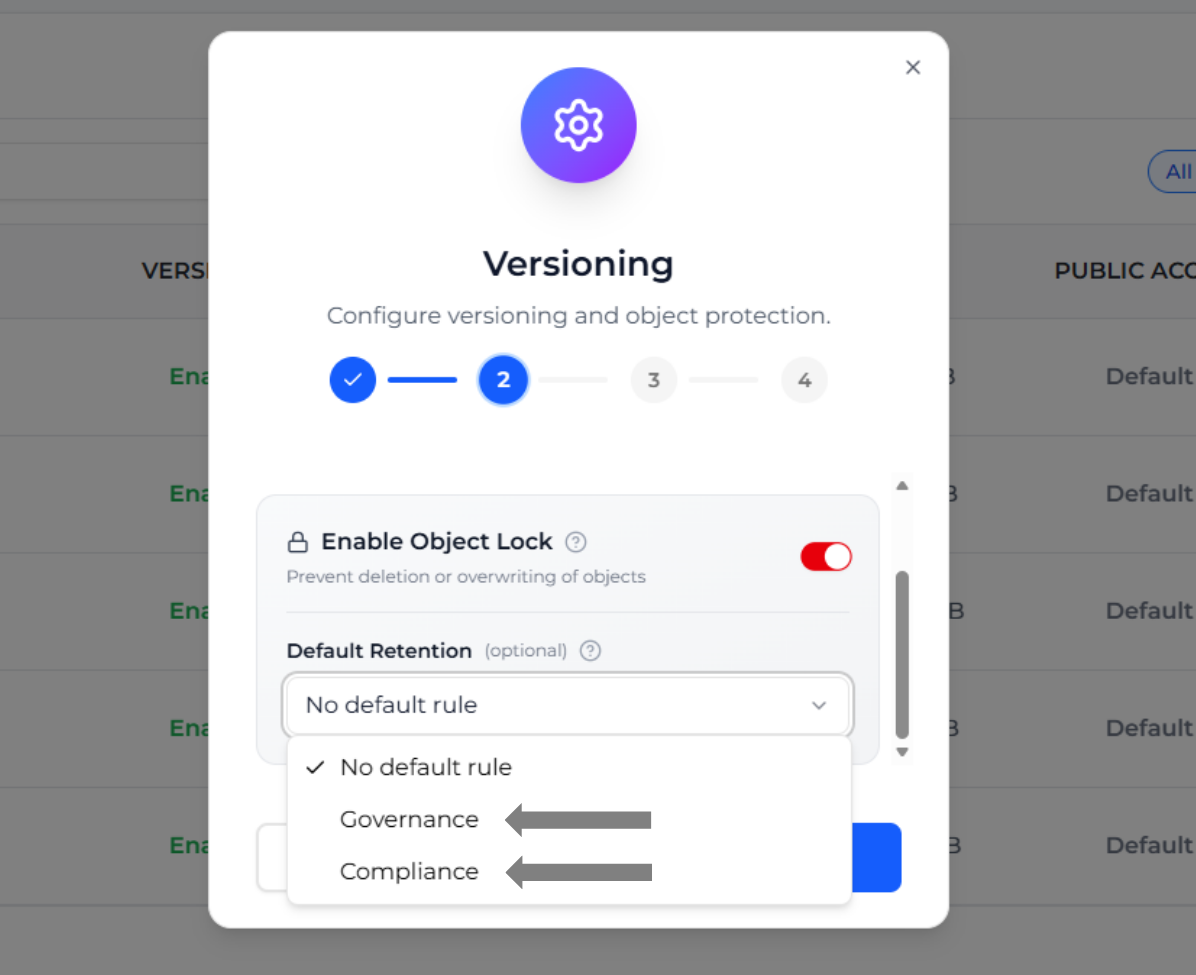
There are two modes: Governance and Compliance mode. You can choose either of them.

> **Note:** You can change the default object lock settings later from the Bucket Settings page.

<figure><img src="https://2683631041-files.gitbook.io/~/files/v0/b/gitbook-x-prod.appspot.com/o/spaces%2FPPVG4W649TwXN8OejRhb%2Fuploads%2Fgit-blob-365f790fb8b16164c8bd6ca6c1e43ea1177b3900%2Fobject-lock-create-bucket-1.png?alt=media" alt="Object Lock Settings 1"><figcaption></figcaption></figure>

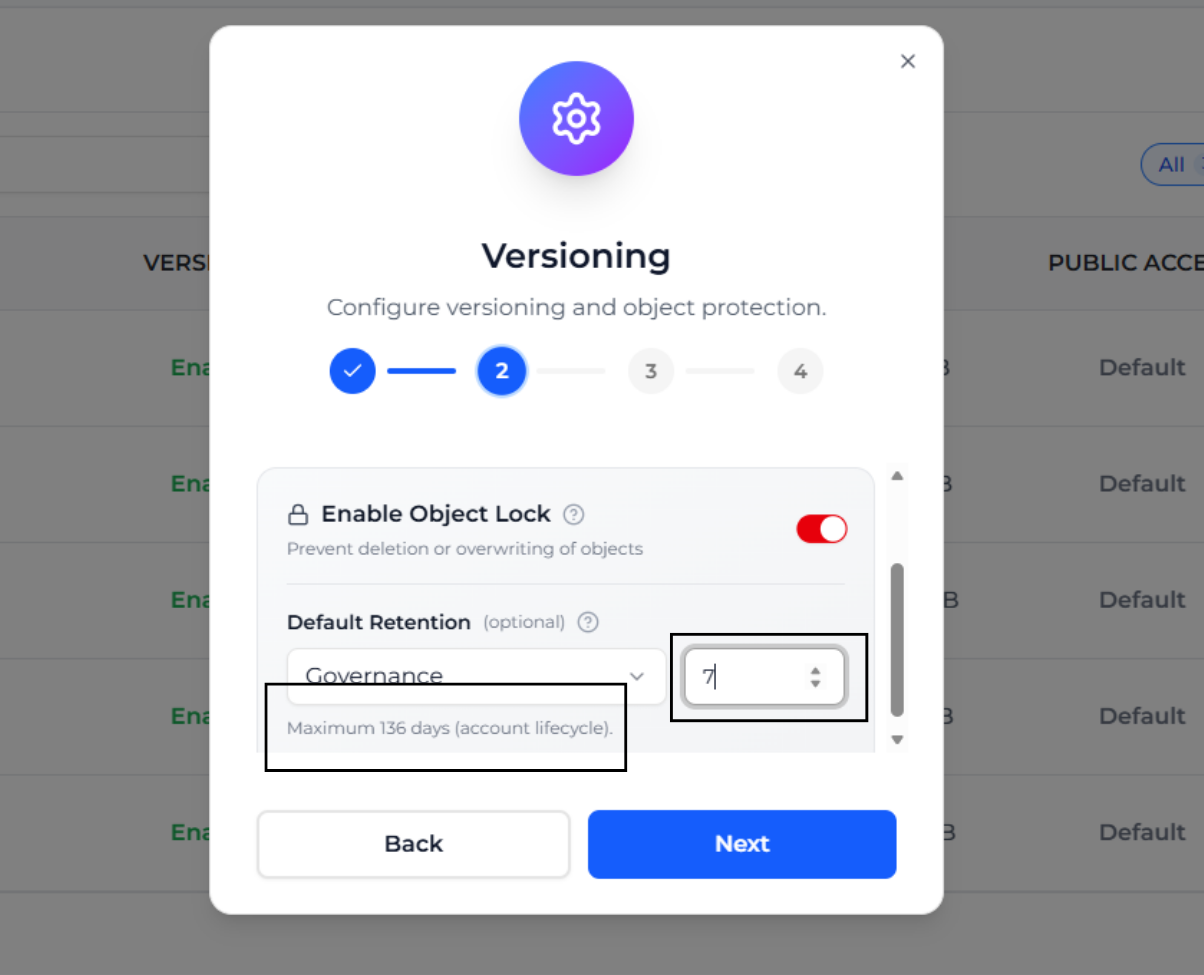
You can set the number of days to lock the object versions. The maximum number of days you can set is determined by your account lifecycle.

<figure><img src="https://2683631041-files.gitbook.io/~/files/v0/b/gitbook-x-prod.appspot.com/o/spaces%2FPPVG4W649TwXN8OejRhb%2Fuploads%2Fgit-blob-09619657a9fd5914ce091884e7fe06cb8455c2b2%2Fobject-lock-create-bucket-2.png?alt=media" alt="Object Lock Settings 2"><figcaption></figcaption></figure>

**Encryption**:- Encryption refers to protecting data by converting it into an unreadable format.

To Apply the Tags to Bucket

<figure><img src="https://2683631041-files.gitbook.io/~/files/v0/b/gitbook-x-prod.appspot.com/o/spaces%2FPPVG4W649TwXN8OejRhb%2Fuploads%2F3y59PXsO1lAYJ5EiOPiW%2Fimage.png?alt=media&amp;token=658c7fd4-4021-498e-ad0a-bdeda6aa2c3b" alt=""><figcaption></figcaption></figure>

Now the Review information about bucket, click on the Next.

<figure><img src="https://2683631041-files.gitbook.io/~/files/v0/b/gitbook-x-prod.appspot.com/o/spaces%2FPPVG4W649TwXN8OejRhb%2Fuploads%2F3icjH0pQkMPpshJHEvJS%2Fimage.png?alt=media&amp;token=877ecaf7-eb45-4f8d-86c5-d0a7bebdf862" alt=""><figcaption></figcaption></figure>

Now, The bucket review displays details such as bucket name, owner, versioning, public access, creation date, and actions.\
Click on **Create Bucket** to create a new bucket. After successful creation, the bucket becomes visible in the list.

<figure><img src="https://2683631041-files.gitbook.io/~/files/v0/b/gitbook-x-prod.appspot.com/o/spaces%2FPPVG4W649TwXN8OejRhb%2Fuploads%2FO1C8Zwccjaj9GSP5dtXv%2Fimage.png?alt=media&amp;token=c0bf49ec-78f7-41f3-b5cc-138b0604fbb5" alt=""><figcaption></figcaption></figure>

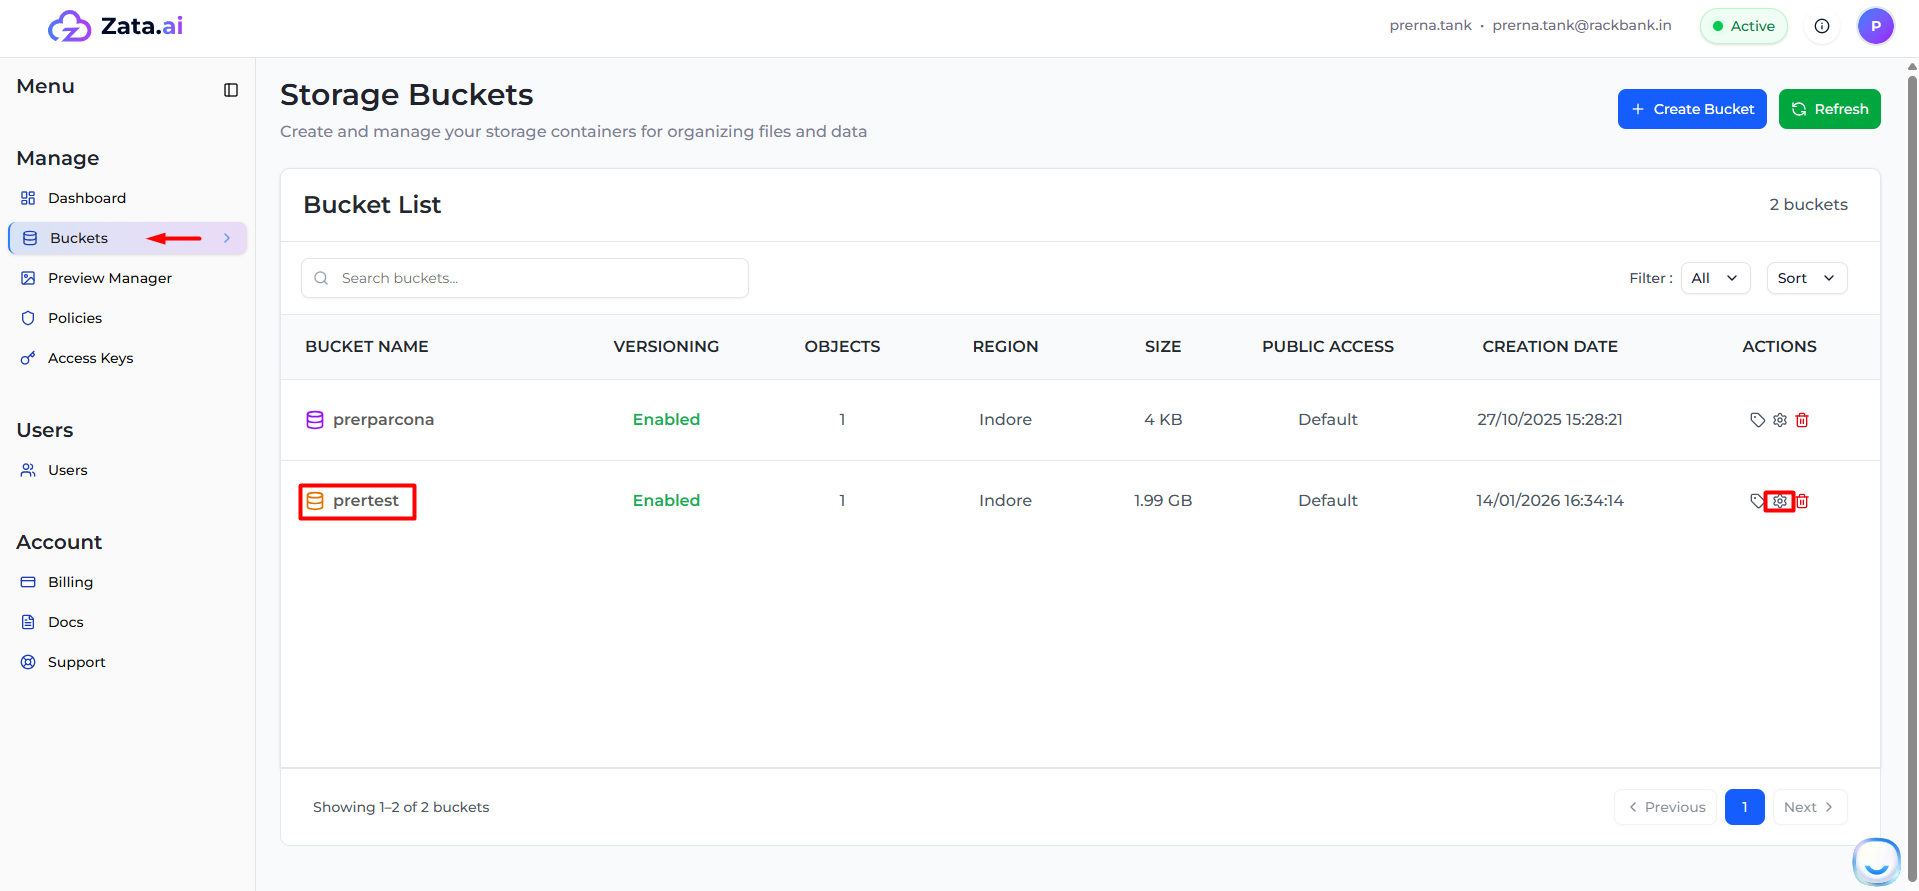
Click on the **Actions** column located to the right of the specific bucket name. In the Actions section, options are available to manage the bucket, such as deleting the bucket, managing tags, and modifying bucket settings.

<figure><img src="https://2683631041-files.gitbook.io/~/files/v0/b/gitbook-x-prod.appspot.com/o/spaces%2FPPVG4W649TwXN8OejRhb%2Fuploads%2F1Xf3BsAXnJmTpzCEG4VG%2Fimage.png?alt=media&amp;token=96330018-b837-4e2b-b7b6-1275164aca6f" alt=""><figcaption></figcaption></figure>


# Bucket Settings

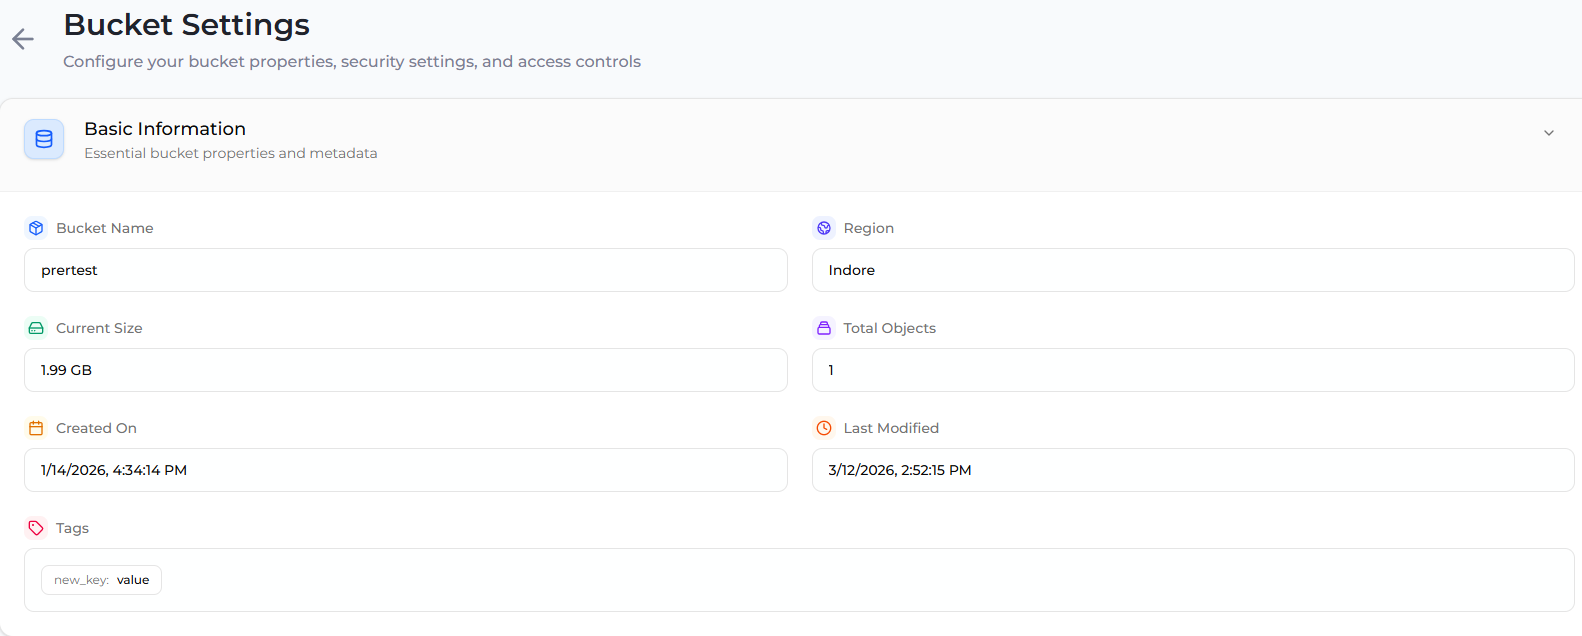
Click on **Settings** to open the bucket configuration page.\
The **Bucket Settings** page allows users to configure bucket properties, versioning, security access, and storage limits.

<figure><img src="https://2683631041-files.gitbook.io/~/files/v0/b/gitbook-x-prod.appspot.com/o/spaces%2FPPVG4W649TwXN8OejRhb%2Fuploads%2FWYgPev6MzLXd8Omoozhg%2Fimage.png?alt=media&amp;token=b467fa3e-8dee-42da-b198-29e5a0612c27" alt=""><figcaption></figcaption></figure>

***

**1. Basic Information**

The **Basic Information** section displays the core metadata and properties of the bucket.

**Bucket Name**

Displays the unique name assigned to the bucket when it was created.\
This name is used to identify and access the bucket within the object storage system.

**Region**

Indicates the geographical region where the bucket is hosted.\
The selected region determines **data locality, latency, and compliance requirements**.

**Current Size**

Shows the total storage currently used by all objects inside the bucket.

**Total Objects**

Displays the total number of objects stored in the bucket.

**Created On**

Shows the exact **date and time when the bucket was created**.

**Last Modified**

Displays the most recent timestamp when any object or configuration in the bucket was updated.

**Tags**

Tags allow users to attach **key–value metadata** to the bucket for easier organization, management, and automation.

Example:

```
Environment : Production
Project : Backup
```

<figure><img src="https://2683631041-files.gitbook.io/~/files/v0/b/gitbook-x-prod.appspot.com/o/spaces%2FPPVG4W649TwXN8OejRhb%2Fuploads%2FVk2PMUtVkwbMtrMP0rFK%2Fimage.png?alt=media&amp;token=2bb737cb-2fd1-411e-b5e4-b0de3020aa8c" alt=""><figcaption></figcaption></figure>

***

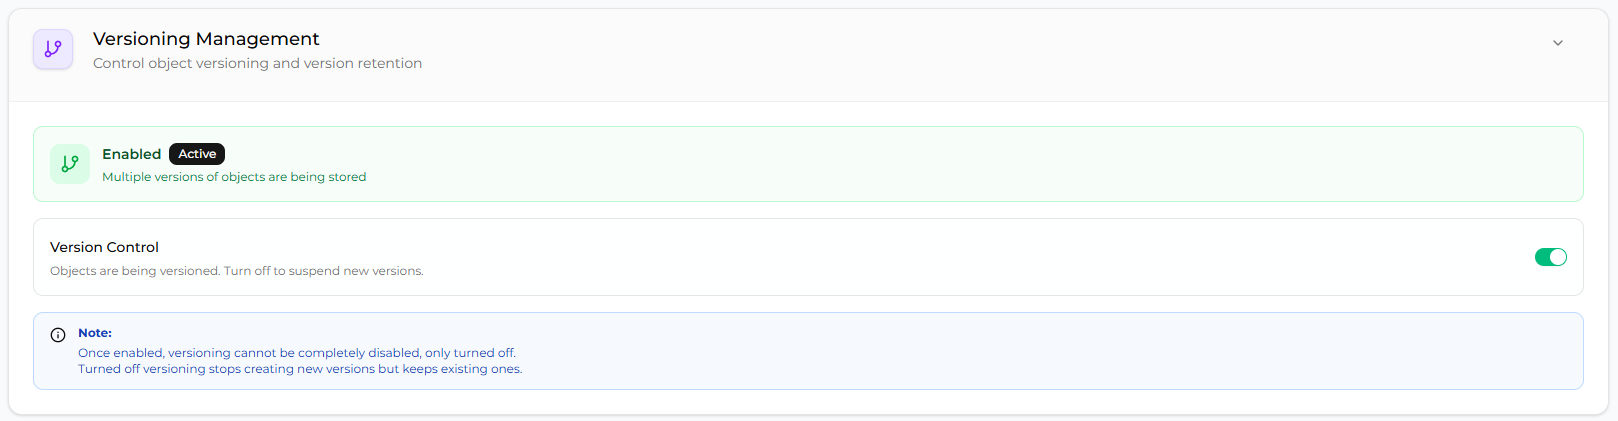
**2. Versioning Management**

The **Versioning Management** section controls the object versioning functionality for the bucket.\
\
**Version Control**

Version control enables the storage of **multiple versions of the same object**.

When **Versioning is Enabled:**

* Every update to an object creates a new version.
* Older versions are preserved.
* Deleted objects can be recovered.

This feature helps with:

* Data recovery
* Protection from accidental deletion
* Object rollback

<figure><img src="https://2683631041-files.gitbook.io/~/files/v0/b/gitbook-x-prod.appspot.com/o/spaces%2FPPVG4W649TwXN8OejRhb%2Fuploads%2F63VZWIXck0nFlCN2MjLj%2Fimage.png?alt=media&amp;token=51b8aa4d-fc03-4240-8319-3e4f22658dfb" alt=""><figcaption></figcaption></figure>

**Note:**\
Once versioning is enabled, it **cannot be completely removed**. It can only be **turned off to stop creating new versions**, while existing versions remain stored.

***

**3. Security & Access**

The **Security & Access** section controls public accessibility of the bucket.

**Public Access**

This setting determines whether the bucket is publicly accessible.

When **Public Access is Enabled:**

* Anyone with the **object URL** can access the files.
* Files can be **viewed or downloaded without authentication**.

**Warning:**\
Public buckets may expose sensitive data if not properly controlled.

**Public URL**

Displays the base URL used to access objects in the bucket.

Example:

```
https://bucket-name.region.storage-provider.com/object-key
```

Users can access objects by appending the **object key** to the public URL.

<figure><img src="https://2683631041-files.gitbook.io/~/files/v0/b/gitbook-x-prod.appspot.com/o/spaces%2FPPVG4W649TwXN8OejRhb%2Fuploads%2FDKLmpL8CMxm8c9M6xGVt%2Fimage.png?alt=media&amp;token=4c0d0365-1339-45d6-89cb-a9347de3097f" alt=""><figcaption></figcaption></figure>

***

**4. Storage Management**

The **Storage Management** section allows administrators to configure limits on bucket storage usage.\
These limits help control how much storage space and how many objects can be stored in a bucket.

**a. Bucket Quota**

Bucket Quota allows administrators to set limits on storage consumption for a bucket.

Administrators can configure the following limits:

**b. Storage Limit**

Defines the maximum storage capacity allowed for the bucket.

**c. Object Limit**

Defines the maximum number of objects that can be stored in the bucket.

If no limits are configured, both values remain Unlimited, allowing unrestricted usage of the bucket.

<figure><img src="https://2683631041-files.gitbook.io/~/files/v0/b/gitbook-x-prod.appspot.com/o/spaces%2FPPVG4W649TwXN8OejRhb%2Fuploads%2FFtYF52zqx86H6pF4J3Bb%2Fimage.png?alt=media&amp;token=a4fa79e6-26ba-469a-9368-1291111ece39" alt=""><figcaption></figcaption></figure>

***

**Configure Bucket Quota**

To configure storage limits for a bucket, follow the steps below.**Step 1: Open Bucket Quota Configuration**

1. Navigate to the **Bucket Settings** page.
2. Scroll down to the **Storage Management** section.
3. Locate the **Bucket Quota** option.
4. Click on the **Configure** button.

This opens the **Bucket Quota configuration panel**.

<figure><img src="https://2683631041-files.gitbook.io/~/files/v0/b/gitbook-x-prod.appspot.com/o/spaces%2FPPVG4W649TwXN8OejRhb%2Fuploads%2FQ6G11bkuS3O5FB27K4Im%2Fimage.png?alt=media&amp;token=83bfce95-f2ba-4f03-8971-1e667da68f48" alt=""><figcaption></figcaption></figure>

**Step 2: Enable Bucket Quota**

1. Toggle **Enable Quota** to **ON**.
2. Once enabled, additional fields will appear for configuring limits.

Enabling quota allows administrators to control:

* Maximum storage usage
* Maximum number of objects stored in the bucket

<figure><img src="https://2683631041-files.gitbook.io/~/files/v0/b/gitbook-x-prod.appspot.com/o/spaces%2FPPVG4W649TwXN8OejRhb%2Fuploads%2FFNG4RMlHp60SnsfW5YhT%2Fimage.png?alt=media&amp;token=a7972c14-744a-4a4b-b3c9-3c0407a22cfe" alt=""><figcaption></figcaption></figure>

**Step 3: Configure Storage Limits**

After enabling quota, the following fields become available:

**a. Storage Limit (GB)**

Defines the **maximum storage capacity allowed for the bucket**.

Example:

```
100 GB
```

If the storage usage reaches this limit, the system prevents additional uploads until storage becomes available.

**b. Object Limit**

Defines the **maximum number of objects that can be stored in the bucket**.

Example:

```
10000 objects
```

Once this limit is reached, users cannot upload additional objects until some objects are deleted.

**Unlimited Storage or Objects**

If the **Storage Limit** and **Object Limit** fields are left empty:

* Storage remains **unlimited**
* Object count remains **unlimited**

**Step 4: Save Configuration**

After entering the desired limits:

1. Click **Save Changes** to apply the quota settings.
2. Click **Cancel** to discard any unsaved changes.

Once saved, the configured quota limits will be enforced for the bucket.


# Deleting Bucket

Go to the buckets section.

<figure><img src="https://2683631041-files.gitbook.io/~/files/v0/b/gitbook-x-prod.appspot.com/o/spaces%2FPPVG4W649TwXN8OejRhb%2Fuploads%2FZaAVyYSTYyfShcPyrzV9%2Fimage.png?alt=media&amp;token=41a70d39-9b4f-4102-986b-e5292970da4b" alt=""><figcaption></figcaption></figure>

**Delete Bucket Process:**

* ZataCloud follows a minimum storage retention policy, which is applicable to all stored items, even if the objects are deleted.
* Deleting a bucket is a critical and irreversible action, so proceed carefully.

**Steps to delete a bucket:**

1. Click on the **Delete Bucket** option from the Actions menu.
2. A confirmation pop-up will appear with a warning message stating that this action cannot be undone.
3. Copy the bucket name shown on the screen.
4. Paste the bucket name into the blank confirmation field.
5. Click on the **Delete Bucket** button.

<figure><img src="https://2683631041-files.gitbook.io/~/files/v0/b/gitbook-x-prod.appspot.com/o/spaces%2FPPVG4W649TwXN8OejRhb%2Fuploads%2FapA7zEtd1OeP7FbUgWsR%2Fimage.png?alt=media&amp;token=5505ae81-b24c-40e5-93c5-94b967165afb" alt=""><figcaption></figcaption></figure>


# Deleting Large Buckets

**Deleting Large Buckets in Zata**

In Zata, buckets that contain a very large number of objects or multiple object versions cannot always be deleted directly through the user interface or by simple API calls. Due to the nature of distributed object storage systems, deleting buckets with large volumes of data requires a controlled and managed process to ensure safety, reliability, and system stability.

**Process**

**1. Submit a Support Ticket:**\
If you need to delete a bucket that contains a large number of objects or object versions, raise a support ticket and provide the following information:

* Full bucket name
* Approximate number of objects stored in the bucket
* Any relevant details regarding the bucket’s contents or usage

**2. Support Team Verification:**\
The Zata support team will review the request to verify that:

* The requester has the required permissions to delete the bucket
* There are no operational dependencies or regulatory or compliance constraints preventing deletion

**3. Deletion Execution and Timeline Confirmation:**\
After successful verification, the support team will perform the deletion using backend procedures optimized to handle large object counts efficiently. Based on the size of the bucket and the volume of objects, the team will communicate the estimated time required to complete the deletion.

**Summary**

To delete a large bucket in Zata:

* Raise a support ticket with all required bucket details
* The Zata support team will verify the request and carry out the deletion
* The estimated completion time will be shared after verification

This controlled approach ensures that large bucket deletions are handled in a secure, reliable, and well-governed manner.


# Manage Tags

The **Manage Tags** option is used to add, edit, or remove metadata (tags) for a bucket. Tags are key–value pairs that help in organizing, identifying, and managing buckets efficiently.

To add a tag, click on **Manage Tags** from the Actions menu. Enter the required Key and Value, or click on the ( + ) Add New Tag button to add more fields. After entering the details, click on Save Changes to apply and store the tag information.

<figure><img src="https://2683631041-files.gitbook.io/~/files/v0/b/gitbook-x-prod.appspot.com/o/spaces%2FPPVG4W649TwXN8OejRhb%2Fuploads%2FFfWwiJHg4vuZgrUEGuo9%2Fimage.png?alt=media&amp;token=80149966-a629-4972-b14d-52bada48283f" alt=""><figcaption></figcaption></figure>

<figure><img src="https://2683631041-files.gitbook.io/~/files/v0/b/gitbook-x-prod.appspot.com/o/spaces%2FPPVG4W649TwXN8OejRhb%2Fuploads%2FuRCLubGmJDjEN2iRQCrT%2Fimage.png?alt=media&amp;token=cf4b2517-c18e-4f10-a323-c687792146c7" alt=""><figcaption></figcaption></figure>


# Storing Objects in a Bucket

**Open the Bucket**\
Go to the Bucket List and click on the bucket where you want to store your objects. You can upload objects to buckets in both the **Indore** and **Mumbai** regions.

<figure><img src="https://2683631041-files.gitbook.io/~/files/v0/b/gitbook-x-prod.appspot.com/o/spaces%2FPPVG4W649TwXN8OejRhb%2Fuploads%2FgtPb4wCmOiHgTjT59egQ%2Fimage.png?alt=media&amp;token=1b7b5991-0e32-415b-bc1c-54d39617a6e5" alt=""><figcaption></figcaption></figure>

There are two ways to upload files and folders in Zata. You can upload a file directly into the bucket, or you can first create a folder and then upload files inside that folder. This helps in organizing data in a structured manner. The upload process works the same way for buckets in both the Indore and Mumbai regions.

**Upload File Directly**\
Click on the **Upload File** button. A panel will appear where you can either drag and drop files or browse and select files from your system. After selecting the file, the upload process will start automatically.\
\
**Create Folder First (Optional Method)**\
If you want to organize your data, click on **Create Folder**, enter the folder name, and submit.

<figure><img src="https://2683631041-files.gitbook.io/~/files/v0/b/gitbook-x-prod.appspot.com/o/spaces%2FPPVG4W649TwXN8OejRhb%2Fuploads%2FRnsRueW5drJPTS0TW7rJ%2Fimage.png?alt=media&amp;token=92bea0e6-bdf4-47d5-a9c1-04dec15d6bcd" alt=""><figcaption></figcaption></figure>

<figure><img src="https://2683631041-files.gitbook.io/~/files/v0/b/gitbook-x-prod.appspot.com/o/spaces%2FPPVG4W649TwXN8OejRhb%2Fuploads%2Fs9y1xM5LP0remzKMx5fx%2Fimage.png?alt=media&amp;token=243499a2-c115-42b2-8c8a-58b51b5de6c4" alt=""><figcaption></figcaption></figure>

After selecting the file to click on the upload file then, uploading will start.

<figure><img src="https://2683631041-files.gitbook.io/~/files/v0/b/gitbook-x-prod.appspot.com/o/spaces%2FPPVG4W649TwXN8OejRhb%2Fuploads%2FuficM0b4cmQ6b6ZUWsnS%2Fimage.png?alt=media&amp;token=741b0c44-71e1-42e0-bc74-40098d44ba70" alt=""><figcaption></figcaption></figure>

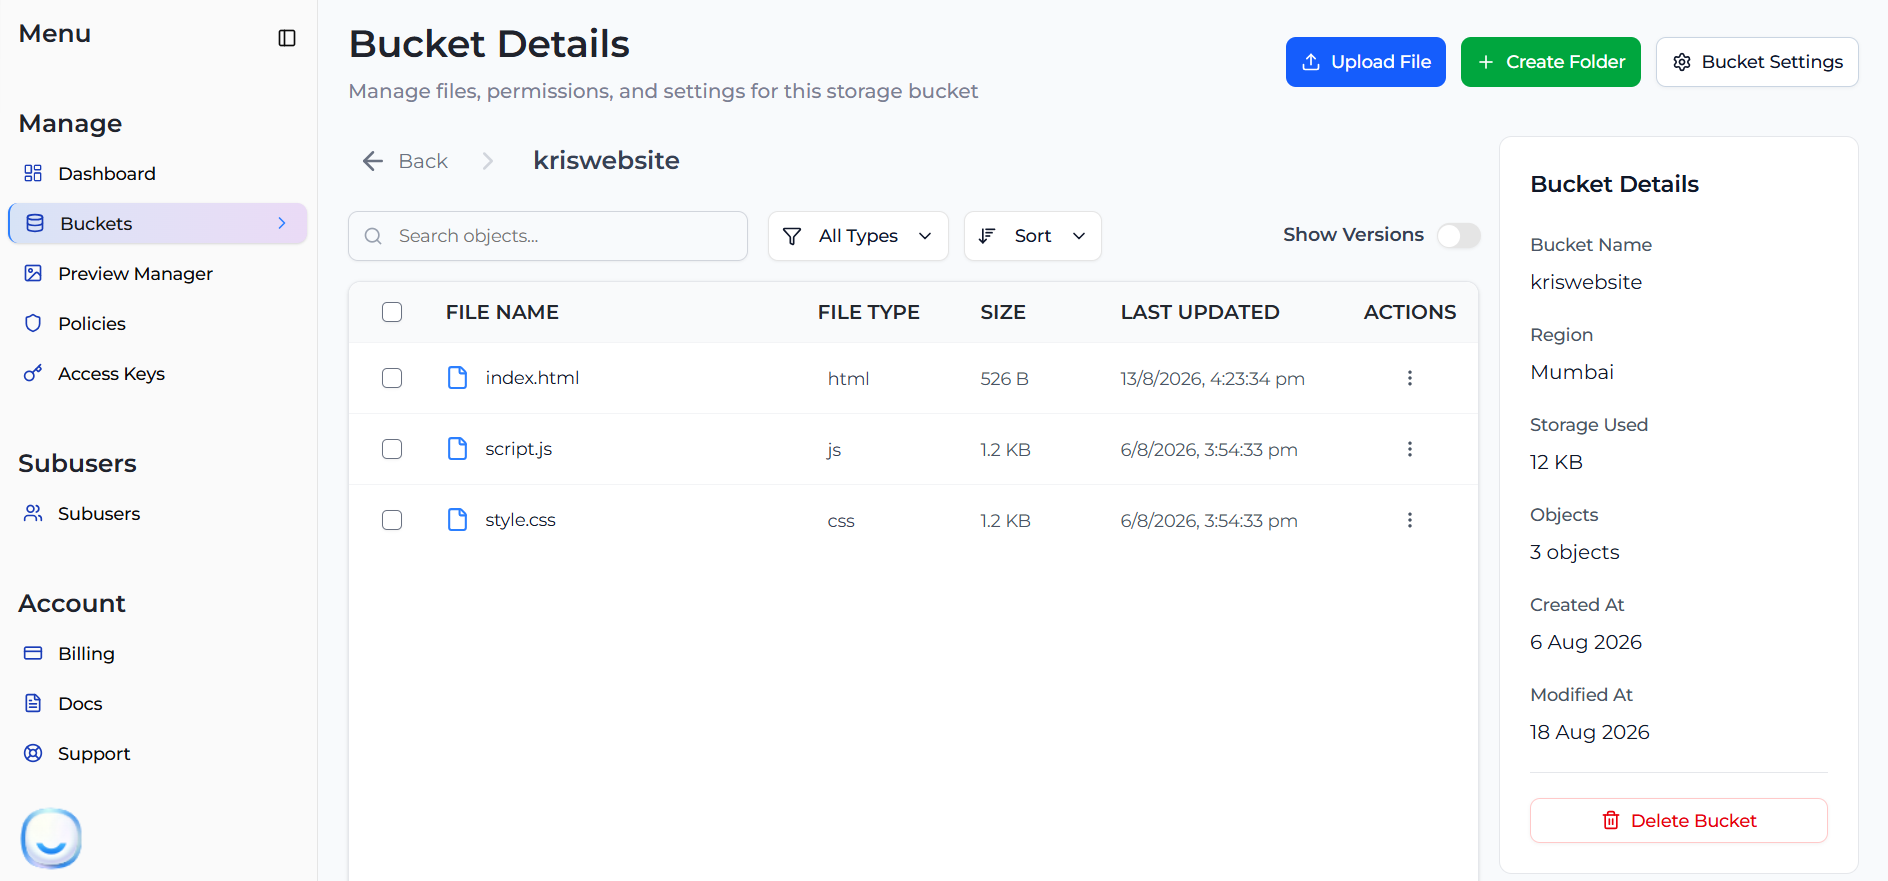
After uploading the files we can see details of objects like File name, File type, Size, and Last Updates and actions.

<figure><img src="https://2683631041-files.gitbook.io/~/files/v0/b/gitbook-x-prod.appspot.com/o/spaces%2FPPVG4W649TwXN8OejRhb%2Fuploads%2FmKegB5Nb02h4AOrFkESR%2Fimage.png?alt=media&amp;token=d75db026-0096-4536-bb08-eac924f33c72" alt=""><figcaption></figcaption></figure>

**Object Actions in Zata**

For each object, an Actions menu is available that allows you to perform basic operations. The following options are currently supported:

* **Share** – Used to generate a temporary presigned URL to provide secure access to the object for a limited time.
* **Download** – Used to download the selected object to the local system.
* **Delete** – Used to permanently remove the object from the bucket.

<figure><img src="https://2683631041-files.gitbook.io/~/files/v0/b/gitbook-x-prod.appspot.com/o/spaces%2FPPVG4W649TwXN8OejRhb%2Fuploads%2F8JbPgIJufNVxDEBiON9R%2Fimage.png?alt=media&amp;token=a018e395-6241-4bdf-872c-98f55e5d6804" alt=""><figcaption></figcaption></figure>


# Sharing an Object Using Presigned URL

The Share Object feature is used to generate a temporary and secure access link (Presigned URL) for an object. This link allows users to access the object for a limited time without changing bucket permissions.

1.Go to the bucket, locate the required object, and click on the **Actions (three dots)** option. Then select **Share**.

<figure><img src="https://2683631041-files.gitbook.io/~/files/v0/b/gitbook-x-prod.appspot.com/o/spaces%2FPPVG4W649TwXN8OejRhb%2Fuploads%2FZxLEORLf7HrgBuF52ecW%2Fimage.png?alt=media&amp;token=ae278099-d174-4f69-bf98-115e51ed44c3" alt=""><figcaption></figcaption></figure>

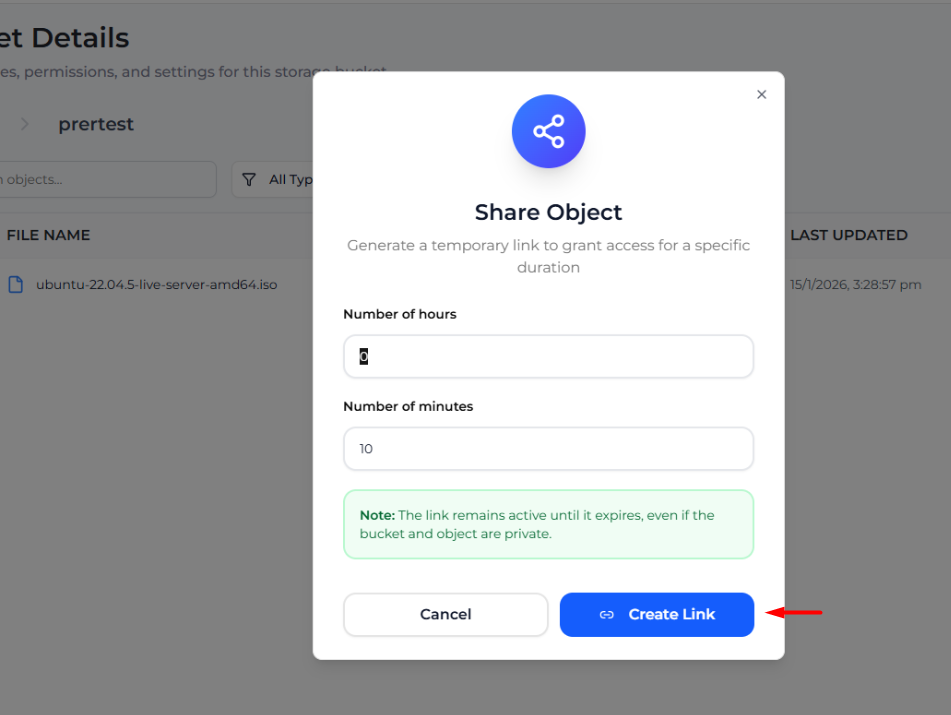
2. **Set Time Duration**\
   The Share Object window will appear. Enter the required time in:

* **Number of hours**
* **Number of minutes**

This defines how long the link will remain active.\ <br>

<figure><img src="https://2683631041-files.gitbook.io/~/files/v0/b/gitbook-x-prod.appspot.com/o/spaces%2FPPVG4W649TwXN8OejRhb%2Fuploads%2FOwqQBqdxThrCXV636O01%2Fimage.png?alt=media&amp;token=a182ae3a-a9ed-455a-84d9-ecabaf91c5b1" alt=""><figcaption></figcaption></figure>

**3.Generate the Link**\
Click on **Create Link** to generate the presigned URL.\
After generation, a **Presigned URL** is displayed along with its expiration time.

<figure><img src="https://2683631041-files.gitbook.io/~/files/v0/b/gitbook-x-prod.appspot.com/o/spaces%2FPPVG4W649TwXN8OejRhb%2Fuploads%2Fv2dJpPmHYUriz8hBOSkK%2Fimage.png?alt=media&amp;token=d5245639-b5b8-4fb0-9cc7-d1c6a4188dde" alt=""><figcaption></figcaption></figure>

Click on **Copy URL** to copy the link and share it with the intended user. The link will remain active until the specified expiration time, even if the bucket and object are private.\
\
After copying the URL to paste these URLs your browser and the object is downloaded automatically.


# Delete and Restore Object in Zata

First, upload an object into the bucket.

<figure><img src="https://2683631041-files.gitbook.io/~/files/v0/b/gitbook-x-prod.appspot.com/o/spaces%2FPPVG4W649TwXN8OejRhb%2Fuploads%2FLEfkch5oa46dGVRaFLfg%2Fimage.png?alt=media&amp;token=89a9bb81-9444-488b-99b0-389b0c6f8a1a" alt=""><figcaption></figcaption></figure>

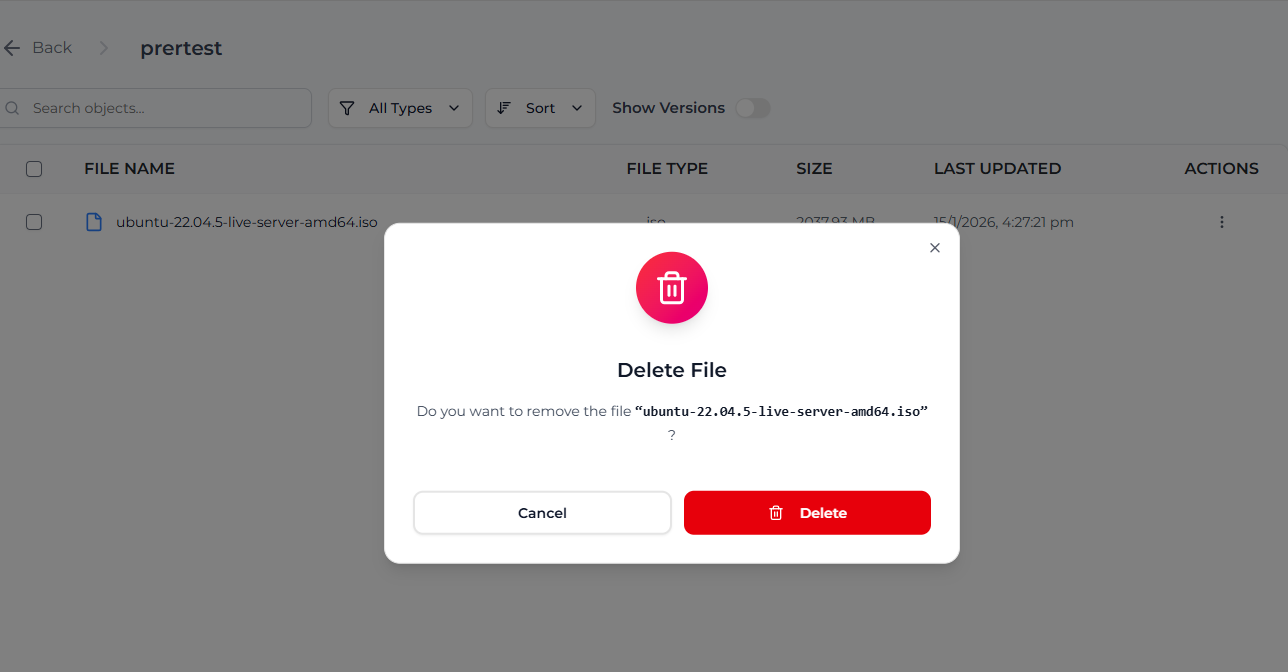
**To Delete an Object:**

* Click on the **Actions (three dots)** next to the object.
* Select **Delete**.
* The object will be removed from the main object list.

<figure><img src="https://2683631041-files.gitbook.io/~/files/v0/b/gitbook-x-prod.appspot.com/o/spaces%2FPPVG4W649TwXN8OejRhb%2Fuploads%2FzzjDSAbOIcTvHuJH5zv8%2Fimage.png?alt=media&amp;token=1c88849a-0b65-4b6a-b76b-880965a0a369" alt=""><figcaption></figcaption></figure>

After deleting the object:

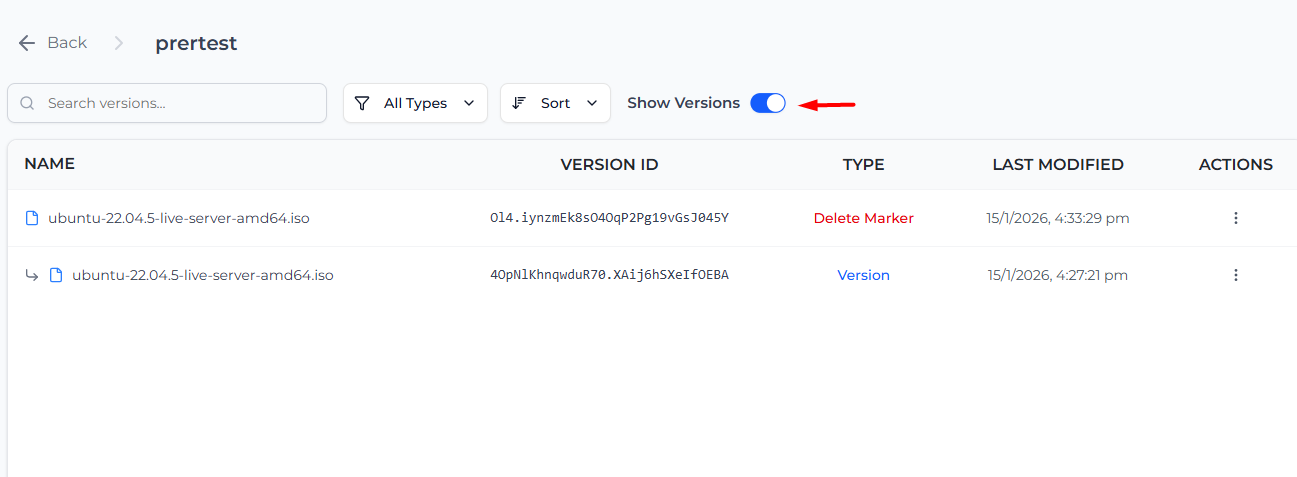
* Enable the **Show Versions** option.
* The deleted object will appear with a **Delete Marker**.The Delete Marker indicates that the object is deleted but not permanently removed.

<figure><img src="https://2683631041-files.gitbook.io/~/files/v0/b/gitbook-x-prod.appspot.com/o/spaces%2FPPVG4W649TwXN8OejRhb%2Fuploads%2FRBvXiMCTYuQEew51FEkc%2Fimage.png?alt=media&amp;token=83d34f63-57eb-42a8-b781-713542ed8825" alt=""><figcaption></figcaption></figure>

**To Restore the Object:**

* Click on the **Actions (three dots)** of the **Delete Marker**.
* Select **Remove Marker**.

<figure><img src="https://2683631041-files.gitbook.io/~/files/v0/b/gitbook-x-prod.appspot.com/o/spaces%2FPPVG4W649TwXN8OejRhb%2Fuploads%2Fln5mbYEbeKZiH3kfjxZA%2Fimage.png?alt=media&amp;token=df1ed290-cddc-4fdd-9a30-ddc09fccae1f" alt=""><figcaption></figcaption></figure>

After removing the Delete Marker, the object becomes visible again in the bucket and is successfully restored.

<figure><img src="https://2683631041-files.gitbook.io/~/files/v0/b/gitbook-x-prod.appspot.com/o/spaces%2FPPVG4W649TwXN8OejRhb%2Fuploads%2FLEfkch5oa46dGVRaFLfg%2Fimage.png?alt=media&amp;token=89a9bb81-9444-488b-99b0-389b0c6f8a1a" alt=""><figcaption></figcaption></figure>

In Zata, the restore operation is performed using the **Remove Marker** option. Removing the Delete Marker automatically restores the object.


# Bucket Policy Configuration

Bucket Policy is used to manage access control for a bucket by defining who can access it and what actions they can perform. It allows secure and fine-grained permission management without changing the bucket’s public visibility. By creating a bucket policy, specific users or the public can be granted limited access such as read-only or download permissions. This ensures better security and controlled usage of object storage resources.

<br>

### Creating an Access Policy

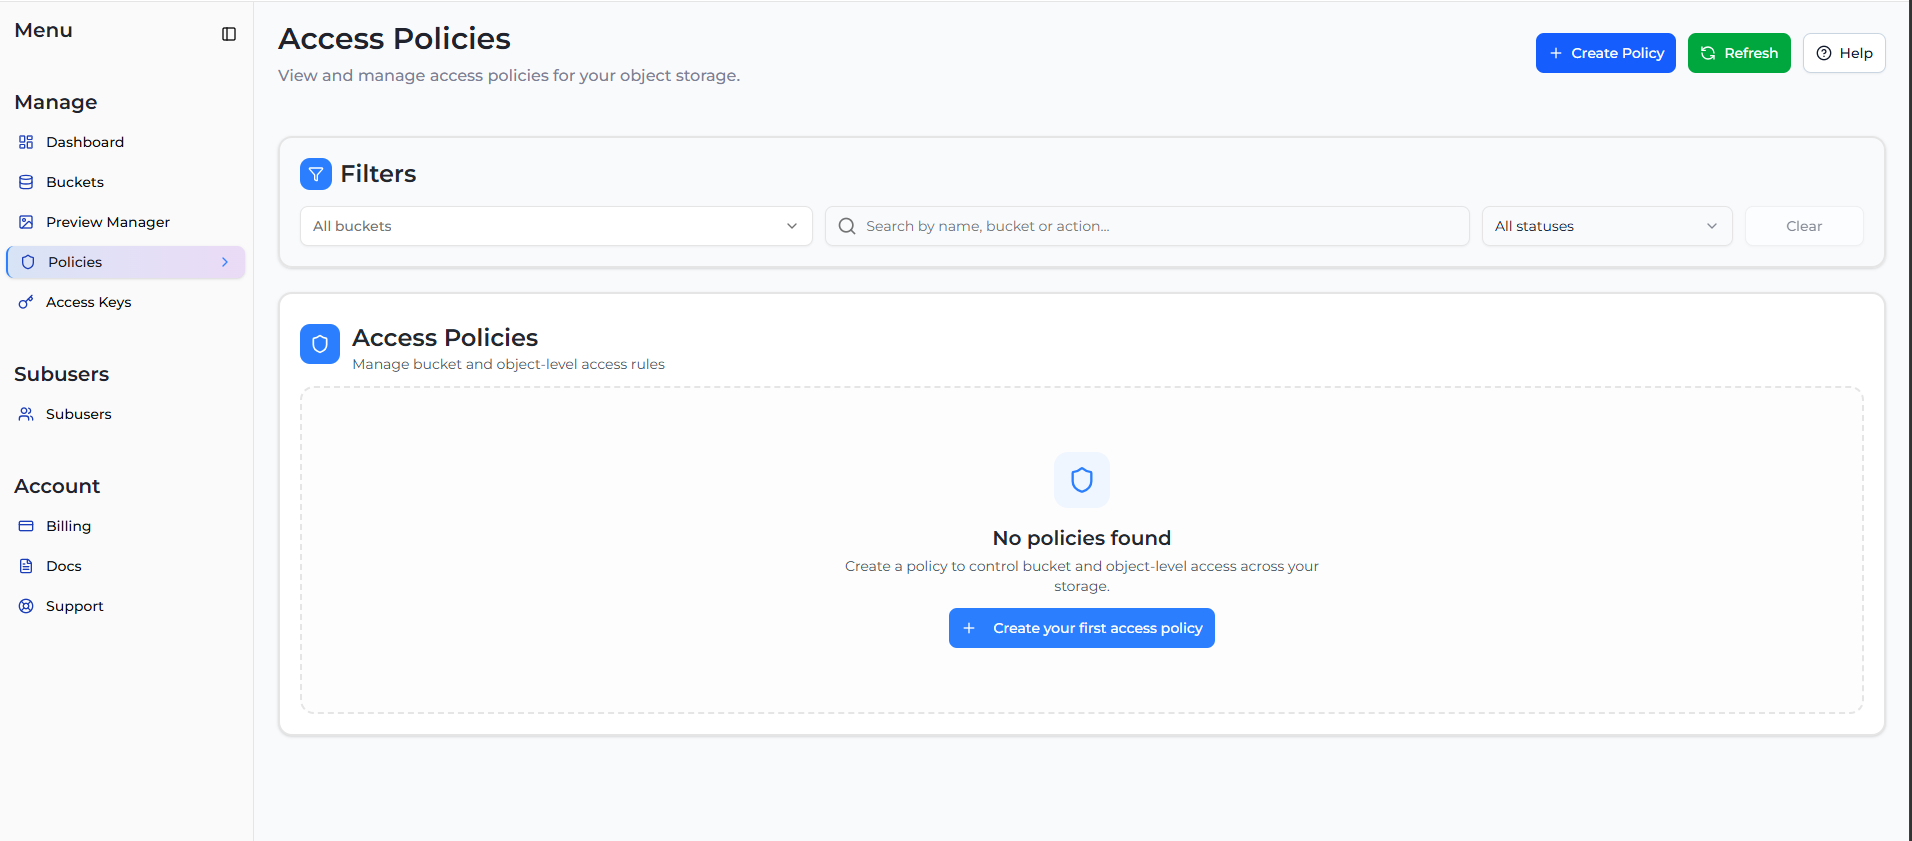
1. From the left sidebar menu, navigate to **Policies**.
2. Click on the **+ Create Policy** button.

<figure><img src="https://2683631041-files.gitbook.io/~/files/v0/b/gitbook-x-prod.appspot.com/o/spaces%2FPPVG4W649TwXN8OejRhb%2Fuploads%2Fgit-blob-a1639d170122aa779f0d711905ac201ae09f2cc7%2Fbucket-policy-configuration-1.png?alt=media" alt="Access Policies Dashboard"><figcaption></figcaption></figure>

The policy creation process follows a simple 4-step wizard:

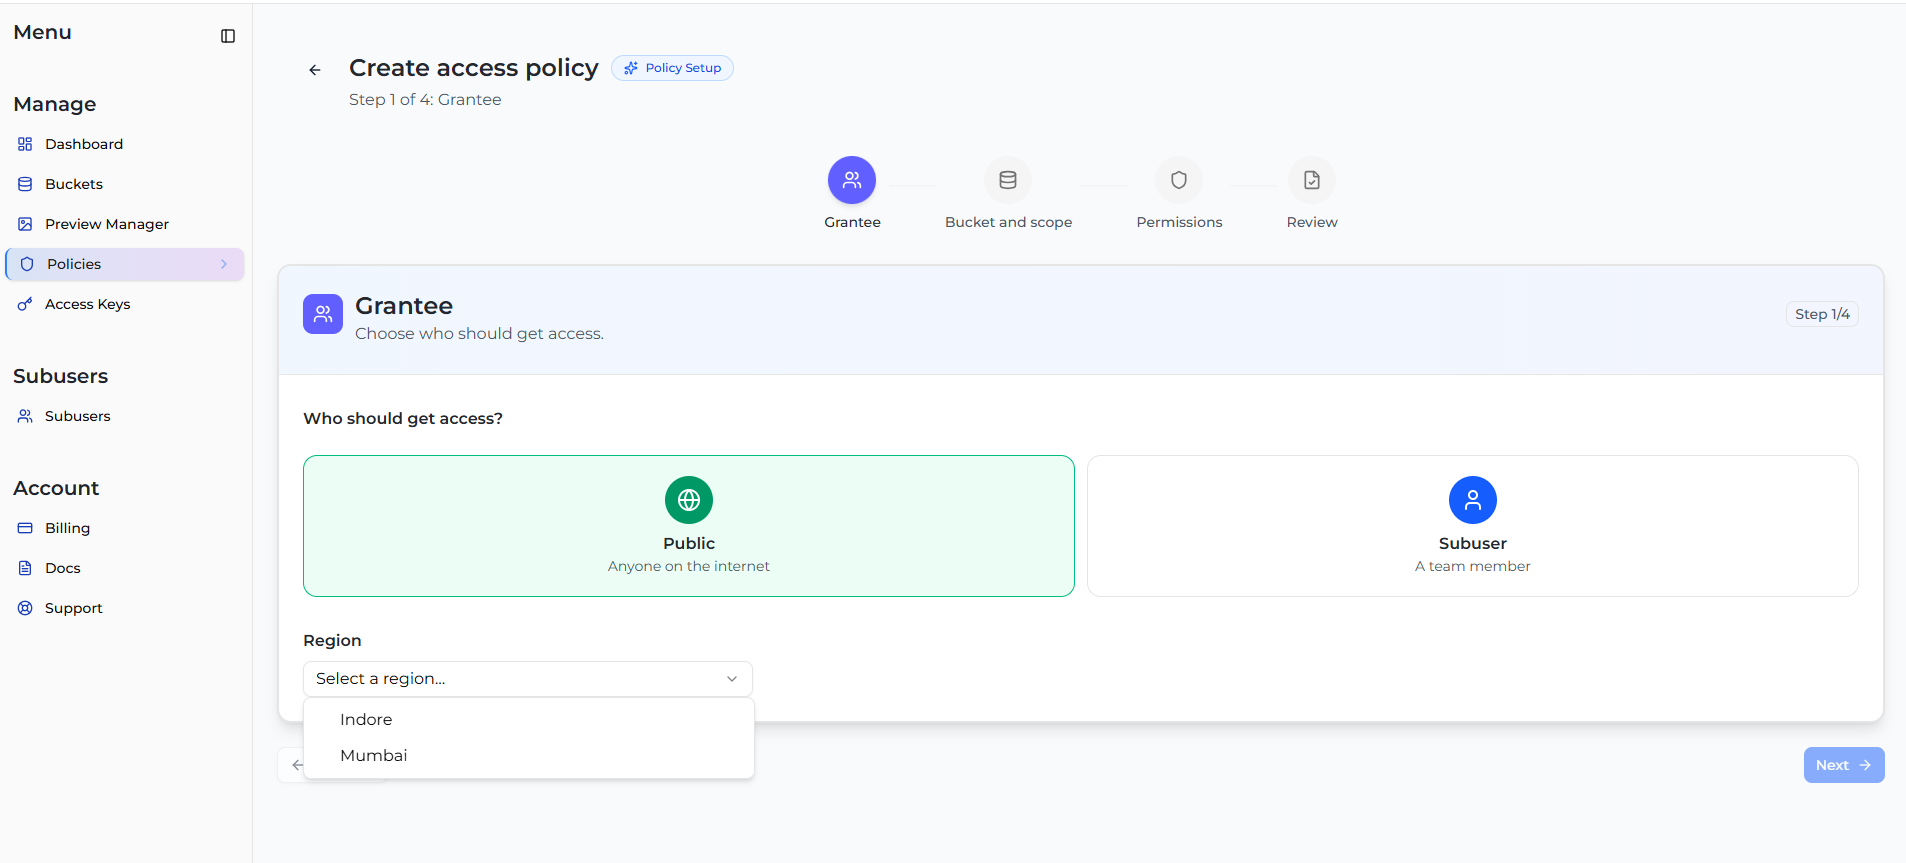
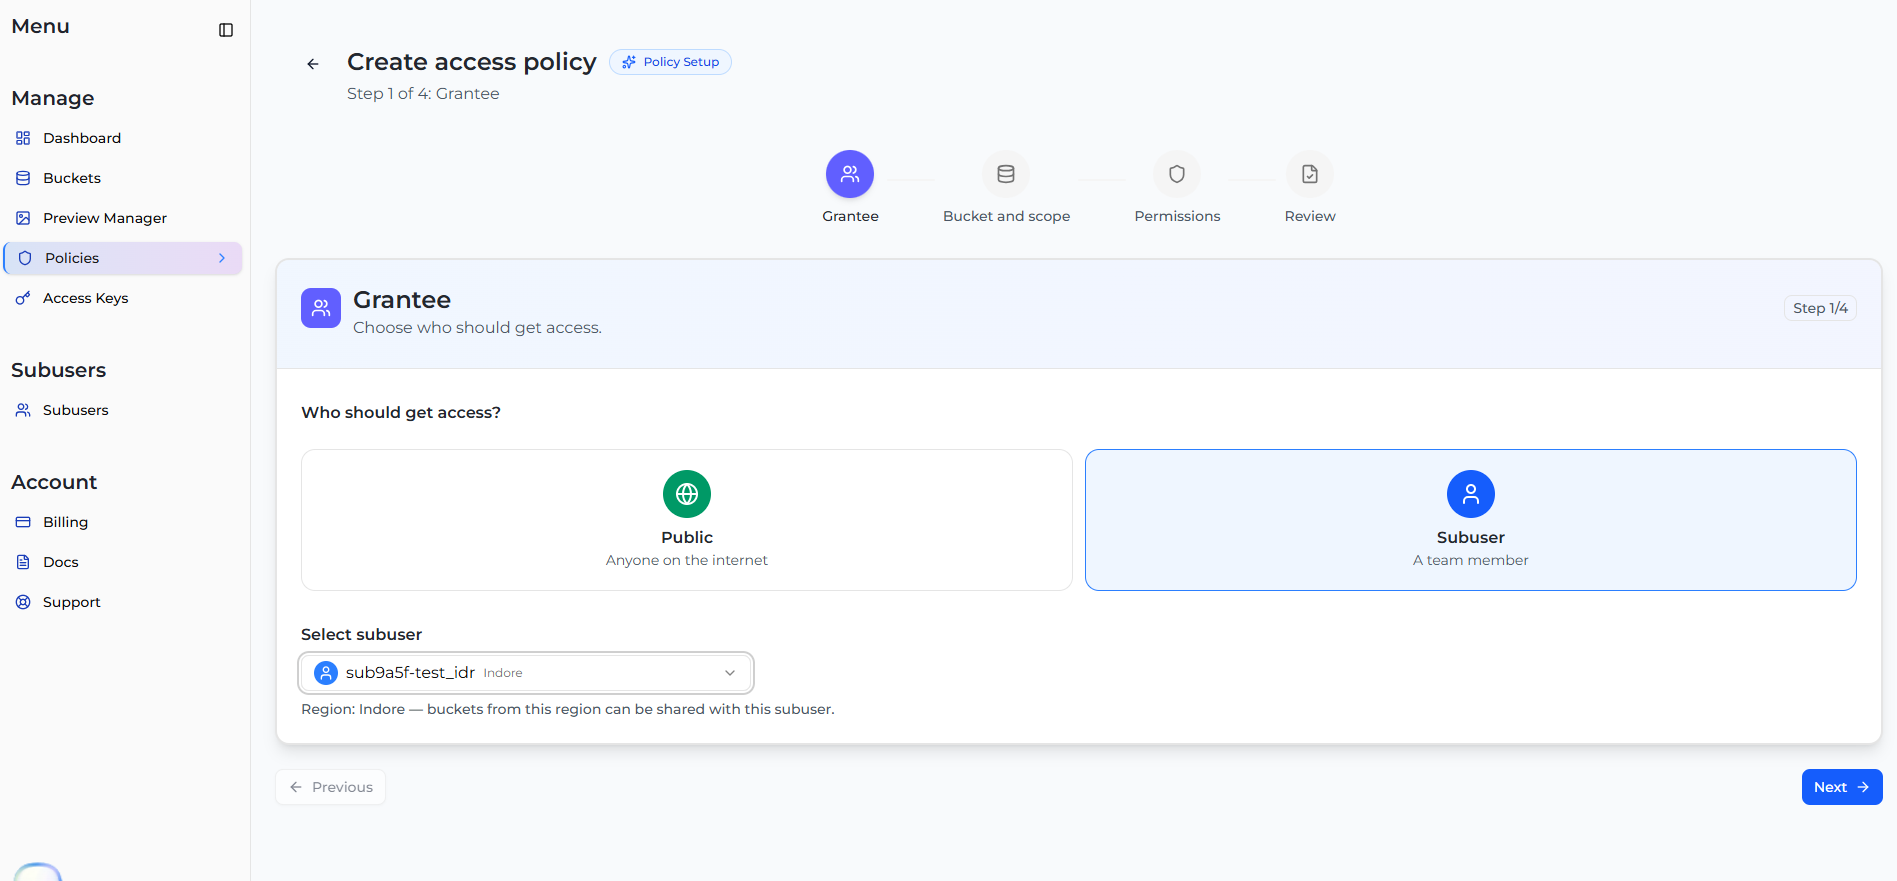
#### Step 1: Grantee

Choose who should get access to your bucket. You can grant access to:

* **Public**: Anyone on the internet.
* **Subuser**: A specific team member.

After selecting the grantee, choose the **Region** from the dropdown menu and select the specific subuser if applicable.

<figure><img src="https://2683631041-files.gitbook.io/~/files/v0/b/gitbook-x-prod.appspot.com/o/spaces%2FPPVG4W649TwXN8OejRhb%2Fuploads%2Fgit-blob-c86921fd30eb27e351ab94f56d899a245a8ed96f%2Fbucket-policy-configuration-2.png?alt=media" alt="Select Grantee - Public"><figcaption></figcaption></figure>

<figure><img src="https://2683631041-files.gitbook.io/~/files/v0/b/gitbook-x-prod.appspot.com/o/spaces%2FPPVG4W649TwXN8OejRhb%2Fuploads%2Fgit-blob-16b75f08a4687371e2ce6b8f2f6b585f017a5b78%2Fbucket-policy-configuration-3.png?alt=media" alt="Select Grantee - Subuser"><figcaption></figcaption></figure>

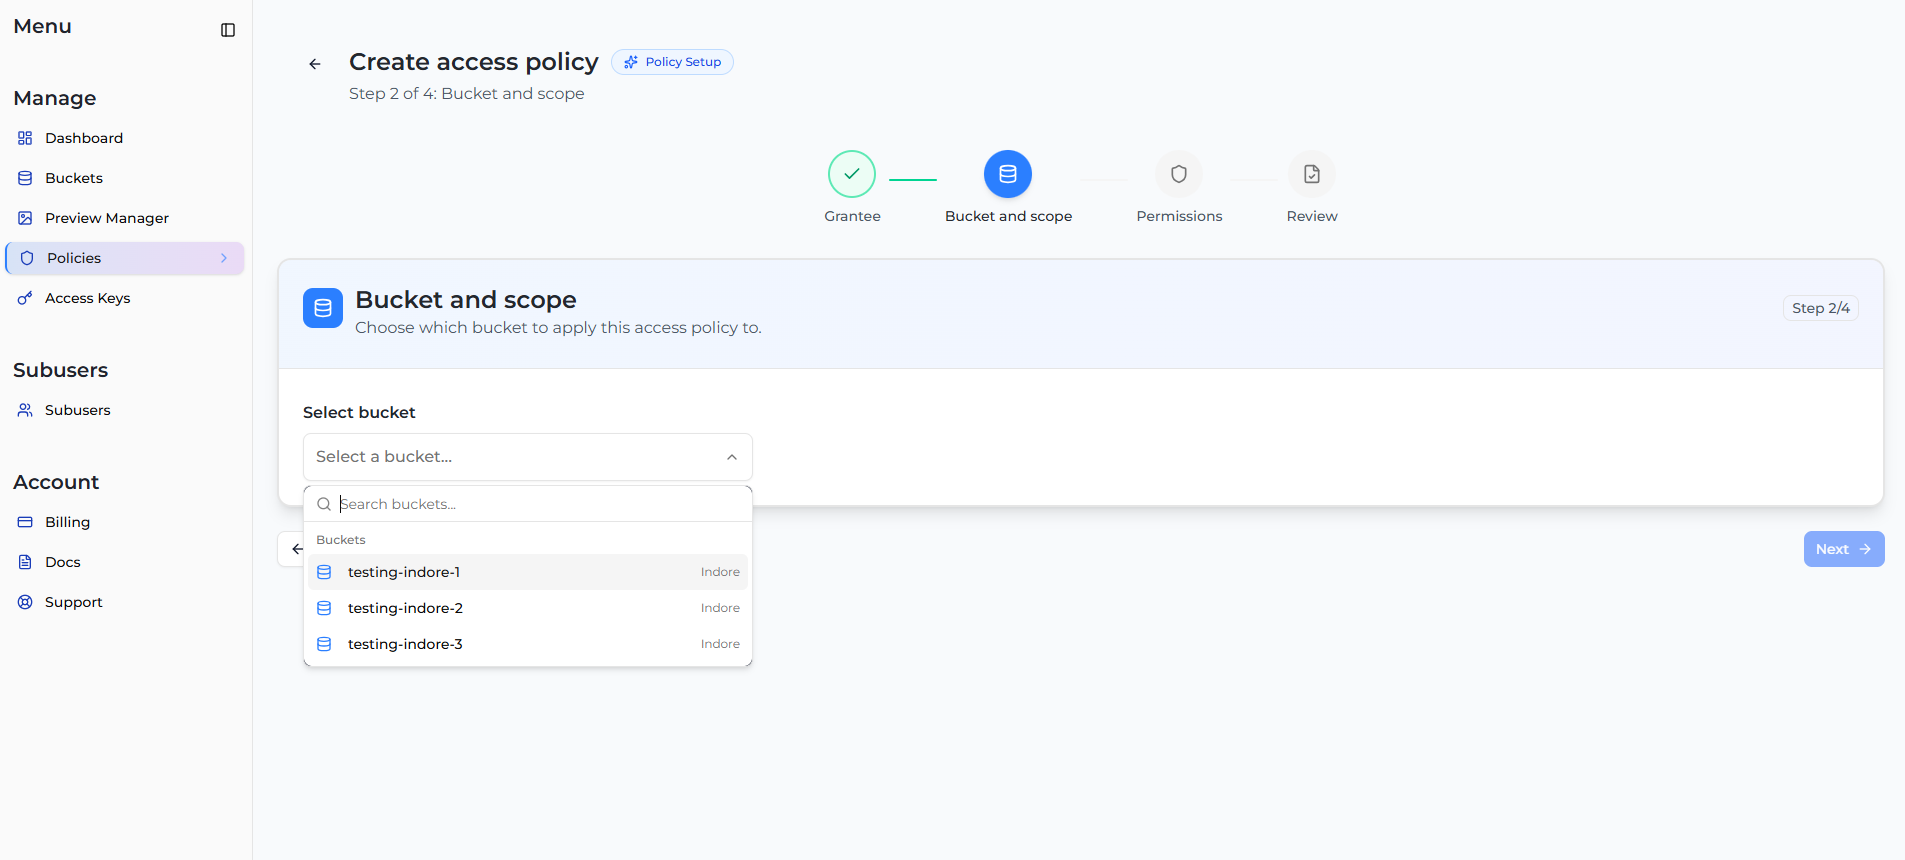
#### Step 2: Bucket and scope

Select the specific bucket you want to apply this access policy to.

<figure><img src="https://2683631041-files.gitbook.io/~/files/v0/b/gitbook-x-prod.appspot.com/o/spaces%2FPPVG4W649TwXN8OejRhb%2Fuploads%2Fgit-blob-f27511859f34c1ad94909302183f71aed77d6f57%2Fbucket-policy-configuration-4.png?alt=media" alt="Select Bucket"><figcaption></figcaption></figure>

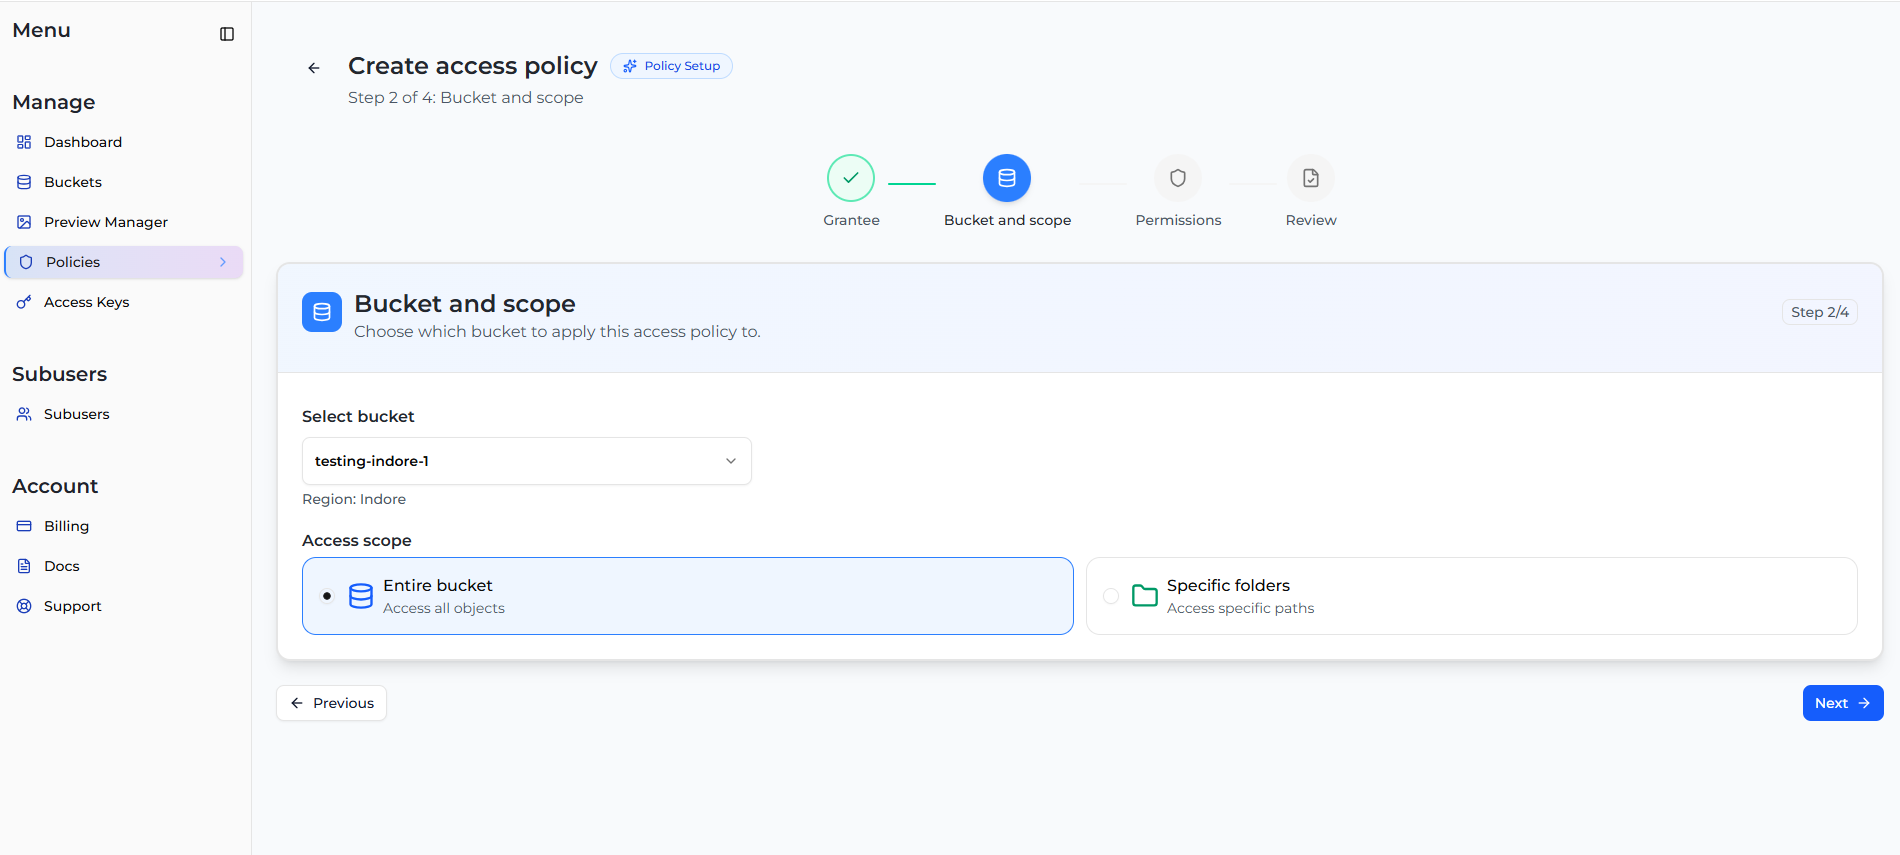
Next, define the **Access scope**:

* **Entire bucket**: Access all objects within the selected bucket.
* **Specific folders**: Restrict access to specific paths within the bucket.

<figure><img src="https://2683631041-files.gitbook.io/~/files/v0/b/gitbook-x-prod.appspot.com/o/spaces%2FPPVG4W649TwXN8OejRhb%2Fuploads%2Fgit-blob-c96bdac1c7b7fa29c2996437ed6101bd7c4a4b6c%2Fbucket-policy-configuration-5.png?alt=media" alt="Select Access Scope"><figcaption></figcaption></figure>

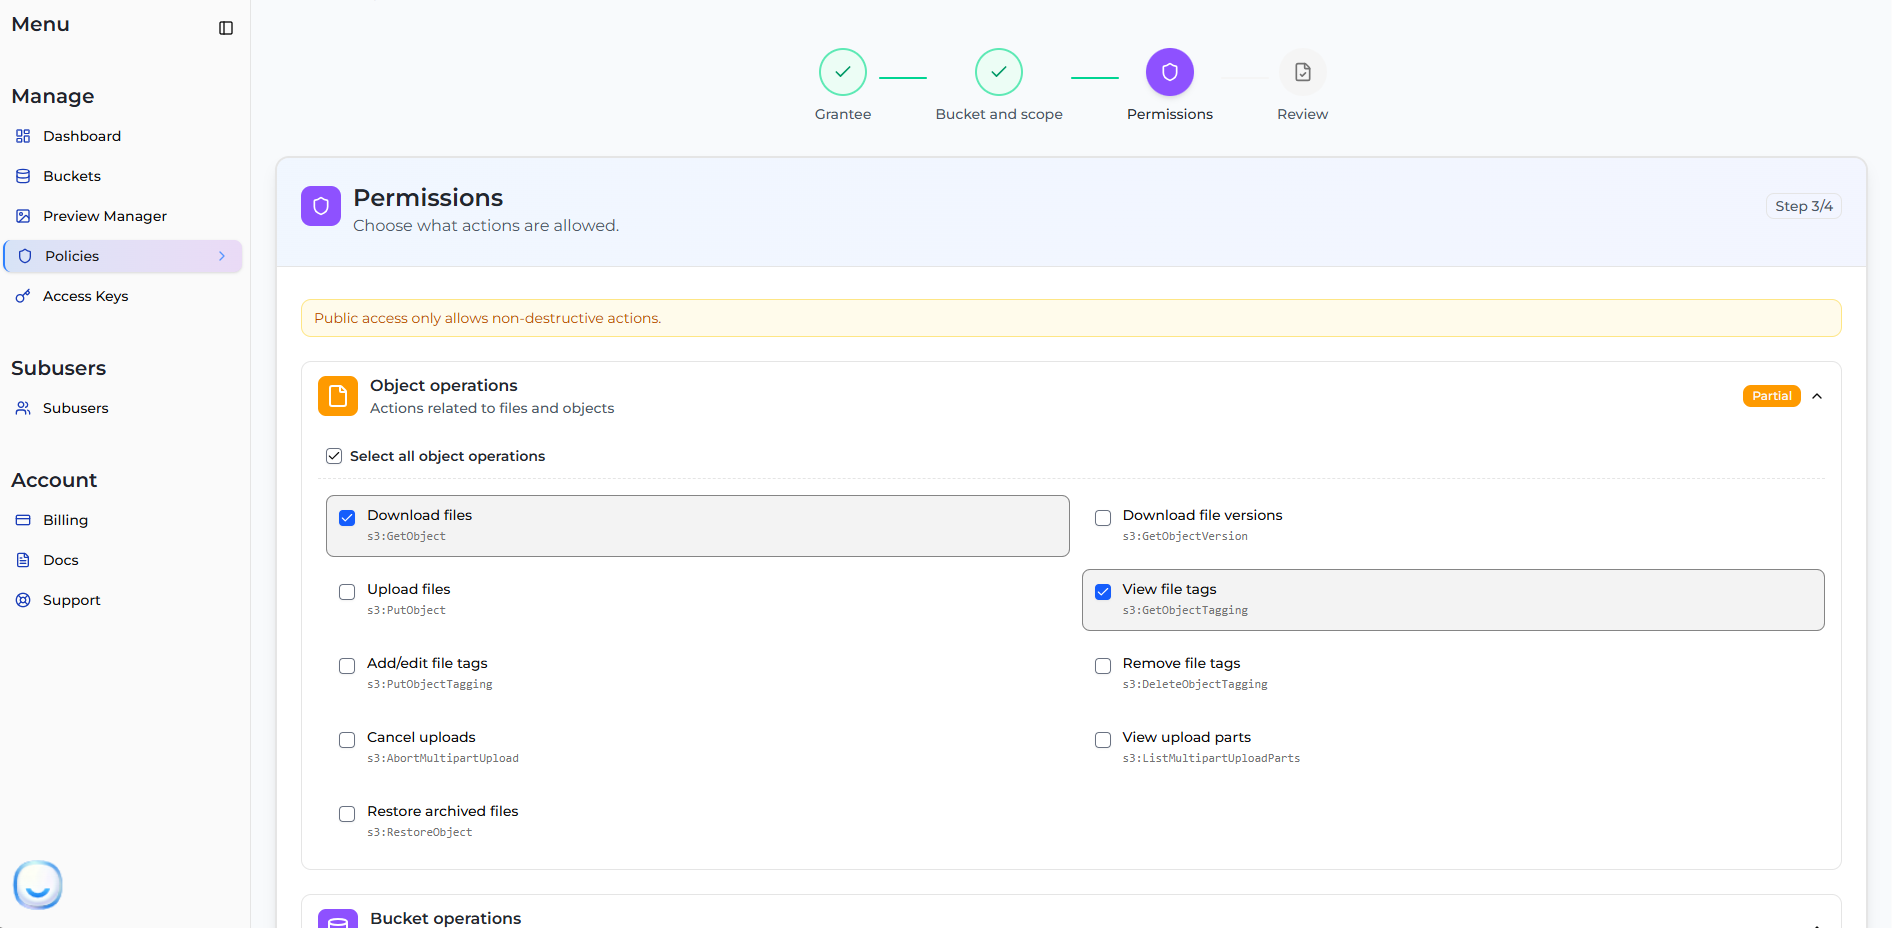
#### Step 3: Permissions

Choose the specific actions that are allowed or denied for the grantee. You can select individual Object operations (e.g., Download files, View file tags) or Bucket operations.

<figure><img src="https://2683631041-files.gitbook.io/~/files/v0/b/gitbook-x-prod.appspot.com/o/spaces%2FPPVG4W649TwXN8OejRhb%2Fuploads%2Fgit-blob-56aaea1aaa46c9a949b5d4b891f33154afa2c2cc%2Fbucket-policy-configuration-6.png?alt=media" alt="Select Permissions"><figcaption></figcaption></figure>

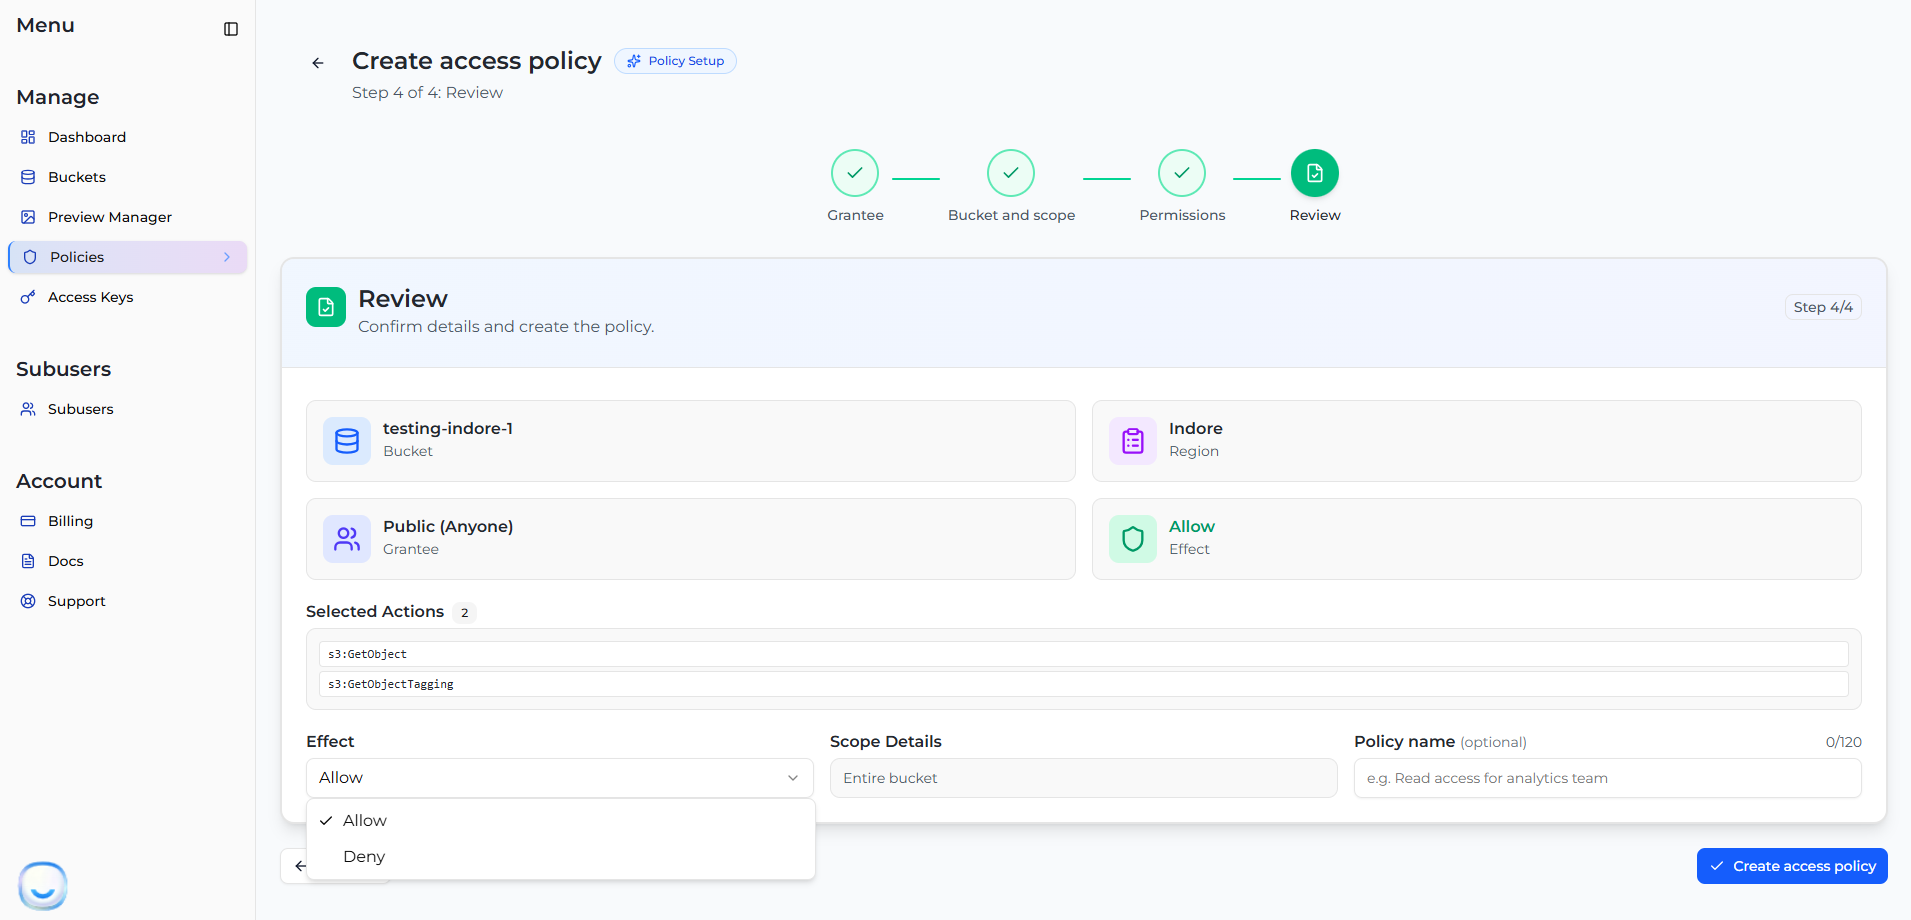
#### Step 4: Review

Review the details of your policy setup, including the Grantee, Bucket, and Permissions.

* Select the **Effect**: Choose `Allow` to grant the permissions or `Deny` to explicitly restrict them.
* (Optional) Enter a **Policy name** for easier identification later.

Click **Create access policy** to finalize and apply the rules.

<figure><img src="https://2683631041-files.gitbook.io/~/files/v0/b/gitbook-x-prod.appspot.com/o/spaces%2FPPVG4W649TwXN8OejRhb%2Fuploads%2Fgit-blob-a18b8f4b09c77ef42de88148e057150346ee3e7d%2Fbucket-policy-configuration-7.png?alt=media" alt="Review Policy Details"><figcaption></figcaption></figure>

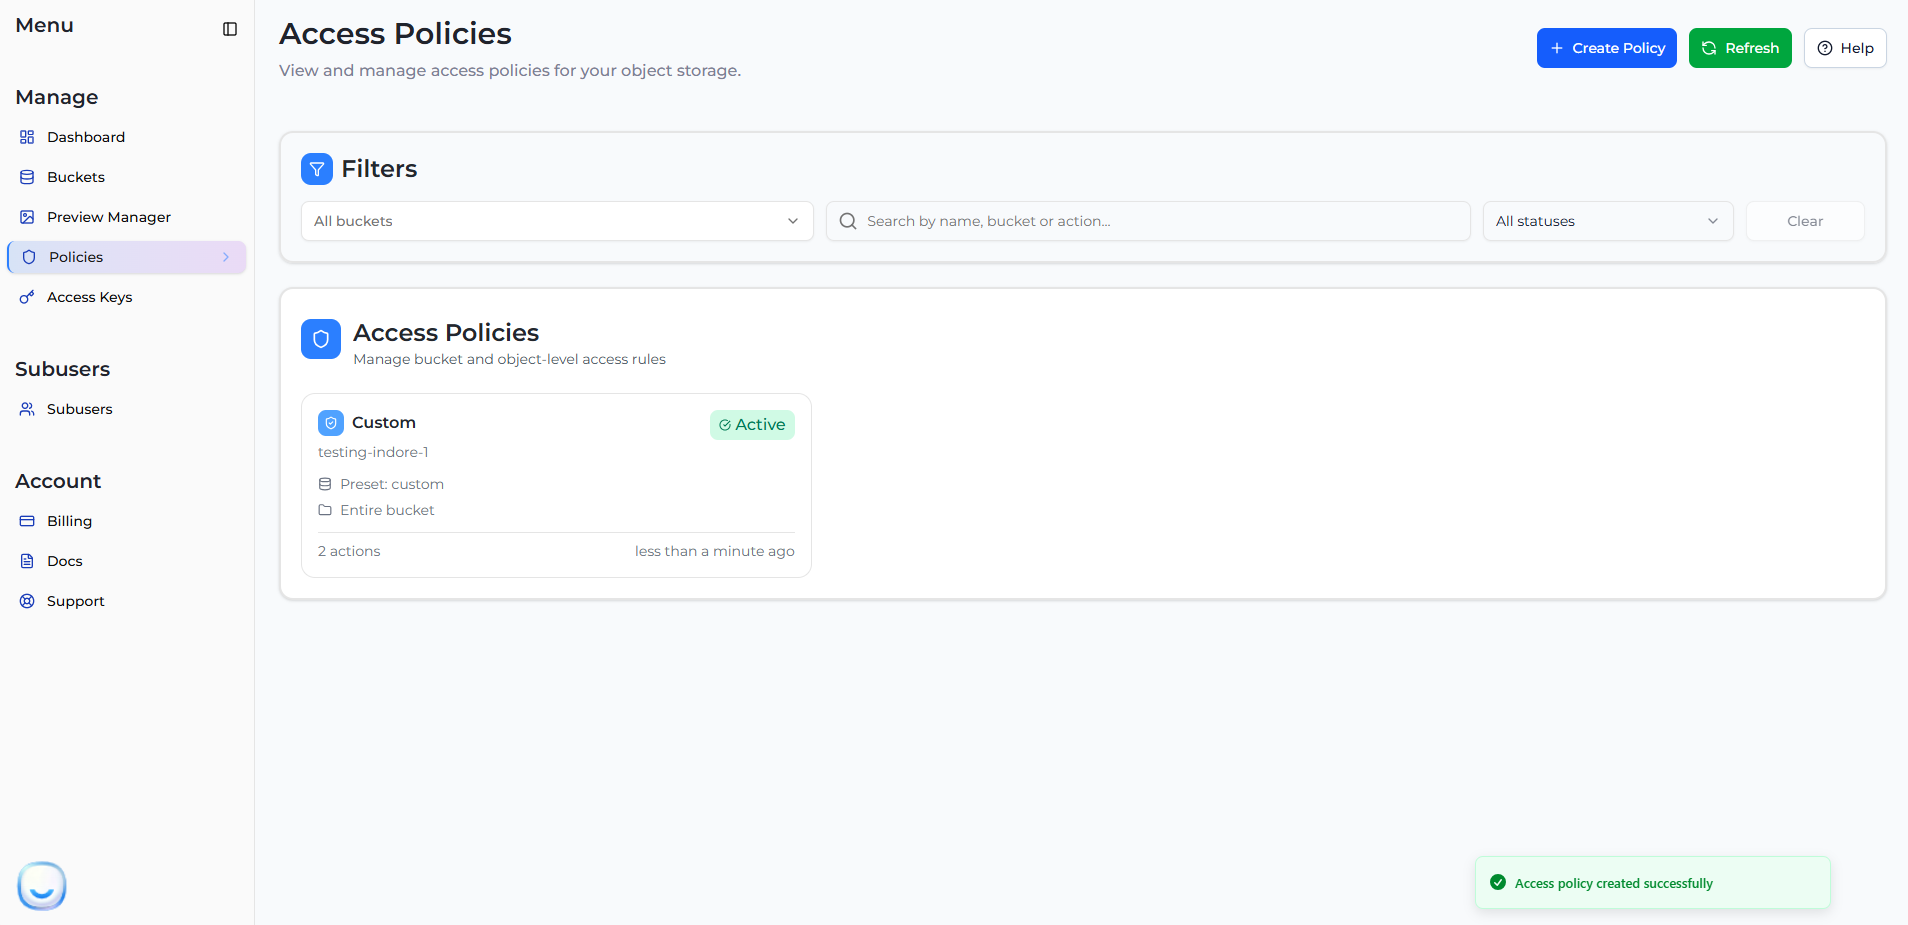
### Managing Policies

After successful creation, your new policy will appear in the Access Policies list. From here, you can view, edit, or delete existing policies.

<figure><img src="https://2683631041-files.gitbook.io/~/files/v0/b/gitbook-x-prod.appspot.com/o/spaces%2FPPVG4W649TwXN8OejRhb%2Fuploads%2Fgit-blob-a9ab3ab71c121d51e62f6769853e07cd20982737%2Fbucket-policy-configuration-8.png?alt=media" alt="Active Access Policy List"><figcaption></figcaption></figure>

**Delete a Bucket policy:** To delete a policy, navigate to the **Policies** section, locate the policy you want to remove, and select the delete option from the actions menu. This removes all custom access rules defined in that policy.


# Applying Limitations with Bucket Policies

We have support a subset of the Amazon s3 policy language applied to buckets.

## Policy Creation and Removal

Bucket policies are managed through standard S3 operations.

For example, I have created a policy to access objects inside the bucket.

```
{
    "Version": "2012-10-17",
    "Statement": [{
      "Effect": "Allow",
      "Principal": {"AWS": ["arn:aws:iam:::user/4fe084dd-8531-4087-bc89-91cca2c9ea8d:Access"]},
      "Action": "s3:GetObject",
      "Resource": [
        "arn:aws:s3:::pankimages/*"
      ]
    }]
  }
```

## Limitations

Currently, we support only the following actions:

* s3:AbortMultipartUpload
* s3:CreateBucket
* s3:DeleteBucketPolicy
* s3:DeleteBucket
* s3:DeleteBucketWebsite
* s3:DeleteObject
* s3:DeleteObjectVersion
* s3:DeleteReplicationConfiguration
* s3:GetAccelerateConfiguration
* s3:GetBucketAcl
* s3:GetBucketCORS
* s3:GetBucketLocation
* s3:GetBucketLogging
* s3:GetBucketNotification
* s3:GetBucketPolicy
* s3:GetBucketRequestPayment
* s3:GetBucketTagging
* s3:GetBucketVersioning
* s3:GetBucketWebsite
* s3:GetLifecycleConfiguration
* s3:GetObjectAcl
* s3:GetObject
* s3:GetObjectTorrent
* s3:GetObjectVersionAcl
* s3:GetObjectVersion
* s3:GetObjectVersionTorrent
* s3:GetReplicationConfiguration
* s3:IPAddress
* s3:NotIpAddress
* s3:ListAllMyBuckets
* s3:ListBucketMultipartUploads
* s3:ListBucket
* s3:ListBucketVersions
* s3:ListMultipartUploadParts
* s3:PutAccelerateConfiguration
* s3:PutBucketAcl
* s3:PutBucketCORS
* s3:PutBucketLogging
* s3:PutBucketNotification
* s3:PutBucketPolicy
* s3:PutBucketRequestPayment
* s3:PutBucketTagging
* s3:PutBucketVersioning
* s3:PutBucketWebsite
* s3:PutLifecycleConfiguration
* s3:PutObjectAcl
* s3:PutObject
* s3:PutObjectVersionAcl
* s3:PutReplicationConfiguration
* s3:RestoreObject

Instead of the Amazon twelve-digit account ID, we utilize the RGW 'tenant' identifier. In the future, assigning an account ID to a tenant may be possible. However, for now, when creating users for policies between AWS S3 and RGW S3, you must use the Amazon account ID as the tenant ID

In AWS, a single namespace is shared by all tenants. RGW provides each tenant with a dedicated namespace for their buckets. In future releases, there might be a choice to activate a 'flat' bucket namespace similar to AWS. Currently, in order to reach a bucket owned by a different tenant, refer to it as "tenant:bucket" when making an S3 request

In AWS, a bucket policy allows giving access to a different account, which can further grant access to specific users by assigning user permissions. As user, role, and group permissions are not yet supported, account owners must currently give access to individual users directly. Granting access to a bucket for an entire account will give access to all users in that account.

String interpolation is not currently supported by bucket policies.

The condition keys we support for all requests are: - aws:CurrentTime - aws:EpochTime - aws:PrincipalType - aws:Referer - aws:SecureTransport - aws:SourceIp - aws:UserAgent - aws:username

We uphold specific s3 condition keys for requests related to buckets and objects.

Functionality for the specified bucket operations has been included.

### Bucket Related Operations

<table data-header-hidden><thead><tr><th width="258"></th><th></th></tr></thead><tbody><tr><td><strong>Permission</strong></td><td><strong>Condition Keys</strong></td></tr><tr><td>s3:createBucket</td><td>s3:x-amz-acl s3:x-amz-grant-&#x3C;perm> where perm is one of read/write/read-acp write-acp/ full-control</td></tr><tr><td><p>s3:ListBucket &#x26;</p><p>s3:ListBucketVersions</p></td><td><p>s3:prefix</p><p>s3:delimiter</p><p>s3:max-keys</p></td></tr><tr><td>s3:PutBucketAcl</td><td>s3:x-amz-acl s3:x-amz-grant-&#x3C;perm></td></tr></tbody></table>

### Object Related Operations

<table data-header-hidden><thead><tr><th width="368"></th><th width="253"></th><th></th></tr></thead><tbody><tr><td>Permission</td><td>Condition Keys</td><td>Comments</td></tr><tr><td></td><td><p>s3:x-amz-acl &#x26; s3:x-amz-grant-&#x3C;perm></p><p>s3:x-amz-copy-source</p></td><td></td></tr><tr><td></td><td>s3:x-amz-server-side-encryption</td><td></td></tr><tr><td>s3:PutObject</td><td>s3:x-amz-server-side-encryption-aws-kms-key-id</td><td></td></tr><tr><td></td><td>s3:x-amz-metadata-directive</td><td>PUT &#x26; COPY to overwrite/preserve metadata in COPY requests</td></tr><tr><td></td><td>s3:RequestObjectTag/&#x3C;tag-key></td><td></td></tr><tr><td><p>s3:PutObjectAcl</p><p>s3:PutObjectVersionAcl</p></td><td><p>s3:x-amz-acl &#x26; s3-amz-grant-&#x3C;perm></p><p>s3:ExistingObjectTag/&#x3C;tag-key></p></td><td></td></tr><tr><td>s3:PutObjectTagging &#x26; s3:PutObjectVersionTagging</td><td><p>s3:RequestObjectTag/&#x3C;tag-key></p><p>s3:ExistingObjectTag/&#x3C;tag-key></p></td><td></td></tr><tr><td><p>s3:GetObject &#x26;</p><p>s3:GetObjectVersion</p></td><td>s3:ExistingObjectTag/&#x3C;tag-key></td><td></td></tr><tr><td><p>s3:GetObjectAcl &#x26;</p><p>s3:GetObjectVersionAcl</p></td><td>s3:ExistingObjectTag/&#x3C;tag-key></td><td></td></tr><tr><td>s3:GetObjectTagging &#x26; s3:GetObjectVersionTagging</td><td>s3:ExistingObjectTag/&#x3C;tag-key></td><td></td></tr><tr><td>s3:DeleteObjectTagging &#x26; s3:DeleteObjectVersionTagging</td><td>s3:ExistingObjectTag/&#x3C;tag-key></td><td></td></tr></tbody></table>

Additional support may be available in the near future as we merge with the recently revamped Authentication/Authorization subsystem.


# Generating a Public Access URL for an Object

### Accessing an Object Using Public URL

1. Log in to the **Zata.ai Dashboard**.
2. Go to the **Buckets** section and select your required bucket.

***

<figure><img src="https://2683631041-files.gitbook.io/~/files/v0/b/gitbook-x-prod.appspot.com/o/spaces%2FPPVG4W649TwXN8OejRhb%2Fuploads%2FyeK1wOugf4dwUjuQfydp%2Fimage.png?alt=media&amp;token=e13f0560-5553-4b2f-8851-6369c7c7c2f0" alt=""><figcaption></figcaption></figure>

\
3\. Click on **Bucket Settings**.\
4\. Open the **Permissions** tab.

<figure><img src="https://2683631041-files.gitbook.io/~/files/v0/b/gitbook-x-prod.appspot.com/o/spaces%2FPPVG4W649TwXN8OejRhb%2Fuploads%2FNQ47WucqKN7Aw3I1eAeq%2Fimage.png?alt=media&amp;token=3e3fe256-60cd-4c9a-b8a8-8926316e3cc6" alt=""><figcaption></figcaption></figure>

5\. Enable public access by adding the following bucket policy:

```json
{
  "Version": "2012-10-17",
  "Statement": [{
    "Effect": "Allow",
    "Principal": "*",
    "Action": "s3:GetObject",
    "Resource": [
      "arn:aws:s3:::<Bucketname>/*"
    ]
  }]
}
```

Explanation for documentation:

* **Effect: Allow** → Grants permission.
* **Principal: "\*"** → Allows access to everyone (public access).
* **Action: s3:GetObject** → Allows only read/download access.
* **Resource** → Applies to all objects inside the bucket.

Replace `<Bucketname>` with your actual bucket name.\
Example:

```
arn:aws:s3:::prertest/*
```

<figure><img src="https://2683631041-files.gitbook.io/~/files/v0/b/gitbook-x-prod.appspot.com/o/spaces%2FPPVG4W649TwXN8OejRhb%2Fuploads%2FKI22s2XJjy8uhUjic5VF%2Fimage.png?alt=media&amp;token=488a70e7-25b7-41a3-bf09-df85d804a426" alt=""><figcaption></figcaption></figure>

\
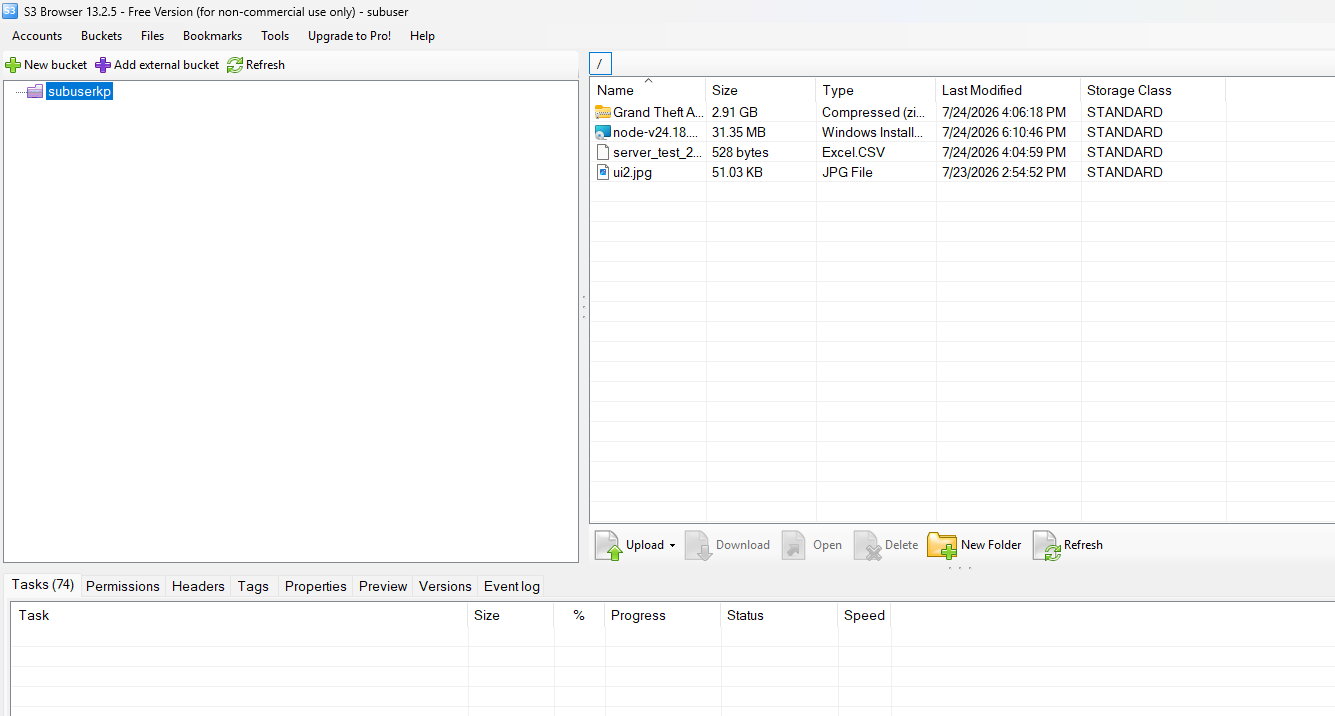
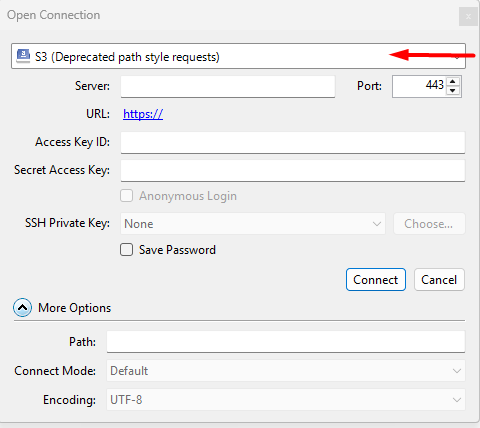
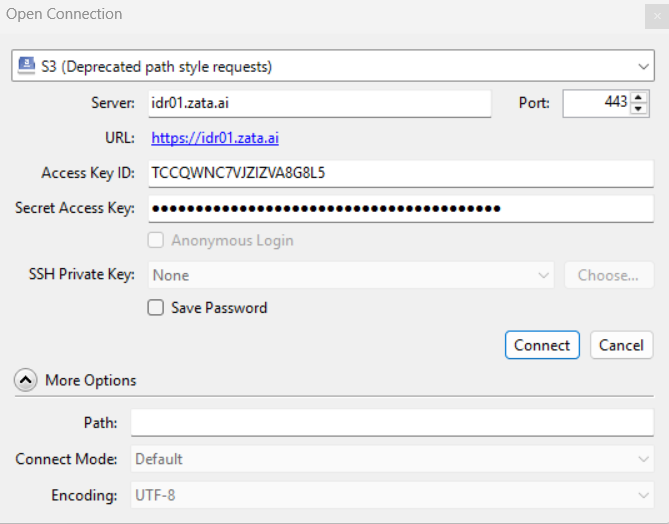
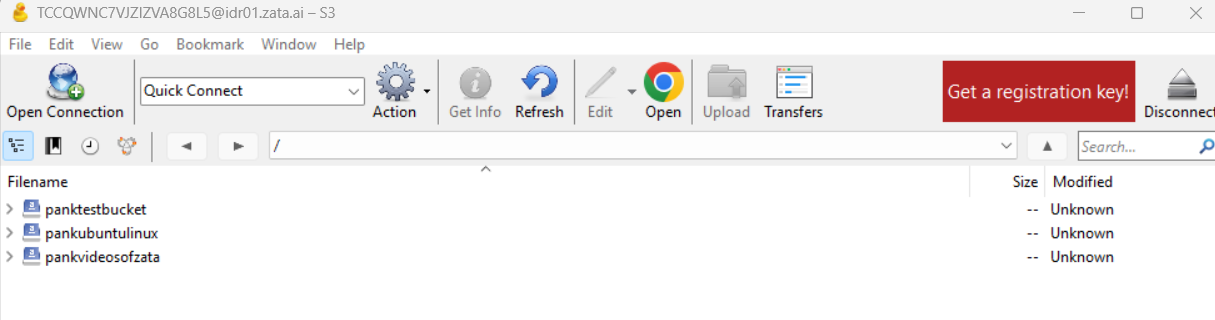
7\. Open your **S3 Browser** application.\
8\. Connect using your access credentials.

***

9\. Your bucket will now be accessible publicly.\
10\. Navigate inside the bucket and select the required object.

<figure><img src="https://2683631041-files.gitbook.io/~/files/v0/b/gitbook-x-prod.appspot.com/o/spaces%2FPPVG4W649TwXN8OejRhb%2Fuploads%2F6m1mcBwMn1rjY8D9EOfx%2Fimage.png?alt=media&amp;token=207cf15b-67ed-4016-97c8-cb89f69c4bdb" alt=""><figcaption></figcaption></figure>

<figure><img src="https://2683631041-files.gitbook.io/~/files/v0/b/gitbook-x-prod.appspot.com/o/spaces%2FPPVG4W649TwXN8OejRhb%2Fuploads%2FF5XYKpeZmYvqusvrGvUj%2Fimage.png?alt=media&amp;token=463d656e-172c-420c-8ea7-979187077d2d" alt=""><figcaption></figcaption></figure>

***

<figure><img src="https://2683631041-files.gitbook.io/~/files/v0/b/gitbook-x-prod.appspot.com/o/spaces%2FPPVG4W649TwXN8OejRhb%2Fuploads%2FLhmg9ntPwkJ0quioDRKq%2Fimage.png?alt=media&amp;token=51d8d0d2-f1f3-41c1-8299-162a00b19a04" alt=""><figcaption></figcaption></figure>

\
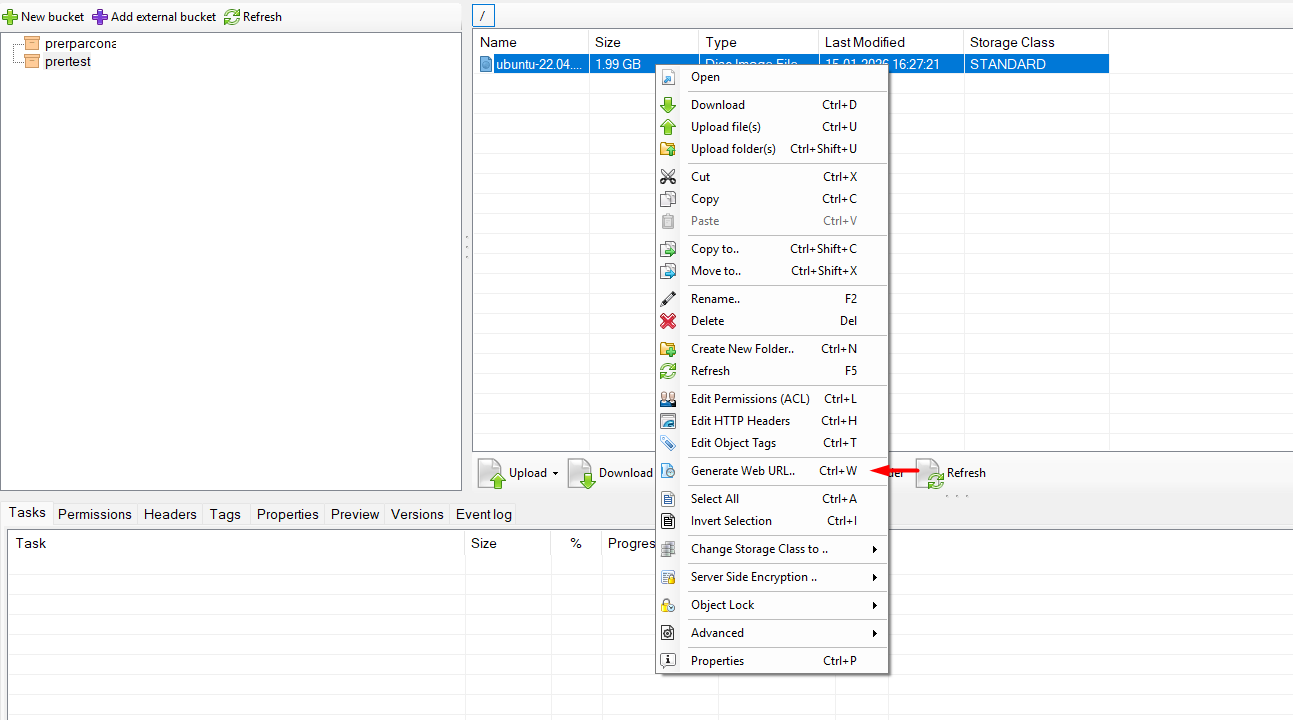
11\. Right-click on the object.\
12\. Select **Generate Web URL**.

***

<figure><img src="https://2683631041-files.gitbook.io/~/files/v0/b/gitbook-x-prod.appspot.com/o/spaces%2FPPVG4W649TwXN8OejRhb%2Fuploads%2FveDMTP97nE4VkYomdssH%2Fimage.png?alt=media&amp;token=cebd6728-51e0-46d4-9e61-2ecbdf817f86" alt=""><figcaption></figcaption></figure>

\
Click on **Copy** .

\
13\. Paste the copied URL into any web browser and press Enter, The object will open directly in the browser using the public URL.

\
\ <br>


# Object Lock (WORM)

Zata.ai provides **S3 Object Lock**, which follows the Write-Once-Read-Many (WORM) model. This feature allows you to store objects using a model that prevents them from being deleted or overwritten for a fixed amount of time or indefinitely.

Object Lock helps you meet regulatory requirements that require WORM storage or simply add an extra layer of protection against object changes and deletion.

> **IMPORTANT** Object Lock capability can **only be enabled during bucket creation**. It cannot be turned on for an existing bucket. Enabling Object Lock will permanently turn on Bucket Versioning.

***

## Retention Modes and Features

Zata.ai's Object Lock offers three distinct ways to protect your data. You can learn how to use and configure each of these by visiting their dedicated pages:

* [**Governance Mode**](/manage/bucket/object-lock/governance-mode)**:** Users cannot delete or overwrite an object version or alter its lock settings unless they have special permissions.
* [**Compliance Mode**](/manage/bucket/object-lock/compliance-mode)**:** A protected object version cannot be overwritten or deleted by **anyone** until its retention period has expired.
* [**Legal Hold**](/manage/bucket/object-lock/legal-hold)**:** Provides the same protection as a retention period, but it has no expiration date and must be explicitly turned off.

***

## Retention Ceilings (Recommended Maximum Dates)

When you select a "Retain Until" date in the Zata dashboard for either Governance or Compliance mode, you will see a **Recommended Maximum Date**.

Because Zata is a prepaid cloud platform, your data is tied to your billing lifecycle. The recommended maximum date ensures that you don't lock your data past the point when your account might naturally expire or be suspended (e.g., due to the end of a free trial or an unpaid invoice).

* **For Trial Users:** The recommended date is usually up to 45 days from account creation.
* **For Billed Users:** The recommended date is usually up to 120 days from the start of the current billing cycle.

> **NOTE** You can set retention dates beyond this ceiling, but doing so will not prevent data from being wiped if your account is suspended and permanently terminated due to non-payment.

***

## Bulk Retention (Apply to All Unprotected Versions)

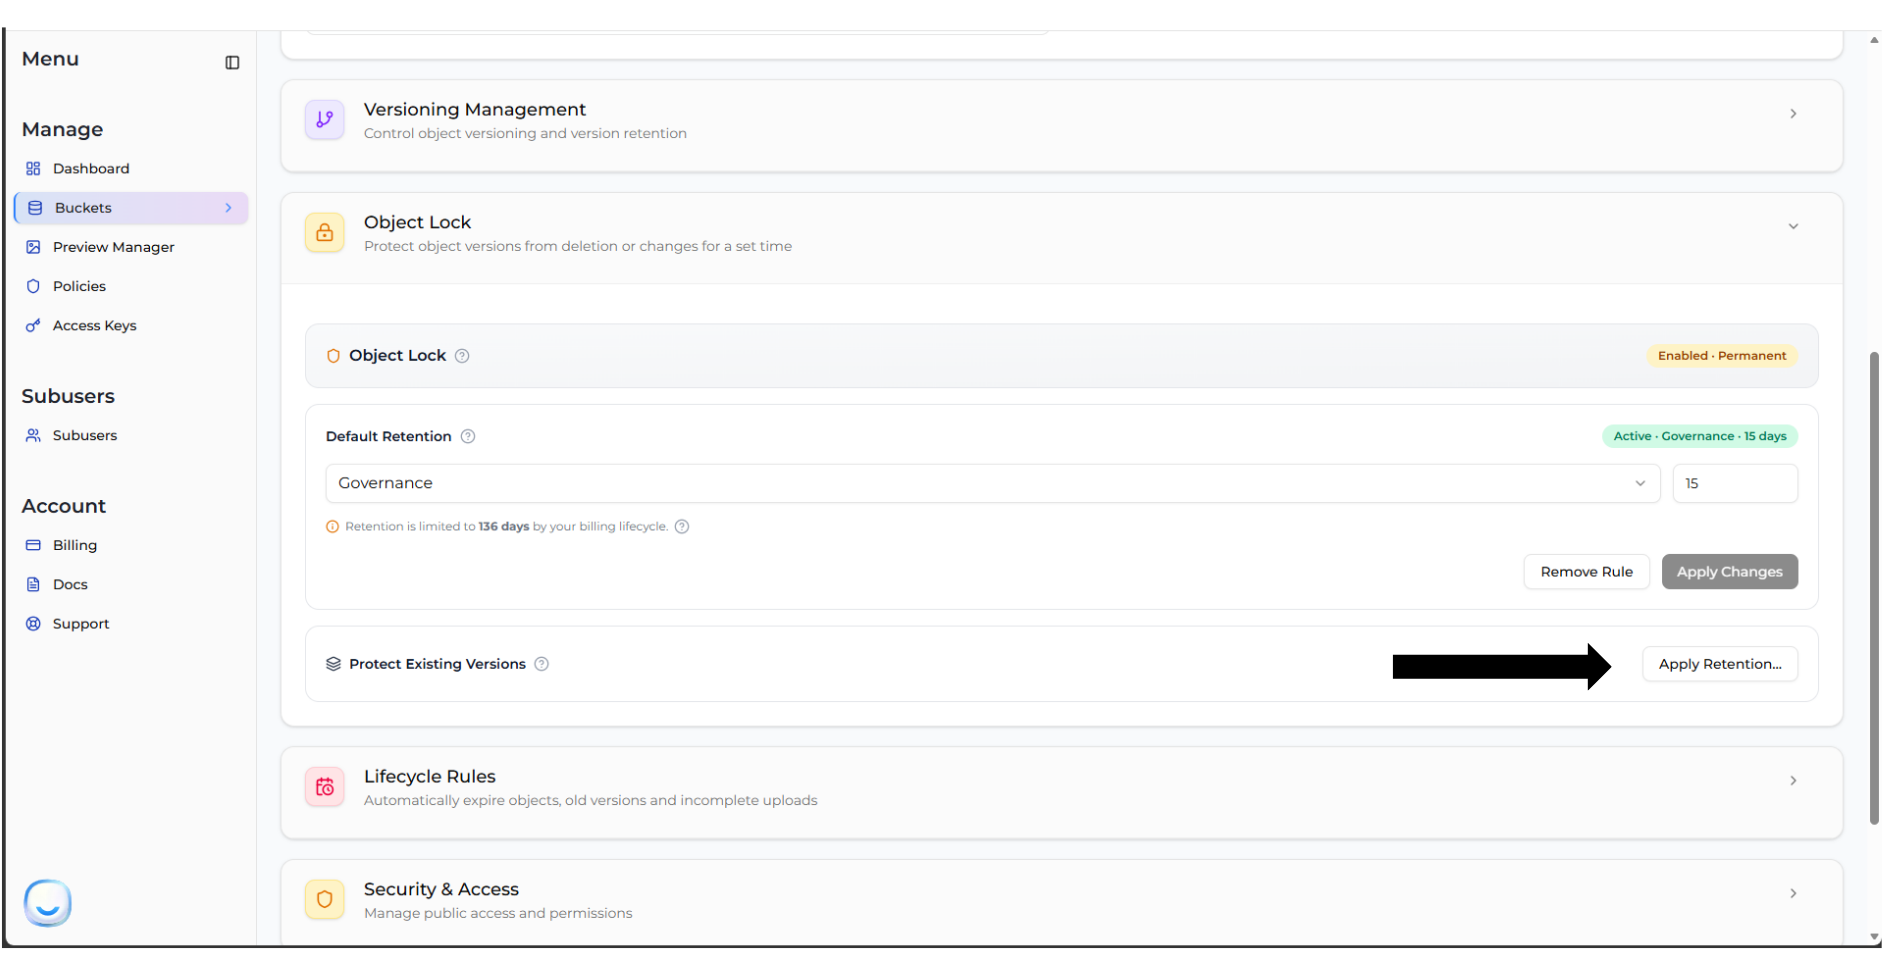
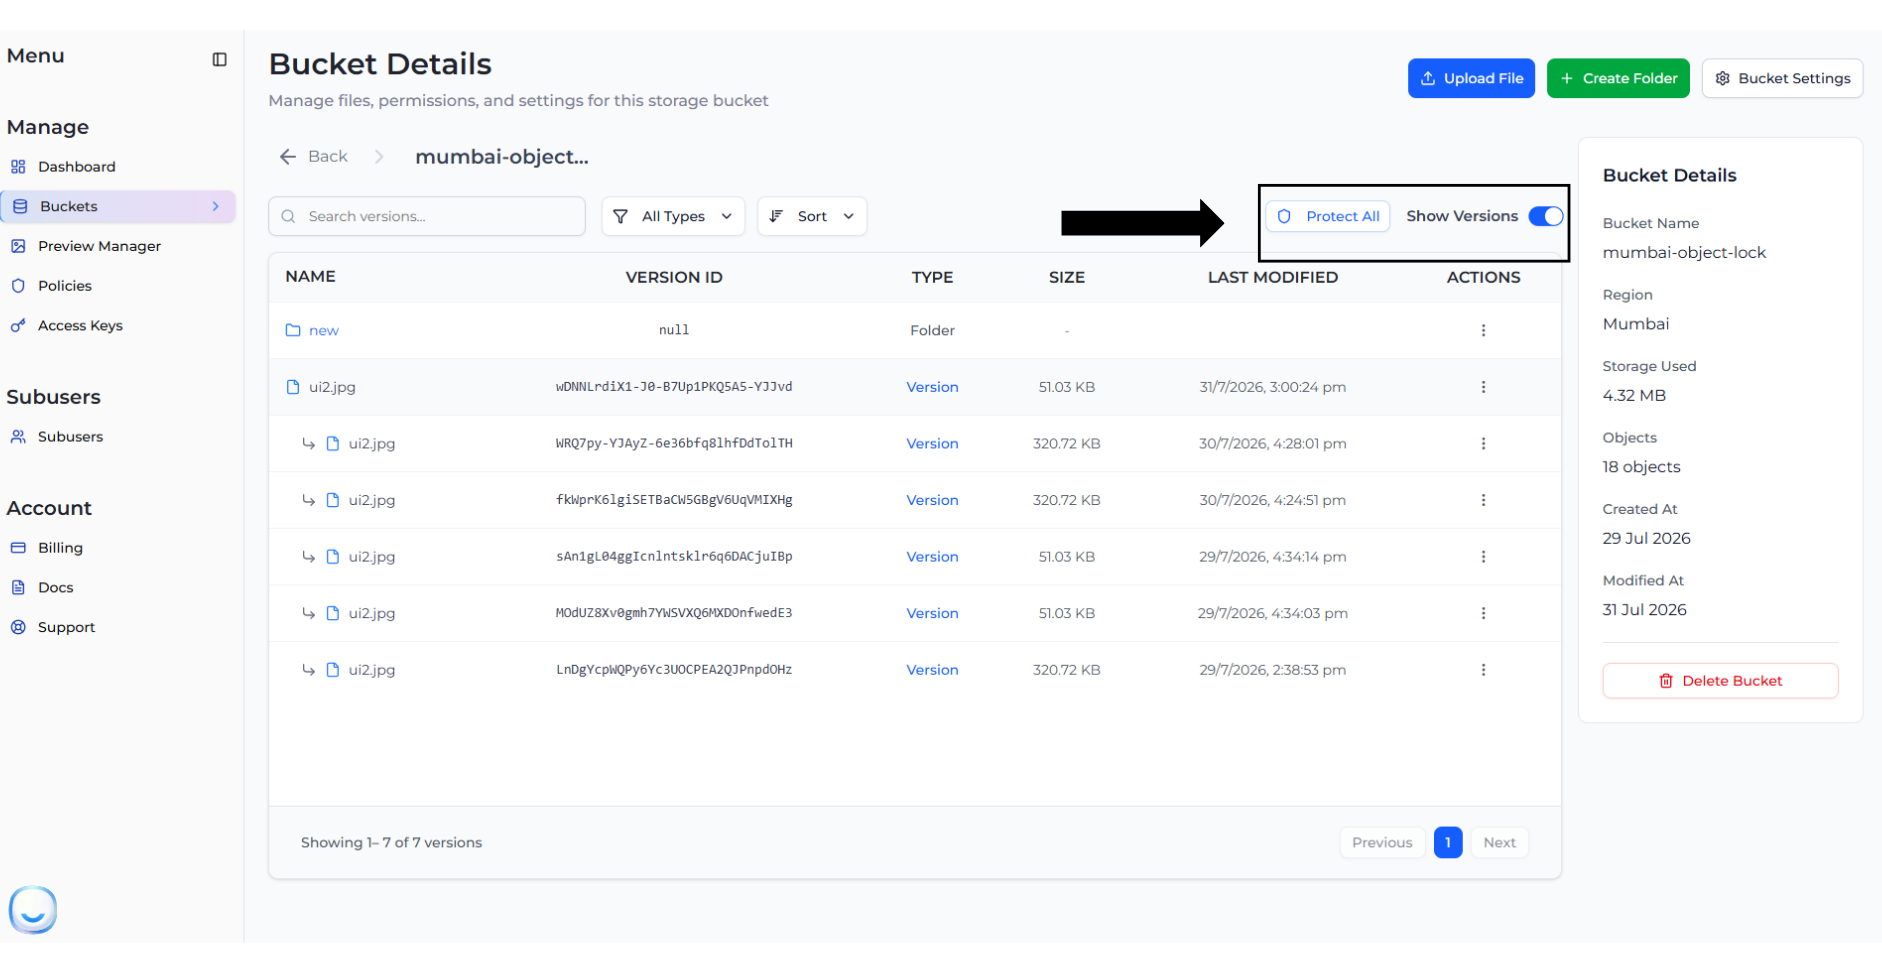
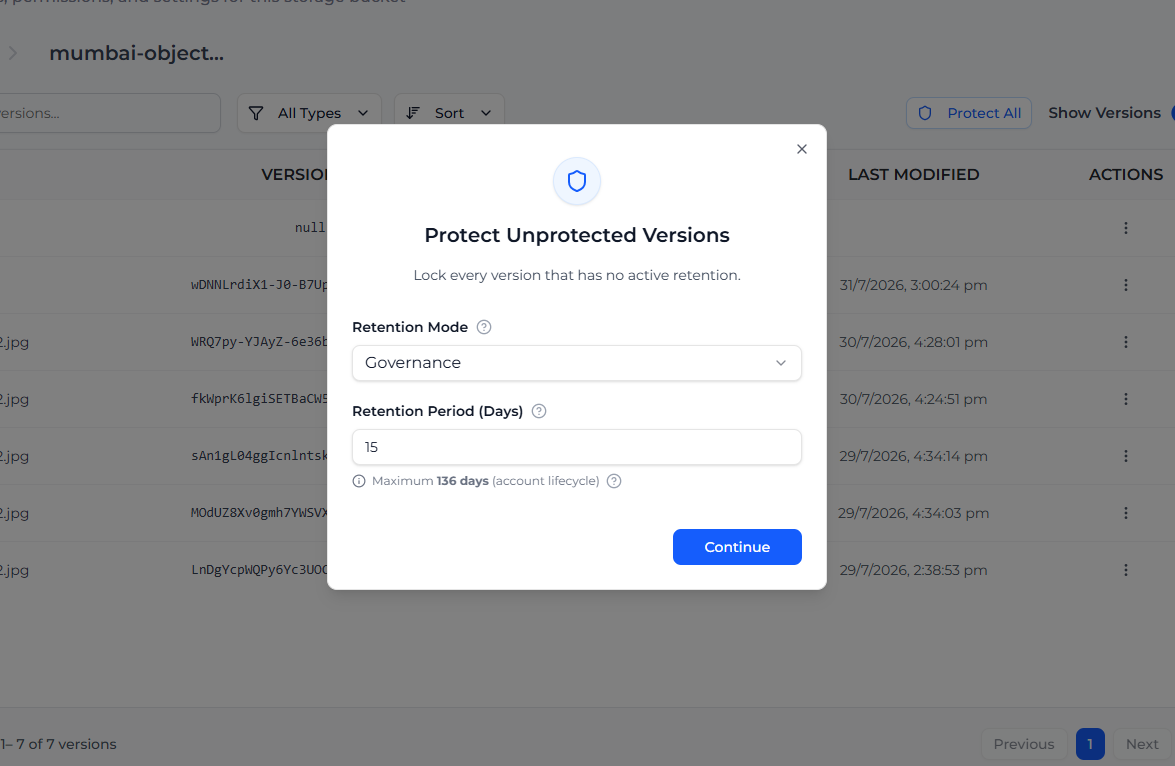
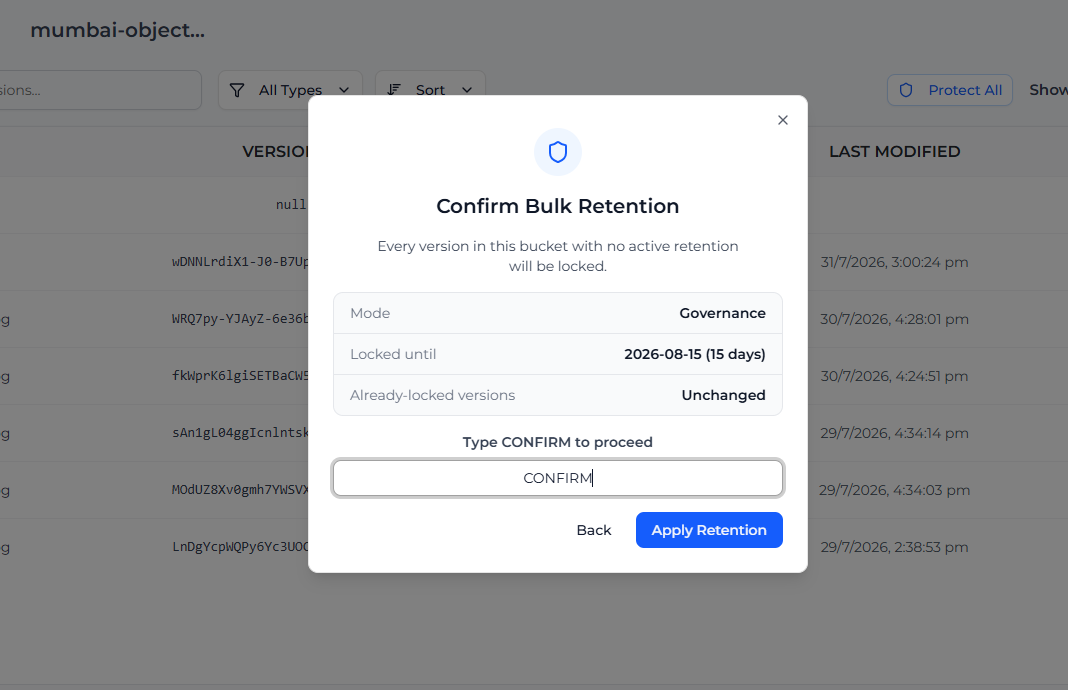
If you have many objects in a bucket that are not currently protected (e.g., they were uploaded before you enabled a default rule, or their previous retention expired), you can lock them all at once. This action will lock every version that currently has no active retention, while leaving already-locked versions unchanged.

You can initiate Bulk Retention from two different places in the Zata Dashboard:

**Option 1: From Bucket Settings** Navigate to **Bucket > Settings** and locate the **Object Lock** section. Click the **Apply Retention...** button under the *Protect Existing Versions* section.

<figure><img src="https://2683631041-files.gitbook.io/~/files/v0/b/gitbook-x-prod.appspot.com/o/spaces%2FPPVG4W649TwXN8OejRhb%2Fuploads%2Fgit-blob-6fc20c7e90bbb518357d3dfd5b91f5fa7b543e31%2Fbulk-retention-1.png?alt=media" alt="Bulk Retention from Settings"><figcaption></figcaption></figure>

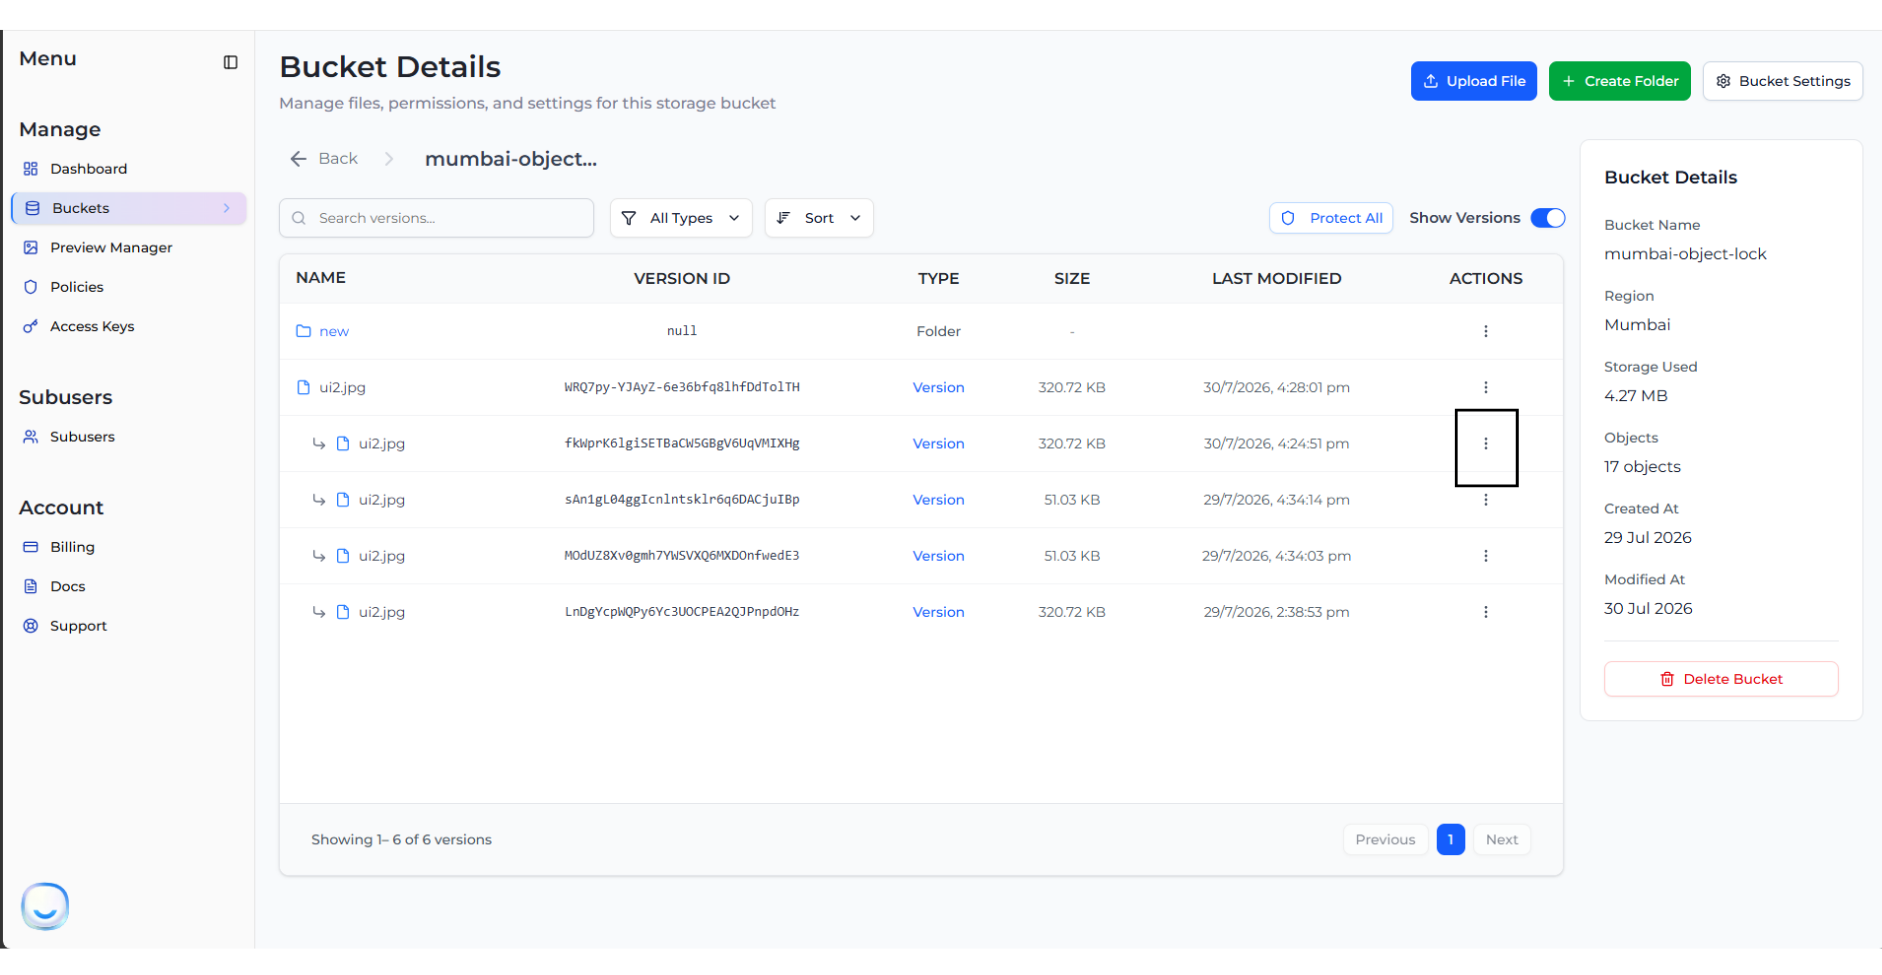
**Option 2: From the Files View** Navigate to your bucket's file list and toggle **Show Versions** to ON. Then, click the **Protect All** button.

<figure><img src="https://2683631041-files.gitbook.io/~/files/v0/b/gitbook-x-prod.appspot.com/o/spaces%2FPPVG4W649TwXN8OejRhb%2Fuploads%2Fgit-blob-f795c8e5ebdee2fa19cdc27e1ff0e0bbb65ec9bf%2Fbulk-retention-2.png?alt=media" alt="Protect All Button in Files View"><figcaption></figcaption></figure>

### Applying the Bulk Retention

Regardless of which option you choose, a modal will appear where you can define the retention settings:

1. Select the **Retention Mode** (Governance or Compliance) and set the **Retention Period (Days)**. Then click **Continue**.

<figure><img src="https://2683631041-files.gitbook.io/~/files/v0/b/gitbook-x-prod.appspot.com/o/spaces%2FPPVG4W649TwXN8OejRhb%2Fuploads%2Fgit-blob-26733bb61d55f9ab465f900be4052218f4ee811e%2Fbulk-retention-3.png?alt=media" alt="Set Bulk Retention Mode"><figcaption></figcaption></figure>

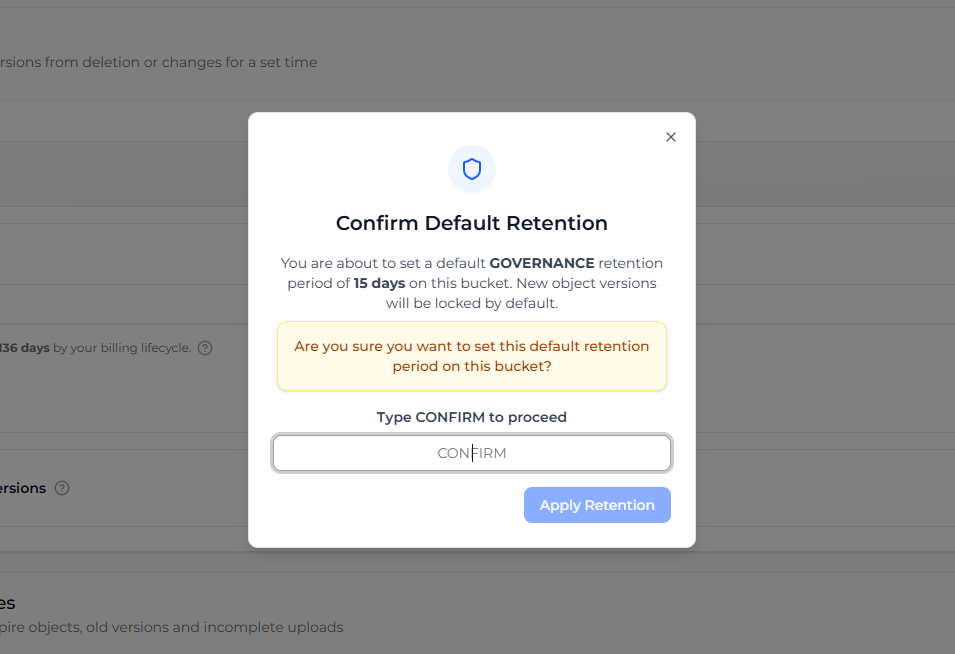
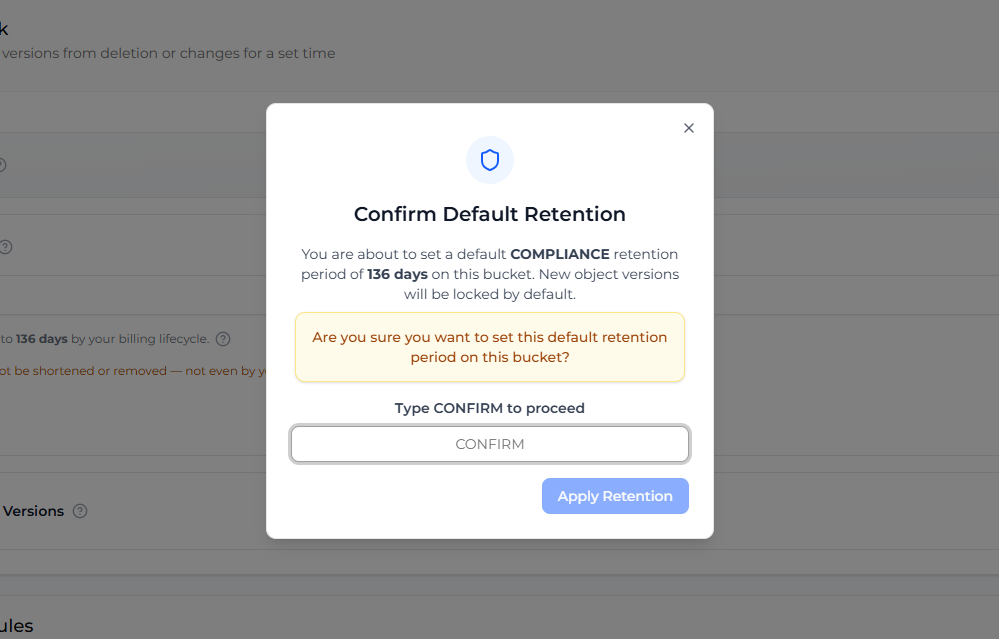
2. You will be asked to confirm your choice by typing "CONFIRM".

<figure><img src="https://2683631041-files.gitbook.io/~/files/v0/b/gitbook-x-prod.appspot.com/o/spaces%2FPPVG4W649TwXN8OejRhb%2Fuploads%2Fgit-blob-897d64b150fb0c581822935c7ddd19e3e3c0a90a%2Fbulk-retention-4.png?alt=media" alt="Confirm Bulk Retention"><figcaption></figcaption></figure>

3. Click **Apply Retention** to instantly apply the chosen retention mode and period to every unprotected version in the bucket.

> **Note on Reapplying Retention to Expired Versions** When using Bulk Retention on versions whose previous retention has expired, the success depends on the previous retention mode:
>
> * If the expired version was previously in **Governance** mode, you can successfully apply either a new Governance or Compliance rule.
> * If the expired version was previously in **Compliance** mode, you cannot downgrade it to Governance mode (the new rule will not apply). You can only apply a new Compliance rule.


# Governance Mode

In **Governance Mode**, users cannot delete or overwrite an object version or alter its lock settings unless they have special permissions.

* **Root User Bypass:** The Root User (account owner) can bypass this lock to delete a protected object. This requires explicitly confirming the deletion in the dashboard by typing "confirm".
* **Subusers:** Subusers cannot bypass Governance Mode.

## Applying a Default Governance Rule

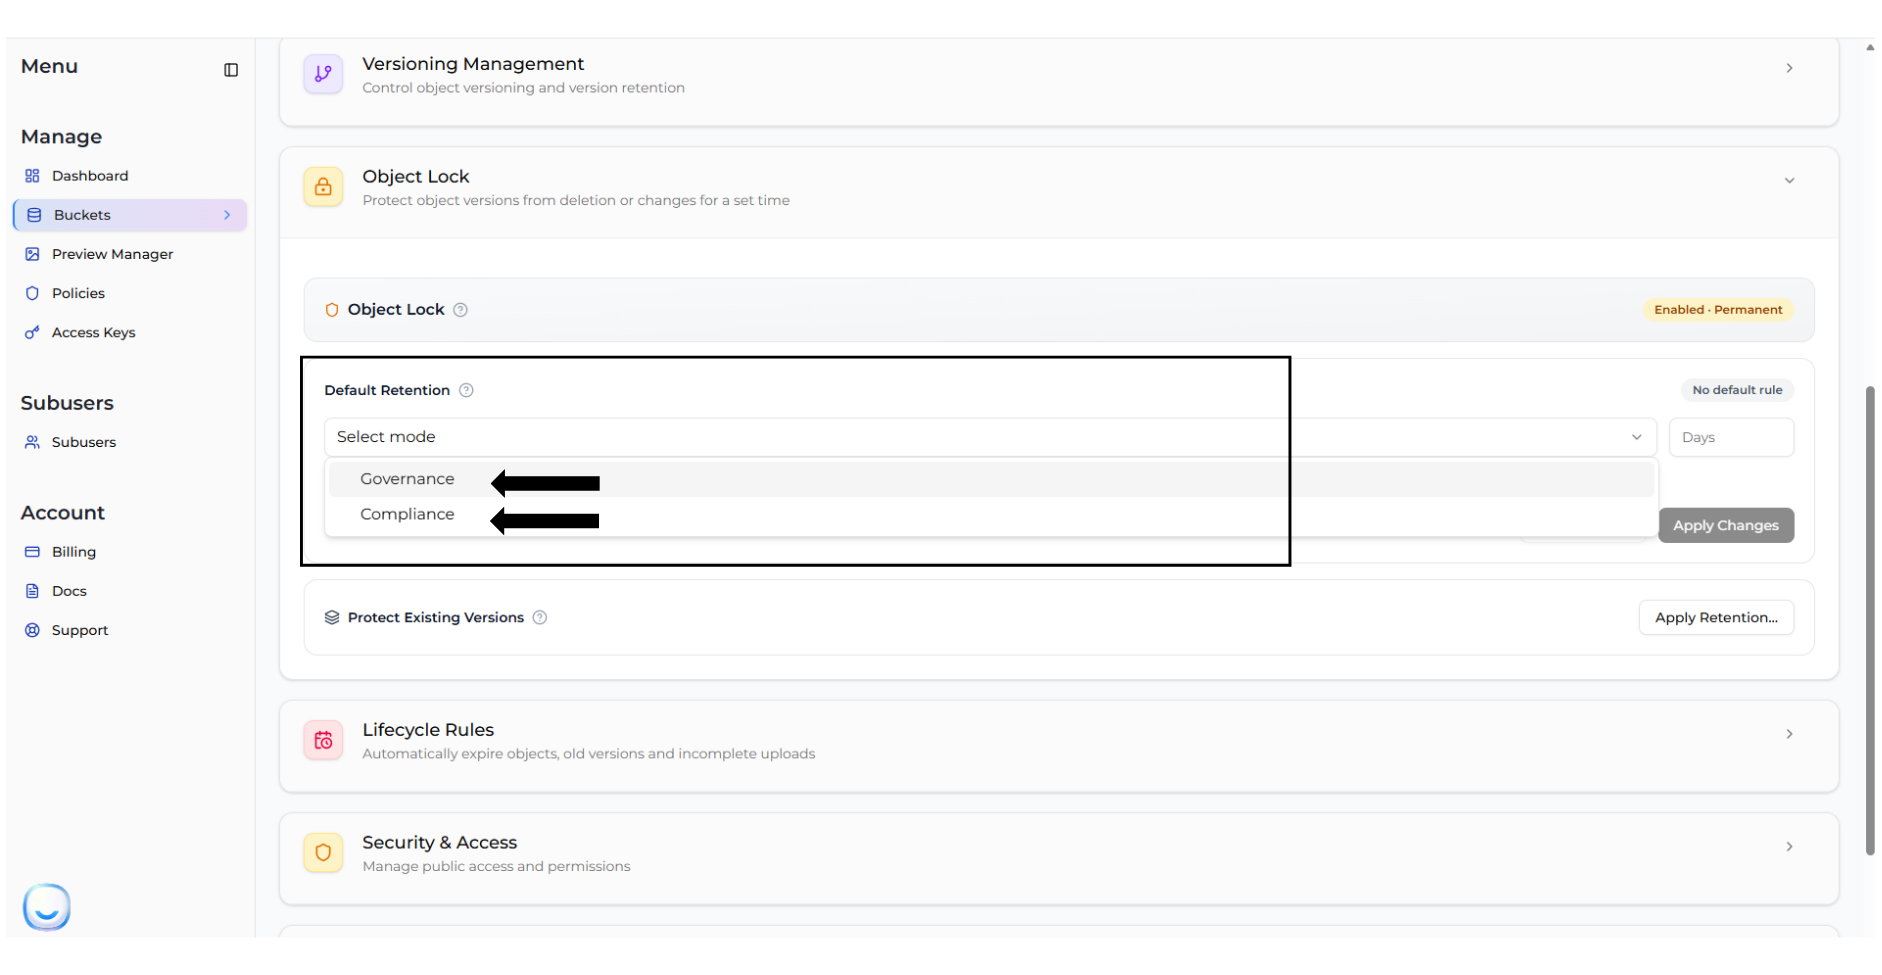
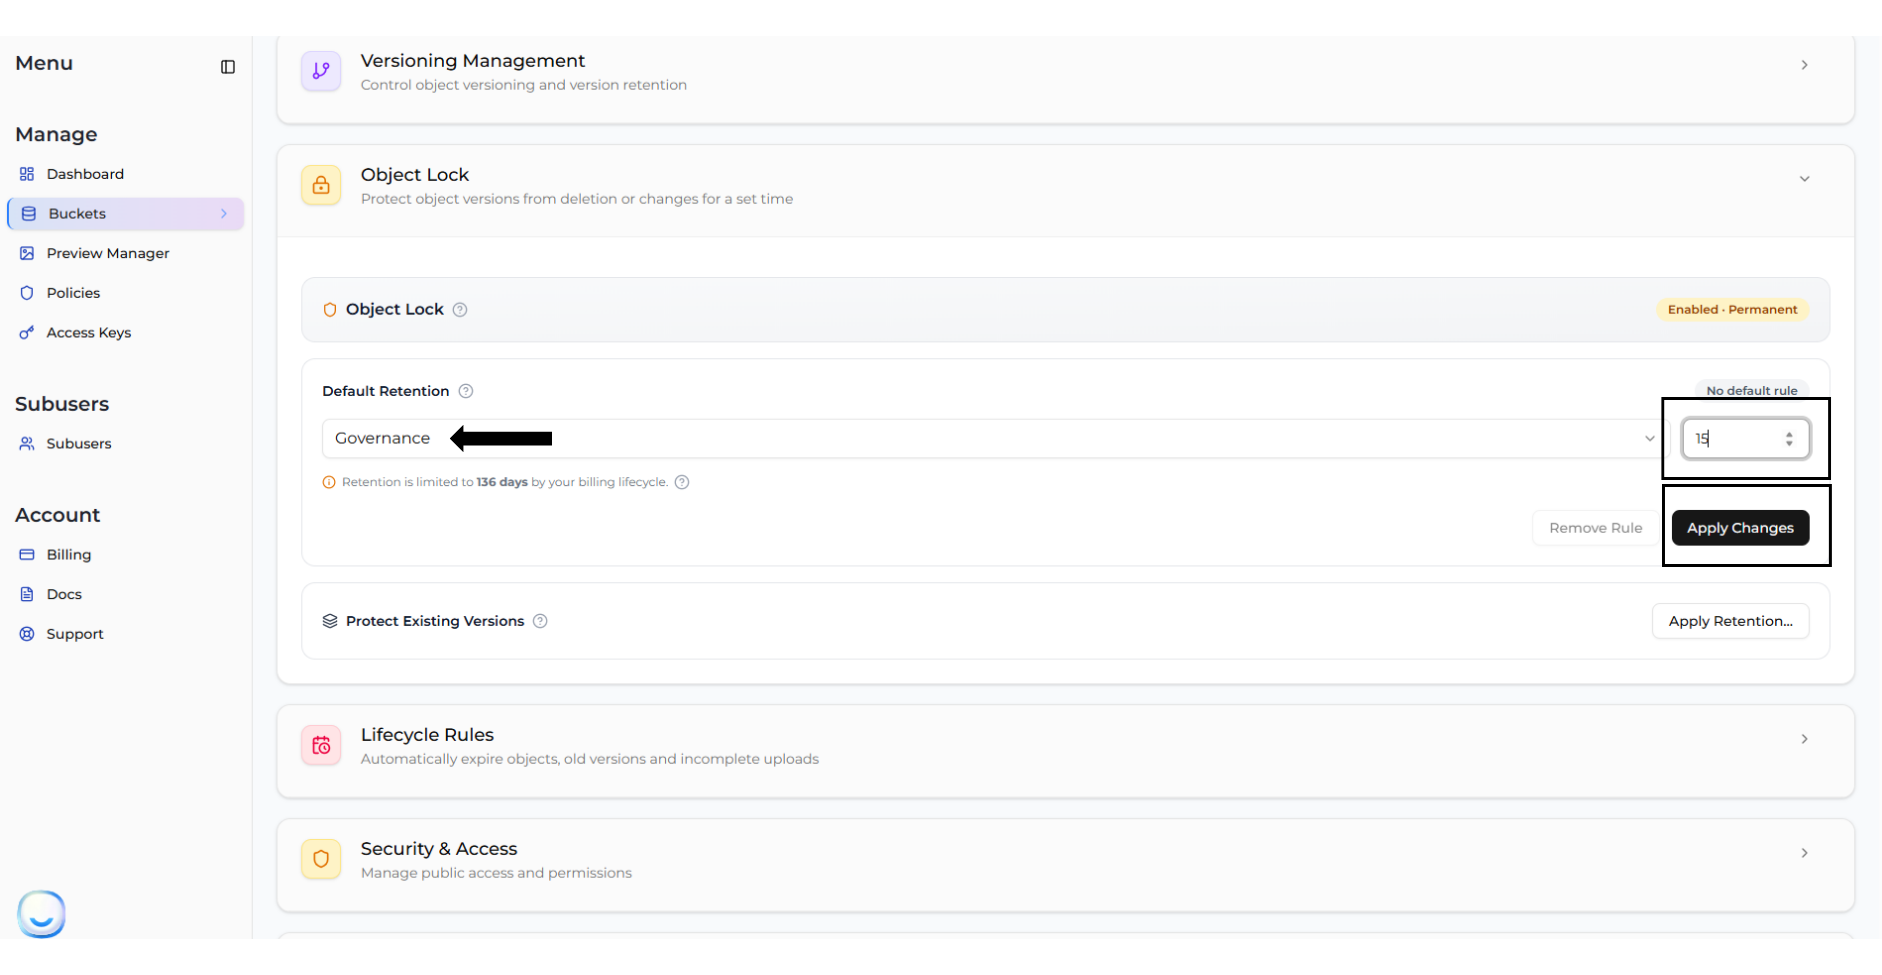
If your bucket was created with Object Lock enabled, you can configure a **Default Retention Rule** in your Bucket Settings so that all new uploads are automatically protected under Governance Mode.

1. Navigate to **Bucket > Settings**.
2. Locate the **Default Retention Rule** section.
3. Select **Governance** from the mode dropdown, and enter the retention period (in days).
4. Click **Apply Changes**.

<figure><img src="https://2683631041-files.gitbook.io/~/files/v0/b/gitbook-x-prod.appspot.com/o/spaces%2FPPVG4W649TwXN8OejRhb%2Fuploads%2Fgit-blob-29baf12e65cbfa8a871a3b76f16540cc28506056%2Fobject-lock-1.png?alt=media" alt="Select Governance Mode"><figcaption></figcaption></figure>

<figure><img src="https://2683631041-files.gitbook.io/~/files/v0/b/gitbook-x-prod.appspot.com/o/spaces%2FPPVG4W649TwXN8OejRhb%2Fuploads%2Fgit-blob-4ae1ac5330128245957bc8f76fda4f0187ceb0c0%2Fobject-lock-2.png?alt=media" alt="Set Retention Days"><figcaption></figcaption></figure>

You will be asked to confirm your choice by typing "CONFIRM".

<figure><img src="https://2683631041-files.gitbook.io/~/files/v0/b/gitbook-x-prod.appspot.com/o/spaces%2FPPVG4W649TwXN8OejRhb%2Fuploads%2Fgit-blob-ea5cc843c9167c63c2e2b9eb91637b73b44e4a1f%2Fobject-lock-3.png?alt=media" alt="Confirm Governance Rule"><figcaption></figcaption></figure>

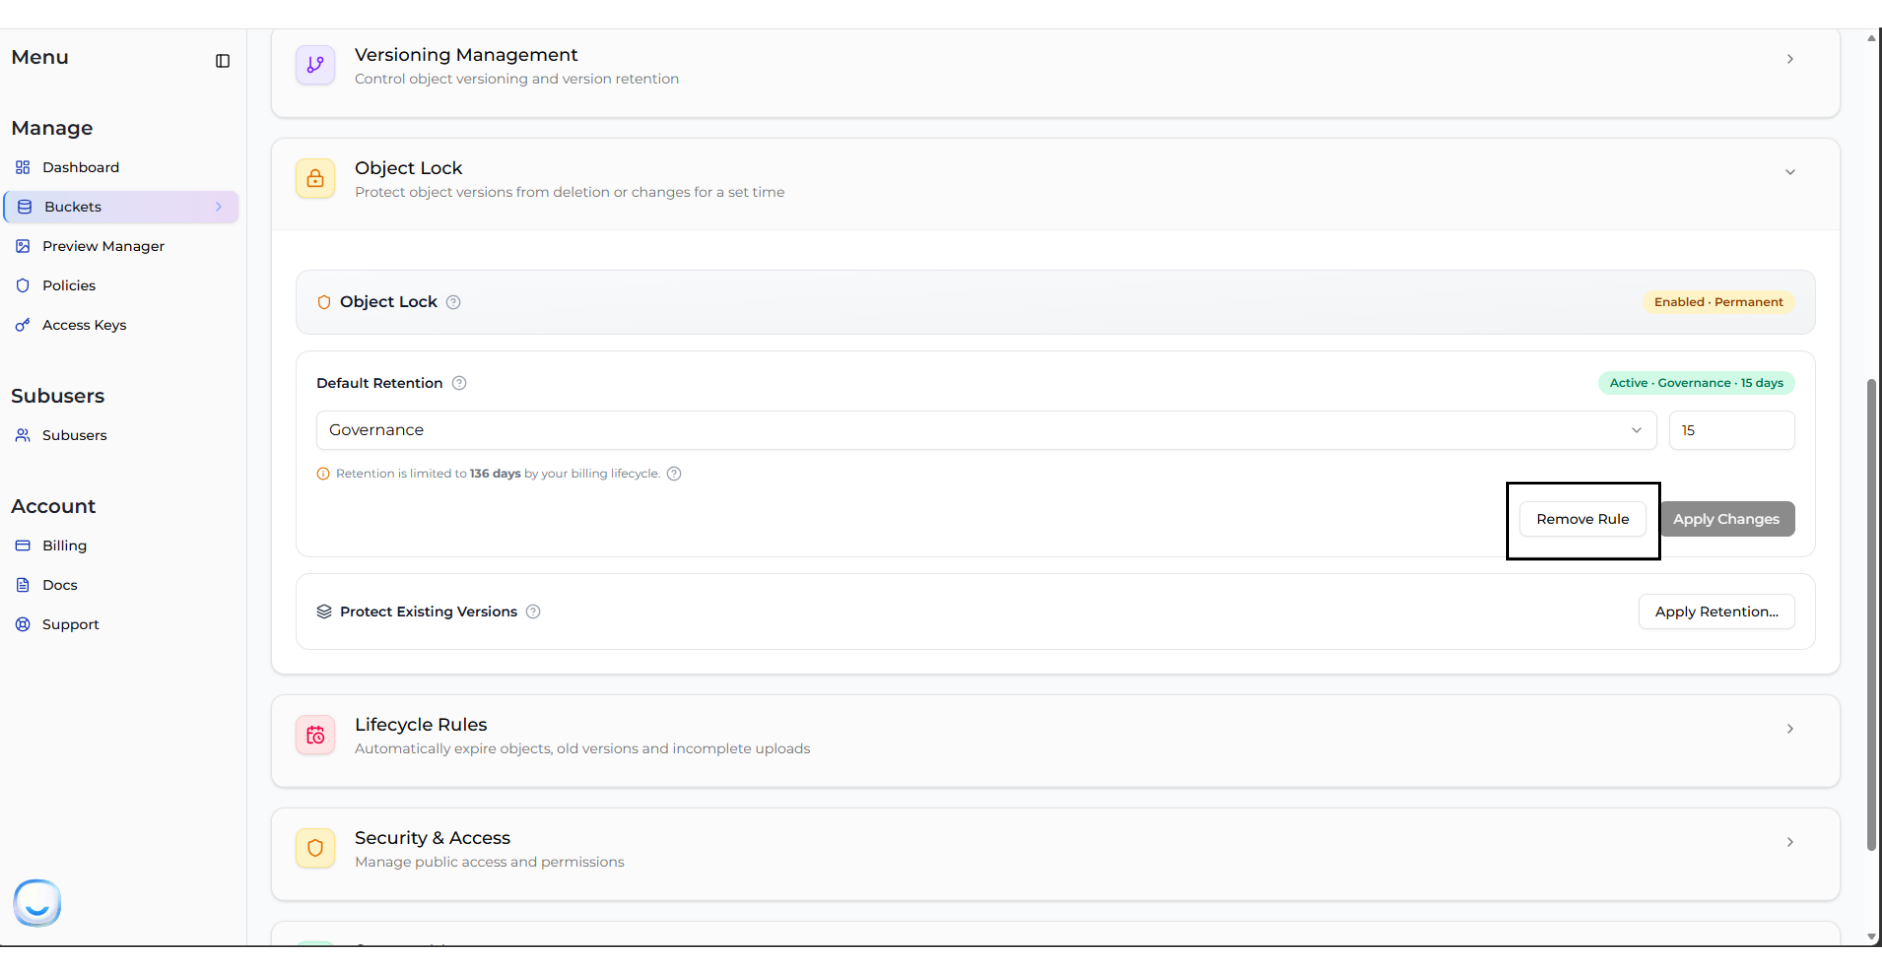
## Removing a Default Governance Rule

To stop automatically locking new uploads under this rule, you can remove it:

1. In the **Default Retention Rule** section, click **Remove Rule**.

<figure><img src="https://2683631041-files.gitbook.io/~/files/v0/b/gitbook-x-prod.appspot.com/o/spaces%2FPPVG4W649TwXN8OejRhb%2Fuploads%2Fgit-blob-66f3e753baa882a8b883a2f34a5f92d5e0765fba%2Fobject-lock-6.png?alt=media" alt="Remove Rule"><figcaption></figcaption></figure>

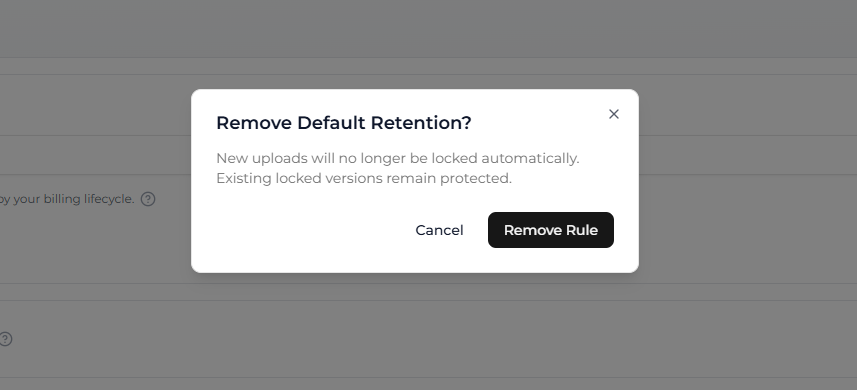
2. Confirm the removal.

<figure><img src="https://2683631041-files.gitbook.io/~/files/v0/b/gitbook-x-prod.appspot.com/o/spaces%2FPPVG4W649TwXN8OejRhb%2Fuploads%2Fgit-blob-01431b97d9a5dd89bcdd386424184bb8c136c7a6%2Fobject-lock-7.png?alt=media" alt="Confirm Remove Rule"><figcaption></figcaption></figure>

> **INFO** Removing the default retention rule stops auto-locking new uploads, but it **does not** unlock objects that are already protected.

## Managing Governance on Individual Versions

You can view and modify Governance settings for specific object versions directly from the Zata Dashboard.

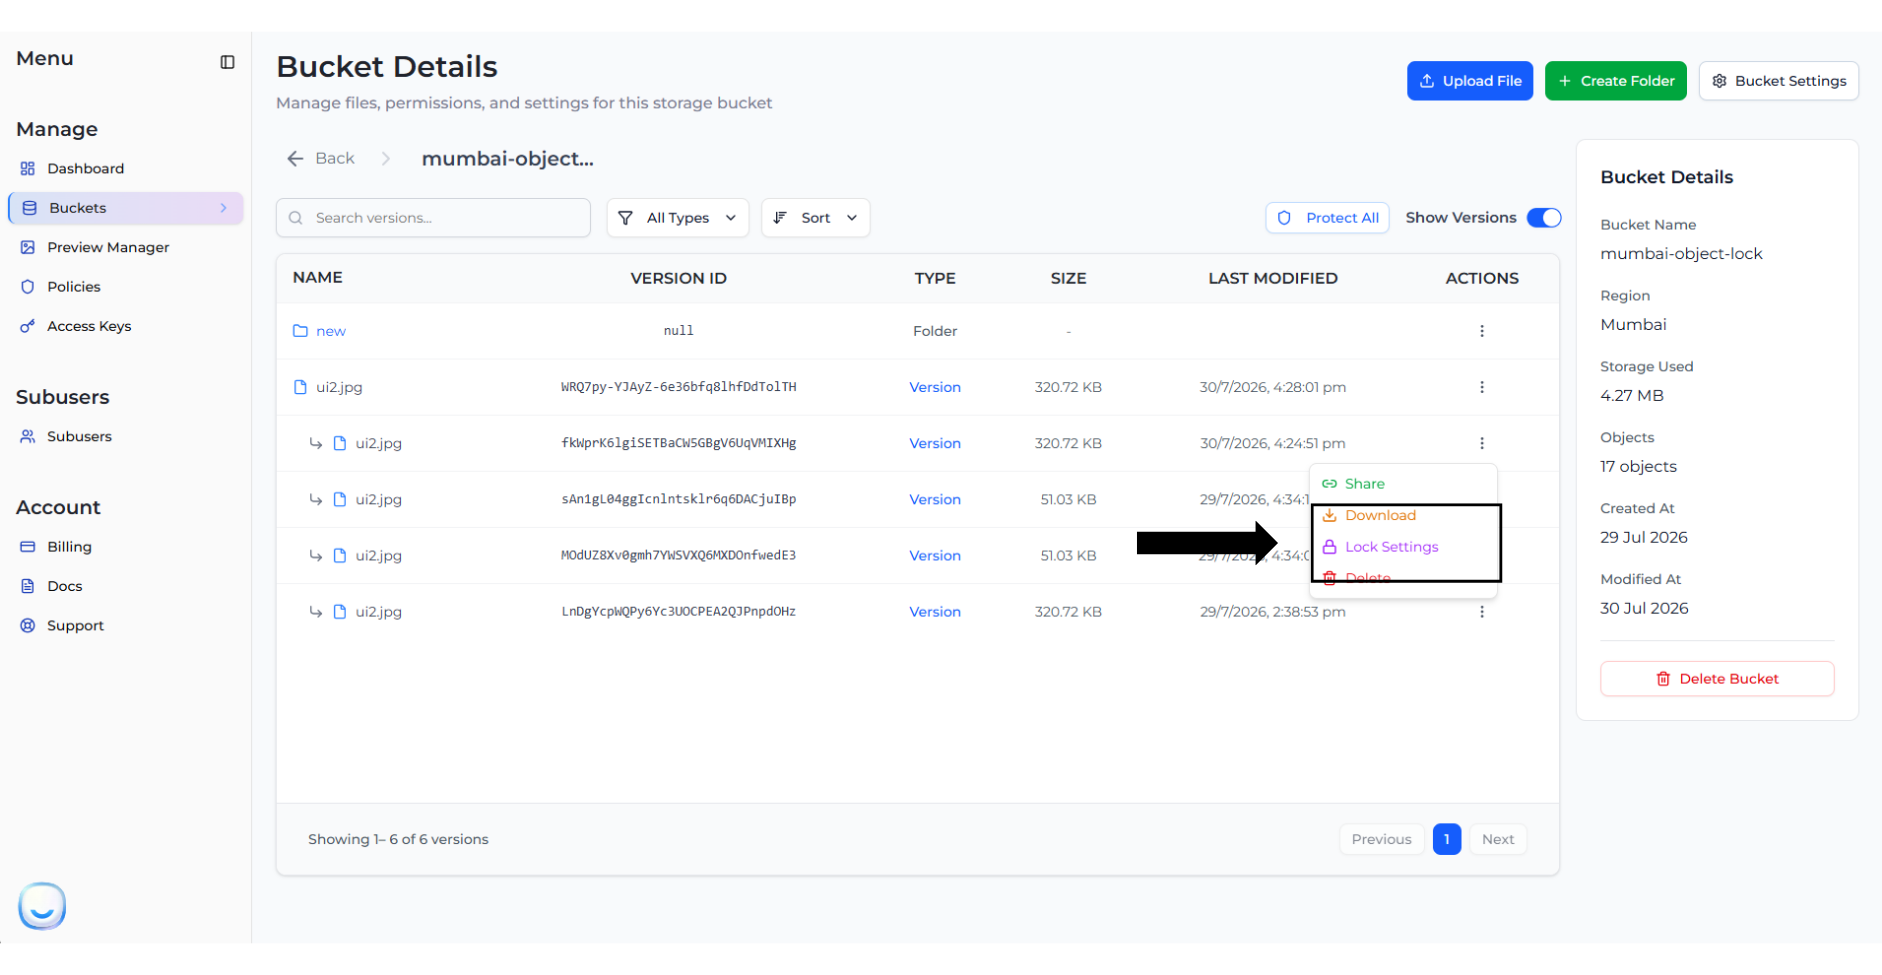
1. Navigate to your bucket and click on an object to expand its versions list.

<figure><img src="https://2683631041-files.gitbook.io/~/files/v0/b/gitbook-x-prod.appspot.com/o/spaces%2FPPVG4W649TwXN8OejRhb%2Fuploads%2Fgit-blob-e282c16fc103f93da94b36fd43881a1bbc4cee20%2Fobject-lock-dash.png?alt=media" alt="View Object Versions"><figcaption></figcaption></figure>

2. Click on the three dots (Actions) next to a specific version and select **Lock Settings**.

<figure><img src="https://2683631041-files.gitbook.io/~/files/v0/b/gitbook-x-prod.appspot.com/o/spaces%2FPPVG4W649TwXN8OejRhb%2Fuploads%2Fgit-blob-1179329bba9b6bb0ceb12b51a3293a561b7f408b%2Fobject-lock-dash-2.png?alt=media" alt="Open Lock Settings"><figcaption></figcaption></figure>

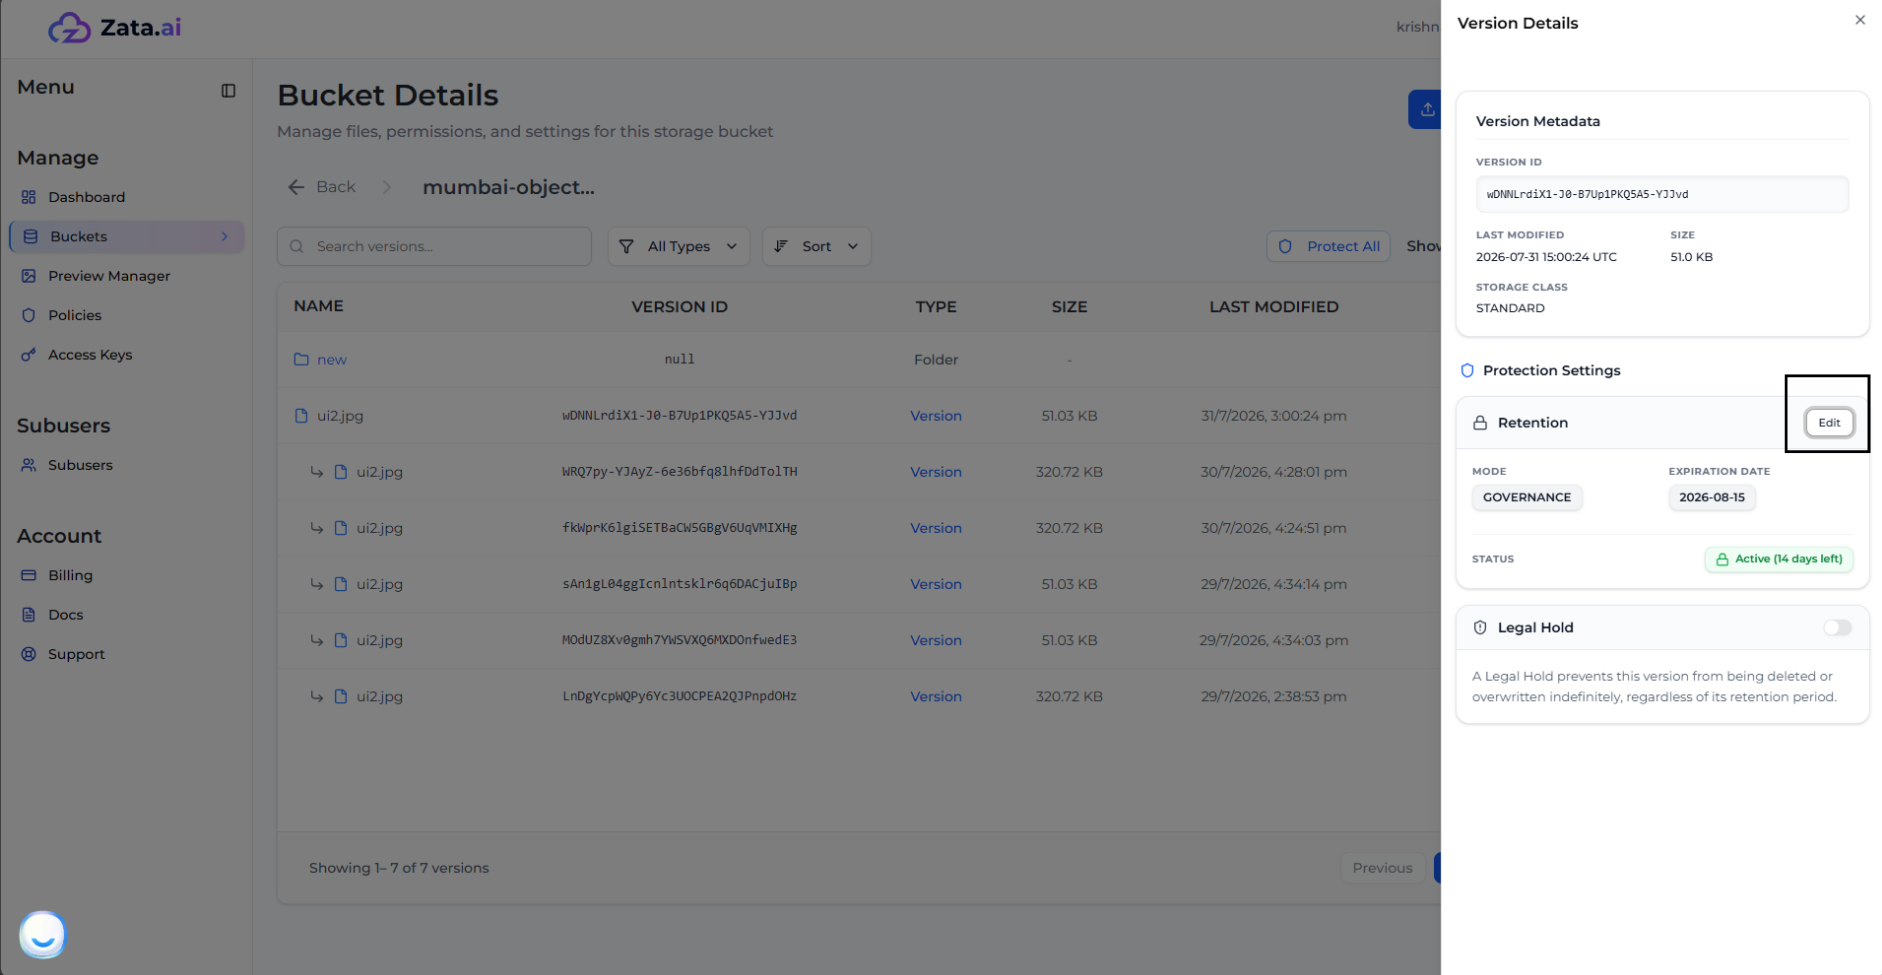
3. This opens the **Version Details** panel. To change the retention settings, click **Edit**.

<figure><img src="https://2683631041-files.gitbook.io/~/files/v0/b/gitbook-x-prod.appspot.com/o/spaces%2FPPVG4W649TwXN8OejRhb%2Fuploads%2Fgit-blob-f13b64661328af42f545fe8b2a47c04e611ee44c%2Fgovernance-to-compliance-1.png?alt=media" alt="Edit Version Details"><figcaption></figcaption></figure>

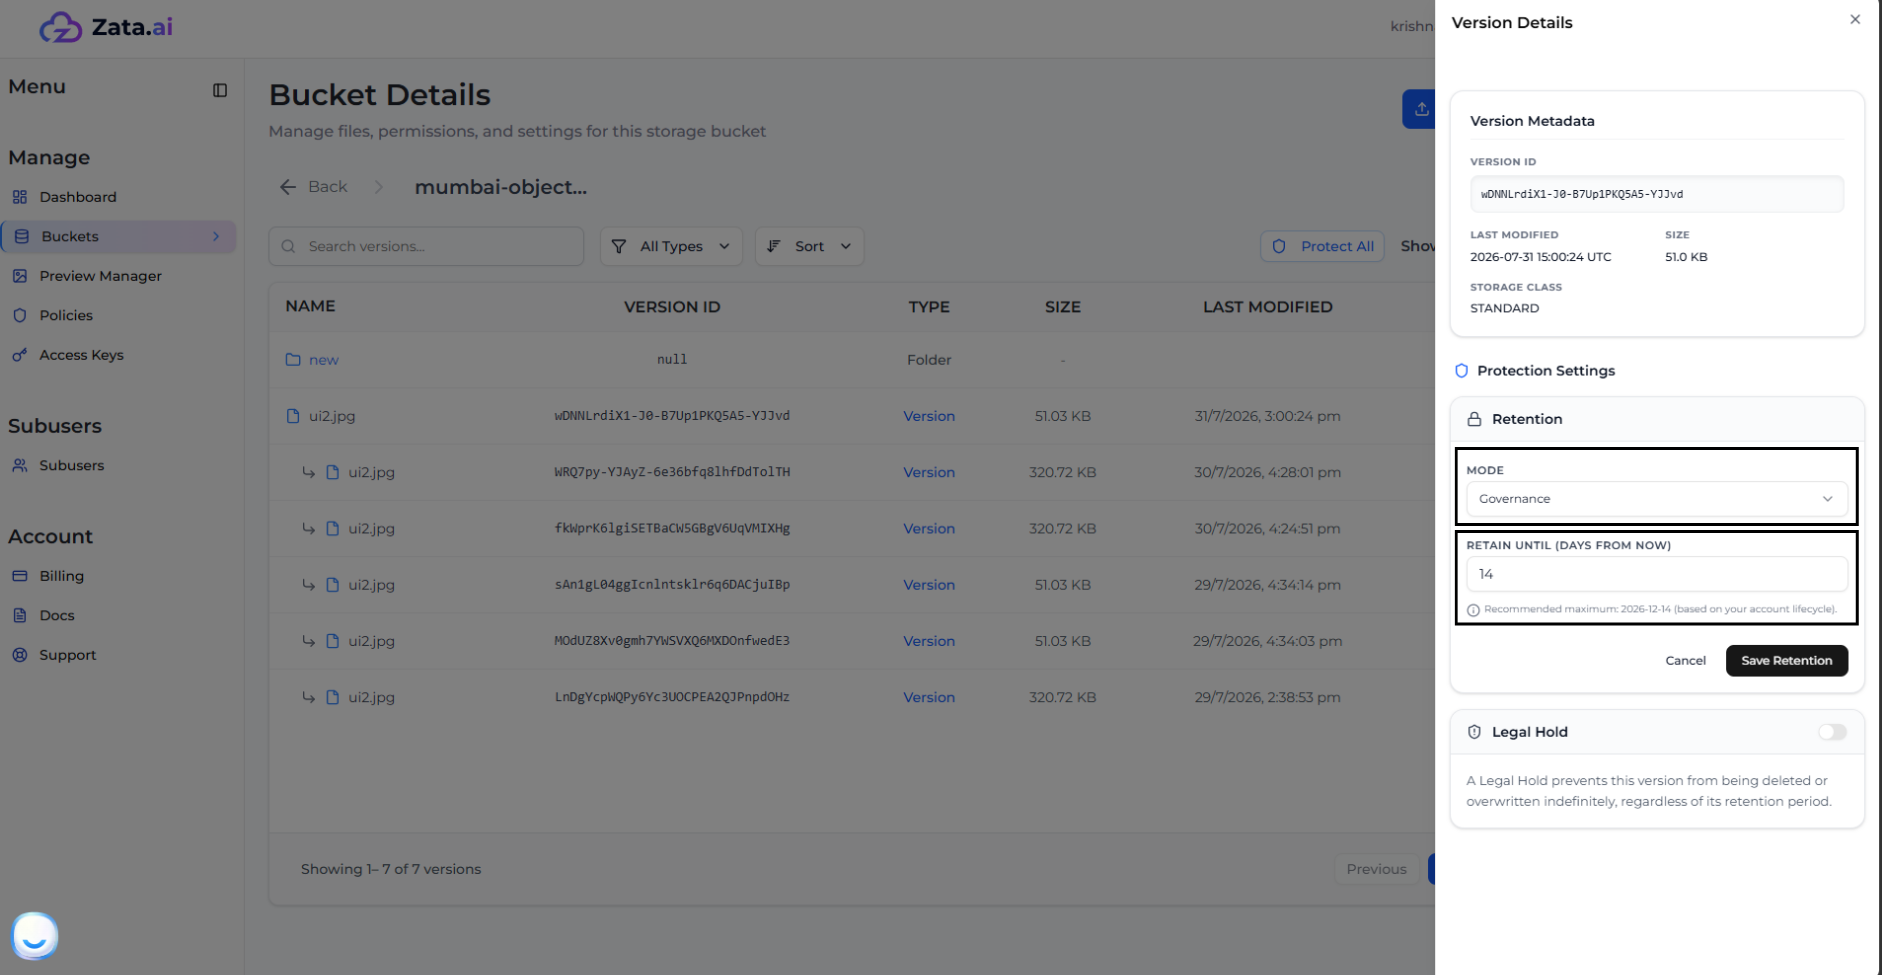
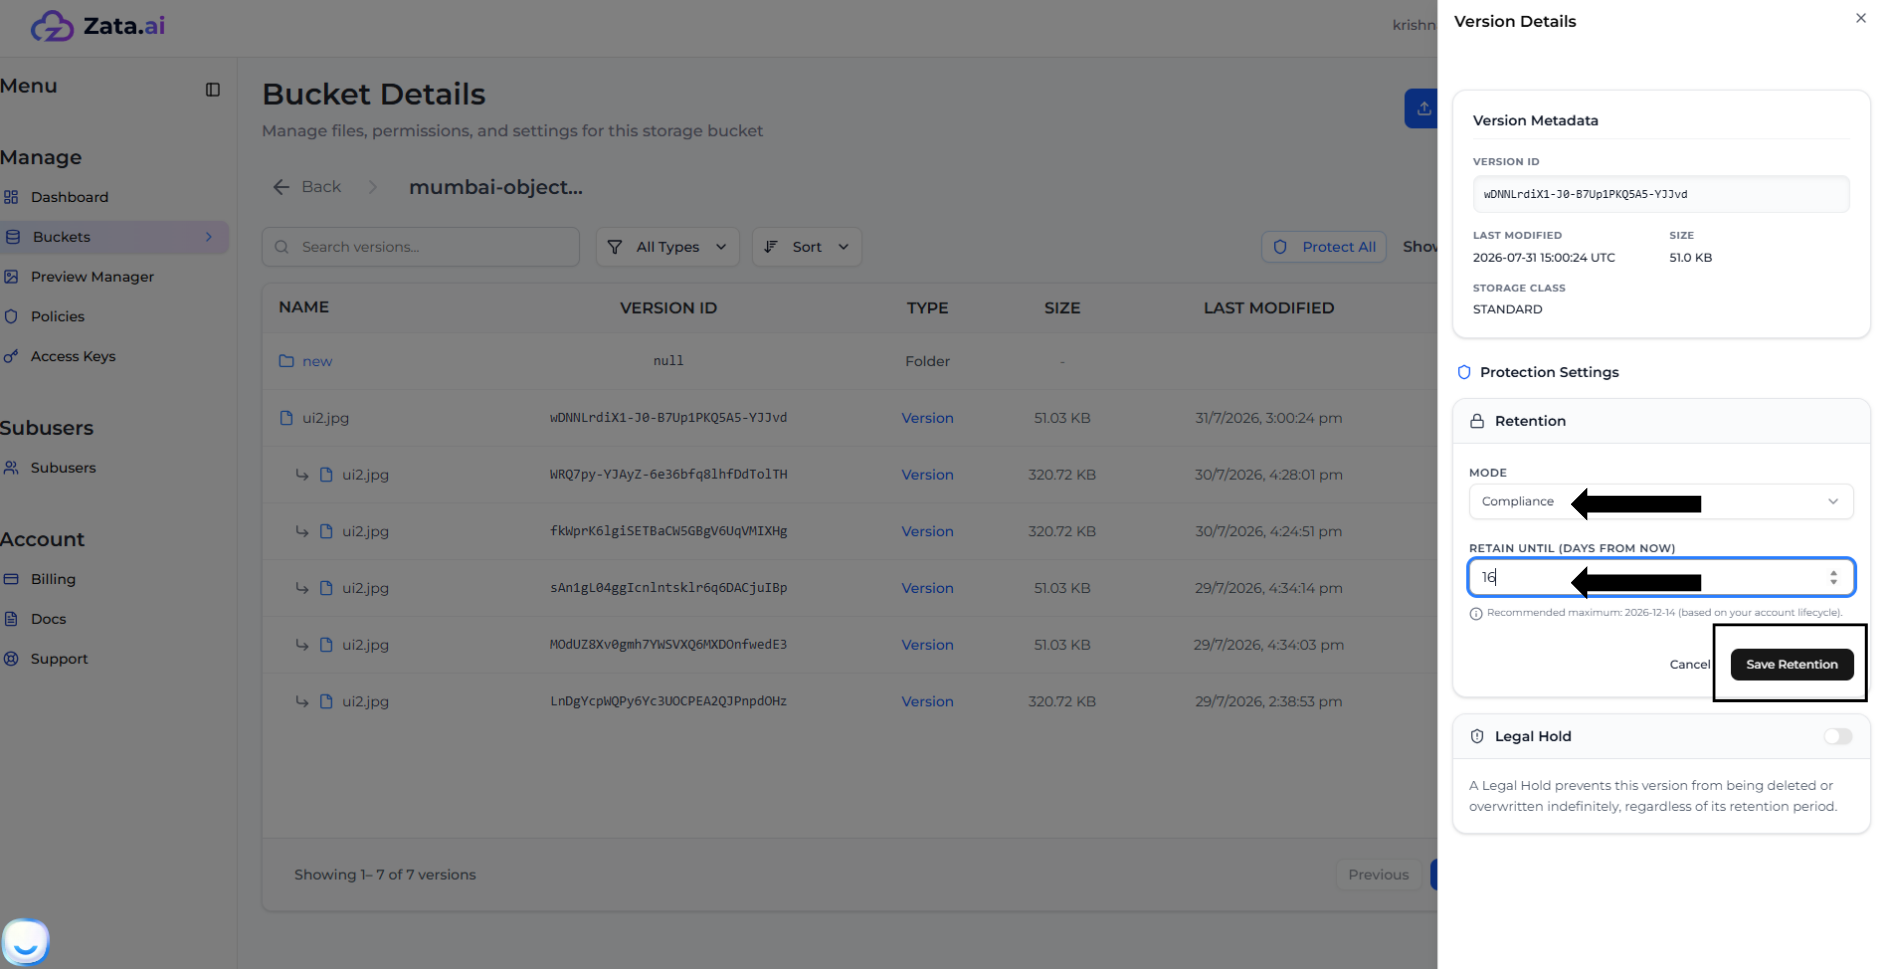
4. You can upgrade the retention mode (e.g., from Governance to Compliance) or extend the retention date.

<figure><img src="https://2683631041-files.gitbook.io/~/files/v0/b/gitbook-x-prod.appspot.com/o/spaces%2FPPVG4W649TwXN8OejRhb%2Fuploads%2Fgit-blob-2839baf54bb95f8b8613033901340a926bd9ca0b%2Fgovernance-to-compliance-2.png?alt=media" alt="Change Retention Mode"><figcaption></figcaption></figure>

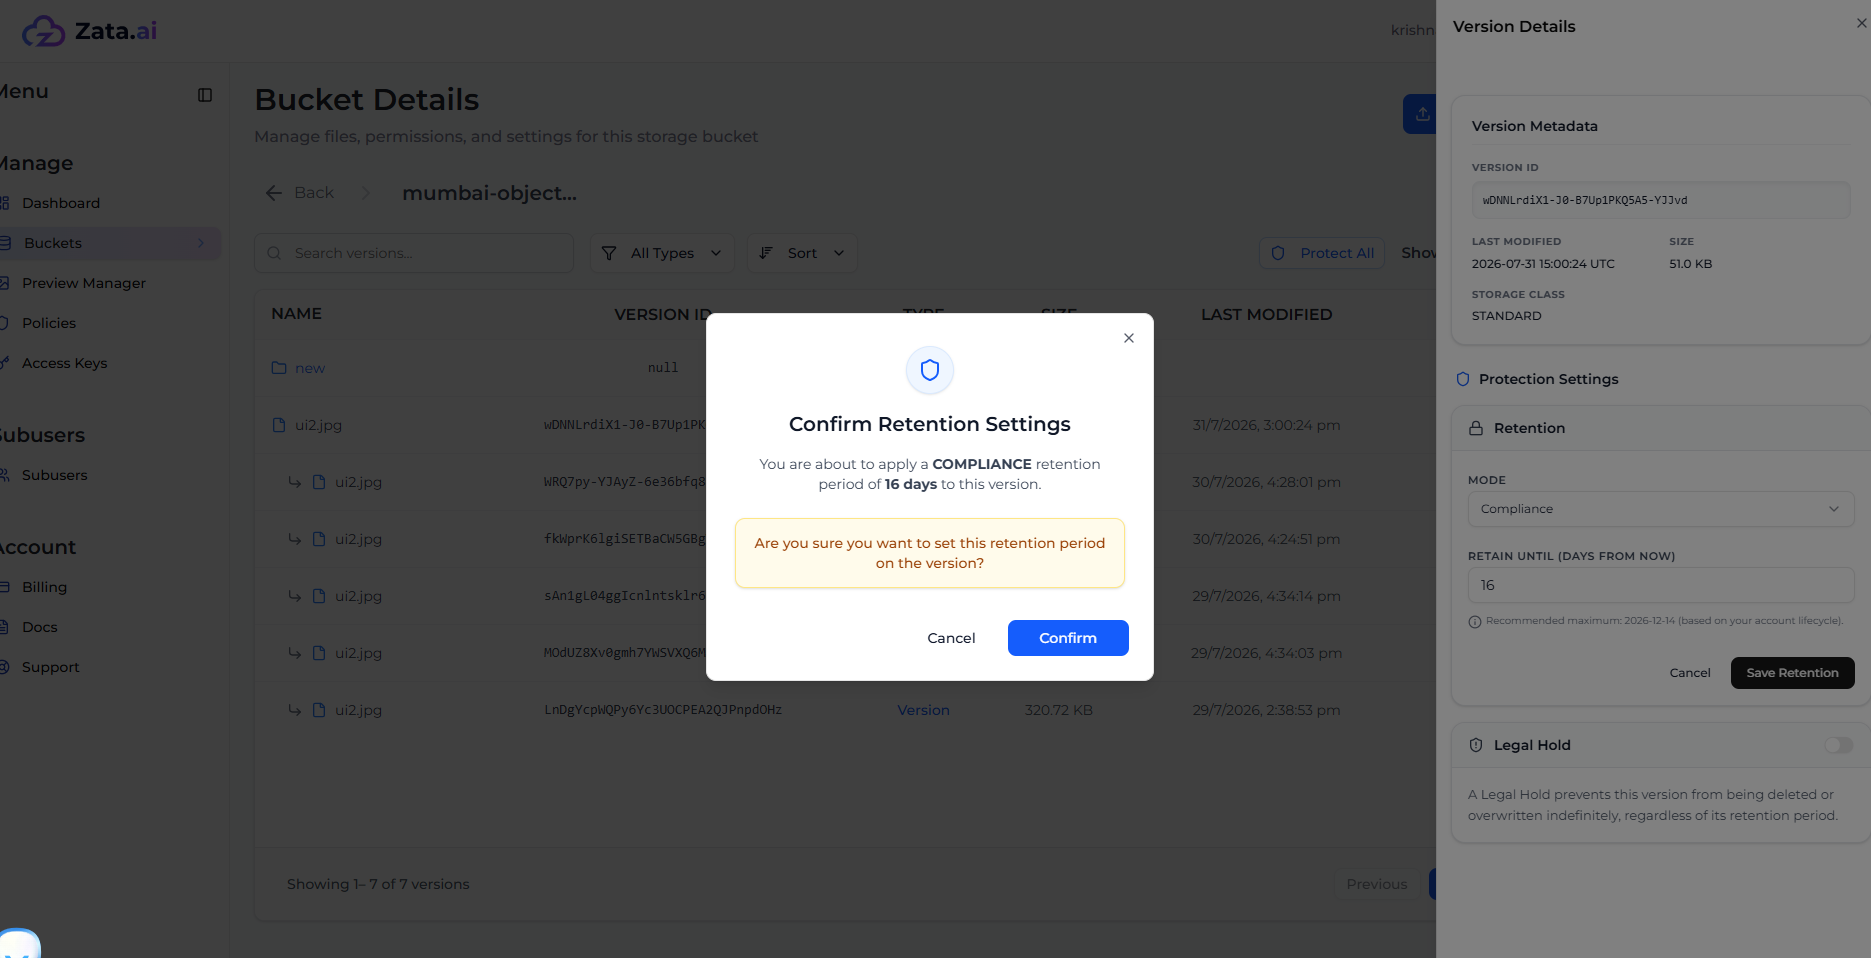
5. After selecting the new settings, click **Save Retention**.

<figure><img src="https://2683631041-files.gitbook.io/~/files/v0/b/gitbook-x-prod.appspot.com/o/spaces%2FPPVG4W649TwXN8OejRhb%2Fuploads%2Fgit-blob-fbf23bcfd4230587ee2485517a57dcf7e352c696%2Fgovernance-to-compliance-3.png?alt=media" alt="Save Retention"><figcaption></figcaption></figure>

6. Confirm the new settings.

<figure><img src="https://2683631041-files.gitbook.io/~/files/v0/b/gitbook-x-prod.appspot.com/o/spaces%2FPPVG4W649TwXN8OejRhb%2Fuploads%2Fgit-blob-f027e19b393e7494c1bb5139db80db30bcb55d3b%2Fgovernance-to-compliance-4.png?alt=media" alt="Confirm Retention Change"><figcaption></figcaption></figure>

7. The version is now protected under the new settings!

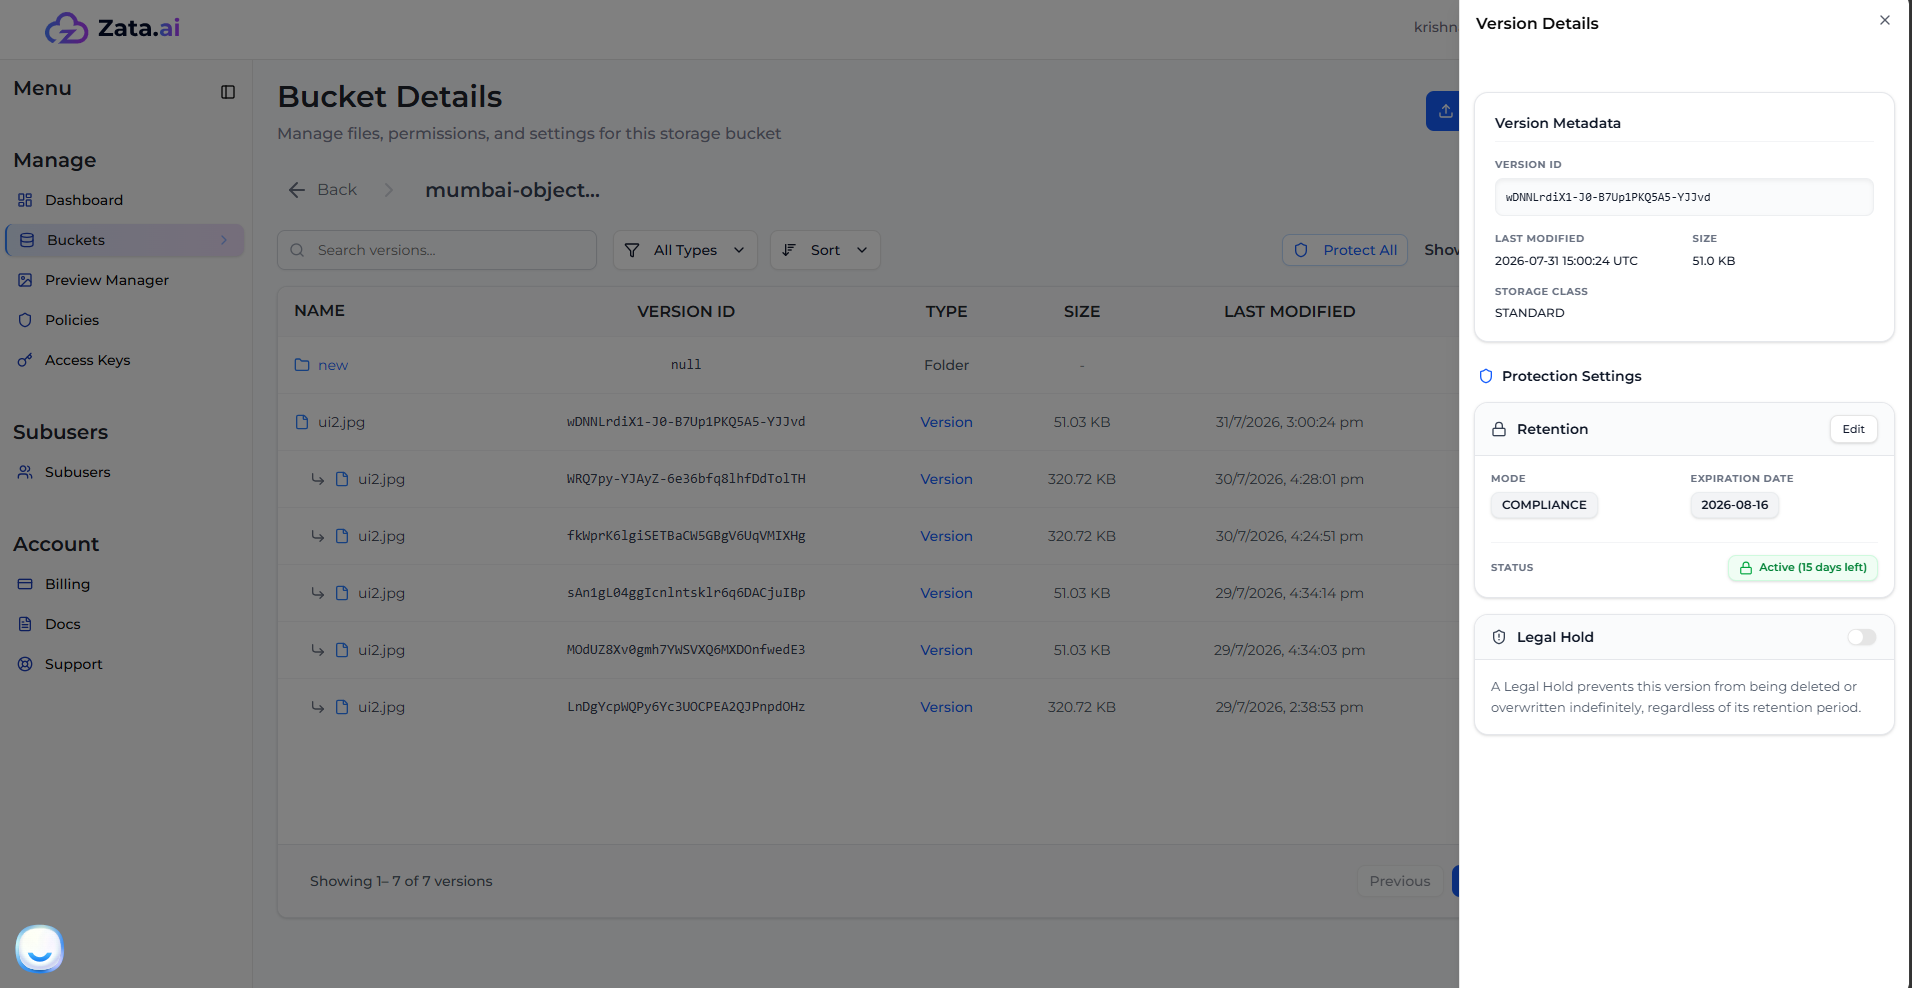
<figure><img src="https://2683631041-files.gitbook.io/~/files/v0/b/gitbook-x-prod.appspot.com/o/spaces%2FPPVG4W649TwXN8OejRhb%2Fuploads%2Fgit-blob-7a0796a50affe4d0471e4f0af1bc9be578f4f38b%2Fgovernance-to-compliance-5.png?alt=media" alt="Updated Version Details"><figcaption></figcaption></figure>

## Deleting a Governance-Protected Version

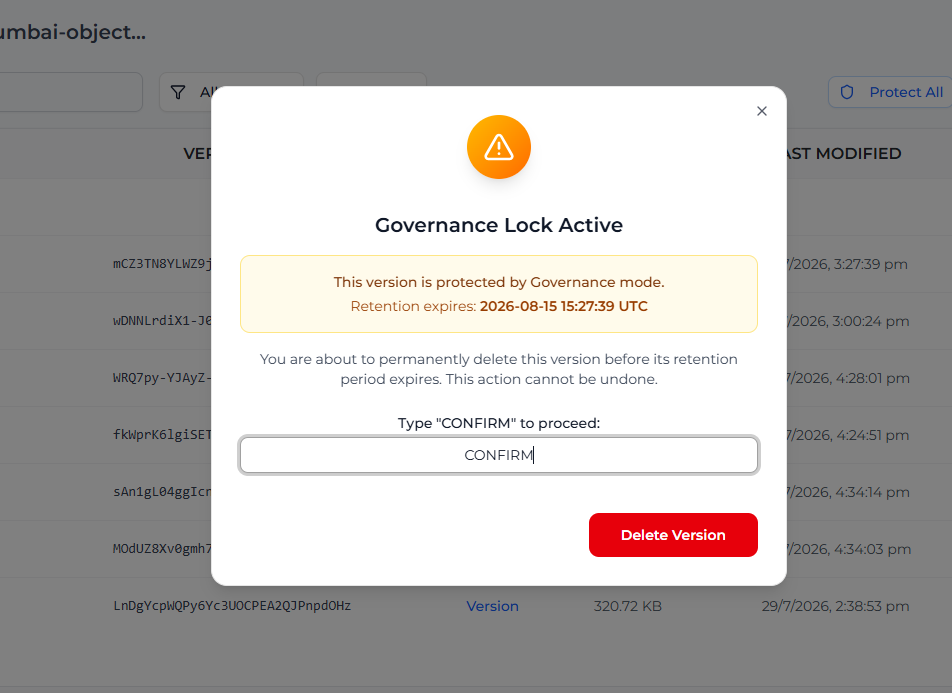
> **Note:** Only the Root User (account owner) can bypass the Governance mode and delete the version. Subusers cannot perform this action.

If you are logged in as the root user and attempt to delete a version protected by Governance mode, you will be asked to explicitly type "CONFIRM" to bypass the lock and delete the version.

<figure><img src="https://2683631041-files.gitbook.io/~/files/v0/b/gitbook-x-prod.appspot.com/o/spaces%2FPPVG4W649TwXN8OejRhb%2Fuploads%2Fgit-blob-46d8f372dc6574f5253043f507eae229fcdd8a03%2Fgovernance-delete.png?alt=media" alt="Delete Governance Version"><figcaption></figcaption></figure>


# Compliance Mode

In **Compliance Mode**, a protected object version cannot be overwritten or deleted by **anyone** until its retention period has expired.

* **Strict Enforcement:** Not even the Root User or Zata.ai Support can bypass or shorten the retention period.
* **Flexibility:** You can extend a Compliance retention period, but you can never shorten it.

## Applying a Default Compliance Rule

If your bucket was created with Object Lock enabled, you can configure a **Default Retention Rule** in your Bucket Settings so that all new uploads are automatically protected under Compliance Mode.

1. Navigate to **Bucket > Settings**.
2. Locate the **Default Retention Rule** section.
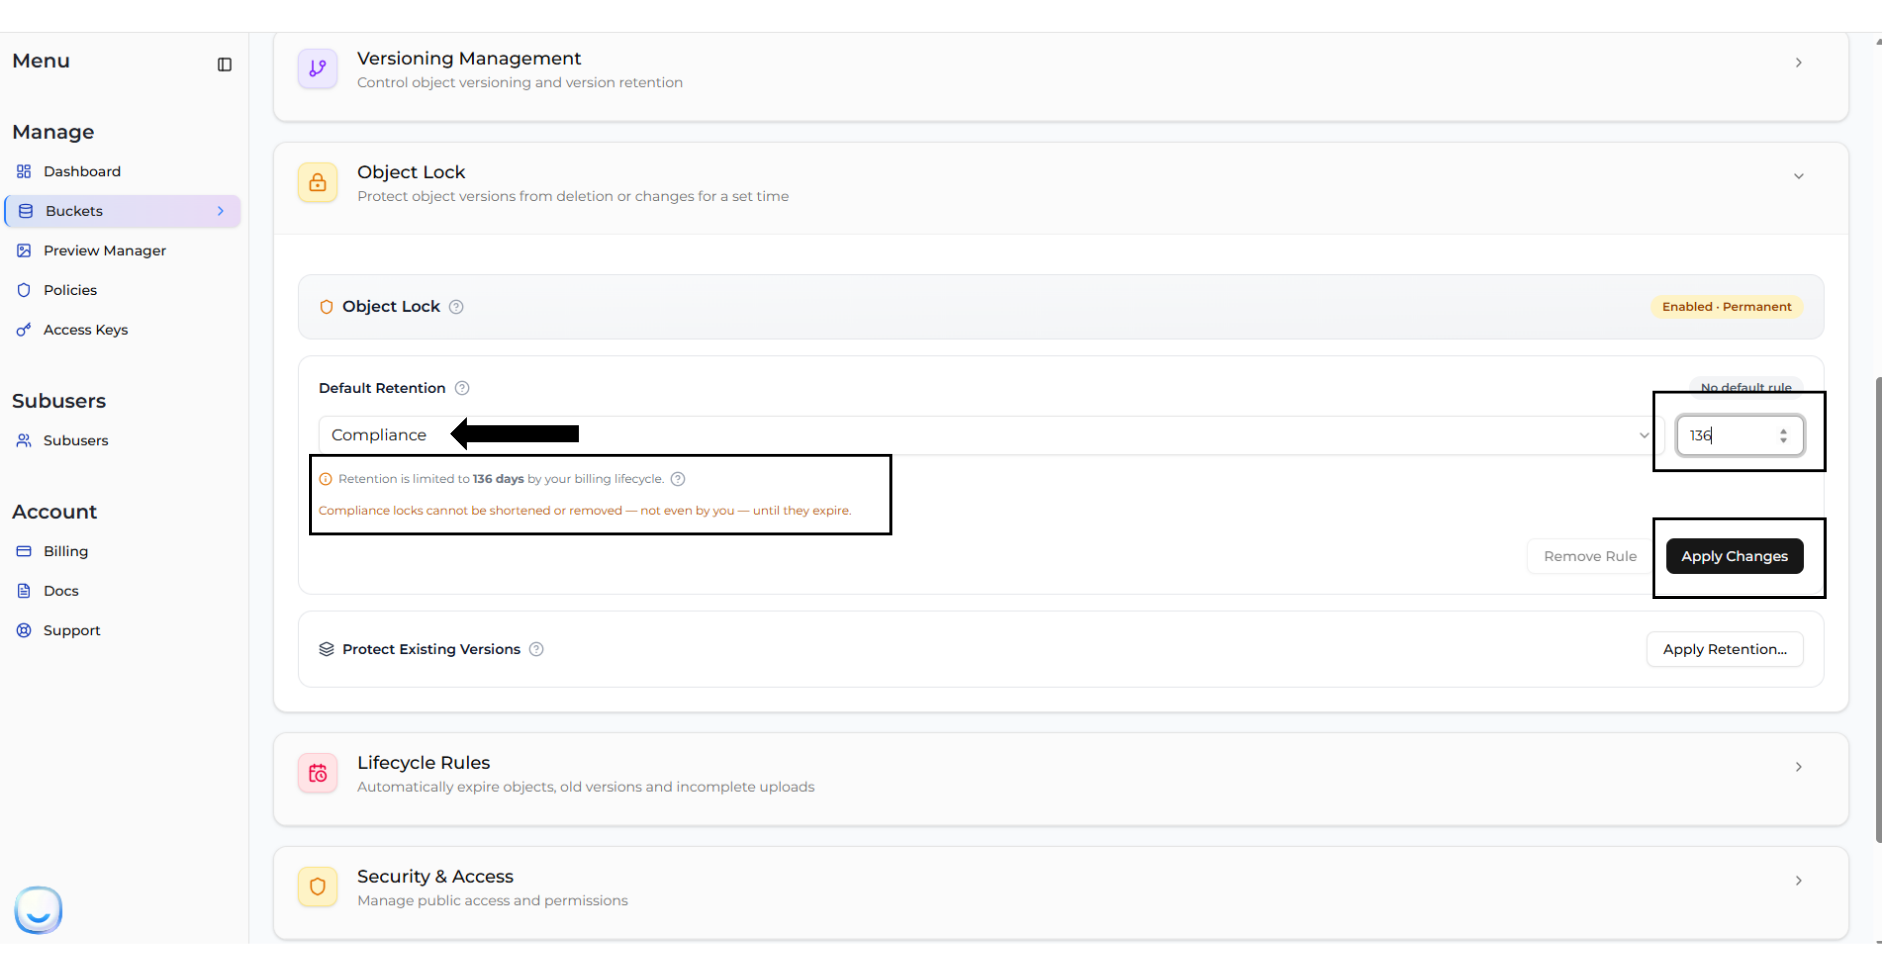
3. Select **Compliance** from the mode dropdown, and enter the retention period (in days).
4. Click **Apply Changes**.

<figure><img src="https://2683631041-files.gitbook.io/~/files/v0/b/gitbook-x-prod.appspot.com/o/spaces%2FPPVG4W649TwXN8OejRhb%2Fuploads%2Fgit-blob-ba339e0ec3777f076acfb23e10904e2036511b43%2Fobject-lock-4.png?alt=media" alt="Select Compliance Mode"><figcaption></figcaption></figure>

Confirm your choice by typing "CONFIRM". Remember that Compliance locks cannot be bypassed!

<figure><img src="https://2683631041-files.gitbook.io/~/files/v0/b/gitbook-x-prod.appspot.com/o/spaces%2FPPVG4W649TwXN8OejRhb%2Fuploads%2Fgit-blob-85b428c1e144fe53d9c2c0be49b529e1a800d56c%2Fobject-lock-5.png?alt=media" alt="Confirm Compliance Rule"><figcaption></figcaption></figure>

## Managing Compliance on Individual Versions

You can view and extend Compliance settings for specific object versions directly from the Zata Dashboard.

1. Navigate to your bucket and click on an object to expand its versions list.

<figure><img src="https://2683631041-files.gitbook.io/~/files/v0/b/gitbook-x-prod.appspot.com/o/spaces%2FPPVG4W649TwXN8OejRhb%2Fuploads%2Fgit-blob-e282c16fc103f93da94b36fd43881a1bbc4cee20%2Fobject-lock-dash.png?alt=media" alt="View Object Versions"><figcaption></figcaption></figure>

2. Click on the three dots (Actions) next to a specific version and select **Lock Settings**.

<figure><img src="https://2683631041-files.gitbook.io/~/files/v0/b/gitbook-x-prod.appspot.com/o/spaces%2FPPVG4W649TwXN8OejRhb%2Fuploads%2Fgit-blob-1179329bba9b6bb0ceb12b51a3293a561b7f408b%2Fobject-lock-dash-2.png?alt=media" alt="Open Lock Settings"><figcaption></figcaption></figure>

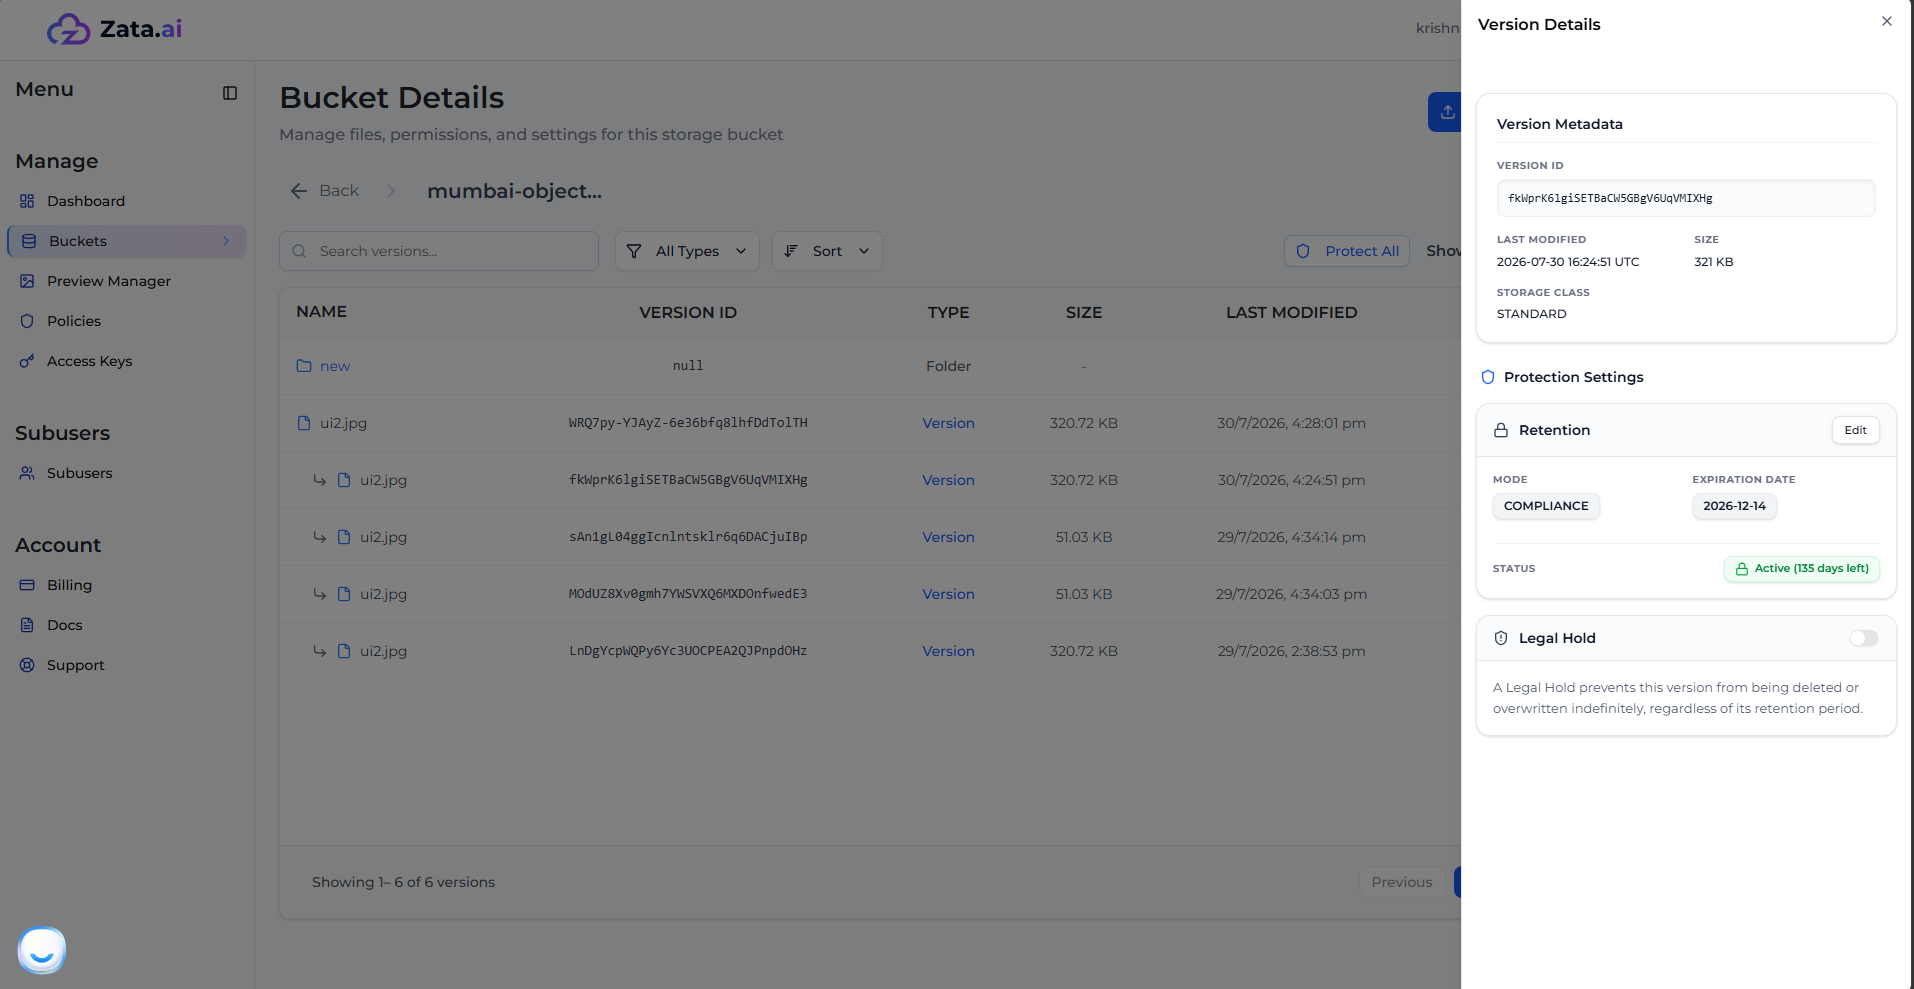
3. This opens the **Version Details** panel. Here, you can view the active Compliance lock and its expiration date. To change it, click **Edit**.

<figure><img src="https://2683631041-files.gitbook.io/~/files/v0/b/gitbook-x-prod.appspot.com/o/spaces%2FPPVG4W649TwXN8OejRhb%2Fuploads%2Fgit-blob-8a6f3f5a2d2a9463c33921a3e45d0557acf36fa6%2Fcompliance.png?alt=media" alt="Compliance Version Details"><figcaption></figcaption></figure>

> **Note:** You can extend an active Compliance retention period, or re-apply retention to a version that has already expired, but you can never shorten an active Compliance lock.

## Deleting a Compliance-Protected Version

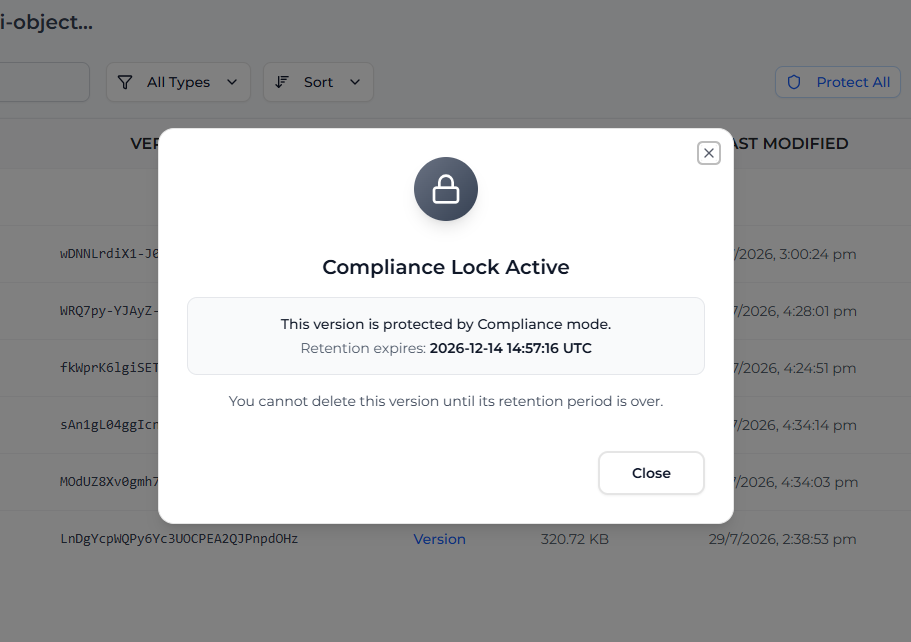
> **Note:** Nobody can delete a version that is protected by Compliance mode until the retention period expires.

If you attempt to delete a version protected by Compliance mode, the system will block the action entirely.

<figure><img src="https://2683631041-files.gitbook.io/~/files/v0/b/gitbook-x-prod.appspot.com/o/spaces%2FPPVG4W649TwXN8OejRhb%2Fuploads%2Fgit-blob-fec52843351ae3aa704a1223e0e8e7e9e550f240%2Fcompliance-delete.png?alt=media" alt="Cannot Delete Compliance Version"><figcaption></figcaption></figure>


# Legal Hold

**Legal Hold** provides the same protection as a retention period, but it has no expiration date. Instead, a Legal Hold remains in place indefinitely until you explicitly turn it **OFF**.

## How Legal Hold Works

* **Independent Protection:** Legal Hold operates completely independent of Retention Modes (Governance and Compliance). An object can have both a retention period and a Legal Hold active at the same time.
* **No Expiration:** If an object's retention period expires, but Legal Hold is still ON, the object still cannot be deleted.
* **Toggle Freedom:** Unlike Compliance mode which cannot be removed, Legal Hold can be toggled ON and OFF freely at any time by users with the appropriate permissions.

## Managing Legal Hold on Individual Versions

Legal Hold is applied on a per-version basis rather than as a default bucket rule. Legal Hold can apply double protection alongside both Governance and Compliance modes, and it is also applicable as a single protection on its own.

To turn Legal Hold on or off for an object version:

1. Navigate to your bucket and click on an object to expand its versions list.

<figure><img src="https://2683631041-files.gitbook.io/~/files/v0/b/gitbook-x-prod.appspot.com/o/spaces%2FPPVG4W649TwXN8OejRhb%2Fuploads%2Fgit-blob-e282c16fc103f93da94b36fd43881a1bbc4cee20%2Fobject-lock-dash.png?alt=media" alt="View Object Versions"><figcaption></figcaption></figure>

2. Click on the three dots (Actions) next to a specific version and select **Lock Settings**.

<figure><img src="https://2683631041-files.gitbook.io/~/files/v0/b/gitbook-x-prod.appspot.com/o/spaces%2FPPVG4W649TwXN8OejRhb%2Fuploads%2Fgit-blob-1179329bba9b6bb0ceb12b51a3293a561b7f408b%2Fobject-lock-dash-2.png?alt=media" alt="Open Lock Settings"><figcaption></figcaption></figure>

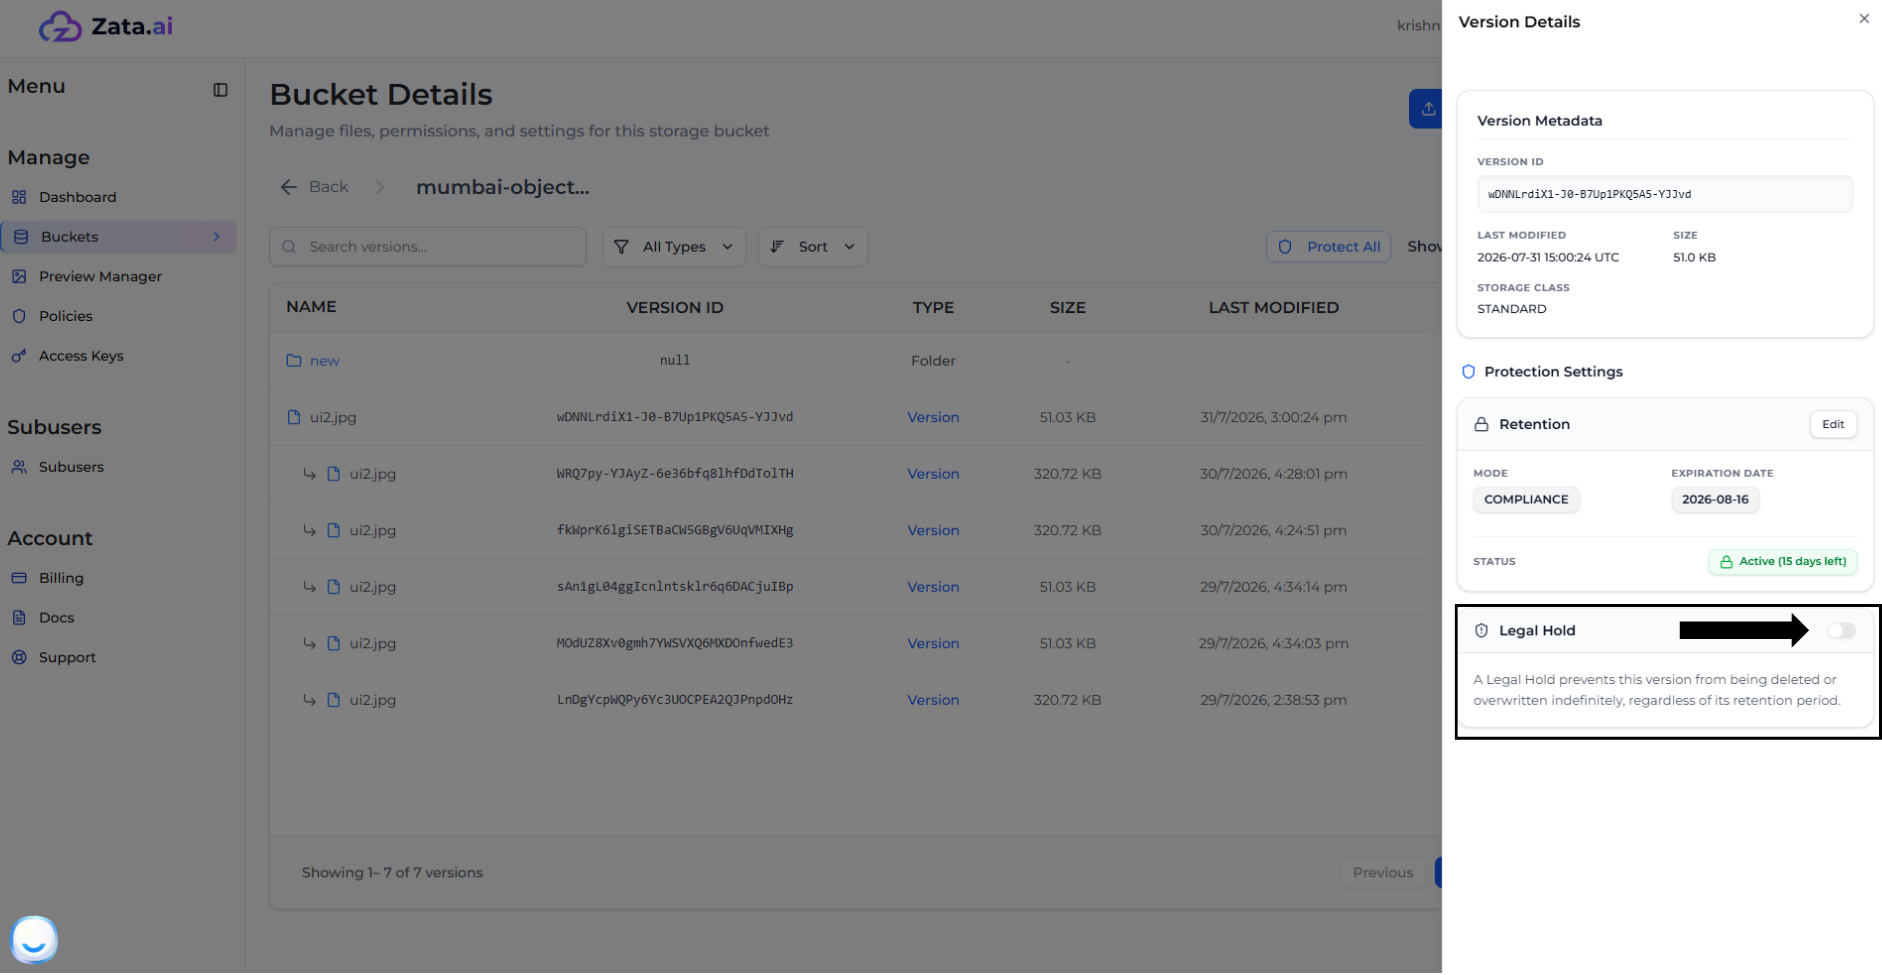
3. This opens the **Version Details** panel. Under the **Legal Hold** section, click the toggle switch to turn it **ON**.

<figure><img src="https://2683631041-files.gitbook.io/~/files/v0/b/gitbook-x-prod.appspot.com/o/spaces%2FPPVG4W649TwXN8OejRhb%2Fuploads%2Fgit-blob-5d13d8ef5d8f97fb38ef8a5e560c27d5cbadff69%2Flegal-hold-1.png?alt=media" alt="Toggle Legal Hold"><figcaption></figcaption></figure>

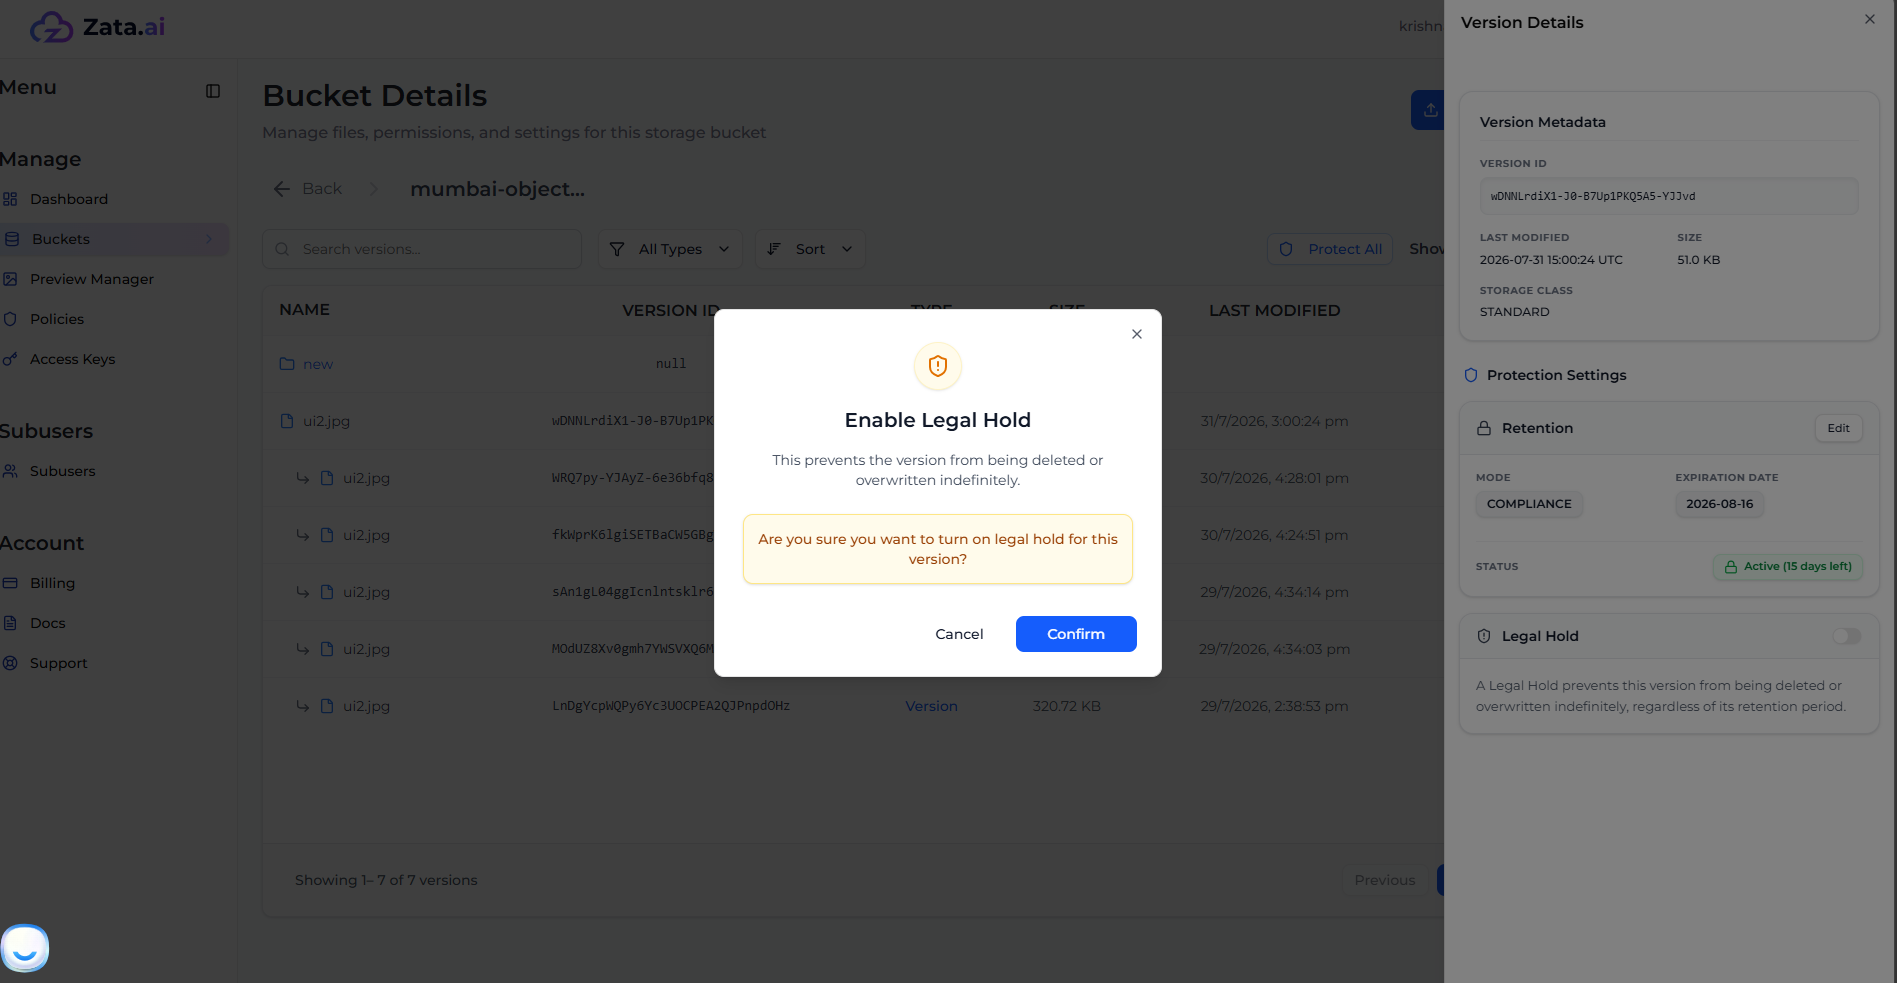
4. Confirm the Legal Hold activation.

<figure><img src="https://2683631041-files.gitbook.io/~/files/v0/b/gitbook-x-prod.appspot.com/o/spaces%2FPPVG4W649TwXN8OejRhb%2Fuploads%2Fgit-blob-5f82a76928f229112cc1fd1d2366580d47b29c36%2Flegal-hold-2.png?alt=media" alt="Confirm Legal Hold"><figcaption></figcaption></figure>

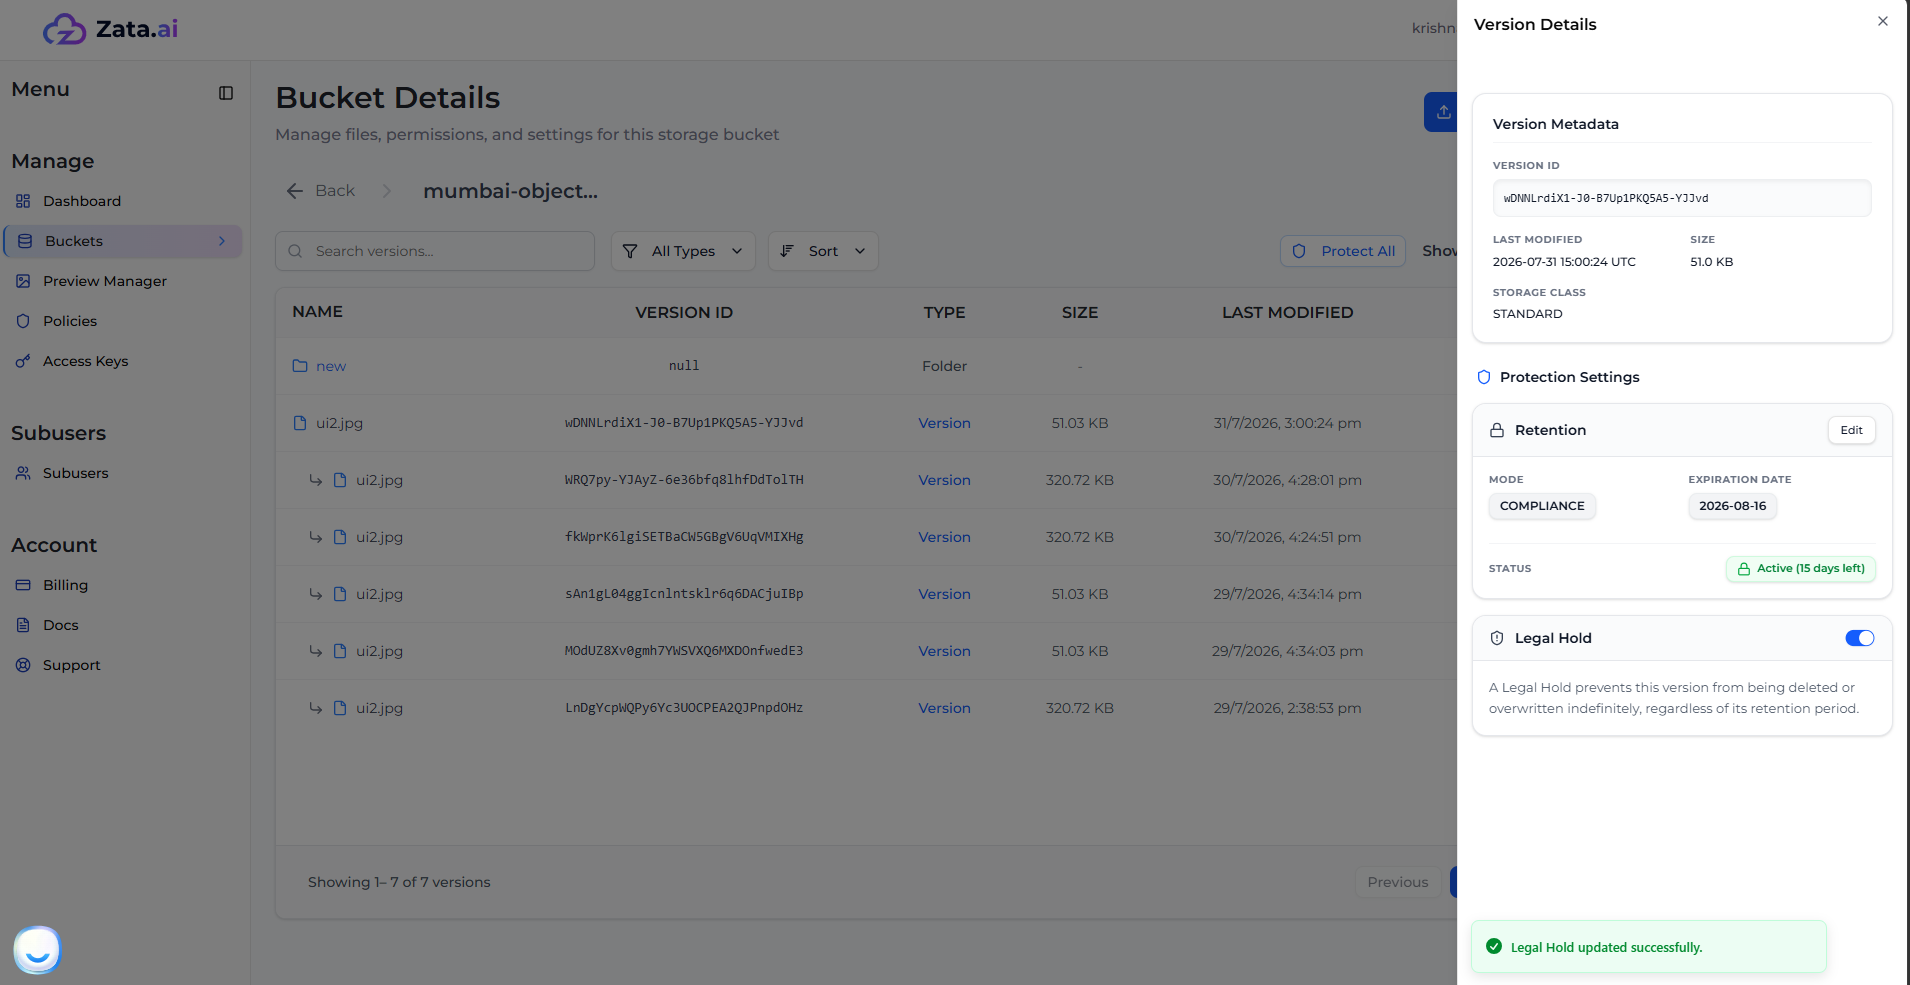
5. The Legal Hold is now active for this version.

<figure><img src="https://2683631041-files.gitbook.io/~/files/v0/b/gitbook-x-prod.appspot.com/o/spaces%2FPPVG4W649TwXN8OejRhb%2Fuploads%2Fgit-blob-512ab80eb3580da740be53ad112fa7904b256f48%2Flegal-hold-3.png?alt=media" alt="Legal Hold Active"><figcaption></figcaption></figure>

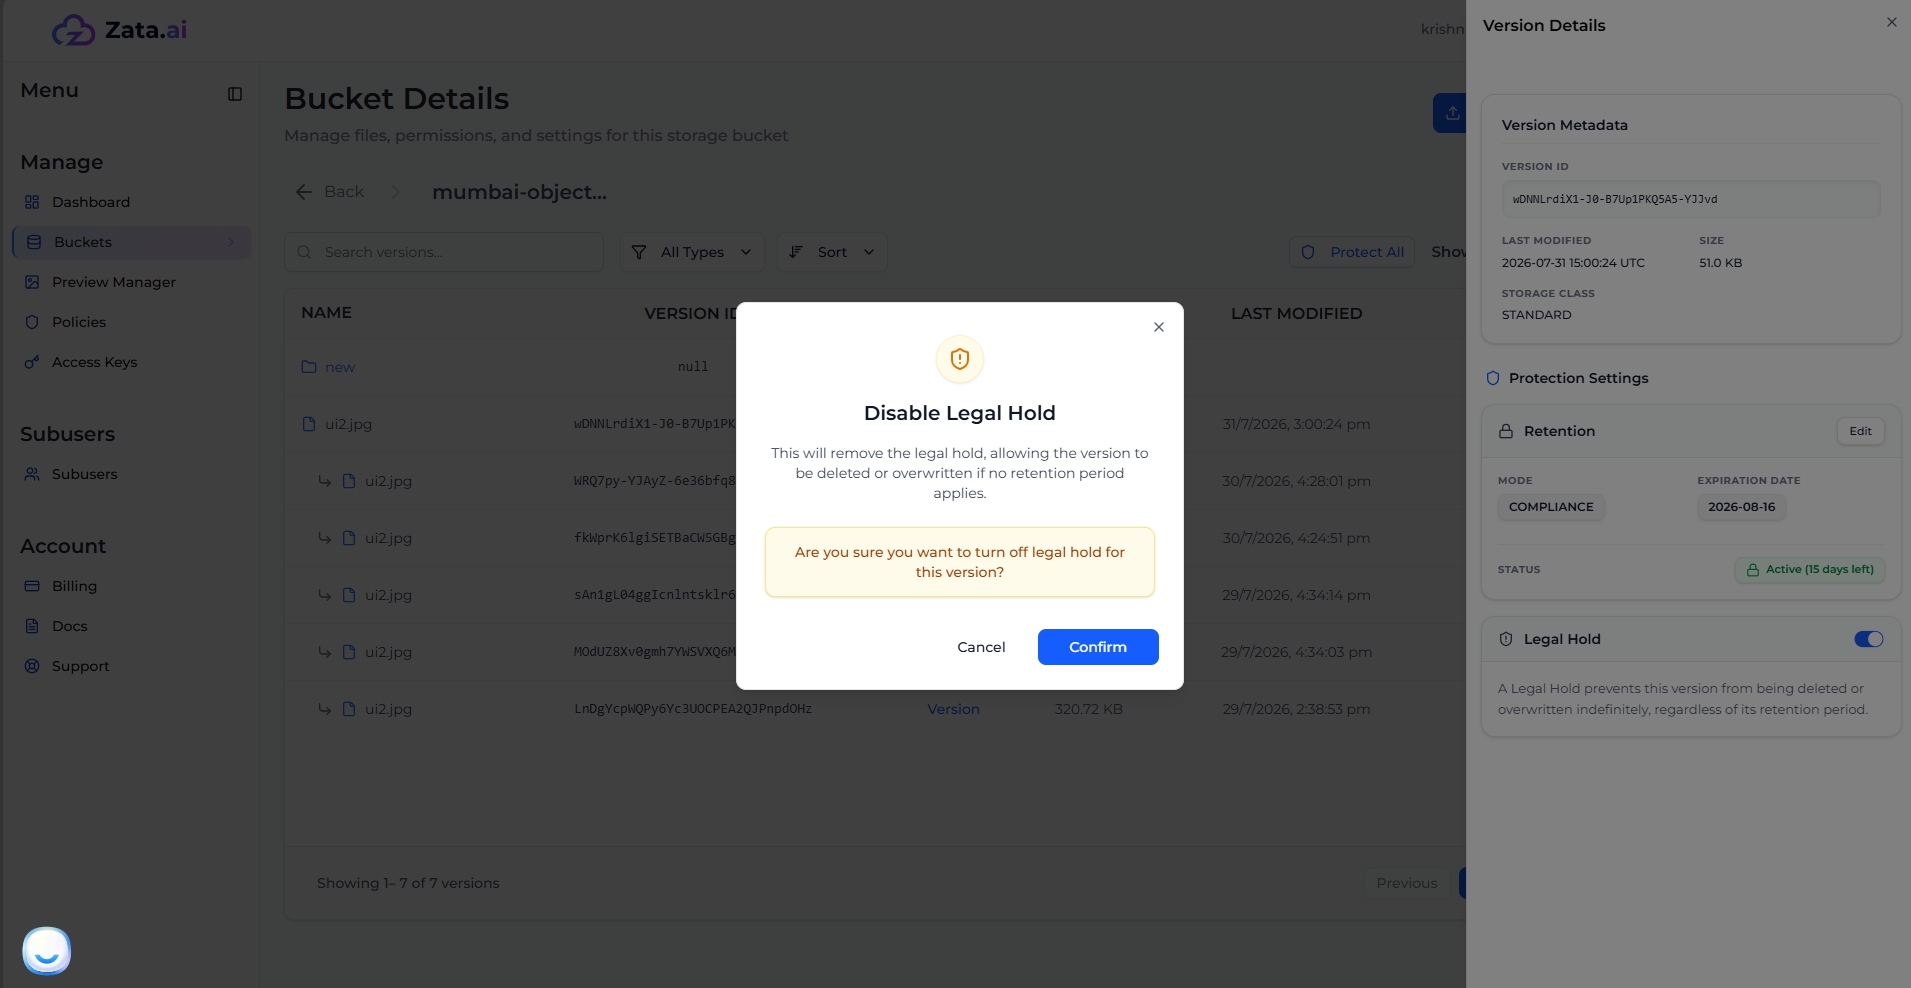
6. To turn it off, simply click the toggle switch again and confirm.

<figure><img src="https://2683631041-files.gitbook.io/~/files/v0/b/gitbook-x-prod.appspot.com/o/spaces%2FPPVG4W649TwXN8OejRhb%2Fuploads%2Fgit-blob-4036dc8fac26f6f9c4009419ffce7c9e84d9589e%2Flegal-hold-4.png?alt=media" alt="Disable Legal Hold"><figcaption></figcaption></figure>

## Deleting a Legal Hold Protected Version

> **Note:** Nobody can delete the version whenever the toggle is not turned off.

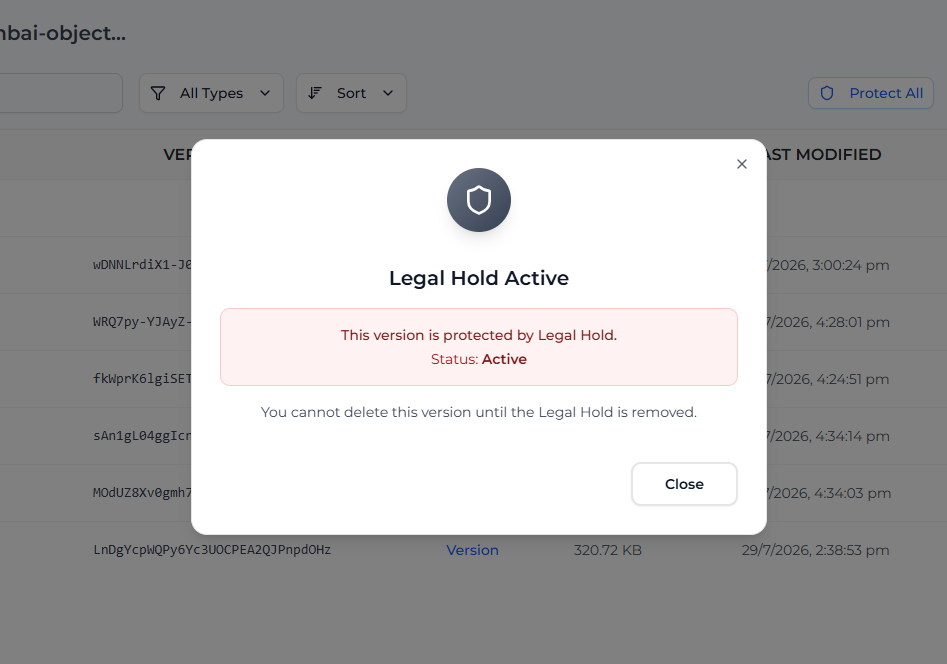
If you attempt to delete a version that has an active Legal Hold, the system will block the action entirely until you explicitly toggle the Legal Hold off.

<figure><img src="https://2683631041-files.gitbook.io/~/files/v0/b/gitbook-x-prod.appspot.com/o/spaces%2FPPVG4W649TwXN8OejRhb%2Fuploads%2Fgit-blob-bc440c03a338f929683ad55ed7ebb699728766b6%2Flegal-hold-delete.png?alt=media" alt="Cannot Delete Legal Hold Version"><figcaption></figcaption></figure>


# Lifecycle Rules

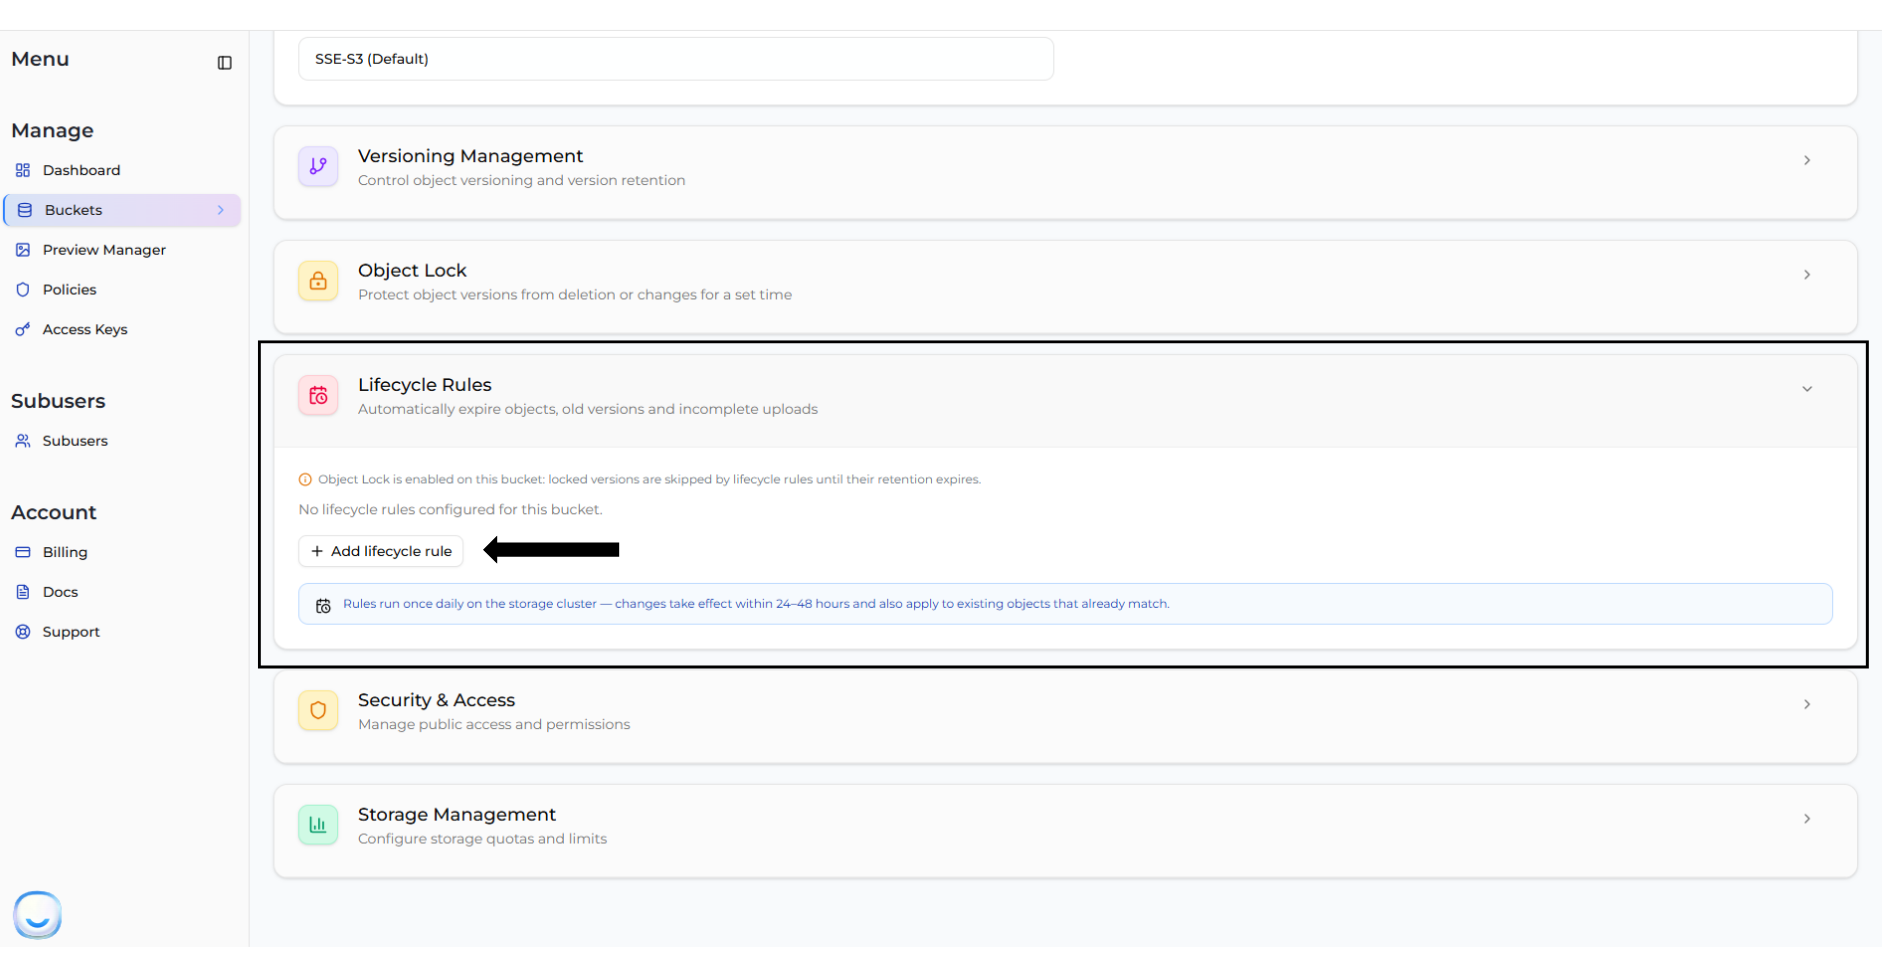
Lifecycle Rules allow you to automate the management of your objects over time, helping you optimize storage costs by cleaning up old data, expiring objects, and removing incomplete uploads.

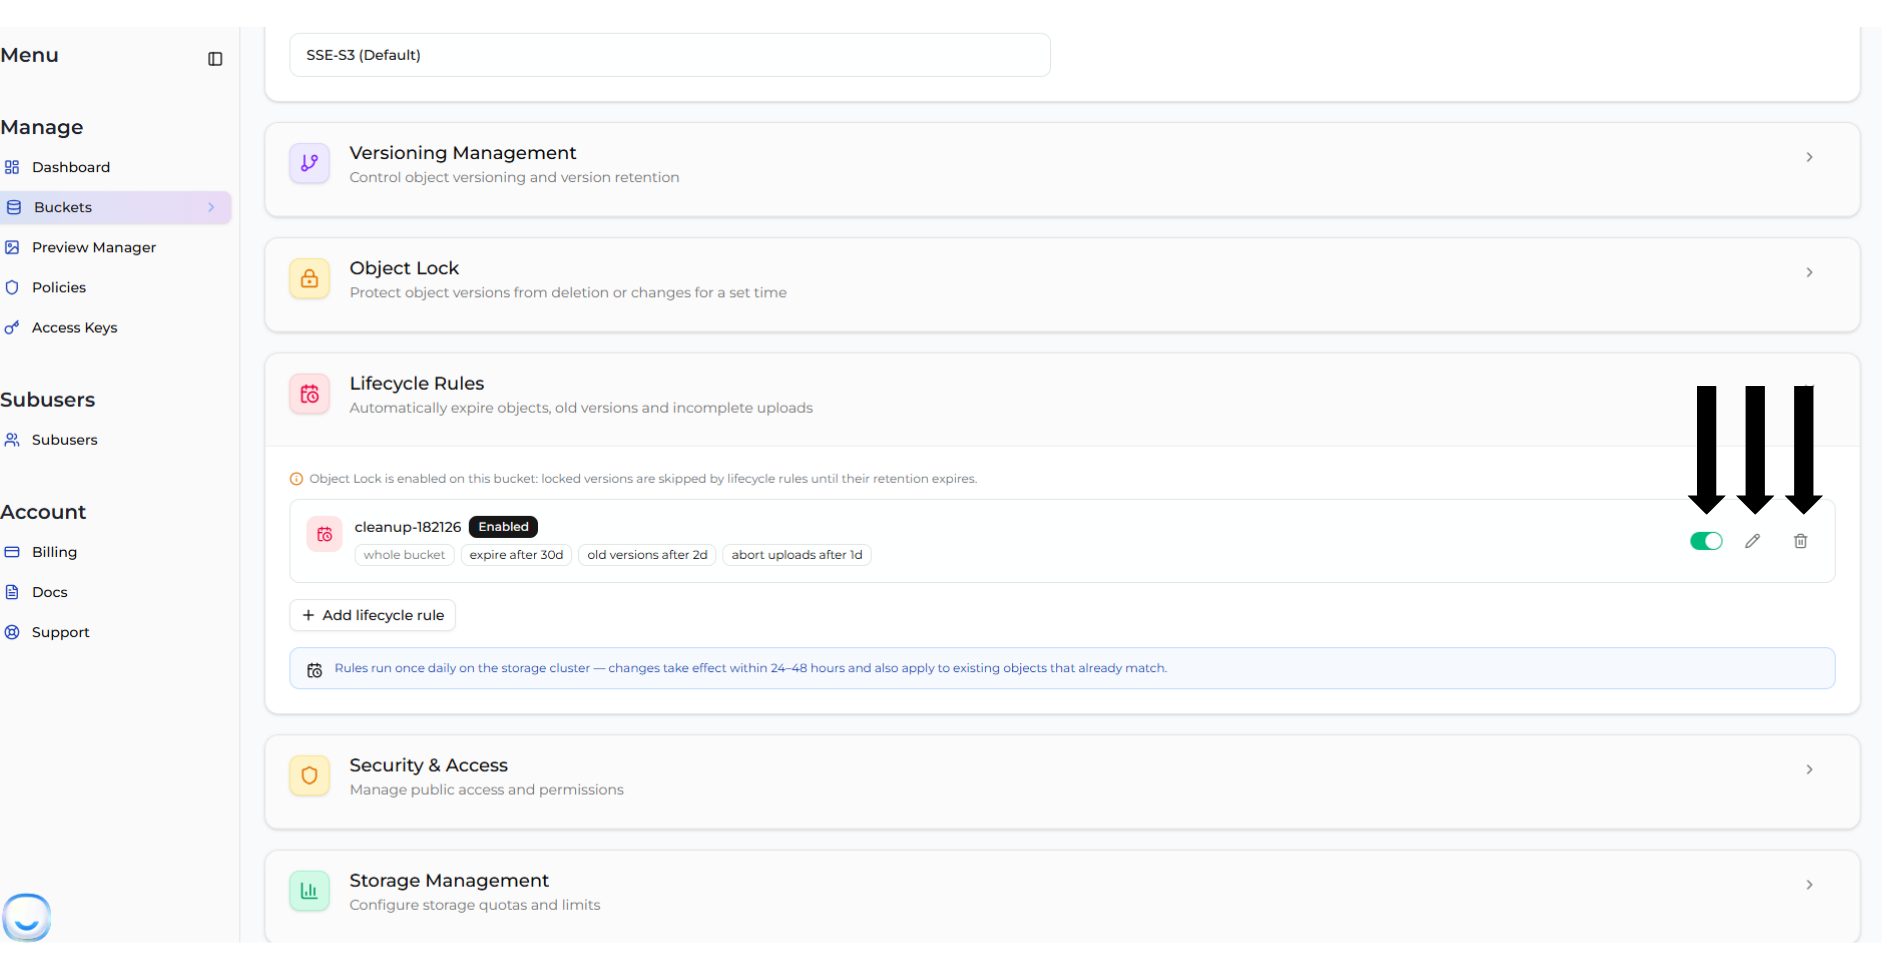
You can manage your lifecycle rules by navigating to **Bucket > Settings > Lifecycle Rules**. From here, you can add new rules, edit existing ones, toggle them ON/OFF, or delete them.

<figure><img src="https://2683631041-files.gitbook.io/~/files/v0/b/gitbook-x-prod.appspot.com/o/spaces%2FPPVG4W649TwXN8OejRhb%2Fuploads%2Fgit-blob-7c4456829f0add7d28c042fdda226602790e0bff%2Flifecycle-1.png?alt=media" alt="Lifecycle Rules Settings"><figcaption></figcaption></figure>

> **INFO** Lifecycle rules run once daily on the storage cluster. Any changes you make to rules take effect within 24–48 hours and will apply to all existing objects that already match the criteria.

***

## Types of Lifecycle Rules

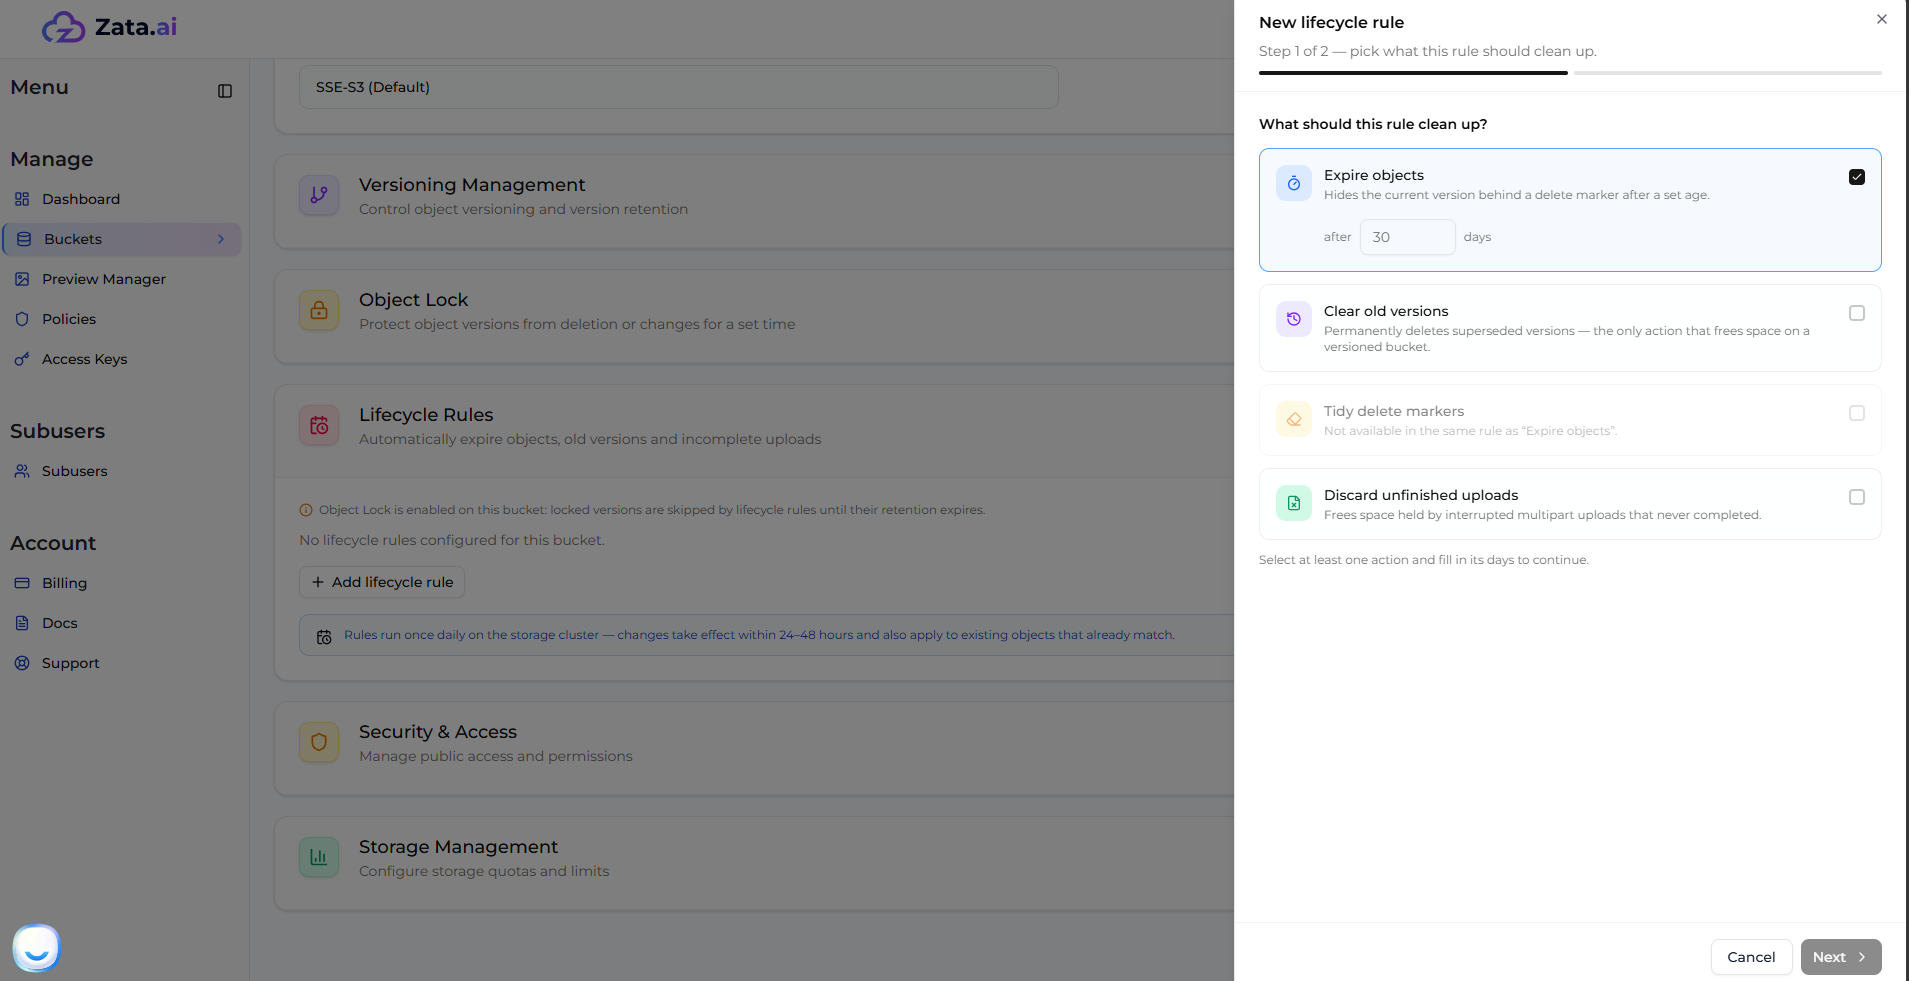
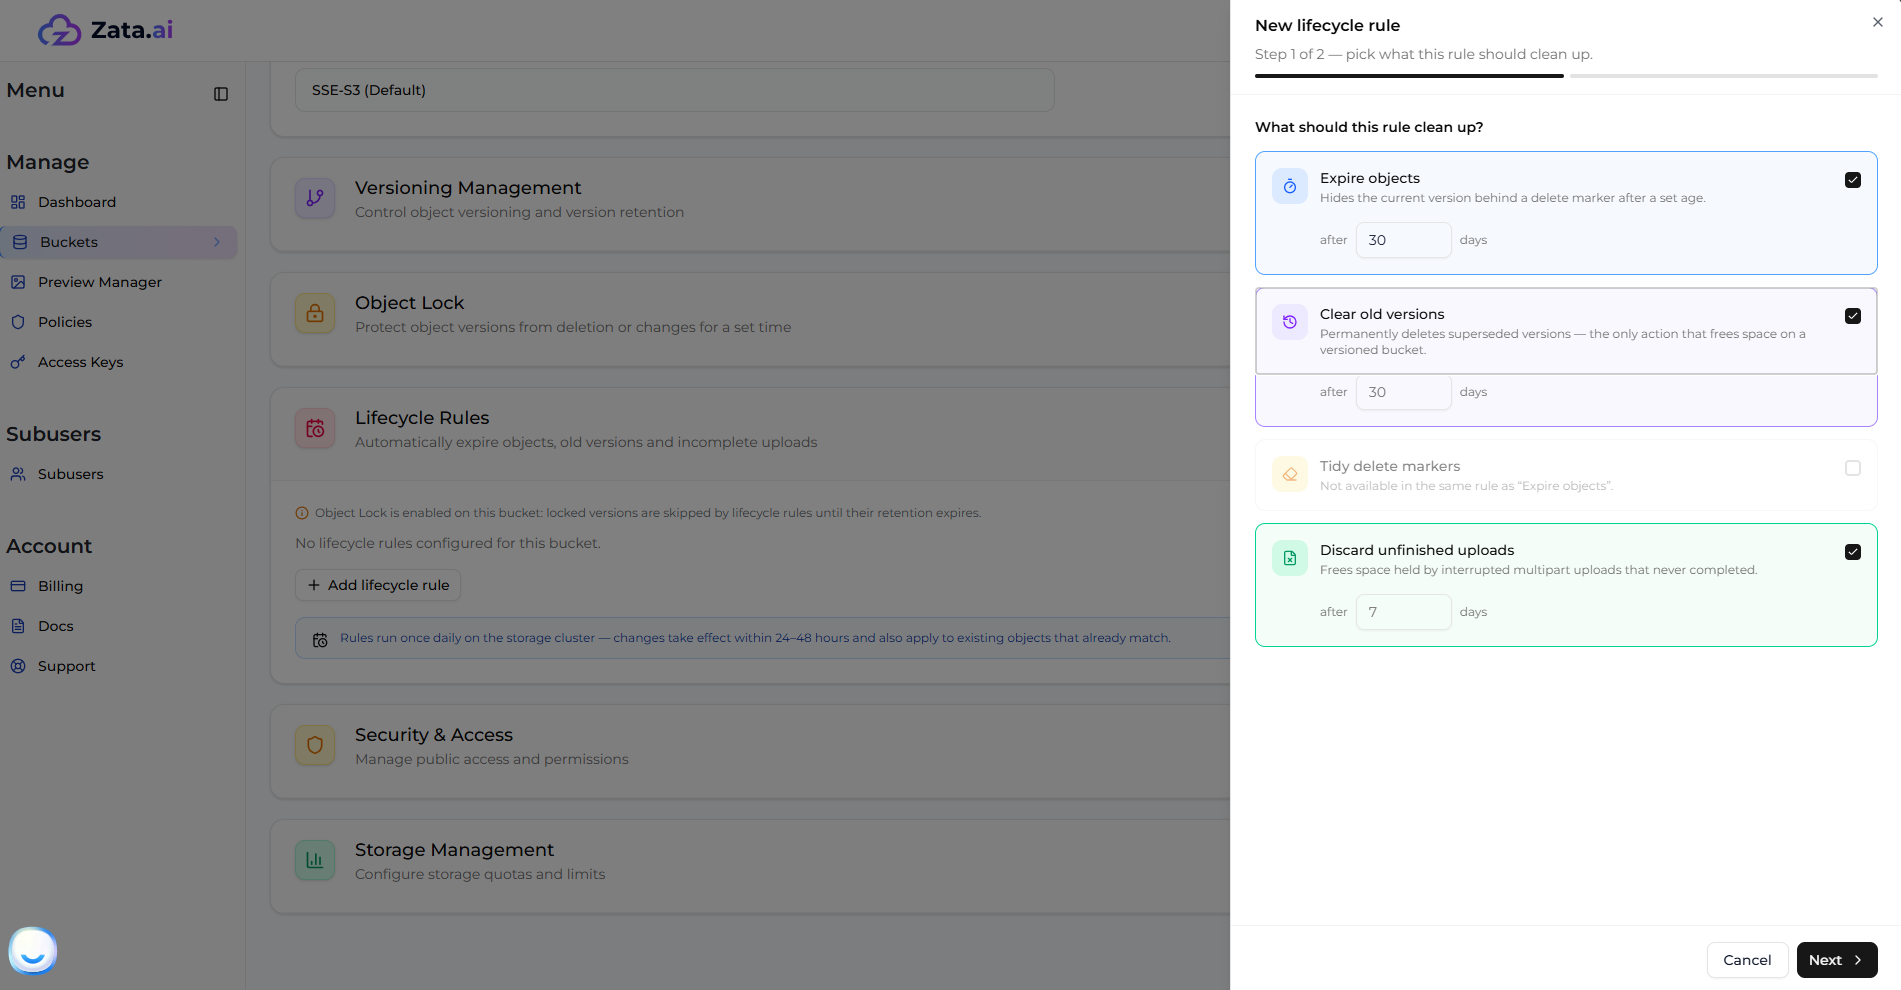
When creating a new rule, you can choose one or more actions to automate bucket cleanup:

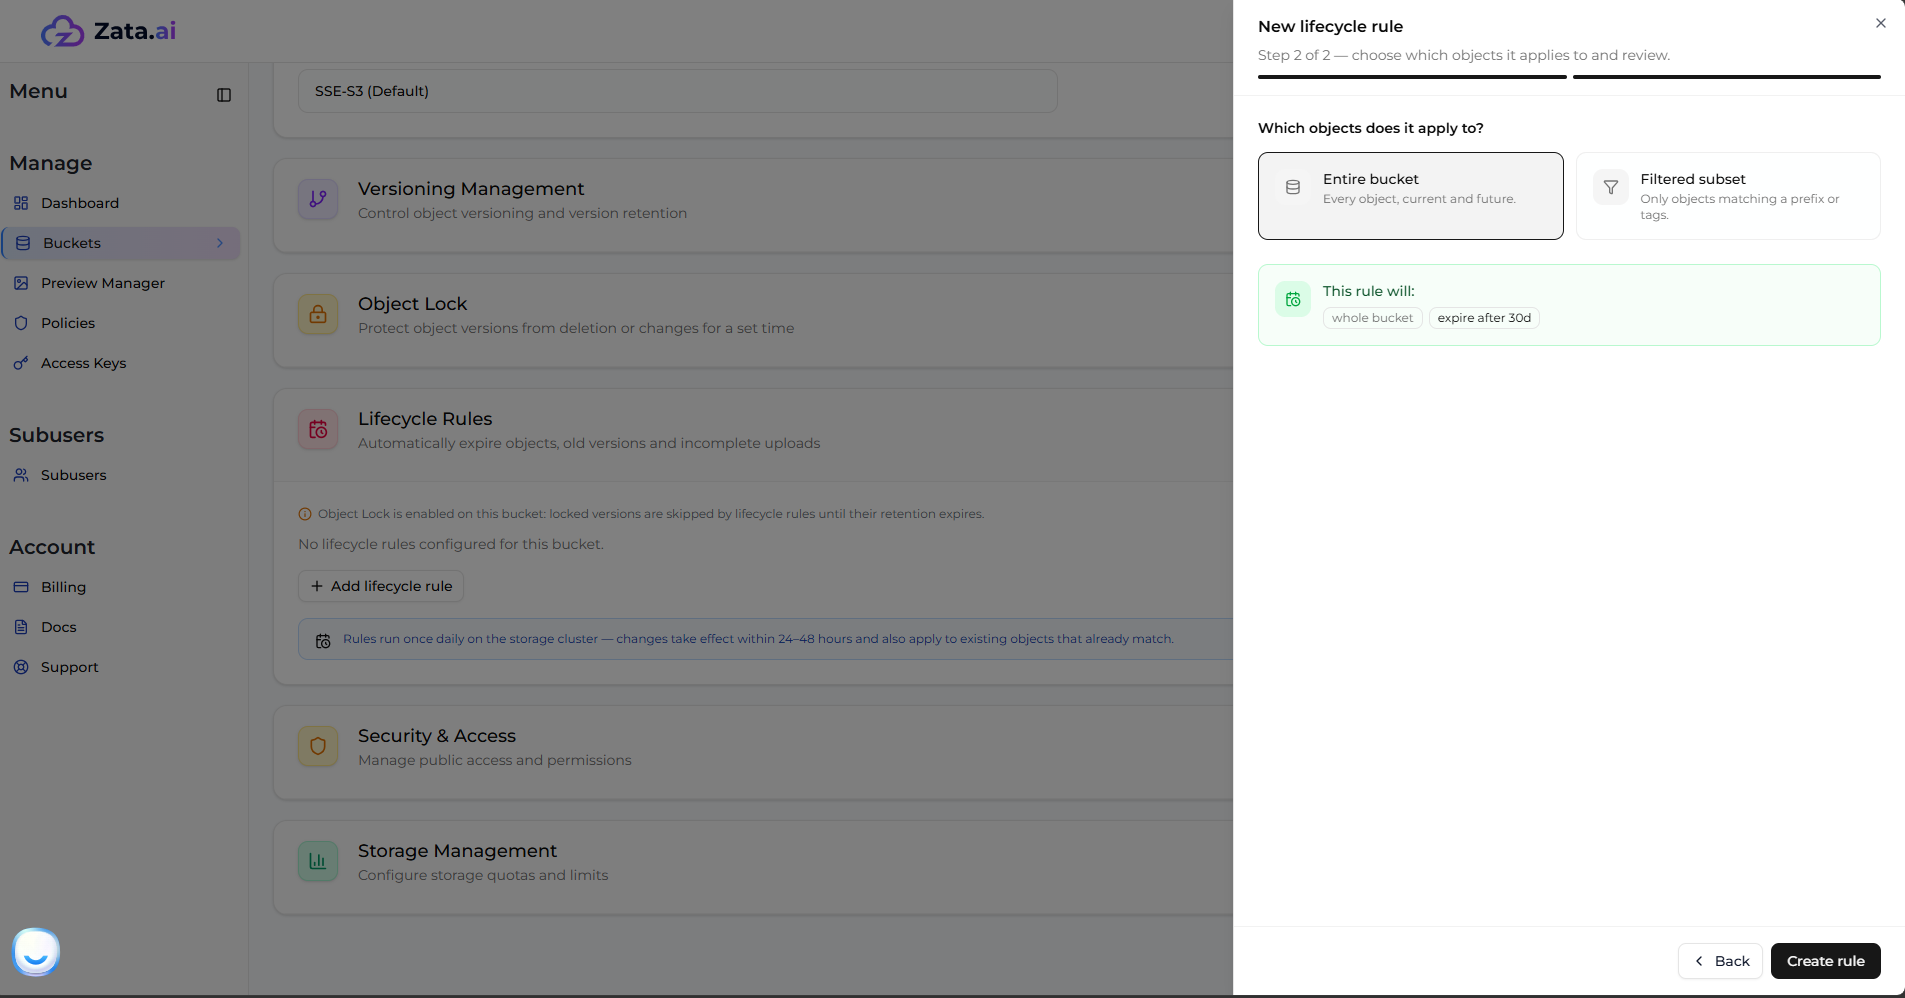
### 1. Expire Objects

This rule hides the current version of an object behind a delete marker after it reaches a set age (e.g., 30 days).

* **If Versioning is OFF:** The object is deleted permanently after the set time.
* **If Versioning is ON:** The object is not permanently deleted, but a delete marker is created, hiding the current version. To free up actual storage space on a versioned bucket, use the **Clear Old Versions** rule instead.

<figure><img src="https://2683631041-files.gitbook.io/~/files/v0/b/gitbook-x-prod.appspot.com/o/spaces%2FPPVG4W649TwXN8OejRhb%2Fuploads%2Fgit-blob-e321479bed78246fcd1957e2b4c9472953c4d92f%2Flifecycle-2.png?alt=media" alt="Expire Objects Rule"><figcaption></figcaption></figure>

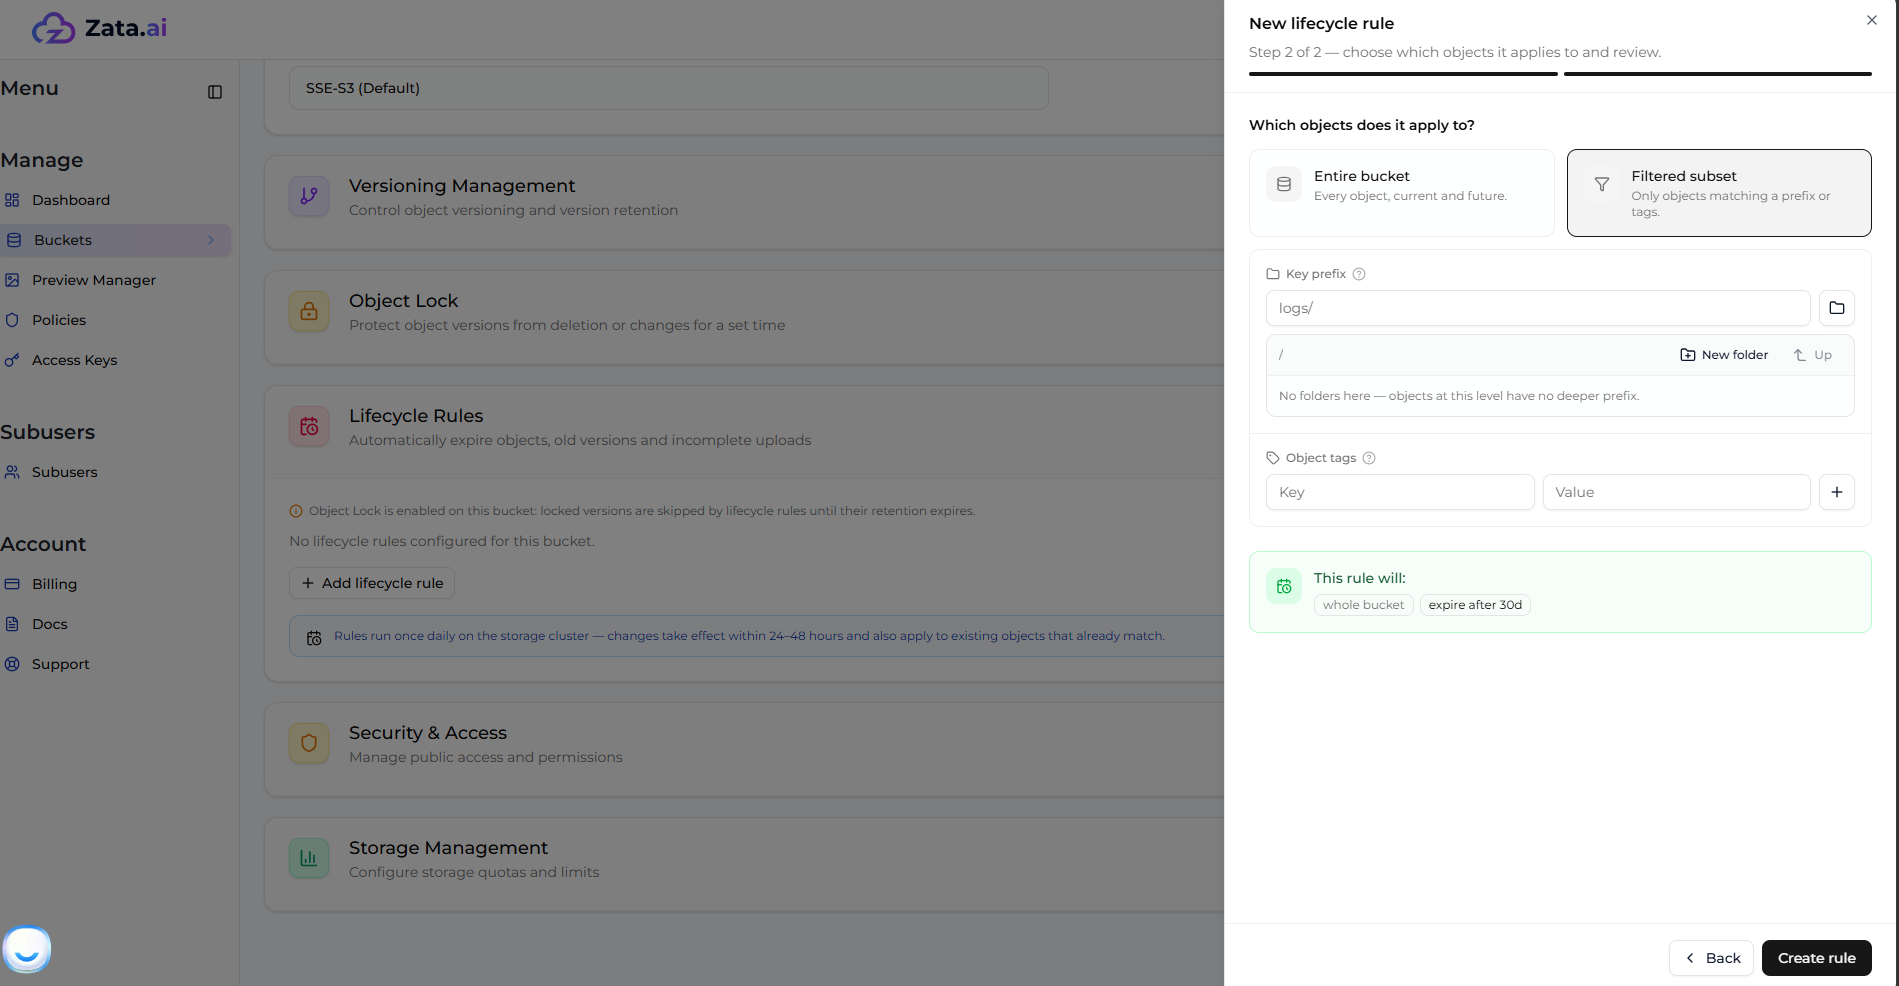
<figure><img src="https://2683631041-files.gitbook.io/~/files/v0/b/gitbook-x-prod.appspot.com/o/spaces%2FPPVG4W649TwXN8OejRhb%2Fuploads%2Fgit-blob-53039f7d60239a6d634994af2dd5c203edd60a7b%2Flifecycle-default-1.png?alt=media" alt="Apply to Entire Bucket"><figcaption></figcaption></figure>

<figure><img src="https://2683631041-files.gitbook.io/~/files/v0/b/gitbook-x-prod.appspot.com/o/spaces%2FPPVG4W649TwXN8OejRhb%2Fuploads%2Fgit-blob-c132f4b624ee0895727dae63956a07d4a782d814%2Flifecycle-defualt-2.png?alt=media" alt="Apply to Filtered Subset"><figcaption></figcaption></figure>

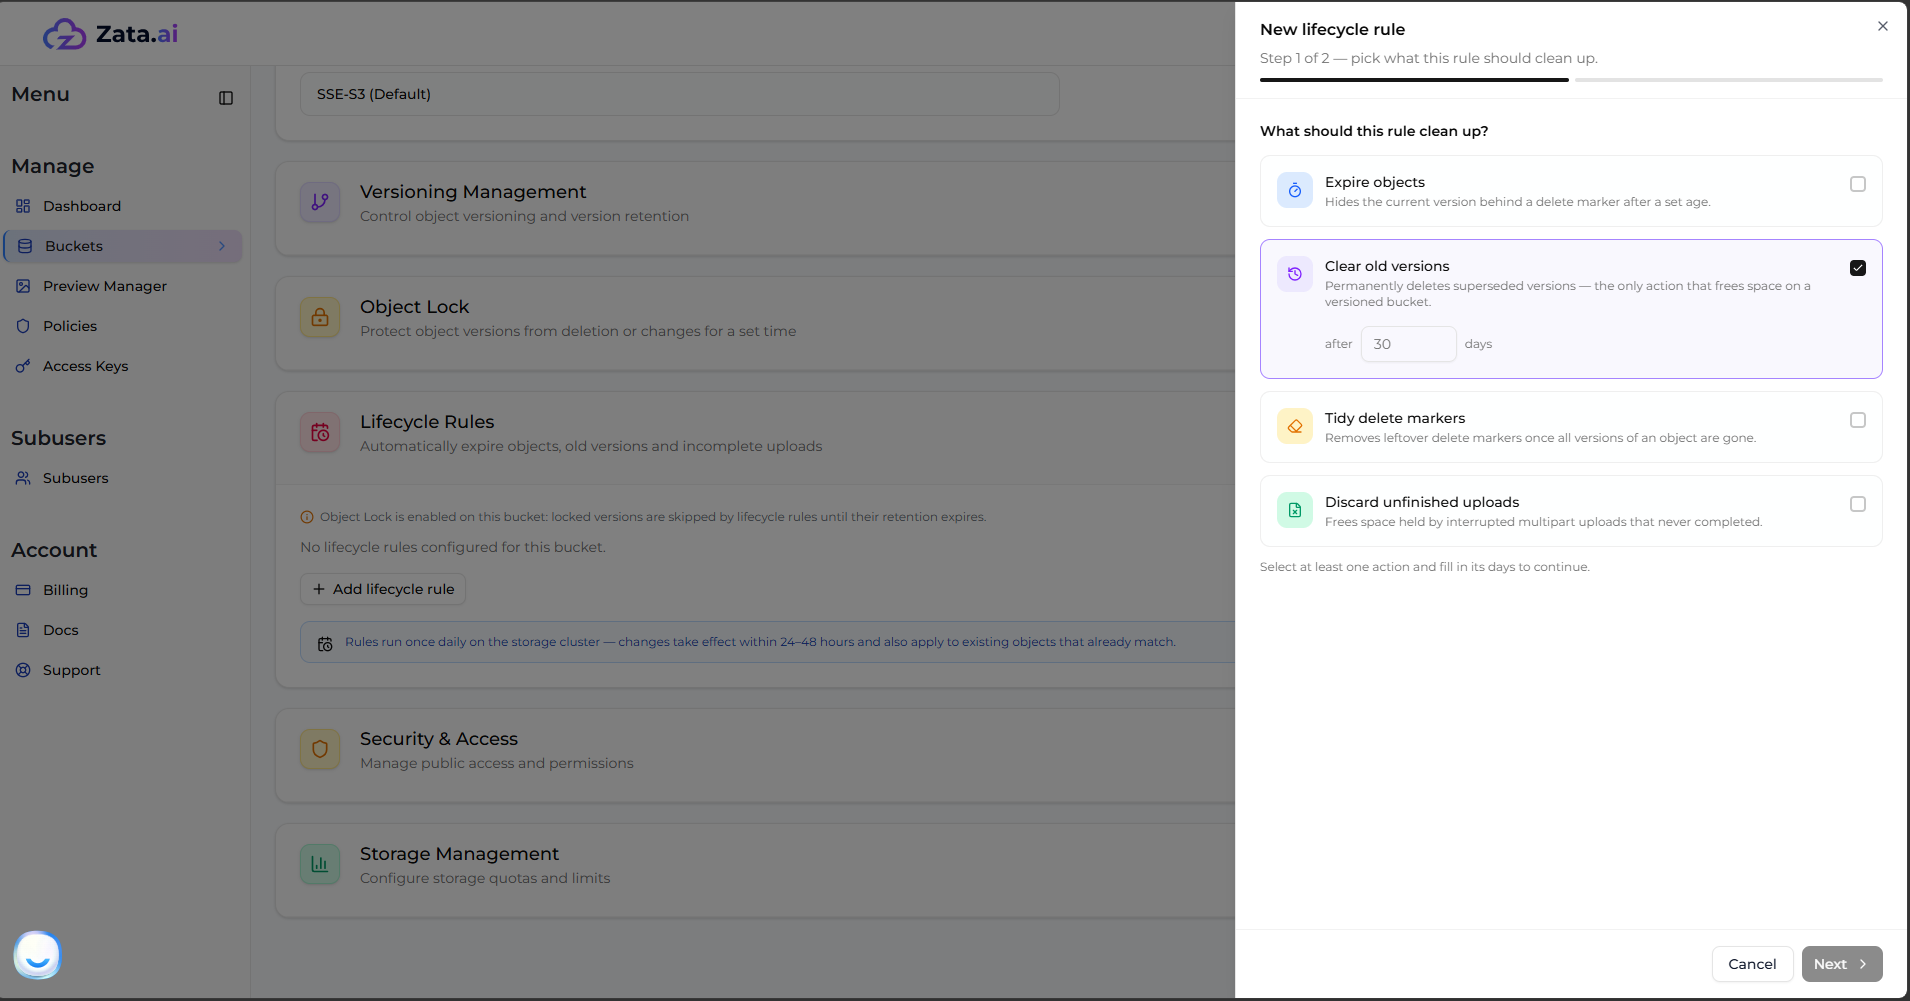
### 2. Clear Old Versions

> **Note:** This rule is only available if **Bucket Versioning is Enabled**. If versioning is off, this option will not appear.

This is the only action that frees up space on a versioned bucket. It permanently deletes superseded (non-current) versions after a set age.

* **Keep Newest Versions (Optional):** You can optionally choose to retain a specific number of the most recent versions. For example, if you set the rule to clear versions after **10 days** but keep the newest **3 versions**, Zata will delete all versions older than 10 days *except* for the 3 most recent ones, ensuring you always have recent backups.
  * *Note: The "Keep Newest Versions" feature is currently supported in the **Mumbai** region, but is not supported in the **Indore** region.*

<figure><img src="https://2683631041-files.gitbook.io/~/files/v0/b/gitbook-x-prod.appspot.com/o/spaces%2FPPVG4W649TwXN8OejRhb%2Fuploads%2Fgit-blob-f403f7476d2d7d3d95d44a489c918d7cc8186622%2Flifecycle-3.png?alt=media" alt="Clear Old Versions Rule"><figcaption></figcaption></figure>

<figure><img src="https://2683631041-files.gitbook.io/~/files/v0/b/gitbook-x-prod.appspot.com/o/spaces%2FPPVG4W649TwXN8OejRhb%2Fuploads%2Fgit-blob-53039f7d60239a6d634994af2dd5c203edd60a7b%2Flifecycle-default-1.png?alt=media" alt="Apply to Entire Bucket"><figcaption></figcaption></figure>

<figure><img src="https://2683631041-files.gitbook.io/~/files/v0/b/gitbook-x-prod.appspot.com/o/spaces%2FPPVG4W649TwXN8OejRhb%2Fuploads%2Fgit-blob-c132f4b624ee0895727dae63956a07d4a782d814%2Flifecycle-defualt-2.png?alt=media" alt="Apply to Filtered Subset"><figcaption></figcaption></figure>

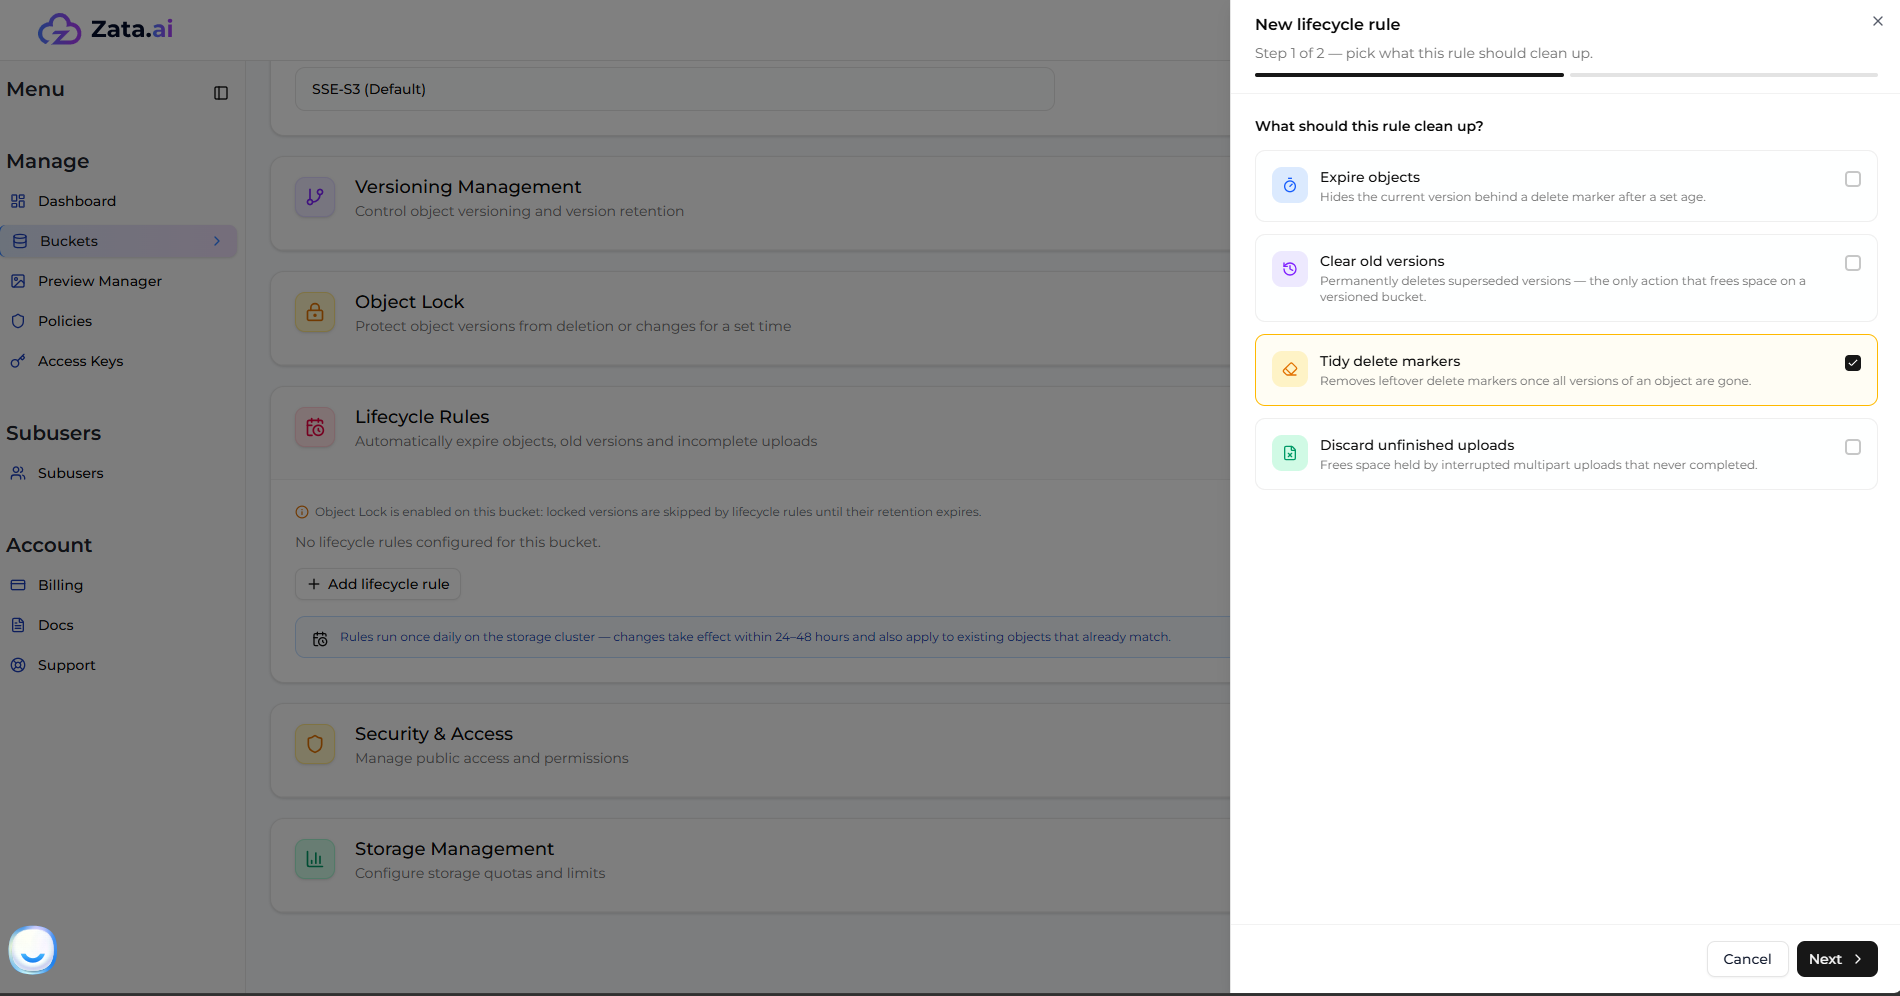
### 3. Tidy Delete Markers

> **Note:** This rule is only available if **Bucket Versioning is Enabled**. If versioning is off, this option will not appear.

This rule automatically cleans up expired object delete markers. If an object has only one version remaining and that version is a delete marker, this rule will permanently remove the delete marker, completely tidying up the object from the bucket.

* Note: This option is not available in the same rule as "Expire Objects".

<figure><img src="https://2683631041-files.gitbook.io/~/files/v0/b/gitbook-x-prod.appspot.com/o/spaces%2FPPVG4W649TwXN8OejRhb%2Fuploads%2Fgit-blob-5582737ed64f7da1b91db56b1cf6648da505ae8a%2Flifecycle-4.png?alt=media" alt="Tidy Delete Markers Rule"><figcaption></figcaption></figure>

<figure><img src="https://2683631041-files.gitbook.io/~/files/v0/b/gitbook-x-prod.appspot.com/o/spaces%2FPPVG4W649TwXN8OejRhb%2Fuploads%2Fgit-blob-53039f7d60239a6d634994af2dd5c203edd60a7b%2Flifecycle-default-1.png?alt=media" alt="Apply to Entire Bucket"><figcaption></figcaption></figure>

<figure><img src="https://2683631041-files.gitbook.io/~/files/v0/b/gitbook-x-prod.appspot.com/o/spaces%2FPPVG4W649TwXN8OejRhb%2Fuploads%2Fgit-blob-c132f4b624ee0895727dae63956a07d4a782d814%2Flifecycle-defualt-2.png?alt=media" alt="Apply to Filtered Subset"><figcaption></figcaption></figure>

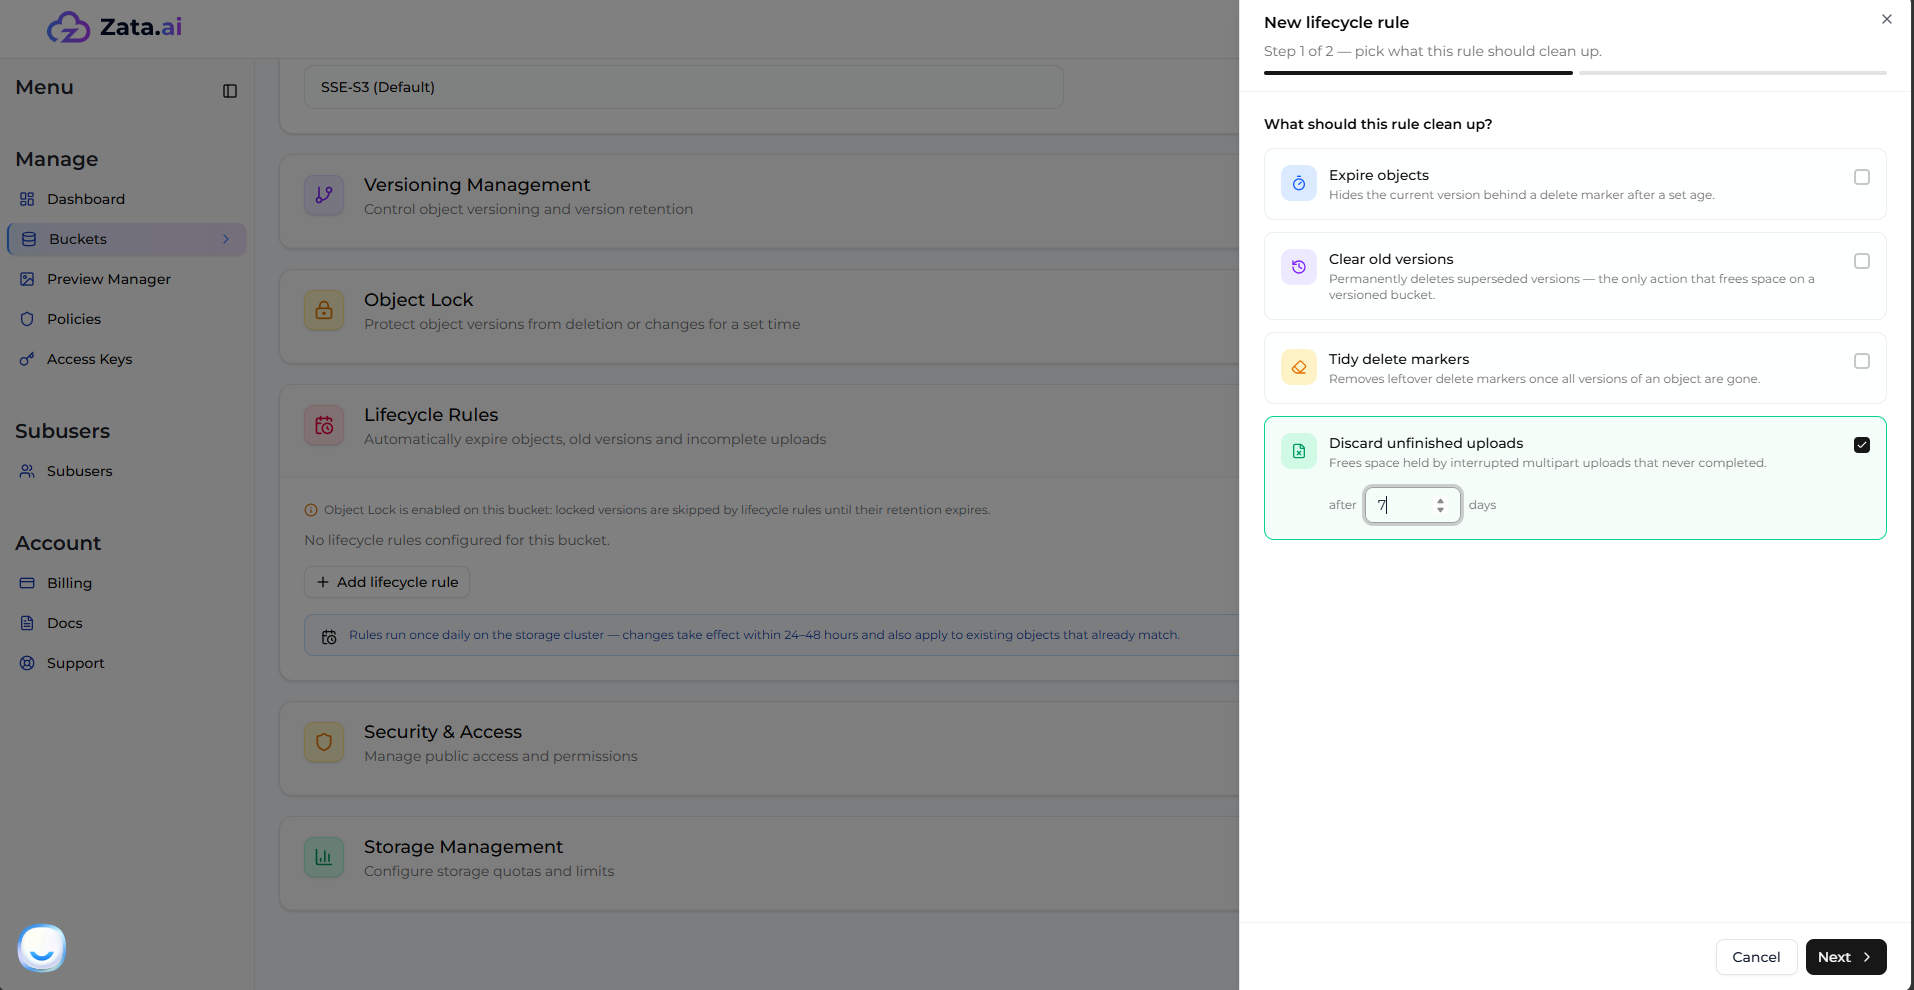
### 4. Discard Unfinished Uploads

Sometimes, multipart uploads are interrupted (e.g., due to network failure) and never completed, leaving unused data taking up storage space. This rule automatically frees space held by these interrupted uploads after a specified number of days (e.g., after 7 days).

<figure><img src="https://2683631041-files.gitbook.io/~/files/v0/b/gitbook-x-prod.appspot.com/o/spaces%2FPPVG4W649TwXN8OejRhb%2Fuploads%2Fgit-blob-ee55e3d409cffddac983beb47d857b83d4185211%2Flifecycle-5.png?alt=media" alt="Discard Unfinished Uploads Rule"><figcaption></figcaption></figure>

<figure><img src="https://2683631041-files.gitbook.io/~/files/v0/b/gitbook-x-prod.appspot.com/o/spaces%2FPPVG4W649TwXN8OejRhb%2Fuploads%2Fgit-blob-53039f7d60239a6d634994af2dd5c203edd60a7b%2Flifecycle-default-1.png?alt=media" alt="Apply to Entire Bucket"><figcaption></figcaption></figure>

<figure><img src="https://2683631041-files.gitbook.io/~/files/v0/b/gitbook-x-prod.appspot.com/o/spaces%2FPPVG4W649TwXN8OejRhb%2Fuploads%2Fgit-blob-c132f4b624ee0895727dae63956a07d4a782d814%2Flifecycle-defualt-2.png?alt=media" alt="Apply to Filtered Subset"><figcaption></figcaption></figure>

***

## Multiple Rules and Management

You can also select multiple lifecycle rules to run simultaneously on your bucket.

<figure><img src="https://2683631041-files.gitbook.io/~/files/v0/b/gitbook-x-prod.appspot.com/o/spaces%2FPPVG4W649TwXN8OejRhb%2Fuploads%2Fgit-blob-a5f5853b5efb4b1b336dc291ca2adb8d2a6997c3%2Flifecycle-6.png?alt=media" alt="Multiple Lifecycle Rules"><figcaption></figcaption></figure>

Once a rule is created, you can disable, edit, and delete the lifecycle rule at any time directly from the settings.

<figure><img src="https://2683631041-files.gitbook.io/~/files/v0/b/gitbook-x-prod.appspot.com/o/spaces%2FPPVG4W649TwXN8OejRhb%2Fuploads%2Fgit-blob-30ea0ca24a7e8e2325c6be9ede58871dfc9815c2%2Flifecycle-7.png?alt=media" alt="Manage Lifecycle Rules"><figcaption></figcaption></figure>


# Access Control (ACL)

Decide who can see your file list, who can download your files and who can upload

Access Control decides **who can see, download and change the things you store in Zata.ai**.

There are two separate settings, and each one does a different job:

* **Bucket ACL** — can people see the **list of files** in your bucket, and can they **upload** to it?
* **Object ACL** — can people **download** a particular file?

You set them in two different places, and changing one never changes the other.

> **INFO** Think of a bucket as a folder. The bucket setting decides whether people can look inside the folder and read the file names, and whether they can put new things in. The object setting decides whether they can actually open a file.

***

## The one rule to remember

**Making a bucket public does not make your files downloadable.**

Someone can see that a file called `invoice-2026.pdf` exists and how big it is, but the download is refused until you make that file public too.

**Making a file public does not show people the rest of your bucket.**

They can open the file you shared, and nothing else.

So if you want visitors to browse your files *and* download them, you have to turn on both settings.

***

## Where to find each setting

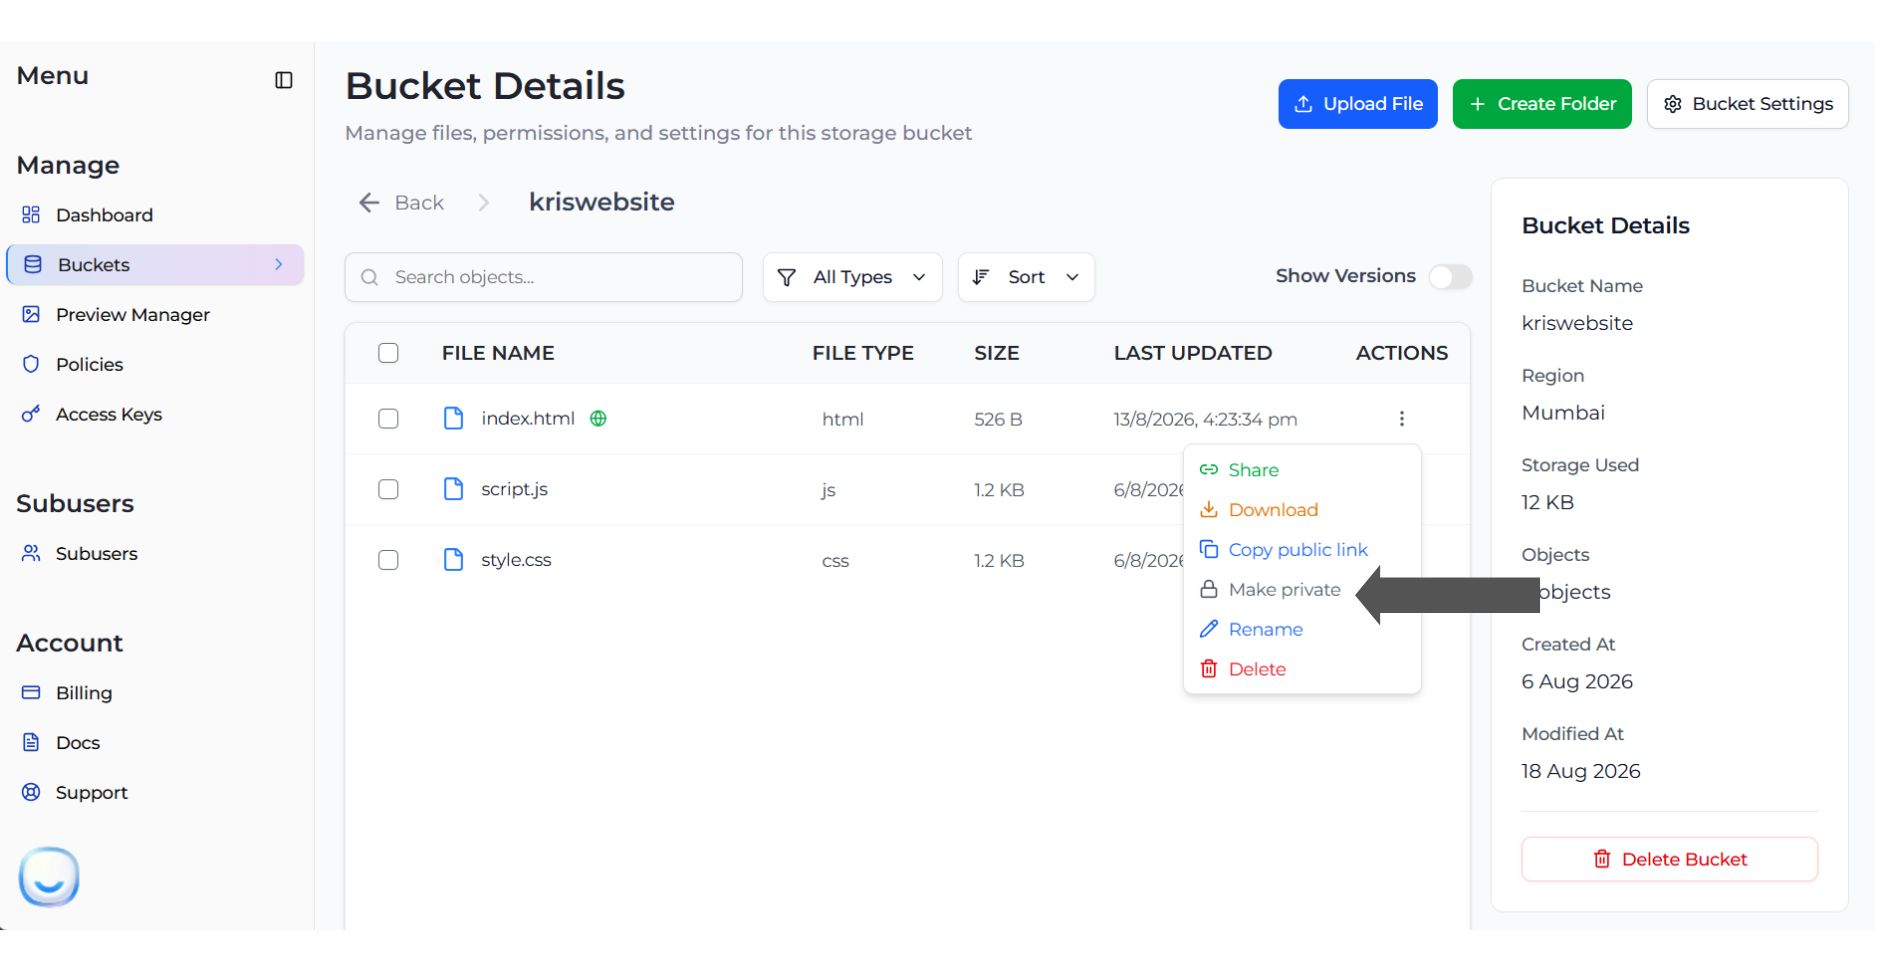
| Setting    | Where you change it                                           | The question it answers                            |
| ---------- | ------------------------------------------------------------- | -------------------------------------------------- |
| Bucket ACL | **Bucket > Bucket Settings > Access Control**                 | Who can see the list of files, and who can upload? |
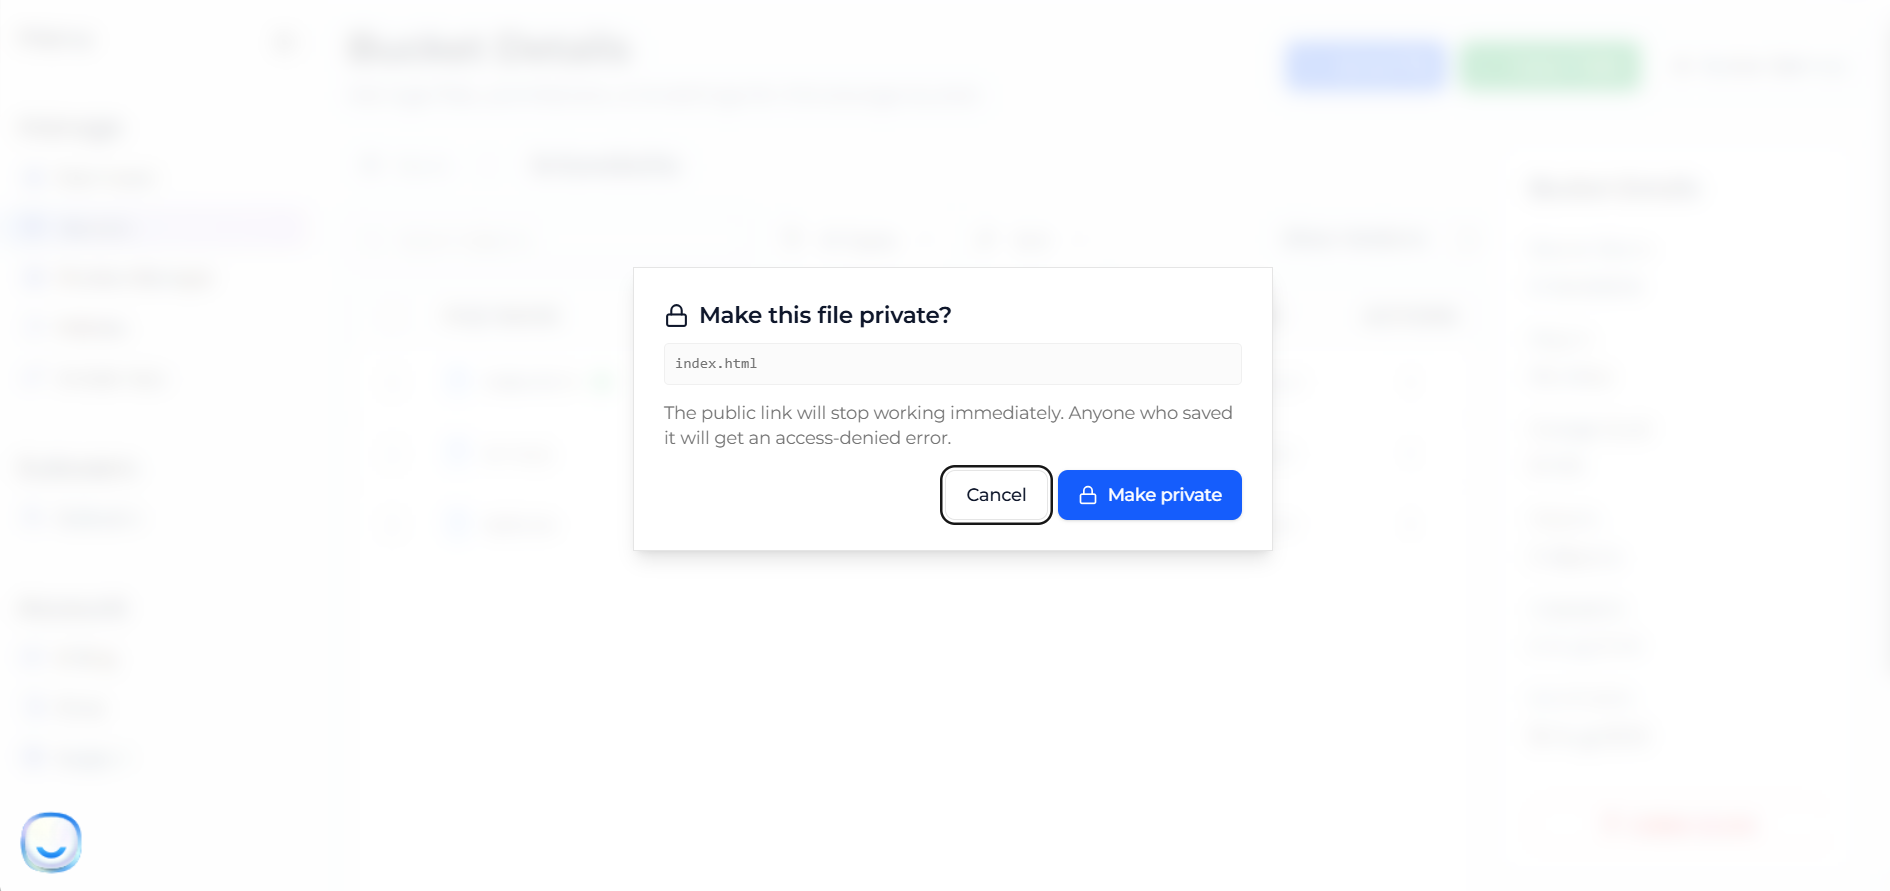
| Object ACL | **Bucket Details > Actions (⋮) > Make public / Make private** | Who can download this one file?                    |

Each one has its own page:

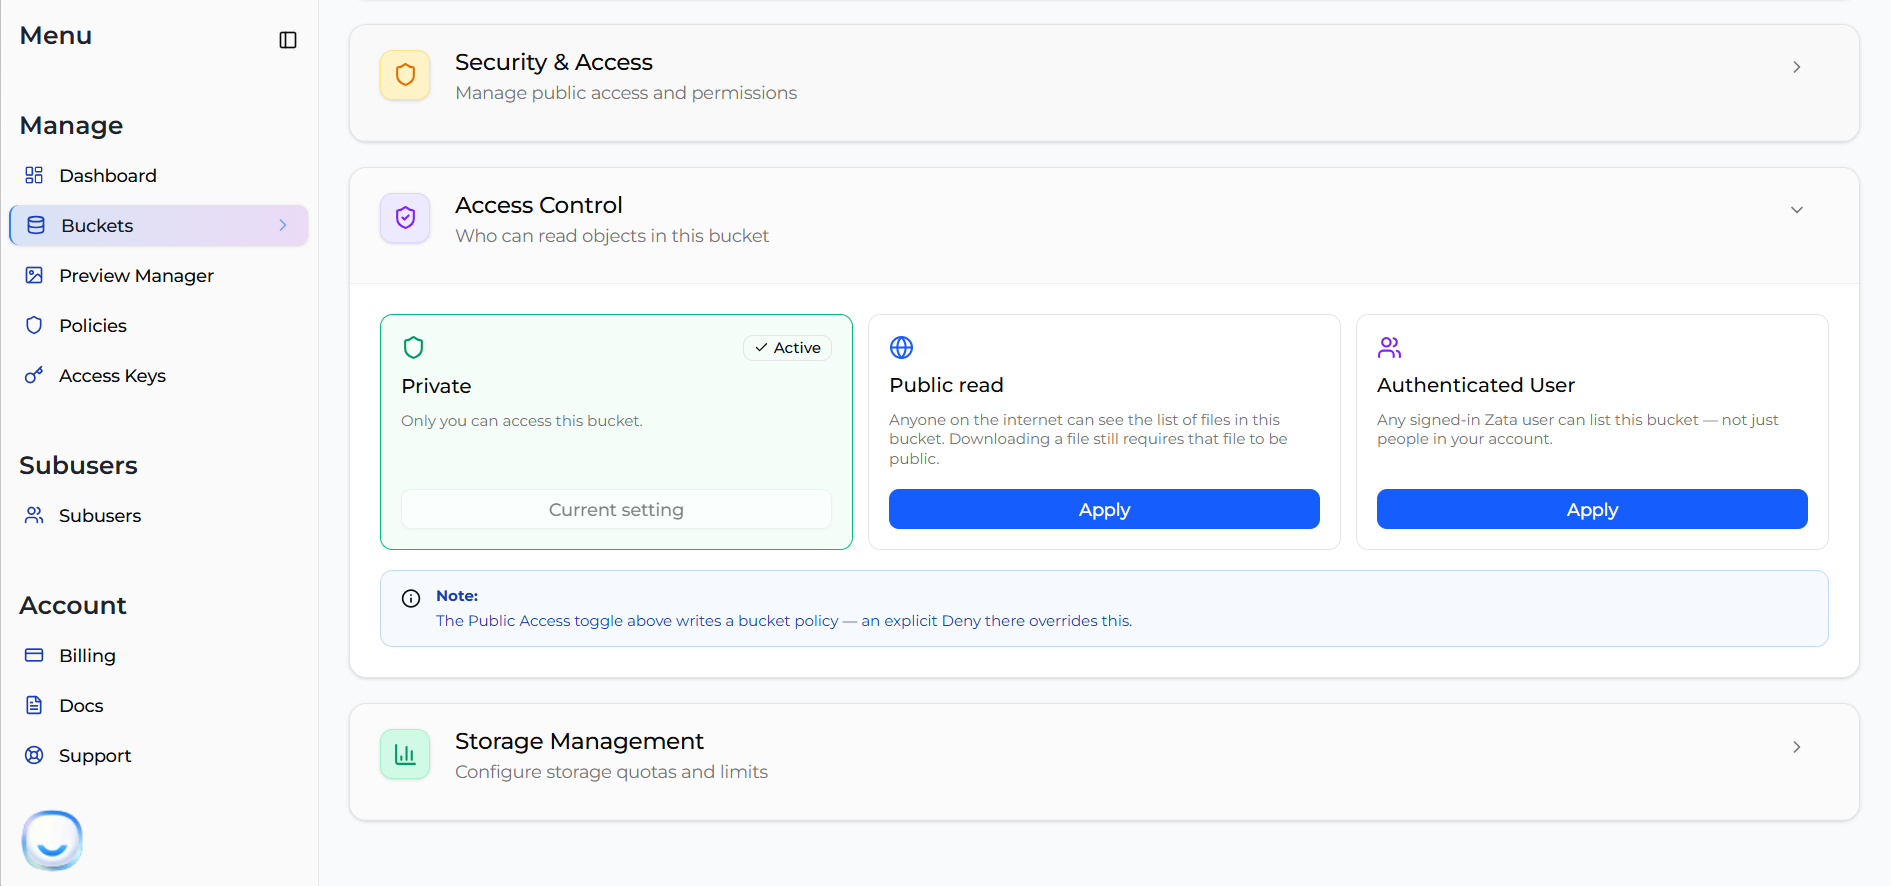
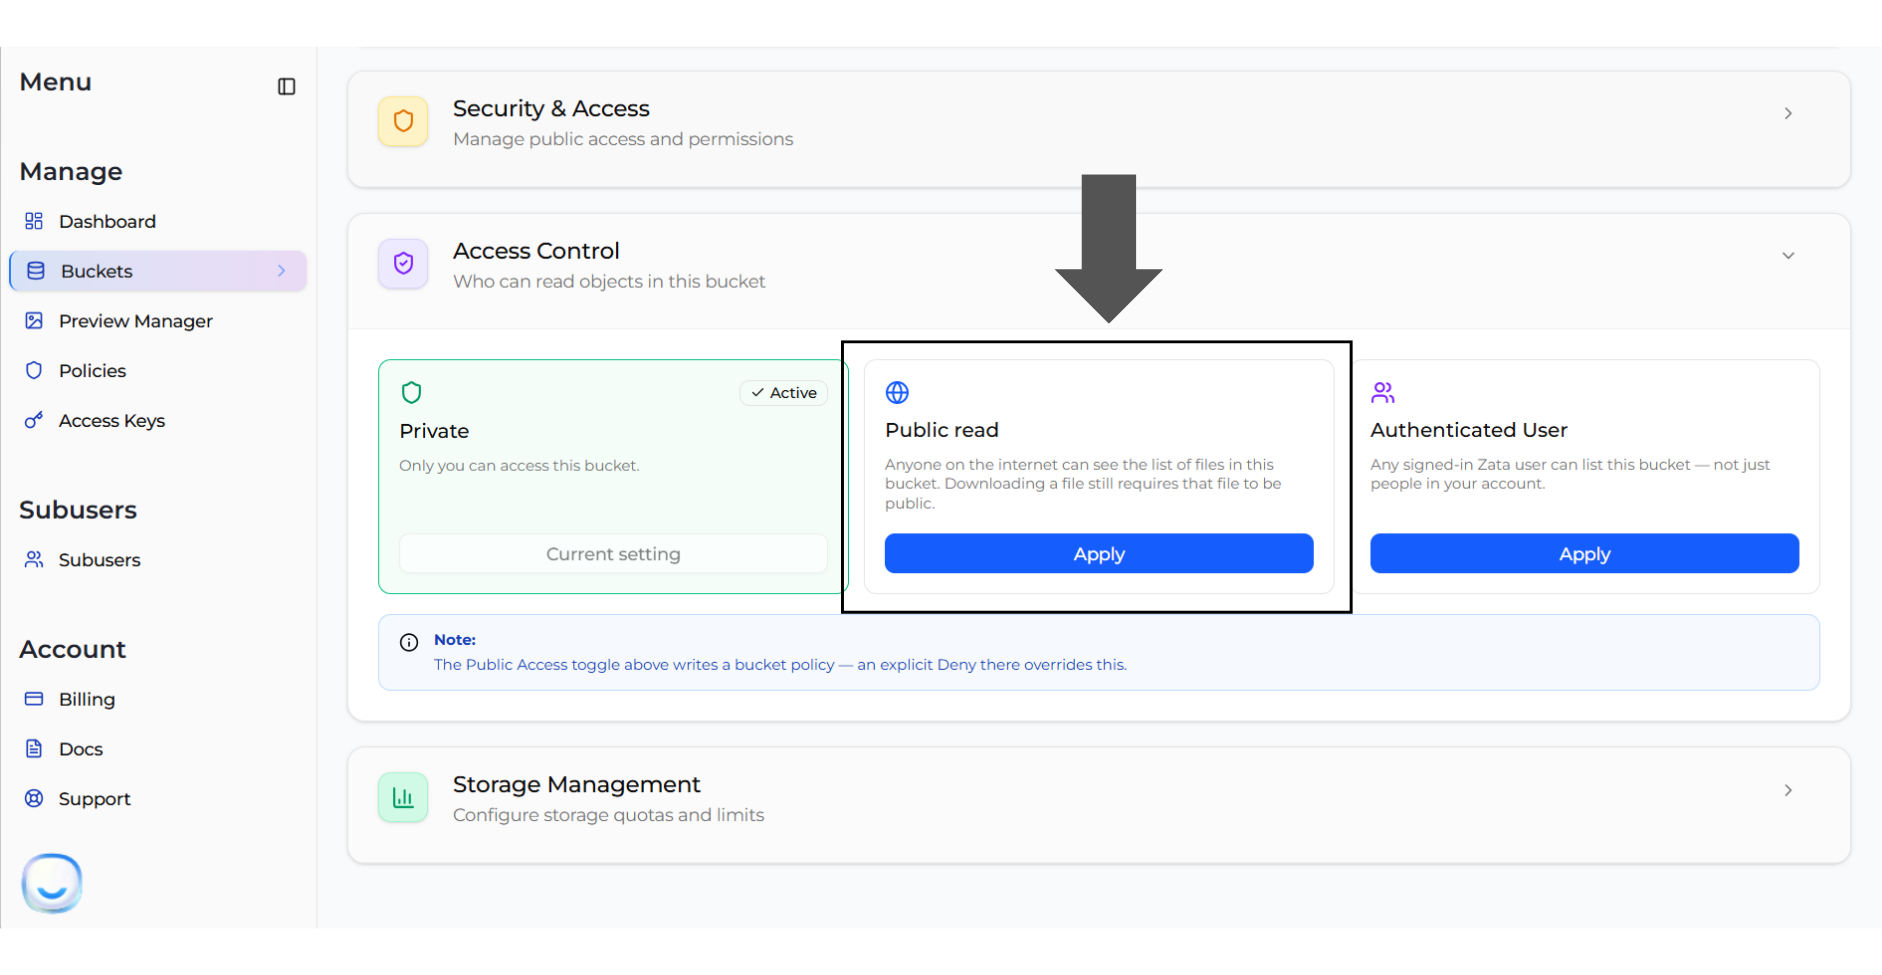
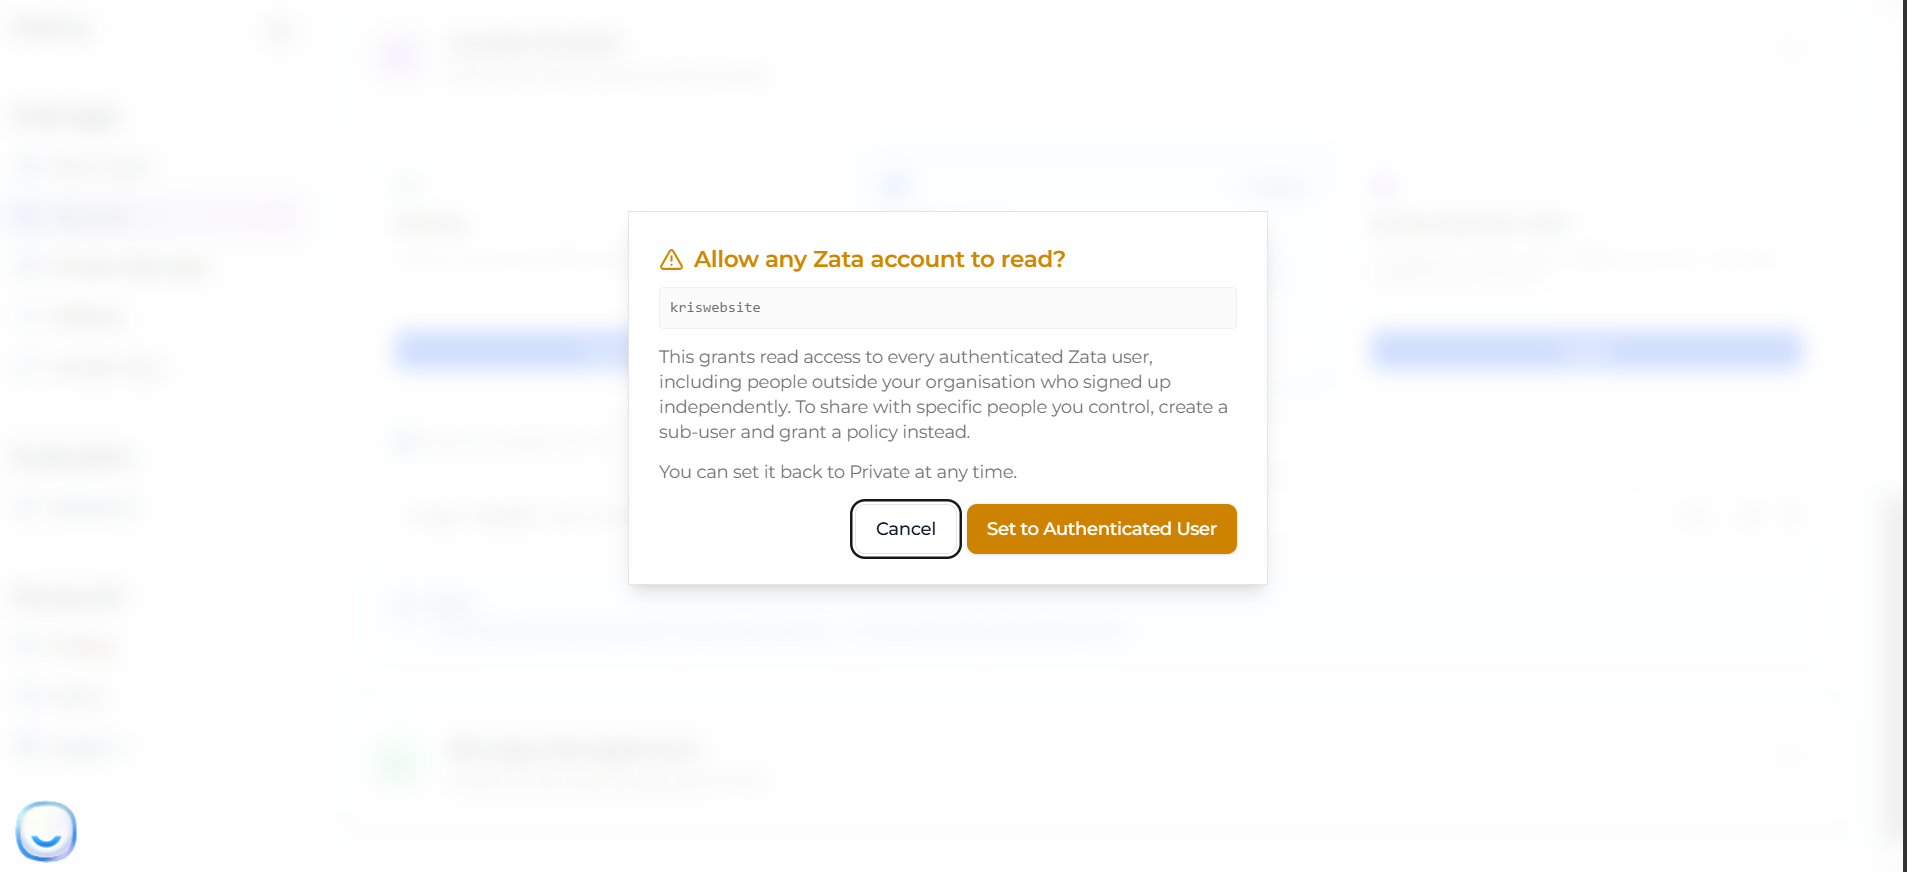
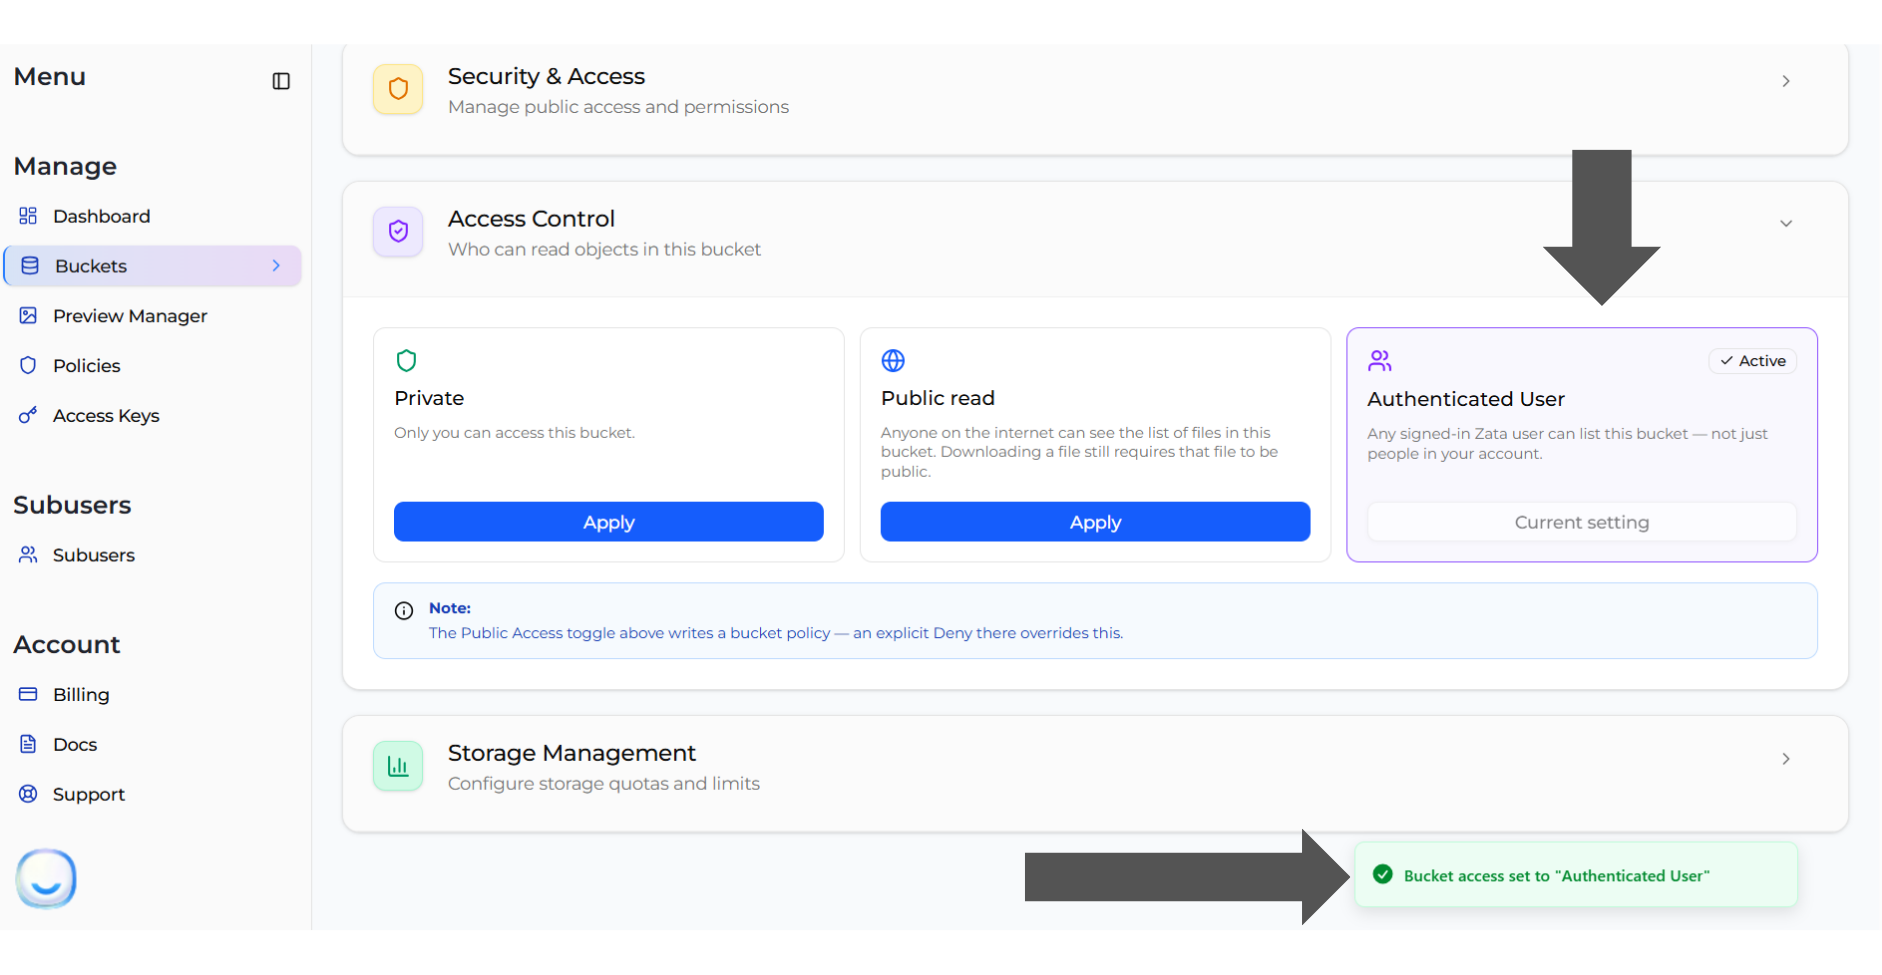
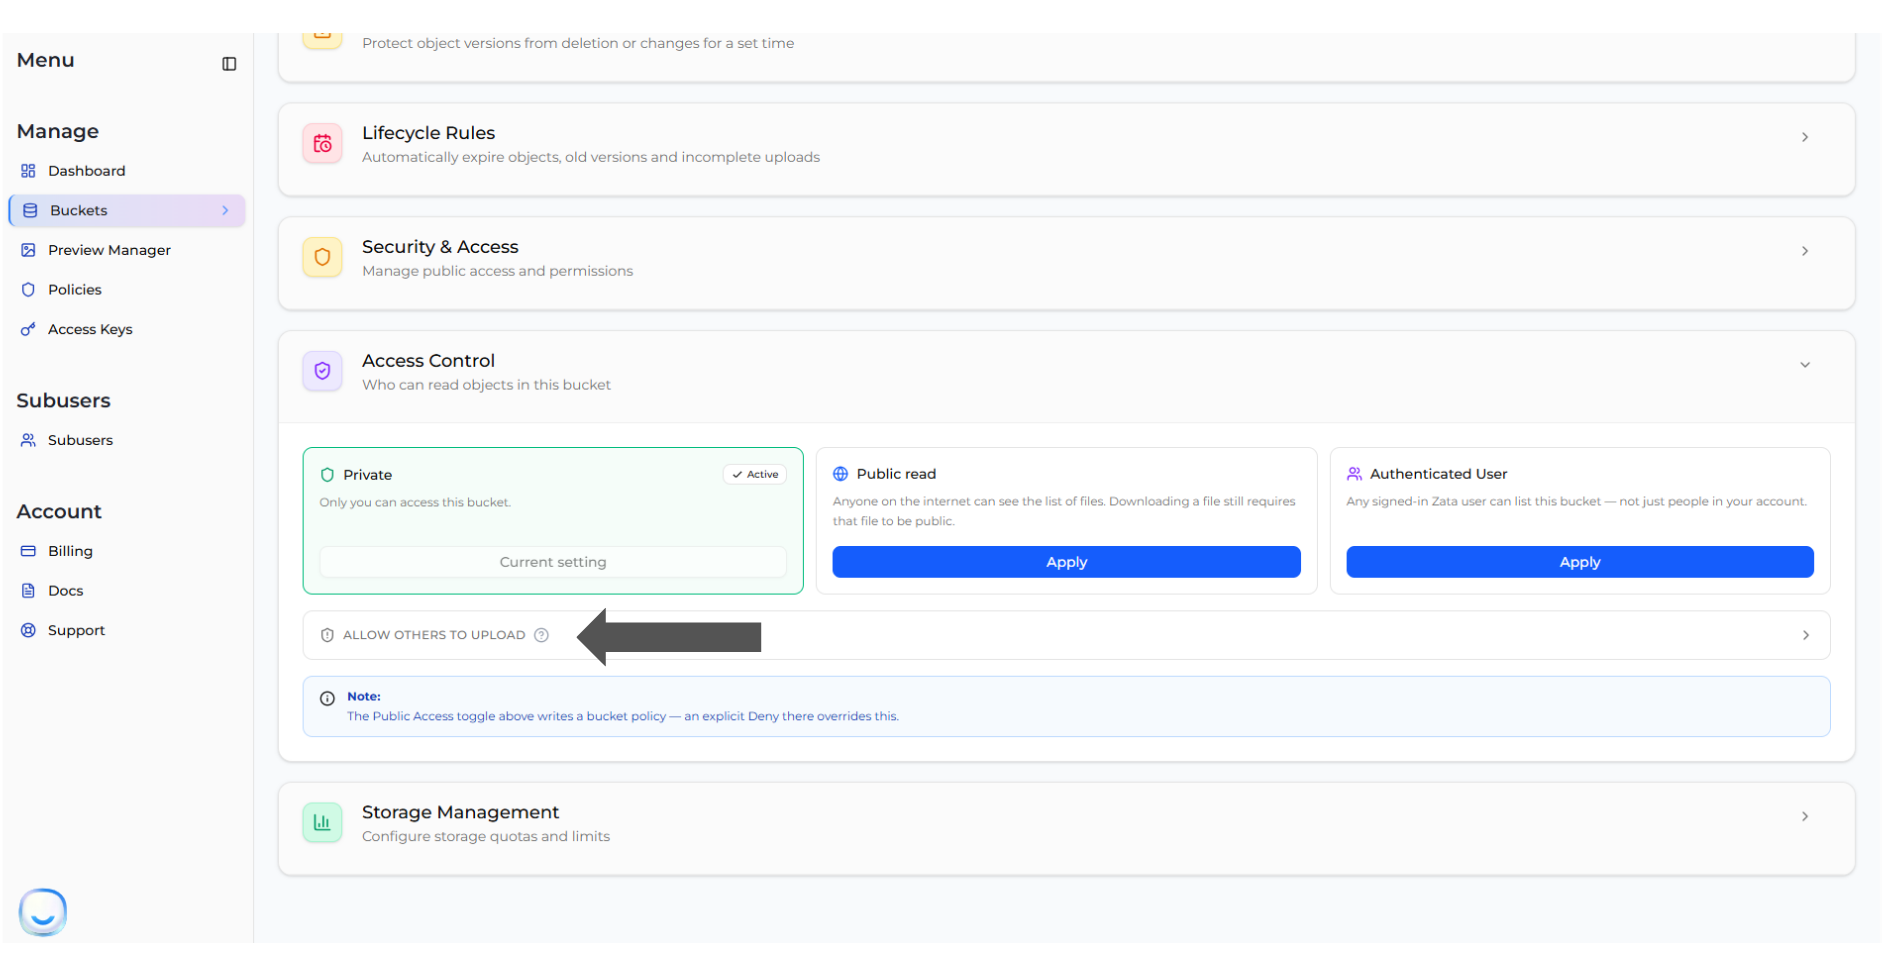
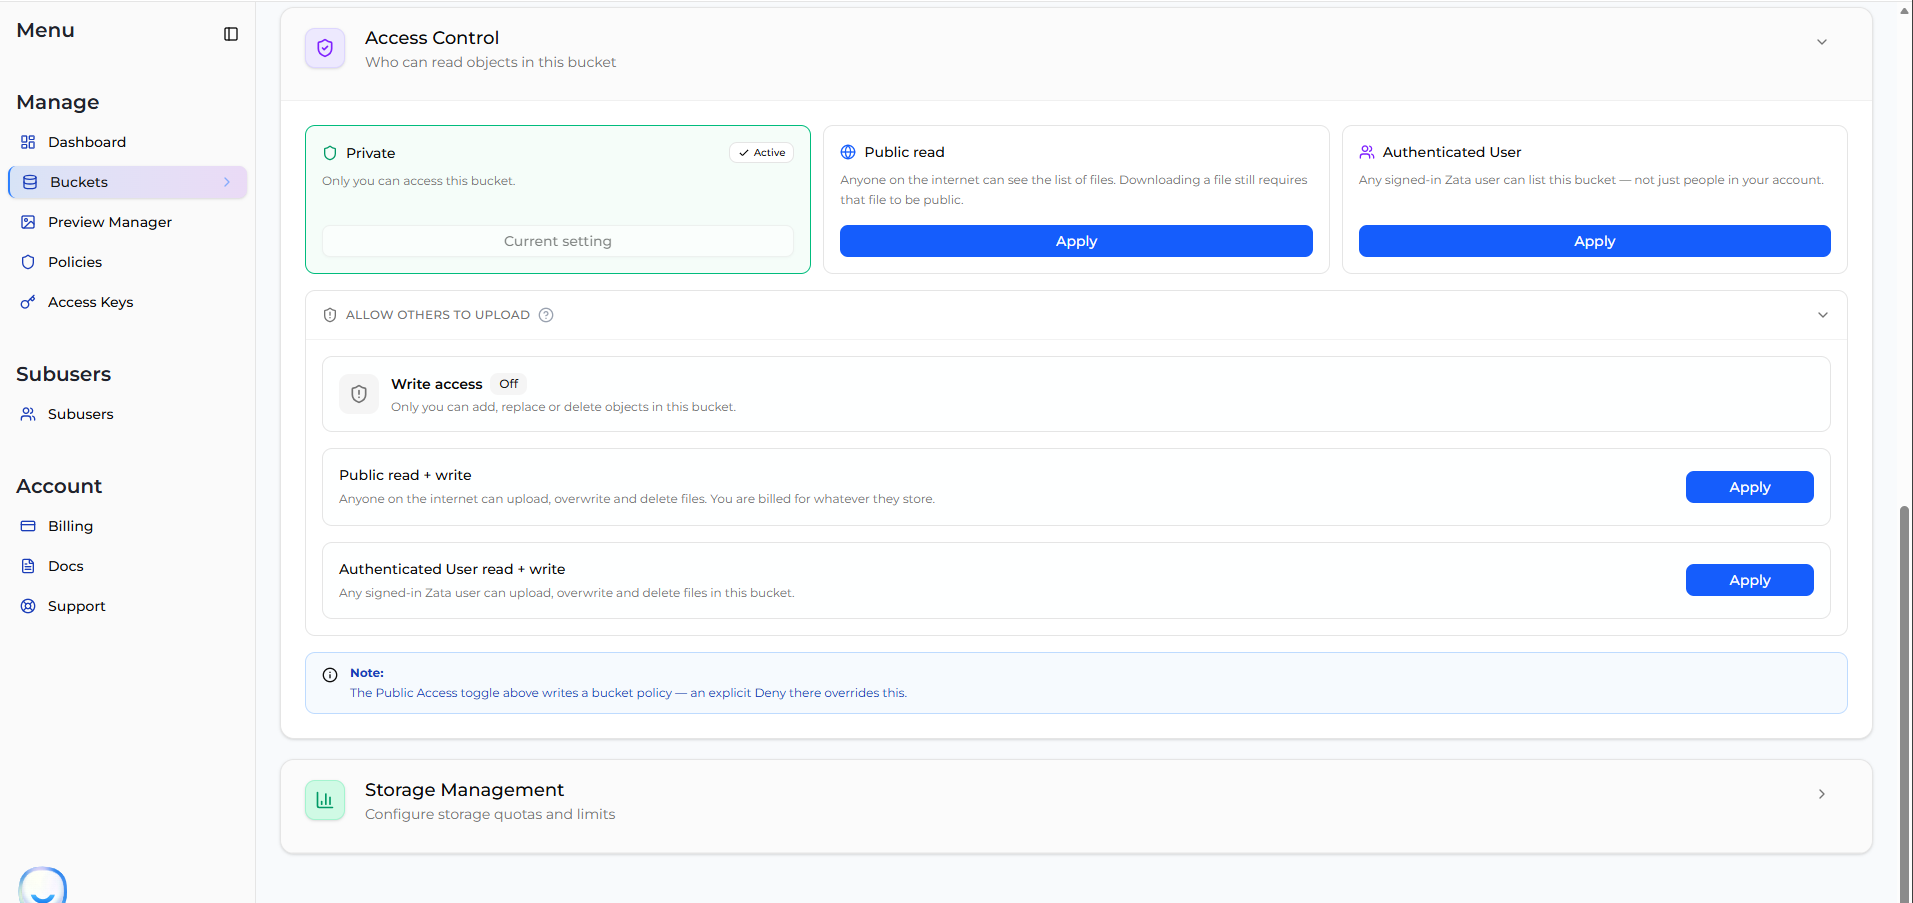
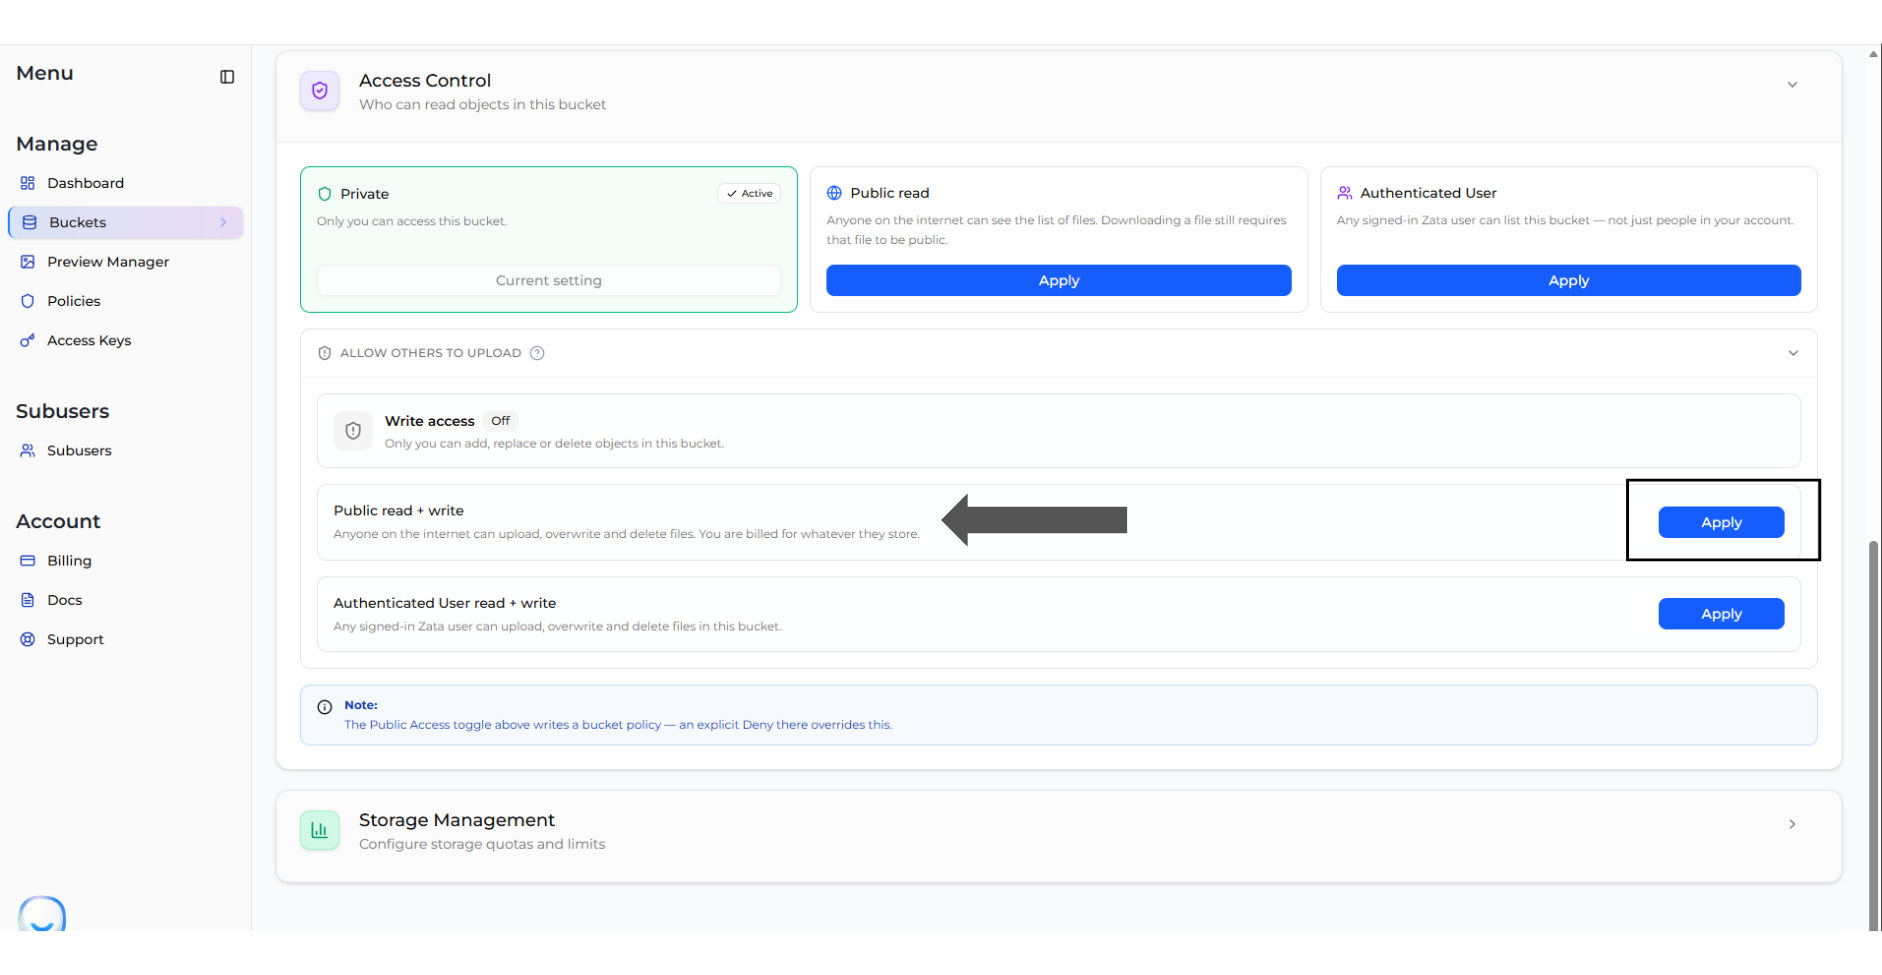
* [**Bucket ACL**](/manage/bucket/access-control/bucket-acl) — set your bucket to Private, Public read, Authenticated User, or one of the two write settings.
* [**Object ACL**](/manage/bucket/access-control/object-acl) — make a single file public or private, and copy its link.

***

## Your choices

**For a bucket**, you pick one of five. The first three are read-only; the last two also let other people upload.

| Option                              | Who can see the file list                                                   | Who can upload, overwrite and delete    |
| ----------------------------------- | --------------------------------------------------------------------------- | --------------------------------------- |
| **Private**                         | Only you. This is the default.                                              | Only you                                |
| **Public read**                     | Anyone on the internet, with no sign-in                                     | Only you                                |
| **Authenticated User**              | Anyone signed in to *any* Zata.ai account — not only people in your account | Only you                                |
| **Public read + write**             | Anyone on the internet                                                      | Anyone on the internet                  |
| **Authenticated User read + write** | Anyone signed in to any Zata.ai account                                     | Anyone signed in to any Zata.ai account |

**For a file**, you pick one of two:

| Option      | Who can download it                                            |
| ----------- | -------------------------------------------------------------- |
| **Private** | Only you. This is the default for every upload.                |
| **Public**  | Anyone with the link, with no sign-in. The link never expires. |

> **IMPORTANT** The two write settings let other people **overwrite and permanently delete** your files, not just add new ones — upload and delete are a single S3 permission. Read [Write access](/manage/bucket/access-control/bucket-acl#write-access) before you turn either one on.

***

## What a visitor can actually do

Here is what someone **with no Zata.ai account** can do, for each combination of the read-only settings:

| Bucket setting     | File setting | Can they see the file list? | Can they download the file? |
| ------------------ | ------------ | --------------------------- | --------------------------- |
| Private            | Private      | No                          | No                          |
| Private            | Public       | No                          | Yes, if they have the link  |
| Public read        | Private      | Yes                         | No                          |
| Public read        | Public       | Yes                         | Yes                         |
| Authenticated User | Private      | No                          | No                          |
| Authenticated User | Public       | No                          | Yes, if they have the link  |

With **Authenticated User**, visitors cannot see the list — but anyone signed in to a Zata.ai account can.

The two write settings behave like their read-only versions in this table, and add the ability to upload, overwrite and delete.

***

## When ACL is not the right tool

An ACL is all-or-nothing: it opens your bucket to *everyone* in a group, and you cannot pick individual people or folders. When you need that kind of control, use one of these instead:

| What you want to do                                                  | Use this                                                                                                                                      |
| -------------------------------------------------------------------- | --------------------------------------------------------------------------------------------------------------------------------------------- |
| Share one file with someone for a limited time                       | [Presigned URL](https://docs.zata.ai/manage/bucket/storing-objects-in-a-bucket/sharing-an-object-using-presigned-url) — it expires on its own |
| Give a colleague ongoing access you control                          | [Subuser](https://docs.zata.ai/subusers/create-a-subuser) with a [policy](https://docs.zata.ai/subusers/create-a-subuser/policies)            |
| Let a specific person upload, without opening the bucket to everyone | [Subuser](https://docs.zata.ai/subusers/create-a-subuser) with a write policy                                                                 |
| Share only one folder, not the whole bucket                          | [Bucket Policy](https://docs.zata.ai/manage/bucket/bucket-policy-configuration)                                                               |

***

## Good to know

> **IMPORTANT** A public file list shows your file names to everyone. File names often contain customer names, invoice numbers or project names, so treat the list itself as information worth protecting — even when the files stay private.

* Both browsing and downloading count towards your egress usage. See [Ingress and Egress Policy](https://docs.zata.ai/account/ingress-and-egress-policy).
* All public access stops working if your account is suspended.
* You can switch any of these settings back at any time — but switching off write access does not undo anything that was already uploaded or deleted.
* A bucket policy can block public access even when the ACL allows it. If a setting seems to have no effect, see [ACL and bucket policies](#acl-and-bucket-policies) below.

***

## ACL and bucket policies

Zata.ai checks the ACL **and** your bucket policies. If a policy says no, the answer is no — a policy that blocks access always wins over an ACL that allows it.

The Access Control section repeats this on screen:

> **NOTE** The Public Access toggle above writes a bucket policy — an explicit Deny there overrides this.

So if you set a bucket to **Public read** and nothing changes, check the **Security & Access** section of Bucket Settings and the **Policies** page for a rule that is blocking it.

***

## If you use the S3 API

Zata.ai follows the standard S3 ACL model, so the dashboard options match standard S3 permissions:

| Dashboard option                | S3 canned ACL        | Who it grants access to                                                |
| ------------------------------- | -------------------- | ---------------------------------------------------------------------- |
| Private                         | `private`            | The owner only                                                         |
| Public read                     | `public-read`        | READ for the `AllUsers` group — everyone                               |
| Authenticated User              | `authenticated-read` | READ for the `AuthenticatedUsers` group — every signed-in Zata.ai user |
| Public read + write             | `public-read-write`  | READ and WRITE for the `AllUsers` group                                |
| Authenticated User read + write | *no canned name*     | READ and WRITE granted explicitly to the `AuthenticatedUsers` group    |

In S3, "read" means different things depending on what the ACL is attached to:

* On a **bucket**, read means *list the objects*.
* On an **object**, read means *download the contents*.

Same permission name, two different results. That is the reason the two settings have to be applied separately.

WRITE has no such split — it exists only on a bucket, and it covers adding, replacing and deleting objects together. That is why Zata.ai cannot offer an upload-only setting.


# Bucket ACL

Set who can see your file list and who can upload to your bucket

The Bucket ACL controls two things:

* **Who can see the list of files** in your bucket — the file names, their sizes and when they were last changed.
* **Who can upload, overwrite and delete** files in your bucket.

It does **not** control who can download your files. That is set on each file separately, on the [Object ACL](/manage/bucket/access-control/object-acl) page.

To change it, open your bucket, click **Bucket Settings**, and open the **Access Control** section.

<figure><img src="https://2683631041-files.gitbook.io/~/files/v0/b/gitbook-x-prod.appspot.com/o/spaces%2FPPVG4W649TwXN8OejRhb%2Fuploads%2Fgit-blob-d484c23bd60af10ebd3973818d1bd202b5acb6c5%2Fbucket-acl-1.png?alt=media" alt="Access Control section in Bucket Settings"><figcaption></figcaption></figure>

***

## The five settings

Your bucket uses **one** setting at a time. Three of them are read-only. The other two also let other people upload.

| Setting                             | Who can see the file list  | Who can upload, overwrite and delete |
| ----------------------------------- | -------------------------- | ------------------------------------ |
| **Private**                         | Only you                   | Only you                             |
| **Public read**                     | Anyone on the internet     | Only you                             |
| **Authenticated User**              | Any signed-in Zata.ai user | Only you                             |
| **Public read + write**             | Anyone on the internet     | Anyone on the internet               |
| **Authenticated User read + write** | Any signed-in Zata.ai user | Any signed-in Zata.ai user           |

The three read-only settings appear as cards at the top of the section. The two write settings are inside **ALLOW OTHERS TO UPLOAD** just below them.

Whichever setting you are using is marked **Active**, and its button reads **Current setting**. The others have an **Apply** button.

> **INFO** These five settings are alternatives, not layers. When you turn on a write setting, it replaces your read setting — which is why the cards at the top stop showing **Active** once **Public read + write** or **Authenticated User read + write** is in use.

***

## Read-only settings

### Private

*Only you can access this bucket.*

Every new bucket starts here. Nobody else can see what is inside, and nobody else can upload.

You can still share individual files while the bucket stays private — either by making a file public, or with a [presigned URL](https://docs.zata.ai/manage/bucket/storing-objects-in-a-bucket/sharing-an-object-using-presigned-url).

**Choose this** unless you have a specific reason not to.

### Public read

*Anyone on the internet can see the list of files. Downloading a file still requires that file to be public.*

Anyone can open your bucket URL and read the file names, with no sign-in. Downloads are still blocked until you make each file public, and nobody else can upload.

**Choose this** when you want visitors to browse a set of files you are publishing on purpose.

### Authenticated User

*Any signed-in Zata user can list this bucket — not just people in your account.*

This one is easy to misread. It does **not** mean "people in my company". It means **every Zata.ai account in existence**, including strangers who signed up on their own.

**Do not choose this** to share with your team. Create a [subuser](https://docs.zata.ai/subusers/create-a-subuser) and give it a policy instead — that way you decide exactly who gets in.

***

## Setting a bucket to Public read

1. In **Bucket Settings > Access Control**, click **Apply** on the **Public read** card.

<figure><img src="https://2683631041-files.gitbook.io/~/files/v0/b/gitbook-x-prod.appspot.com/o/spaces%2FPPVG4W649TwXN8OejRhb%2Fuploads%2Fgit-blob-194f5443b9b994e7ac2ac7af3774d9d9e659e2a5%2Fbucket-acl-2.png?alt=media" alt="Apply on the Public read card"><figcaption></figcaption></figure>

2. A box appears asking **Allow anyone to list this bucket?**. It shows the bucket name and explains what will change. Read it, then click **Set to Public read**.

<figure><img src="https://2683631041-files.gitbook.io/~/files/v0/b/gitbook-x-prod.appspot.com/o/spaces%2FPPVG4W649TwXN8OejRhb%2Fuploads%2Fgit-blob-0aa2a018079ca4962201cd4bc820a1528a788165%2Fbucket-acl-3.png?alt=media" alt="Allow anyone to list this bucket confirmation"><figcaption></figcaption></figure>

3. The **Public read** card is now marked **Active** and a message confirms *Bucket access set to "Public read"*. A new **PUBLIC BUCKET URL** field appears, with buttons to copy the link or open it in a new tab.

<figure><img src="https://2683631041-files.gitbook.io/~/files/v0/b/gitbook-x-prod.appspot.com/o/spaces%2FPPVG4W649TwXN8OejRhb%2Fuploads%2Fgit-blob-b9aaef0c5ad4dcacb16ee14c61affa977f636632%2Fbucket-acl-4.png?alt=media" alt="Public read active with public bucket URL"><figcaption></figcaption></figure>

To undo this, click **Apply** on the **Private** card.

### Your public bucket URL

The link looks like this:

```
https://<service-url>/<bucket-name>/
```

Use the service URL for the region your bucket is in:

| Region                  | Public bucket URL                      |
| ----------------------- | -------------------------------------- |
| Central India (Indore)  | `https://idr01.zata.ai/<bucket-name>/` |
| Southern India (Mumbai) | `https://bom01.zata.ai/<bucket-name>/` |

The `kriswebsite` bucket above is in Mumbai, so its link is `https://bom01.zata.ai/kriswebsite/`. Opening it shows the file list.

For the full list of regions, see [Service URLs for Zata.ai S3](https://docs.zata.ai/manage/service-urls-for-zata.ai-s3).

***

## Setting a bucket to Authenticated User

1. In **Bucket Settings > Access Control**, click **Apply** on the **Authenticated User** card.

<figure><img src="https://2683631041-files.gitbook.io/~/files/v0/b/gitbook-x-prod.appspot.com/o/spaces%2FPPVG4W649TwXN8OejRhb%2Fuploads%2Fgit-blob-d0ed1ef14ee82b136a52f369bab5dbca690b8918%2Fbucket-acl-5.png?alt=media" alt="Apply on the Authenticated User card"><figcaption></figcaption></figure>

2. A box appears asking **Allow any Zata account to read?**. It warns you that this includes people outside your organisation, and suggests subusers as the safer option. Click **Set to Authenticated User** if you are sure.

<figure><img src="https://2683631041-files.gitbook.io/~/files/v0/b/gitbook-x-prod.appspot.com/o/spaces%2FPPVG4W649TwXN8OejRhb%2Fuploads%2Fgit-blob-a597d2a64c101887b821ccb16e5e7f8f09c256b6%2Fbucket-acl-6.png?alt=media" alt="Allow any Zata account to read confirmation"><figcaption></figcaption></figure>

3. The **Authenticated User** card is now marked **Active** and a message confirms *Bucket access set to "Authenticated User"*.

<figure><img src="https://2683631041-files.gitbook.io/~/files/v0/b/gitbook-x-prod.appspot.com/o/spaces%2FPPVG4W649TwXN8OejRhb%2Fuploads%2Fgit-blob-820035b3c2426daa6c490660cd5ee68bb2721f16%2Fbucket-acl-7.png?alt=media" alt="Authenticated User active"><figcaption></figcaption></figure>

There is no public bucket URL for this option. Visitors without an account still get turned away — only a signed-in Zata.ai user can see the list.

***

## Write access

Everything above is read-only. If you want other people to **put files into** your bucket, open the **ALLOW OTHERS TO UPLOAD** row underneath the three cards.

<figure><img src="https://2683631041-files.gitbook.io/~/files/v0/b/gitbook-x-prod.appspot.com/o/spaces%2FPPVG4W649TwXN8OejRhb%2Fuploads%2Fgit-blob-7811bf04b7e09a4f3777fe0a345efae34fe698a2%2Fbucket-write-acl-1.png?alt=media" alt="Allow others to upload row"><figcaption></figcaption></figure>

Inside you will find a **Write access** status line and the two write settings.

<figure><img src="https://2683631041-files.gitbook.io/~/files/v0/b/gitbook-x-prod.appspot.com/o/spaces%2FPPVG4W649TwXN8OejRhb%2Fuploads%2Fgit-blob-4a046fcda93aae2f9f4954da083a054a3199965d%2Fbucket-write-acl-10.png?alt=media" alt="Write access options expanded"><figcaption></figcaption></figure>

**Write access** shows whether anyone else can write to the bucket at the moment:

* **Off** — *Only you can add, replace or delete objects in this bucket.* This is the default.
* **On** — other people can write to it right now, and the line tells you who.

The two settings you can apply are:

| Setting                             | Who can upload, overwrite and delete                                    |
| ----------------------------------- | ----------------------------------------------------------------------- |
| **Public read + write**             | Anyone on the internet. *You are billed for whatever they store.*       |
| **Authenticated User read + write** | Any signed-in Zata.ai user, including people outside your organisation. |

Each one also grants the matching read access, so those visitors can list the bucket as well as write to it.

### Before you turn this on

> **IMPORTANT** Upload, overwrite and delete are a **single S3 permission**. There is no upload-only option. Anyone you allow to add files can also replace and permanently delete the files you already have.

The dashboard makes the same point when you apply either setting:

> **NOTE** Upload, overwrite and delete are a single S3 permission — there is no upload-only option. Turn on versioning first if you need to recover a file someone overwrites.

So if the files in this bucket matter, turn on [Versioning](https://docs.zata.ai/manage/bucket/create-bucket/bucket-settings) first. With versioning on, an overwrite creates a new version instead of destroying the old one, so you can go back.

Two more things to know before you decide:

* **You pay for what other people do.** Whatever they upload is stored on your account, and their downloads generate egress billed to you. See [Ingress and Egress Policy](https://docs.zata.ai/account/ingress-and-egress-policy).
* **Turning it off later is not a rewind.** Setting the bucket back to Private stops further access, but it does not undo anything that was already uploaded or deleted.

***

## Setting a bucket to Public read + write

This is the most open setting Zata.ai offers. Anyone who knows the bucket name can write to it, with no account and no sign-in.

1. Expand **ALLOW OTHERS TO UPLOAD** and click **Apply** on the **Public read + write** row.

<figure><img src="https://2683631041-files.gitbook.io/~/files/v0/b/gitbook-x-prod.appspot.com/o/spaces%2FPPVG4W649TwXN8OejRhb%2Fuploads%2Fgit-blob-9bf724d99dd1dfbf4edb6be0d2e045dec326f1a2%2Fbucket-write-acl-2.png?alt=media" alt="Apply on the Public read plus write row"><figcaption></figcaption></figure>

2. A box appears asking **Allow anyone on the internet to write?**. It names the bucket and its region, and lists exactly what strangers will be able to do:

   * Upload files of any size or type
   * Overwrite the files you already have
   * Permanently delete your files
   * Store data and generate egress that is billed to you

   Because of that, the dashboard asks you to **type the bucket name to confirm**. The **Allow write access** button stays greyed out until you do.

<figure><img src="https://2683631041-files.gitbook.io/~/files/v0/b/gitbook-x-prod.appspot.com/o/spaces%2FPPVG4W649TwXN8OejRhb%2Fuploads%2Fgit-blob-e71fe21875f9ba59f30b936fc79da131ac336be7%2Fbucket-write-acl-3.png?alt=media" alt="Allow anyone on the internet to write confirmation"><figcaption></figcaption></figure>

3. Type the bucket name and click **Allow write access**. The **ALLOW OTHERS TO UPLOAD** row now shows a yellow **On** badge, **Write access** reads *On — Anyone on the internet can upload, overwrite and delete files in this bucket right now*, and **Public read + write** is marked **Active**. A message confirms *Bucket access set to "Public read + write"*.

<figure><img src="https://2683631041-files.gitbook.io/~/files/v0/b/gitbook-x-prod.appspot.com/o/spaces%2FPPVG4W649TwXN8OejRhb%2Fuploads%2Fgit-blob-3eec17b6af3f5c302261f98da1a0acaf99970680%2Fbucket-write-acl-4.png?alt=media" alt="Public read plus write active"><figcaption></figcaption></figure>

Notice that the three cards at the top no longer show **Active** — the write setting has replaced your read setting. A **PUBLIC BUCKET URL** row appears as well, because this setting includes public read.

> **IMPORTANT** Only use this for a bucket you would not mind losing. A publicly writable bucket can be filled with other people's data, used to host content you did not choose, or emptied by anyone who finds the name. If you need a drop-box where people send you files, use a [subuser](https://docs.zata.ai/subusers/create-a-subuser) with a write policy instead, so you know who is uploading.

***

## Setting a bucket to Authenticated User read + write

This is narrower than Public read + write, because a visitor has to be signed in to a Zata.ai account. It still covers **every** Zata.ai account, though — not only your own team.

1. Expand **ALLOW OTHERS TO UPLOAD** and click **Apply** on the **Authenticated User read + write** row.

<figure><img src="https://2683631041-files.gitbook.io/~/files/v0/b/gitbook-x-prod.appspot.com/o/spaces%2FPPVG4W649TwXN8OejRhb%2Fuploads%2Fgit-blob-91ee94cc957daa46a2277bd5dcf23273c2a41c19%2Fbucket-write-acl-5.png?alt=media" alt="Apply on the Authenticated User read plus write row"><figcaption></figcaption></figure>

2. A box appears asking **Allow any Zata account to write?**. It spells out that this includes people outside your organisation, lists the same four abilities, and asks you to type the bucket name to confirm.

<figure><img src="https://2683631041-files.gitbook.io/~/files/v0/b/gitbook-x-prod.appspot.com/o/spaces%2FPPVG4W649TwXN8OejRhb%2Fuploads%2Fgit-blob-5b0e237de0638e4edd12f53f7faf4fcb002d7ca1%2Fbucket-write-acl-6.png?alt=media" alt="Allow any Zata account to write confirmation"><figcaption></figcaption></figure>

3. Type the bucket name and click **Allow write access**. **Write access** now reads *On — Any signed-in Zata user can upload, overwrite and delete files in this bucket right now*, and **Authenticated User read + write** is marked **Active**. A message confirms *Bucket access set to "Authenticated User read + write"*.

<figure><img src="https://2683631041-files.gitbook.io/~/files/v0/b/gitbook-x-prod.appspot.com/o/spaces%2FPPVG4W649TwXN8OejRhb%2Fuploads%2Fgit-blob-e6e4b26c869b9764932b70e61eb85fd3afc30b9d%2Fbucket-write-acl-7.png?alt=media" alt="Authenticated User read plus write active"><figcaption></figcaption></figure>

There is no public bucket URL here, because anonymous visitors are still turned away.

***

## Turning write access off

1. In the **ALLOW OTHERS TO UPLOAD** section, click **Make private** on the **Write access** row.

<figure><img src="https://2683631041-files.gitbook.io/~/files/v0/b/gitbook-x-prod.appspot.com/o/spaces%2FPPVG4W649TwXN8OejRhb%2Fuploads%2Fgit-blob-2d71d9ee8848a6d04338bbdbe72edce869654473%2Fbucket-write-acl-8.png?alt=media" alt="Make private button on the Write access row"><figcaption></figcaption></figure>

2. **Write access** goes back to **Off**, the **Private** card is marked **Active**, and a message confirms *Bucket access set to "Private"*.

<figure><img src="https://2683631041-files.gitbook.io/~/files/v0/b/gitbook-x-prod.appspot.com/o/spaces%2FPPVG4W649TwXN8OejRhb%2Fuploads%2Fgit-blob-91c33b8c1e13f3e66c9e588a81c4fe13f8b71726%2Fbucket-write-acl-9.png?alt=media" alt="Write access off and bucket private again"><figcaption></figcaption></figure>

**Make private** returns the bucket to Private in one step — it switches off write access and public listing together. If you wanted to keep the file list public, apply **Public read** again afterwards.

Remember that this stops future access only. Files other people already uploaded stay in your bucket, and files they deleted are gone.

***

## Good to know

> **IMPORTANT** A public file list shows your file names to everyone. File names often contain customer names, invoice numbers or project names, so treat the list itself as information worth protecting — even when the files stay private.

* **Changing this setting never changes your files.** A file you made public earlier stays downloadable, even after you set the bucket back to Private. To stop that, make the file private.
* **A bucket policy can block public access.** If a setting seems to do nothing, check the **Security & Access** section and the **Policies** page. See [ACL and bucket policies](/manage/bucket/access-control#acl-and-bucket-policies).
* Browsing and downloading both count towards your egress usage.
* Public access stops working if your account is suspended.


# Object ACL

Make a single file public or private and copy its public link

The Object ACL decides **who can download one particular file**. You set it on each file, from the file list.

This is the setting that actually puts a file on the internet. The [Bucket ACL](/manage/bucket/access-control/bucket-acl) only controls whether people can see your file names.

Every file has two states:

| State       | What it means                                                                                 |
| ----------- | --------------------------------------------------------------------------------------------- |
| **Private** | Only you can download it. Every file starts out private.                                      |
| **Public**  | Anyone with the link can view and download it. No sign-in needed, and the link never expires. |

> **INFO** Making one file public does not expose the rest of your bucket. Someone with the link gets that one file and nothing else — unless you have also set the bucket to Public read, which lets them browse the file names as well.

***

## Making a file public

1. Open your bucket to see the **Bucket Details** page. Find your file in the list, click the **Actions (⋮)** menu on its row, and choose **Make public**.

<figure><img src="https://2683631041-files.gitbook.io/~/files/v0/b/gitbook-x-prod.appspot.com/o/spaces%2FPPVG4W649TwXN8OejRhb%2Fuploads%2Fgit-blob-e740cf31b573a0a4644d6a75f28928eb467f7d40%2Fobject-acl-1.png?alt=media" alt="Make public in the object actions menu"><figcaption></figcaption></figure>

2. A box appears asking **Make this file public?**. It tells you that anyone with the link can view and download the file, that no sign-in is needed, and that the link does not expire. Click **Make public**.

<figure><img src="https://2683631041-files.gitbook.io/~/files/v0/b/gitbook-x-prod.appspot.com/o/spaces%2FPPVG4W649TwXN8OejRhb%2Fuploads%2Fgit-blob-596346a09ae67a41aa1c6c40b1f2099f01973991%2Fobject-acl-2.png?alt=media" alt="Make this file public confirmation"><figcaption></figcaption></figure>

3. A small green globe now appears next to the file name. This is how you spot which files in a bucket are public.

<figure><img src="https://2683631041-files.gitbook.io/~/files/v0/b/gitbook-x-prod.appspot.com/o/spaces%2FPPVG4W649TwXN8OejRhb%2Fuploads%2Fgit-blob-417eed46e1cf59c10f10c807f74cdcd0394a96f9%2Fobject-acl-3.png?alt=media" alt="Green globe icon marking a public object"><figcaption></figcaption></figure>

***

## Getting the link

Once a file is public, its **Actions (⋮)** menu changes. **Make public** is replaced by two new items: **Copy public link** and **Make private**.

Click **Copy public link** to copy the link to your clipboard.

<figure><img src="https://2683631041-files.gitbook.io/~/files/v0/b/gitbook-x-prod.appspot.com/o/spaces%2FPPVG4W649TwXN8OejRhb%2Fuploads%2Fgit-blob-152c6f233ab11bf32ef43976656a7b92c5ea66bf%2Fobject-acl-4.png?alt=media" alt="Copy public link in the object actions menu"><figcaption></figcaption></figure>

The link looks like this:

```
https://<service-url>/<bucket-name>/<file-name>
```

For `index.html` in the `kriswebsite` bucket in Mumbai, that is `https://bom01.zata.ai/kriswebsite/index.html`. Paste it into any browser and the file opens straight away, with no sign-in.

<figure><img src="https://2683631041-files.gitbook.io/~/files/v0/b/gitbook-x-prod.appspot.com/o/spaces%2FPPVG4W649TwXN8OejRhb%2Fuploads%2Fgit-blob-ff8beb01591401abe7c172034696886eea0ce933%2Fobject-acl-5.png?alt=media" alt="Public object link opened in a browser"><figcaption></figcaption></figure>

Use the service URL for your bucket's region — `idr01.zata.ai` for Central India, `bom01.zata.ai` for Southern India.

If your file sits inside a folder, include the folder name in the link:

```
https://bom01.zata.ai/kriswebsite/assets/logo.png
```

***

## Making a file private again

1. Open the **Actions (⋮)** menu for the file and choose **Make private**.

<figure><img src="https://2683631041-files.gitbook.io/~/files/v0/b/gitbook-x-prod.appspot.com/o/spaces%2FPPVG4W649TwXN8OejRhb%2Fuploads%2Fgit-blob-afd39c0cc9d57d5e4e66d613a487afac153f0f0c%2Fobject-acl-6.png?alt=media" alt="Make private in the object actions menu"><figcaption></figcaption></figure>

2. A box appears asking **Make this file private?**. It warns you that the link stops working straight away, and that anyone who saved it will now get an access-denied error. Click **Make private**.

<figure><img src="https://2683631041-files.gitbook.io/~/files/v0/b/gitbook-x-prod.appspot.com/o/spaces%2FPPVG4W649TwXN8OejRhb%2Fuploads%2Fgit-blob-7e3dd488713628c07e17012b4e28fb5732329c40%2Fobject-acl-7.png?alt=media" alt="Make this file private confirmation"><figcaption></figcaption></figure>

3. The green globe disappears. The file is private again.

<figure><img src="https://2683631041-files.gitbook.io/~/files/v0/b/gitbook-x-prod.appspot.com/o/spaces%2FPPVG4W649TwXN8OejRhb%2Fuploads%2Fgit-blob-3ef1a95f52754264a256f2adfab4c3da6732e862%2Fobject-acl-8.png?alt=media" alt="Object list with no public objects"><figcaption></figcaption></figure>

This is the only way to switch off a public link. Because the link never expires by itself, **Make private** is what you use if you shared a file by mistake.

***

## Good to know

> **IMPORTANT** A public link works forever until you switch it off. It can be forwarded to other people, found by search engines, or saved by anyone who opens it. If you only want to share a file for a short while, use a [presigned URL](https://docs.zata.ai/manage/bucket/storing-objects-in-a-bucket/sharing-an-object-using-presigned-url) instead — it expires on its own.

* **You set this one file at a time.** There is no single switch that makes every file in a bucket public.
* **New uploads are always private**, even in a bucket set to Public read. Files you add later have to be made public one by one.
* **Making a file private does not delete it.** Its versions and any [Object Lock](https://docs.zata.ai/manage/bucket/object-lock) protection stay exactly as they were.
* Downloads count towards your egress usage, and the link stops working if your account is suspended.


# Preview Manager

**Notice: Egress Usage Applies** - Browsing or previewing files through the File Manager will count against your included egress quota. This includes actions such as viewing, downloading, or streaming files. If your egress usage exceeds your plan limit, services may be temporarily restricted as per your account terms.

The Preview Manager is used to preview and manage media files, images, and documents stored inside your buckets without downloading them.

To access the Preview Manager:

1. Log in to your **Zata.ai Dashboard**.
2. From the left sidebar menu, go to:\
   **Manage → Preview Manager**.

### Buckets Overview

Once you open the Preview Manager, all your available buckets are displayed.\
In your case, the buckets visible are:

* **preparcona**
* **prertest**

Each bucket shows basic information such as:

* Bucket name
* Region (e.g., Indore or Mumbai)
* Storage used
* Number of objects

These buckets act as containers where your files and objects are stored.

<figure><img src="https://2683631041-files.gitbook.io/~/files/v0/b/gitbook-x-prod.appspot.com/o/spaces%2FPPVG4W649TwXN8OejRhb%2Fuploads%2F5DRVysGYnUYd7FlWmgCC%2Fimage.png?alt=media&amp;token=eccb4a47-f915-4377-bb02-6eb4a2585493" alt="Preview Manager Indore Region"><figcaption></figcaption></figure>

<figure><img src="https://2683631041-files.gitbook.io/~/files/v0/b/gitbook-x-prod.appspot.com/o/spaces%2FPPVG4W649TwXN8OejRhb%2Fuploads%2Fgit-blob-db984f8076cab4ed07188ffea25bbb97c92fc015%2Fpreview-manager-bom.png?alt=media" alt="Preview Manager Mumbai Region"><figcaption></figcaption></figure>

### Previewing Files Inside a Bucket

📸 *Screenshot: Bucket opened in Preview Manager*

To preview files:

1. Click on any bucket (for example: **prertest**).
2. The Preview Manager will display all objects stored inside that bucket.

<figure><img src="https://2683631041-files.gitbook.io/~/files/v0/b/gitbook-x-prod.appspot.com/o/spaces%2FPPVG4W649TwXN8OejRhb%2Fuploads%2FbEnTgXphOLdPB660lCzl%2Fimage.png?alt=media&amp;token=f47a5ff4-a5d8-475b-9b0a-91af8b0caf93" alt=""><figcaption></figcaption></figure>

### Previewing an Object

3. Click on any file to open its preview.
4. The file will open in a preview window without downloading.<br>

<figure><img src="https://2683631041-files.gitbook.io/~/files/v0/b/gitbook-x-prod.appspot.com/o/spaces%2FPPVG4W649TwXN8OejRhb%2Fuploads%2FN590NeSXpWLWx7f2W31s%2Fimage.png?alt=media&amp;token=ed9d1e62-9400-4df2-b047-66035ede7341" alt=""><figcaption></figcaption></figure>

Supported preview formats include:

* Images: `.jpg`, `.png`, `.gif`
* Videos: `.mp4`
* Documents: `.pdf`
* Other supported media formats

This feature helps you:

* Quickly verify file content
* Check uploaded data
* Avoid unnecessary downloads


# Access Keys

An Access Key is used to authenticate and make secure programmatic API calls to the Zata.ai S3 service. It allows applications and S3-compatible tools to interact with object storage for operations such as uploading, downloading, listing, and managing files.

Each access key consists of two parts:

* **Access Key ID** – Acts as a public identifier (similar to a username).
* **Secret Access Key** – Acts as a private credential (similar to a password).

Both are required to authenticate requests to the Zata.ai API.

Access keys are used to make secure REST or Query protocol requests to the Zata.ai service. When configuring any S3-compatible client such as S3 Browser or Cyberduck, you must enter the Access Key ID and Secret Access Key in the respective fields.

The Zata.ai S3 endpoints are:

| Region         | Endpoint      |
| -------------- | ------------- |
| Central India  | idr01.zata.ai |
| Southern India | bom01.zata.ai |

For security reasons, the Secret Access Key should never be shared with anyone. It is recommended to store access keys securely and rotate them periodically as a best practice.

Access keys provide a standardized and secure way to connect applications and tools with Zata.ai Object Storage.


# Creating a New Access Key

You can create only five access keys.

* Log in to the **Zata.ai Panel**.
* From the left-side menu, click on **Access Keys**.

The Access Keys page displays all your existing keys across both regions (Indore and Mumbai), along with summary cards for **Total Keys**, **Root Keys**, and **Sub-user Keys**.

<figure><img src="https://2683631041-files.gitbook.io/~/files/v0/b/gitbook-x-prod.appspot.com/o/spaces%2FPPVG4W649TwXN8OejRhb%2Fuploads%2Fgit-blob-6f52d8db49b1ae21dd4a50c00aeb3e9703db61c9%2Faccess-key-both-region-1.png?alt=media" alt="Access Keys overview with both regions"><figcaption></figcaption></figure>

* Click on **Generate Key**.

You will see the **Create Access Key** dialog with two options:

* **Root User** – Full administrative access
* **Sub User** – Limited user-level access

Select the appropriate option based on your requirement and choose your **Region** (Indore or Mumbai) from the dropdown.

**Example: Generating a Root Key for Indore region**

<figure><img src="https://2683631041-files.gitbook.io/~/files/v0/b/gitbook-x-prod.appspot.com/o/spaces%2FPPVG4W649TwXN8OejRhb%2Fuploads%2Fgit-blob-7dd5a5d64de8fede9eeb121407f99a81f0f09a26%2Faccess-key-both-region-2.png.png?alt=media" alt="Create Access Key - Indore Region" width="375"><figcaption></figcaption></figure>

**Example: Generating a Root Key for Mumbai region**

<figure><img src="https://2683631041-files.gitbook.io/~/files/v0/b/gitbook-x-prod.appspot.com/o/spaces%2FPPVG4W649TwXN8OejRhb%2Fuploads%2Fgit-blob-e1833c019d12794420a4c77abfd81a87d5d3b6f4%2Faccess-key-both-region-3.png?alt=media" alt="Create Access Key - Mumbai Region" width="375"><figcaption></figcaption></figure>

After selecting the user type and region, click **Continue**. You will see an **Important Note** reminding you to download your key file immediately.

* Click **Generate Key** to create the access key.

<figure><img src="https://2683631041-files.gitbook.io/~/files/v0/b/gitbook-x-prod.appspot.com/o/spaces%2FPPVG4W649TwXN8OejRhb%2Fuploads%2Fgit-blob-e4b2ae5def7afdbf172df51e7b431bdd87a76cad%2Faccess-key-both-region-4.png?alt=media" alt="Important Note - Generate Key" width="375"><figcaption></figcaption></figure>

### Generating a Sub-user Key

To generate a key for a **Sub-user**, select the Sub User option in the Create Access Key dialog.

<figure><img src="https://2683631041-files.gitbook.io/~/files/v0/b/gitbook-x-prod.appspot.com/o/spaces%2FPPVG4W649TwXN8OejRhb%2Fuploads%2FRZ95cOoKEheWJ2gtD0yF%2Fimage.png?alt=media&amp;token=c7fd5f34-9734-45c7-a035-184347bb65bb" alt=""><figcaption></figcaption></figure>

* Choose the required sub-user from the list (for example: `accessuser`).
* Click on **Generate Key**.

<figure><img src="https://2683631041-files.gitbook.io/~/files/v0/b/gitbook-x-prod.appspot.com/o/spaces%2FPPVG4W649TwXN8OejRhb%2Fuploads%2FGJPvPML3UUodlh8WiMbl%2Fimage.png?alt=media&amp;token=de37a2ac-de30-4b2c-8c7a-7a424d97681c" alt=""><figcaption></figcaption></figure>

### After Key Generation

* As soon as you click **Generate Key**, a `.txt` file is automatically downloaded to your local system.
* Open the downloaded `.txt` file. It will contain:
  * Access Key ID
  * Secret Access Key
* Save this file in a secure location on your system.
* Use these keys to configure:
  * S3 Browser
  * Cyberduck
  * Any application using the Zata.ai S3 API

The newly generated key will appear in the Access Keys list with its associated region.

<figure><img src="https://2683631041-files.gitbook.io/~/files/v0/b/gitbook-x-prod.appspot.com/o/spaces%2FPPVG4W649TwXN8OejRhb%2Fuploads%2Fgit-blob-a58eebbafbdcae61223ba153e09f98275dccfce3%2Faccess-key-both-region-last.png?alt=media" alt="Access Keys list with all keys across both regions"><figcaption></figcaption></figure>

If the downloaded file is lost, you must delete the existing access key and generate a new one, as the Secret Access Key cannot be recovered.


# Service URLs for Zata.ai S3

This page provides the service endpoints required to connect to Zata.ai Object Storage using S3-compatible tools and applications. Each region has its own unique service URL, which must be used while configuring clients such as S3 Browser, Cyberduck, AWS CLI, or any application using the S3 API.

| Region         | Service URL             | Region Code  |
| -------------- | ----------------------- | ------------ |
| Central India  | <https://idr01.zata.ai> | CentralIndia |
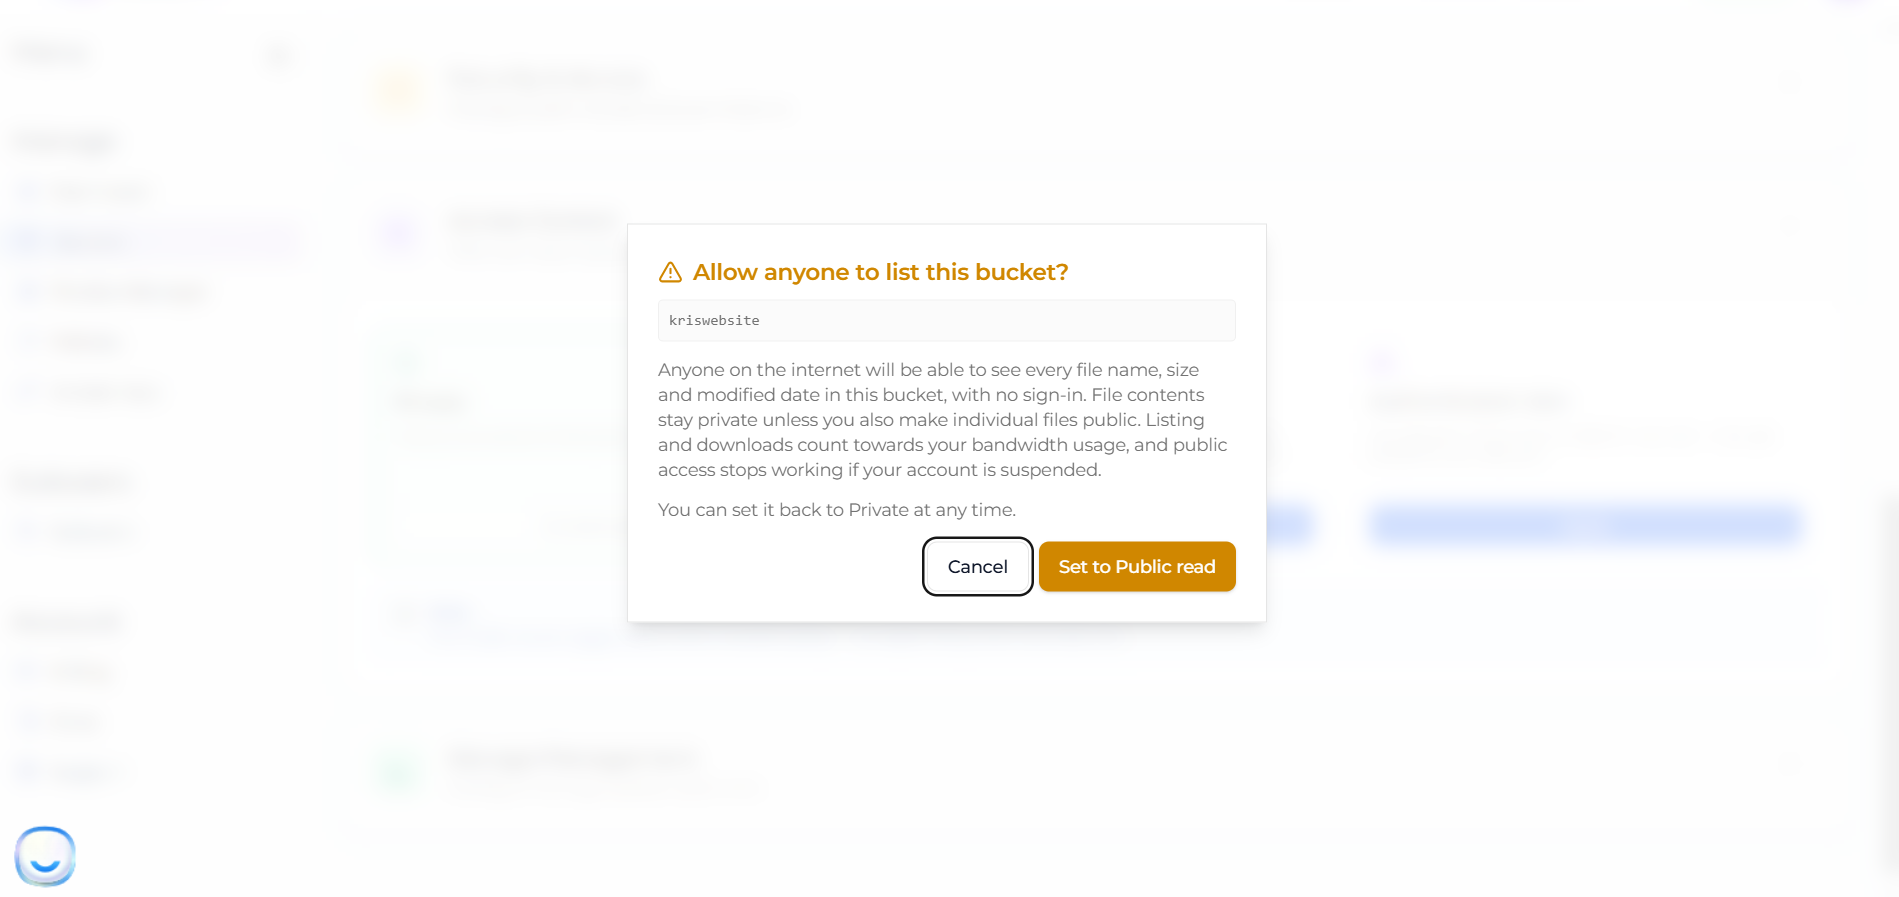
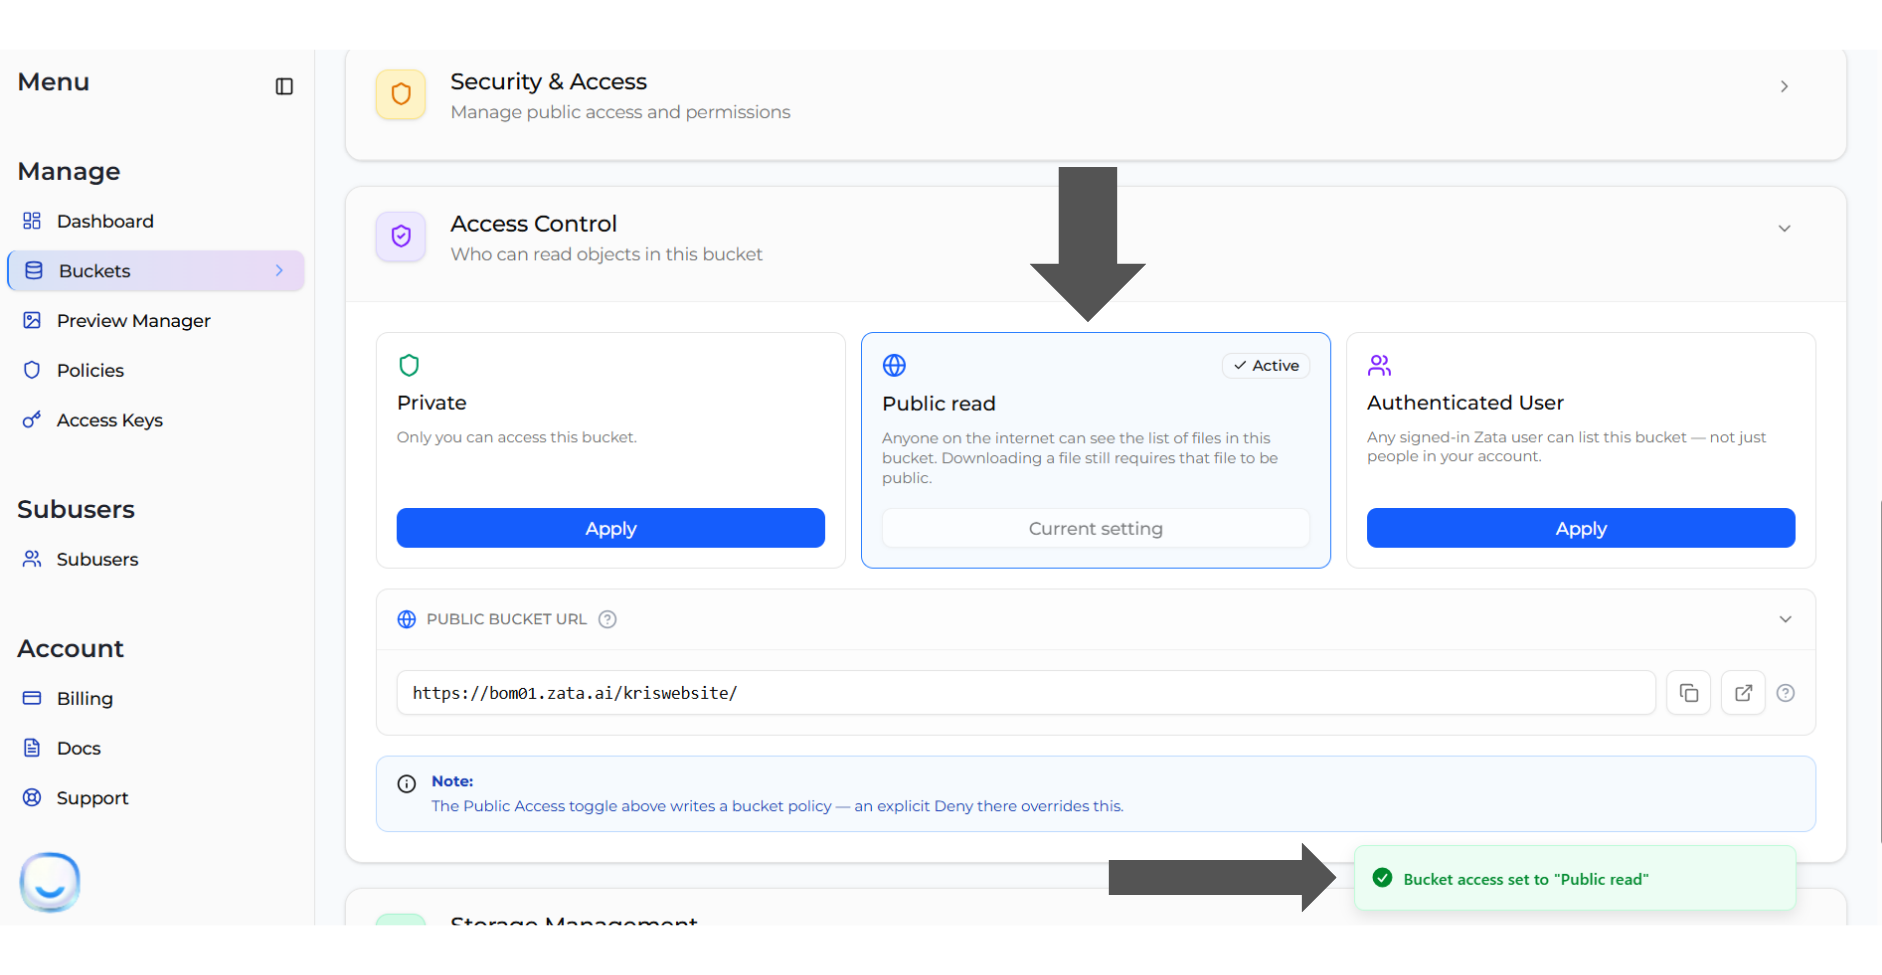
| Southern India | <https://bom01.zata.ai> | SouthIndia   |
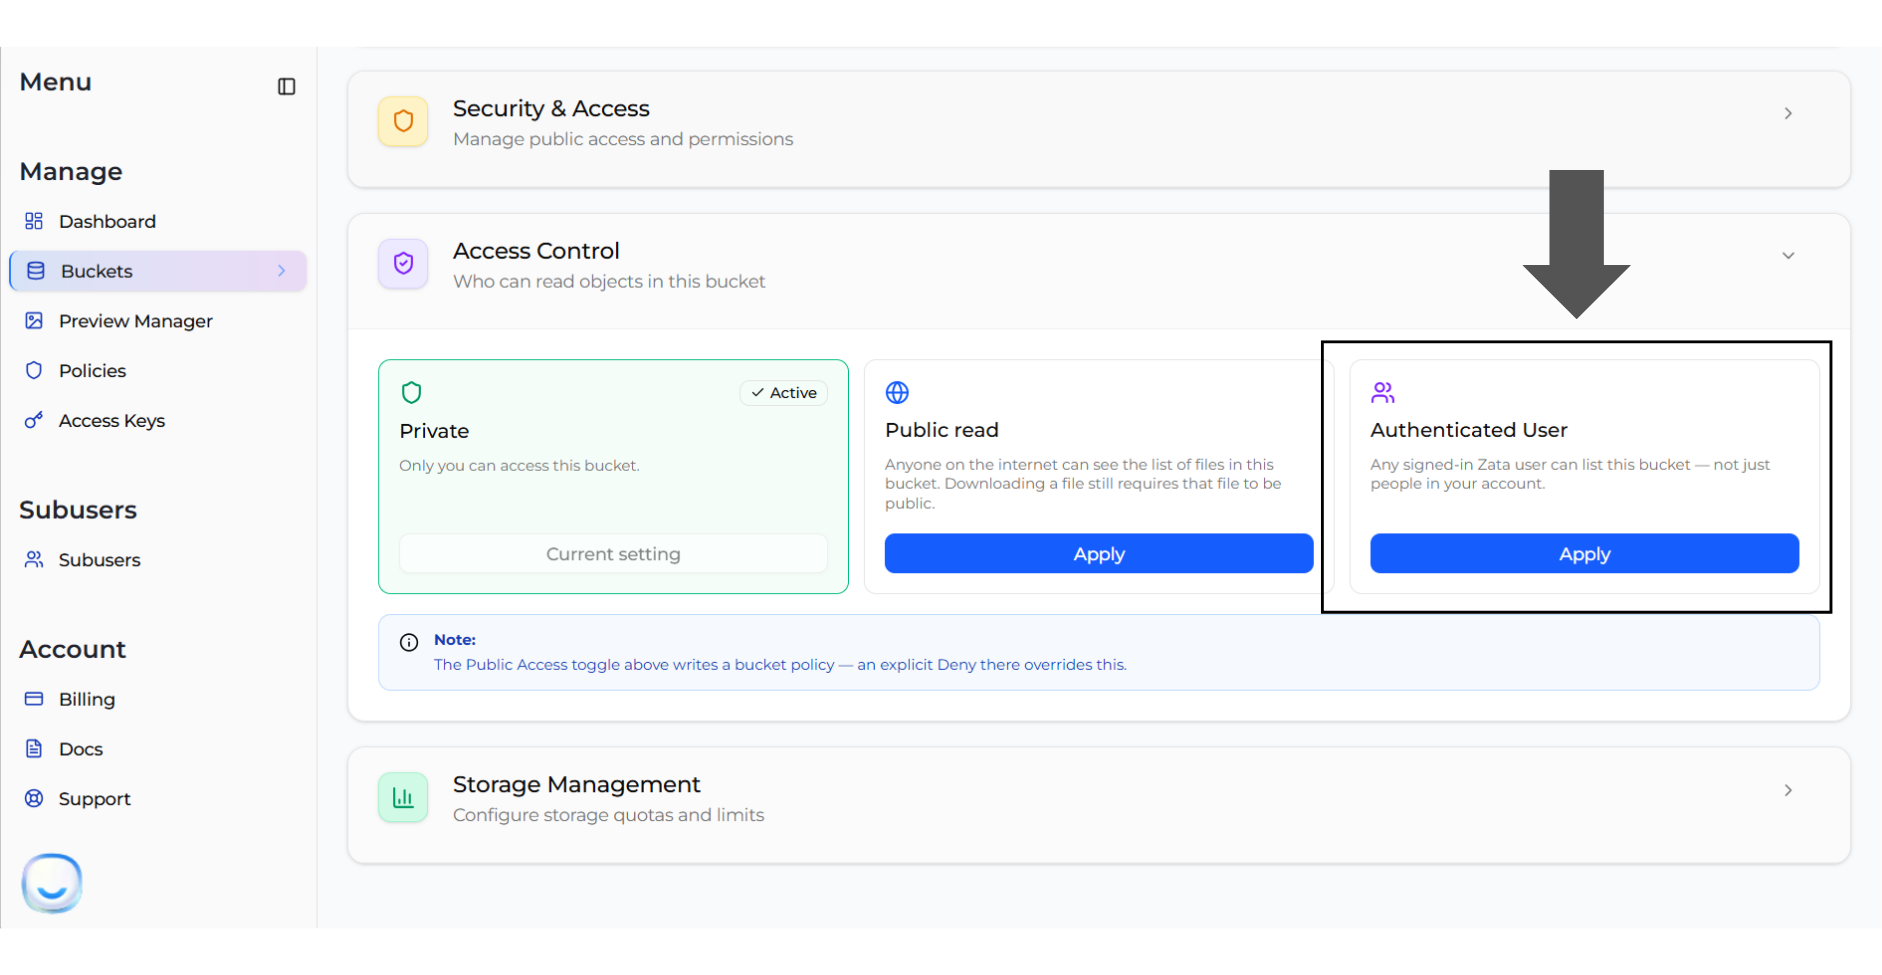
The **Service URL** is the endpoint through which all S3 API requests are sent to Zata.ai. When configuring any S3-compatible client, this URL must be provided as the S3 endpoint.

The **Region Code** is used for identifying the storage region while creating buckets or configuring applications that require region-specific settings.

Use this service URL along with your **Access Key ID** and **Secret Access Key** to establish a secure connection between your application and Zata.ai S3 Object Storage.


# Migration

The Migration feature enables seamless transfer of data from external storage platforms to Zata.ai S3 storage. It is designed to simplify data movement, reduce manual effort, and ensure secure and efficient data handling.

This module helps in centralizing data by allowing users to bring content from multiple sources into a single S3-compatible storage environment. It supports reliable data transfer while maintaining data integrity and accessibility.

The Migration feature is built to be scalable and extensible, allowing additional storage sources and migration options to be integrated in the future as needed. This makes it suitable for growing data requirements and evolving storage ecosystems.


# Migrate from AWS S3 storage to Zata.ai S3 storage

**Prerequisites**

* Select any Linux operating system to perform the migration process.
* In this setup, we have chosen **Ubuntu 22.04** as the operating system.
* Click on the provided link to **Launch the Instance** [Instance](https://docs.neevcloud.com/neevcloud-products/computes/getting-started-launch-vms).

**AWS Setup**

For AWS configuration:

* Log in to the **AWS Management Console**.
* This console will be used to create and manage the S3 bucket and generate access credentials required for migration.

<figure><img src="https://2683631041-files.gitbook.io/~/files/v0/b/gitbook-x-prod.appspot.com/o/spaces%2FPPVG4W649TwXN8OejRhb%2Fuploads%2FaXqOsWTR10IPY12ULeoc%2Fimage.png?alt=media&amp;token=27bbf679-5335-4547-9cfc-c1f8bb2513cd" alt=""><figcaption></figcaption></figure>

**Create a Bucket in AWS S3**

* After logging in to the AWS Management Console, search for **S3** in the services search bar.
* Open the **S3** service and click on **Create bucket**.
* Provide the required details such as bucket name and region, and complete the bucket creation process.

<figure><img src="https://2683631041-files.gitbook.io/~/files/v0/b/gitbook-x-prod.appspot.com/o/spaces%2FPPVG4W649TwXN8OejRhb%2Fuploads%2F6SiB2as25rgtzd4nZTXX%2Fimage.png?alt=media&amp;token=0ecc32fb-4d89-49b0-af9f-ed8ab248bc50" alt=""><figcaption></figcaption></figure>

**Set Bucket Policy and Permissions**

* After creating the bucket, apply the required bucket permissions and bucket policy.
* Click on the created bucket, then navigate to **Permissions → Bucket Policy → Edit**.
* Update the policy by modifying the bucket name, user name, and user account ID according to your requirements before saving it.

When applying a bucket policy, ensure you customize the values based on your requirements. Do not copy this policy directly.

<figure><img src="https://2683631041-files.gitbook.io/~/files/v0/b/gitbook-x-prod.appspot.com/o/spaces%2FPPVG4W649TwXN8OejRhb%2Fuploads%2FHYyPUEaa11AweCSDhF7g%2Fimage.png?alt=media&amp;token=e66e9a02-f4a4-4717-91fb-2b171b0df48a" alt=""><figcaption></figcaption></figure>

**Create Access and Secret Key**

* Navigate to the **IAM** service from the AWS Management Console.
* Go to the **Users** section and select an existing user to create an access and secret key.
* If the user does not exist, create a new user and assign **AdministratorAccess** permissions.

<figure><img src="https://2683631041-files.gitbook.io/~/files/v0/b/gitbook-x-prod.appspot.com/o/spaces%2FPPVG4W649TwXN8OejRhb%2Fuploads%2FEWXuoQg8NPd4ija2uKNn%2Fimage.png?alt=media&amp;token=66534415-6c7f-46d1-af3c-6e16fc384622" alt=""><figcaption></figcaption></figure>

Verify that the selected user has sufficient permissions to access and manage the S3 buckets. Then, navigate to the **Security Credentials** section to generate the Access Key ID and Secret Access Key.

<figure><img src="https://2683631041-files.gitbook.io/~/files/v0/b/gitbook-x-prod.appspot.com/o/spaces%2FPPVG4W649TwXN8OejRhb%2Fuploads%2Fy9yth2xWg74absw1kch8%2Fimage.png?alt=media&amp;token=9a432719-13b4-46f4-b27d-2fc57b6b6cab" alt=""><figcaption></figcaption></figure>

Now create the security credentials to click on the security credentials to create the access key.

<figure><img src="https://2683631041-files.gitbook.io/~/files/v0/b/gitbook-x-prod.appspot.com/o/spaces%2FPPVG4W649TwXN8OejRhb%2Fuploads%2FRxWPKLVjj4yfcDhietoe%2Fimage.png?alt=media&amp;token=4ff29b40-8879-4a97-a085-1504b9228694" alt=""><figcaption></figcaption></figure>

<figure><img src="https://2683631041-files.gitbook.io/~/files/v0/b/gitbook-x-prod.appspot.com/o/spaces%2FPPVG4W649TwXN8OejRhb%2Fuploads%2FCZhOfjZ4j4WHjo7DAPbO%2Fimage.png?alt=media&amp;token=22723fd8-9f4a-4924-8919-ac960e910b0c" alt=""><figcaption></figcaption></figure>

Before clicking on "Done," first copy the access and secret keys to your notepad.

<figure><img src="https://2683631041-files.gitbook.io/~/files/v0/b/gitbook-x-prod.appspot.com/o/spaces%2FPPVG4W649TwXN8OejRhb%2Fuploads%2FQD1auNeGk0OBjB5PpWgo%2Fimage.png?alt=media&amp;token=919ae9d3-897e-4427-8ba8-3ac6febe9651" alt=""><figcaption></figcaption></figure>

After performing these processes in AWS, configure the Zata.ai settings.

**Setup Zata.ai**

For Zata.ai configuration:

* Open the Zata.ai login page and sign in to your account [login page](https://auth.zata.ai/realms/zata/protocol/openid-connect/auth?client_id=zatacloud_client\&redirect_uri=https%3A%2F%2Fmy.zata.ai%2F\&state=dd2b5305-f7f5-4922-8639-4b0c62060c2f\&response_mode=fragment\&response_type=code\&scope=openid\&nonce=646d8811-0870-469c-9045-9e13d0fdd1b3\&code_challenge=wRG6I1qb9wdmY4unvHhPYaYq5WWM-801w72AYyLi8xY\&code_challenge_method=S256).
* Create a bucket by following the *Zata Bucket Creation Guide* [Bucket Creation Guide](https://docs.zata.ai/manage/bucket/create-bucket)
* Generate the Access Key ID and Secret Access Key by following the *Access Keys Guide* [Access Keys Guid](https://docs.zata.ai/manage/access-keys/creating-a-new-access-key)e
* Refer to the Zata.ai documentation for more detailed information and features [zata.ai](https://zata.ai/)

**Guide to Move Data from AWS to Zata.ai**

Ubuntu 22.04 is used as an intermediary system to facilitate the data migration from AWS S3 to Zata.ai S3. This system acts as a bridge between both storage platforms during the transfer process.

For the first process (AWS side setup):

* Update and upgrade the Ubuntu system to ensure all packages are up to date.

```
sudo apt-get update -y
sudo apt-get upgrade -y
```

For migrating data from AWS to Zata.ai, use **rclone**

### Install the configure the rclone <a href="#install-the-configure-the-rclone" id="install-the-configure-the-rclone"></a>

Install and configure the rclone.

```
sudo apt-get install rclone -y
```

* To migrate data, rclone must be configured for both AWS and Zata.ai.
* First, configure rclone for AWS, and then configure it for Zata.ai.
* Run the following command to start the rclone configuration:

```
sudo rclone config
```

* When the rclone configuration starts, choose **`n`** to create a new remote.
* Enter **AWS** as the name of the remote.

<figure><img src="https://2683631041-files.gitbook.io/~/files/v0/b/gitbook-x-prod.appspot.com/o/spaces%2FPPVG4W649TwXN8OejRhb%2Fuploads%2F89wKTEaqE9lpvChHHsA3%2Fimage.png?alt=media&amp;token=1357083f-23cc-4398-8eb2-480499da93d0" alt=""><figcaption></figcaption></figure>

For the storage type, choose option **`4`** to select the AWS S3–compliant storage provider.

<figure><img src="https://2683631041-files.gitbook.io/~/files/v0/b/gitbook-x-prod.appspot.com/o/spaces%2FPPVG4W649TwXN8OejRhb%2Fuploads%2F4c6Vnqwu9YLgGpRPFBgf%2Fimage.png?alt=media&amp;token=5c81679b-ccdb-485d-a5a4-6eb27a05f246" alt=""><figcaption></figcaption></figure>

Select your S3 provider by choosing option **`1`** for **AWS S3**.

<figure><img src="https://2683631041-files.gitbook.io/~/files/v0/b/gitbook-x-prod.appspot.com/o/spaces%2FPPVG4W649TwXN8OejRhb%2Fuploads%2Fj4A7vNkNBFLgtri4t7Gu%2Fimage.png?alt=media&amp;token=8919c57c-31d4-4378-952d-50babee7884a" alt=""><figcaption></figcaption></figure>

* When prompted for `env_auth`, select **false** (press Enter to use the default value).
* This option is used only if credentials are taken from environment variables or EC2/ECS metadata.
* Since the Access Key ID and Secret Access Key were already created in the AWS section, manual entry will be used.
* Enter the **AWS Access Key ID** and **AWS Secret Access Key** when prompted.

<figure><img src="https://2683631041-files.gitbook.io/~/files/v0/b/gitbook-x-prod.appspot.com/o/spaces%2FPPVG4W649TwXN8OejRhb%2Fuploads%2F6tvn5KJzMTxJgYq9h7MP%2Fimage.png?alt=media&amp;token=8a33f798-6018-4c93-8785-5c0053a0f6f8" alt=""><figcaption></figcaption></figure>

* Set the endpoint according to your AWS region.
* In our case, we are using the **Mumbai region**, so the endpoint is:

  ```
  s3.ap-south-1.amazonaws.com
  ```
* When asked for the region, choose option **`17`** for **Asia Pacific (Mumbai)**.

<figure><img src="https://2683631041-files.gitbook.io/~/files/v0/b/gitbook-x-prod.appspot.com/o/spaces%2FPPVG4W649TwXN8OejRhb%2Fuploads%2FZJzXN0Arj8zRZjFUi6pA%2Fimage.png?alt=media&amp;token=13c753a0-dc1f-46a3-9b32-27f9c83825e4" alt=""><figcaption></figcaption></figure>

* When prompted for the S3 API endpoint, enter the following value:

  ```
  s3.ap-south-1.amazonaws.com
  ```
* This sets the S3 API endpoint for the Mumbai (Asia Pacific) region.

<figure><img src="https://2683631041-files.gitbook.io/~/files/v0/b/gitbook-x-prod.appspot.com/o/spaces%2FPPVG4W649TwXN8OejRhb%2Fuploads%2FS0TRpFVj2pjGkxm4zIEI%2Fimage.png?alt=media&amp;token=b1cf2186-df2a-4219-a3bf-31cdeff077f8" alt=""><figcaption></figcaption></figure>

* Press **Enter** to accept all default values.
* When prompted for **Storage Class**, change the value and choose option **`2`**.

<figure><img src="https://2683631041-files.gitbook.io/~/files/v0/b/gitbook-x-prod.appspot.com/o/spaces%2FPPVG4W649TwXN8OejRhb%2Fuploads%2FCY2UsjDDKgPVZ59Dsu0x%2Fimage.png?alt=media&amp;token=a285af42-621c-492e-a223-9dd8da46928b" alt=""><figcaption></figcaption></figure>

* For the ACL option, choose **`4`**.
* This setting applies only when creating buckets.
* Keep all remaining options as default by pressing **Enter** until the configuration is completed.

<figure><img src="https://2683631041-files.gitbook.io/~/files/v0/b/gitbook-x-prod.appspot.com/o/spaces%2FPPVG4W649TwXN8OejRhb%2Fuploads%2F7JR8LMAamo1qqKwSaOo1%2Fimage.png?alt=media&amp;token=2101506d-0309-4fdc-9f01-4621933fed4b" alt=""><figcaption></figcaption></figure>

This is the remote configuration completed after following these steps:

<figure><img src="https://2683631041-files.gitbook.io/~/files/v0/b/gitbook-x-prod.appspot.com/o/spaces%2FPPVG4W649TwXN8OejRhb%2Fuploads%2FelkgnwkF1Jma7exPpc0Q%2Fimage.png?alt=media&amp;token=13102935-fc79-4f0f-b53e-1f3ca2d762d1" alt=""><figcaption></figcaption></figure>

### Second process for Zata.ai

**Configure rclone for Zata.ai**

* Choose **`n`** to create a new remote.
* Set the remote name as **zata**.
* Choose option **`4`** for **S3 Compliant Storage Provider**.
* Choose option **`13`** for **S3 Compatible Provider**.
* Set `env_auth` to **false** to use manual credentials.
* Enter the **Zata Access Key ID** and **Zata Secret Access Key** (refer to the Access Keys Guide).[Access Keys Guid](https://docs.zata.ai/manage/access-keys/creating-a-new-access-key)e
* Set the endpoint as per your region:

  ```
  idr01.zata.ai    (for Central India / Indore)
  bom01.zata.ai    (for Southern India / Mumbai)
  ```

<figure><img src="https://2683631041-files.gitbook.io/~/files/v0/b/gitbook-x-prod.appspot.com/o/spaces%2FPPVG4W649TwXN8OejRhb%2Fuploads%2F7UDrr2kg9mZbGUnBXH0s%2Fimage.png?alt=media&amp;token=8b361531-935e-4c8c-8dc9-7caf11bc0e60" alt=""><figcaption></figcaption></figure>

<figure><img src="https://2683631041-files.gitbook.io/~/files/v0/b/gitbook-x-prod.appspot.com/o/spaces%2FPPVG4W649TwXN8OejRhb%2Fuploads%2Fgit-blob-3bcc377f65bf72cd694ba4c6e93102becca49174%2Fmigration-for-aws-s3.png?alt=media" alt="AWS to Zata Mumbai Migration"><figcaption></figcaption></figure>

Ensure you have created buckets in both **AWS** and Zata.ai before running these commands.

**Copy Data from AWS S3 to Zata.ai S3**

* After completing the rclone configuration for both AWS and Zata.ai, you can start the data transfer.
* Use the following command to copy data from the AWS bucket to the Zata.ai bucket:

```bash
rclone copy AWS:<aws_bucket_name> zata:<zata_bucket_name> --s3-region ap-south-1 --progress
```

* Replace `<aws_bucket_name>` with your AWS S3 bucket name.
* Replace `<zata_bucket_name>` with your Zata.ai bucket name.
* The `--progress` option shows real-time transfer status.
* This command securely copies all objects from AWS S3 to Zata.ai S3.

<figure><img src="https://2683631041-files.gitbook.io/~/files/v0/b/gitbook-x-prod.appspot.com/o/spaces%2FPPVG4W649TwXN8OejRhb%2Fuploads%2Fgc3QntDOGXZac9RftSId%2Fimage.png?alt=media&amp;token=4feed9e8-223a-4825-bc39-cb1575ed1206" alt=""><figcaption></figcaption></figure>

After completing the data transfer, return to both the AWS S3 console and the Zata.ai dashboard to verify the status of the buckets and confirm that all data has been successfully copied.


# Migrate from Wasabi S3 storage to Zata.ai S3 storage

Wasabi Storage is a cloud-based object storage service that provides high performance, scalability, and cost-effective storage solutions. It is commonly used for backup, disaster recovery, and archiving purposes.

**Prerequisites**

* Select any Linux operating system to perform this process.
* In this setup, **Ubuntu 22.04** is used as the operating system.
* Launch the Ubuntu [Instance](https://docs.neevcloud.com/neevcloud-products/computes/getting-started-launch-vms).

**Setup Wasabi**

* Open the Wasabi login page.
* Log in to the **Wasabi Console** to start the configuration [Wasabi Console.](https://console.wasabisys.com/login)

<figure><img src="https://2683631041-files.gitbook.io/~/files/v0/b/gitbook-x-prod.appspot.com/o/spaces%2FPPVG4W649TwXN8OejRhb%2Fuploads%2Fggcbdpf4E4oo24RE2Hlf%2Fimage.png?alt=media&amp;token=9a8a923c-d0ca-4c27-b343-7e38c6789516" alt=""><figcaption></figcaption></figure>

**Create a Bucket in Wasabi**

* After logging in to the Wasabi Console, navigate to the **Buckets** section.
* Click on **Create Bucket** and complete the bucket creation process by providing the required details.

<figure><img src="https://2683631041-files.gitbook.io/~/files/v0/b/gitbook-x-prod.appspot.com/o/spaces%2FPPVG4W649TwXN8OejRhb%2Fuploads%2F7D8hT15qZuuSNQPmh98l%2Fimage.png?alt=media&amp;token=34abd01c-6be8-4f2e-9bfb-b7bed03060d1" alt=""><figcaption></figcaption></figure>

**Create Access & Secret Key**

* Navigate to the **Access Keys** section in the Wasabi Console.
* Generate a new **Access Key ID** and **Secret Access Key**, and store them securely for later use.

<figure><img src="https://2683631041-files.gitbook.io/~/files/v0/b/gitbook-x-prod.appspot.com/o/spaces%2FPPVG4W649TwXN8OejRhb%2Fuploads%2FvKgX8nIl2f3d8ErDNLqf%2Fimage.png?alt=media&amp;token=0f77c1ef-f763-4af4-b95a-8fed50a46329" alt=""><figcaption></figcaption></figure>

**Setup Zata.ai**

For Zata.ai configuration:

* Open the Zata.ai login page and sign in to your account [login page](https://auth.zata.ai/realms/zata/protocol/openid-connect/auth?client_id=zatacloud_client\&redirect_uri=https%3A%2F%2Fmy.zata.ai%2F\&state=dd2b5305-f7f5-4922-8639-4b0c62060c2f\&response_mode=fragment\&response_type=code\&scope=openid\&nonce=646d8811-0870-469c-9045-9e13d0fdd1b3\&code_challenge=wRG6I1qb9wdmY4unvHhPYaYq5WWM-801w72AYyLi8xY\&code_challenge_method=S256).
* Create a bucket by following the *Zata Bucket Creation Guide* [Bucket Creation Guide](https://docs.zata.ai/manage/bucket/create-bucket)
* Generate the Access Key ID and Secret Access Key by following the *Access Keys Guide* [Access Keys Guid](https://docs.zata.ai/manage/access-keys/creating-a-new-access-key)e
* Refer to the Zata.ai documentation for more detailed information and features [zata.ai](https://zata.ai/)

**Guide to Move Data from Wasabi to Zata.ai**

Ubuntu 22.04 is used as an intermediary system to facilitate the data migration from Wasabi S3 to Zata.ai S3.

**First Process (Wasabi Side Setup)**

* Update and upgrade the Ubuntu system to ensure all packages are up to date.

```
sudo apt-get update -y
sudo apt-get upgrade -y
```

For migrating data from Wasabi to Zata.ai, use **rclone.**

### Install and configure the **rclone.**

```
sudo apt-get install rclone -y
```

**Configure rclone for Wasabi and Zata.ai**

To migrate data, rclone must be configured for both Wasabi and Zata.ai. First configure rclone for Wasabi, and then repeat the same process for Zata.ai.\
\
Run the following command to start the rclone configuration:

```
sudo rclone config
```

When the rclone configuration starts, choose **`n`** to create a new remote.\
Enter **Wasabi** as the name of the remote.

<figure><img src="https://2683631041-files.gitbook.io/~/files/v0/b/gitbook-x-prod.appspot.com/o/spaces%2FPPVG4W649TwXN8OejRhb%2Fuploads%2Fqbo64VMvLSwpyDQU3lxt%2Fimage.png?alt=media&amp;token=20f9e171-bdac-4a58-ad80-094d74c79edb" alt=""><figcaption></figcaption></figure>

Select **`4`** as the storage type to choose an S3-compatible storage provider.

Note: The option number may vary depending on the rclone version

<figure><img src="https://2683631041-files.gitbook.io/~/files/v0/b/gitbook-x-prod.appspot.com/o/spaces%2FPPVG4W649TwXN8OejRhb%2Fuploads%2Fsmn03CqR7T5jxp9jY5Ip%2Fimage.png?alt=media&amp;token=95842f3e-ffa7-4afb-a9cd-6252e194b023" alt=""><figcaption></figcaption></figure>

Choose your S3 Provider to choose '12' for Wasabi object storage, these numbers are very dependent on the rclone versions.

<figure><img src="https://2683631041-files.gitbook.io/~/files/v0/b/gitbook-x-prod.appspot.com/o/spaces%2FPPVG4W649TwXN8OejRhb%2Fuploads%2FesDfuYHuYB9iOaKn1uPS%2Fimage.png?alt=media&amp;token=f133ebb8-ac24-48b5-8266-b429ab1f5d65" alt=""><figcaption></figcaption></figure>

* `env_auth: true` is used to fetch credentials from environment variables.
* This option applies only when `access_key_id` and `secret_access_key` are left blank.
* Setting it to **true** means credentials will be taken automatically from the system environment.
* Setting it to **false** means credentials will be entered manually.

<figure><img src="https://2683631041-files.gitbook.io/~/files/v0/b/gitbook-x-prod.appspot.com/o/spaces%2FPPVG4W649TwXN8OejRhb%2Fuploads%2FaU9zKoNzztZUsVGcvTf5%2Fimage.png?alt=media&amp;token=7dcc839e-fd72-4bfe-a638-b7754e6a03b8" alt=""><figcaption></figcaption></figure>

Access & Secret key - We have created the above in the Wasabi section.

<figure><img src="https://2683631041-files.gitbook.io/~/files/v0/b/gitbook-x-prod.appspot.com/o/spaces%2FPPVG4W649TwXN8OejRhb%2Fuploads%2F1NuFUU4mRNi3FXJAFSwW%2Fimage.png?alt=media&amp;token=0e120f46-0011-4212-b506-818a1ed05118" alt=""><figcaption></figcaption></figure>

* Enter the region to connect to your S3 service.
* If you are using an S3-compatible provider (like Wasabi) and no region is required, leave it blank.
* Press **Enter** to use the default value

<figure><img src="https://2683631041-files.gitbook.io/~/files/v0/b/gitbook-x-prod.appspot.com/o/spaces%2FPPVG4W649TwXN8OejRhb%2Fuploads%2FFpiG2QyumpCptTKvD3Pm%2Fimage.png?alt=media&amp;token=a461925b-b89c-40f6-814b-c883c043a05a" alt=""><figcaption></figcaption></figure>

Enter the S3 API endpoint for Wasabi (required for S3-compatible storage) and press Enter to continue.

<figure><img src="https://2683631041-files.gitbook.io/~/files/v0/b/gitbook-x-prod.appspot.com/o/spaces%2FPPVG4W649TwXN8OejRhb%2Fuploads%2FyoZ1CPv4XvceetnowqT6%2Fimage.png?alt=media&amp;token=c6c264dd-1966-4f56-850a-74ad9e6bb98f" alt=""><figcaption></figcaption></figure>

Note that this ACL is applied when server-side copying objects as S3

<figure><img src="https://2683631041-files.gitbook.io/~/files/v0/b/gitbook-x-prod.appspot.com/o/spaces%2FPPVG4W649TwXN8OejRhb%2Fuploads%2FvKcE3yC6ccqMqQCKw399%2Fimage.png?alt=media&amp;token=be94174c-e9bc-48b7-bdff-6933431b2824" alt=""><figcaption></figcaption></figure>

Note that this ACL is applied only when creating buckets.

After completing these processes, simply press Enter at each step

<figure><img src="https://2683631041-files.gitbook.io/~/files/v0/b/gitbook-x-prod.appspot.com/o/spaces%2FPPVG4W649TwXN8OejRhb%2Fuploads%2FqILKKKyr83z0Y2YhJGAd%2Fimage.png?alt=media&amp;token=568bbef9-e735-4728-ae94-47bac41059b0" alt=""><figcaption></figcaption></figure>

This is the remote configuration completed after following these steps:

<figure><img src="https://2683631041-files.gitbook.io/~/files/v0/b/gitbook-x-prod.appspot.com/o/spaces%2FPPVG4W649TwXN8OejRhb%2Fuploads%2FOo20RvgsUJtOAF6xcBuQ%2Fimage.png?alt=media&amp;token=24a2caae-be5d-4c4a-bf6c-7cc24e292661" alt=""><figcaption></figcaption></figure>

Make sure to choose a number these values vary depending on the rclone version.

**Second Process for Zata.ai**

* Repeat the same rclone configuration process for Zata.ai.
* Choose **`n`** to create a new remote.
* Set the remote name as **zata**.
* Choose **`4`** for **S3 Compliant Storage Provider**.
* Choose **`13`** for **S3 Compatible Provider**.
* Set `env_auth` to **true**.
* Enter the **Zata Access Key ID** and **Secret Access Key** (refer to the Access Keys Guide).
* Set the endpoint as per your region:

  ```
  idr01.zata.ai    (for Central India / Indore)
  bom01.zata.ai    (for Southern India / Mumbai)
  ```

<figure><img src="https://2683631041-files.gitbook.io/~/files/v0/b/gitbook-x-prod.appspot.com/o/spaces%2FPPVG4W649TwXN8OejRhb%2Fuploads%2FIN0OJCvB9BR9ERGAvUCl%2Fimage.png?alt=media&amp;token=d1045887-bc8f-4e32-a223-233b9941d856" alt=""><figcaption></figcaption></figure>

<figure><img src="https://2683631041-files.gitbook.io/~/files/v0/b/gitbook-x-prod.appspot.com/o/spaces%2FPPVG4W649TwXN8OejRhb%2Fuploads%2Fgit-blob-26fb2fd335dbc8aba59006e46223943604d85eb3%2Fmigration-for-wasabi-s3.png?alt=media" alt="Wasabi to Zata Mumbai Migration"><figcaption></figcaption></figure>

Ensure you have created buckets in both **Wasabi** and **Zata.ai** before running these commands.

After completing the rclone configuration for both Wasabi and Zata.ai, you can start the data transfer process. Use the following command to copy data from the Wasabi bucket to the Zata.ai bucket:

```bash
rclone copy Wasabi:<wasabi_bucket_name> Zata:<zata_bucket_name> --s3-region ap-northeast-1 --progress
```

Replace `<wasabi_bucket_name>` with your Wasabi bucket name and `<zata_bucket_name>` with your Zata.ai bucket name. The `--progress` option displays the real-time status of the data transfer.

<figure><img src="https://2683631041-files.gitbook.io/~/files/v0/b/gitbook-x-prod.appspot.com/o/spaces%2FPPVG4W649TwXN8OejRhb%2Fuploads%2FvYIC3plWoNMSBti2DE8S%2Fimage.png?alt=media&amp;token=38258b2c-e359-402a-abb6-48fdb051fe17" alt=""><figcaption></figcaption></figure>

After the migration is completed, return to both the **Wasabi Console** and the **Zata.ai Dashboard** to verify the bucket status and confirm that all data has been transferred successfully.


# Migrate from Google Drive to Zata.ai S3 storage

To migrate data from Google Drive to Zata you have to use Rclone. The Rclone software package is a command-line tool which allows a variety of modes of operation for managing data in two or more locations. This article describes how to use Rclone to migrate data from Google Drive to Zata. For more information about Rclone, please visit [the Rclone project page](https://rclone.org/).

**1. Prerequisites**

* Active Zata.ai Account
* Zata Bucket
* Zata Endpoint, Access & Secret Key Pair
* [Rclone Executable](https://rclone.org/downloads/) Version 1.63.1

**2. Configure Google Drive as a Remote Location**

2.1 Open your OS specific terminal and navigate to the folder location where the Rclone executable is stored.

2.2 Type in rclone config to create a new Remote

```powershell
rclone config
```

2.3 Type in/Select "n" for a new remote connection

```powershell
ExplainNo remotes found, make a new one? 
n) New remote 
r) Rename remote 
c) Copy remote 
s) Set configuration password 
q) Quit config
n/r/c/s/q> n
```

2.4 Enter a name for your google drive remote connection

Example :

```
Enter name for new remote.
name> drive
```

2.5 Type in/Select Google Drive

```
 1 / 1Fichier
   \ (fichier)
 2 / Akamai NetStorage
   \ (netstorage)
 3 / Alias for an existing remote
   \ (alias)
 4 / Amazon S3 Compliant Storage Providers including AWS, Alibaba, ArvanCloud, Ceph, ChinaMobile, Cloudflare, DigitalOcean, Dreamhost, GCS, HuaweiOBS, IBMCOS, IDrive, IONOS, LyveCloud, Leviia, Liara, Linode, Magalu, Minio, Netease, Outscale, Petabox, RackCorp, Rclone, Scaleway, SeaweedFS, Selectel, StackPath, Storj, Synology, TencentCOS, Wasabi, Qiniu and others
   \ (s3)
 5 / Backblaze B2
   \ (b2)
 6 / Better checksums for other remotes
   \ (hasher)
 7 / Box
   \ (box)
 8 / Cache a remote
   \ (cache)
 9 / Citrix Sharefile
   \ (sharefile)
10 / Cloudinary
   \ (cloudinary)
11 / Combine several remotes into one
   \ (combine)
12 / Compress a remote
   \ (compress)
13 / Dropbox
   \ (dropbox)
14 / Encrypt/Decrypt a remote
   \ (crypt)
15 / Enterprise File Fabric
   \ (filefabric)
16 / FTP
   \ (ftp)
17 / Files.com
   \ (filescom)
18 / Gofile
   \ (gofile)
19 / Google Cloud Storage (this is not Google Drive)
   \ (google cloud storage)
20 / Google Drive
   \ (drive)
21 / Google Photos
   \ (google photos)
```

2.5 Leave Blank and Hit Enter

```
Option client_id.
Google Application Client Id
Setting your own is recommended.
See https://rclone.org/drive/#making-your-own-client-id for how to create your own.
If you leave this blank, it will use an internal key which is low performance.
Enter a value. Press Enter to leave empty.
client_id>
```

2.6 Leave Blank and Hit Enter

```
Option client_secret.
OAuth Client Secret.
Leave blank normally.
Enter a value. Press Enter to leave empty.
client_secret>
```

2.7 Choose 1 or your scope and hit enter

```
Option scope.
Scope that rclone should use when requesting access from drive.
Choose a number from below, or type in your own value.
Press Enter to leave empty.
1 / Full access all files, excluding Application Data Folder.
\ (drive)
2 / Read-only access to file metadata and file contents.
\ (drive.readonly)
/ Access to files created by rclone only.
3 | These are visible in the drive website.
| File authorization is revoked when the user deauthorizes the app.
\ (drive.file)
/ Allows read and write access to the Application Data folder.
4 | This is not visible in the drive website.
\ (drive.appfolder)
/ Allows read-only access to file metadata but
5 | does not allow any access to read or download file content.
\ (drive.metadata.readonly)
scope> 1
```

2.8 Leave Blank and Hit Enter

```
Option service_account_file.
Service Account Credentials JSON file path.
Leave blank normally.
Needed only if you want use SA instead of interactive login.
Leading `~` will be expanded in the file name as will environment variables such as `${RCLONE_CONFIG_DIR}`.
Enter a value. Press Enter to leave empty.
service_account_file>
```

2.9 Type in/Select "n" for No

```
Edit advanced config?
y) Yes
n) No (default)
y/n> n
```

2.10 Type in "y" for Yes to authenticate to your google drive using a web browser

```
Use web browser to automatically authenticate rclone with remote?
* Say Y if the machine running rclone has a web browser you can use
* Say N if running rclone on a (remote) machine without web browser access
If not sure try Y. If Y failed, try N.

y) Yes (default)
n) No
y/n>y

2023/07/27 13:16:20 NOTICE: If your browser doesn't open automatically go to the following link: http://127.0.0.1:53682/auth?state=hy8ONFPQCykB30YldCCQfA
2023/07/27 13:16:20 NOTICE: Log in and authorize rclone for access
2023/07/27 13:16:20 NOTICE: Waiting for code...
```

2.11 A web browser window will pop up allowing you to enter in your credentials for your Google Drive Account

<figure><img src="https://2683631041-files.gitbook.io/~/files/v0/b/gitbook-x-prod.appspot.com/o/spaces%2FPPVG4W649TwXN8OejRhb%2Fuploads%2FYrJYe8BKsphiKlqFgAfy%2Fimage.png?alt=media&amp;token=fcb1da65-6193-406c-aa46-924a3f81e936" alt=""><figcaption></figcaption></figure>

2.12 After signing in you will get a Success Message and then you can go back to command prompt to continue with setup.

<figure><img src="https://2683631041-files.gitbook.io/~/files/v0/b/gitbook-x-prod.appspot.com/o/spaces%2FPPVG4W649TwXN8OejRhb%2Fuploads%2FdF48aF9HwFObqk5b8YsE%2Fimage.png?alt=media&amp;token=79599886-db59-4b90-9d07-609d85855edf" alt=""><figcaption></figcaption></figure>

2.13 Type in/Select "n" for no in regards to configuring as a Shared Drive.

```
2023/07/27 13:24:14 NOTICE: Got code
Configure this as a Shared Drive (Team Drive)?

y) Yes
n) No (default)
y/n> n
```

2.14 Configuration of Google Drive is complete. Review the information for accuracy and then type in/select "y" for yes to save the configuration and you are done.

```
Configuration complete.
Options:
- type: drive
- scope: drive
- token: {"access_token":"ya29.a0AbVbYH7EgnFk1J2fKDtmXsqIlSff9lQnejKJweBLU9NteOyJtPxsqUTNAqMu-cJIuqwsgQOfO_SH7zbsKGoql0w4v0H3L80VDRsoK4U48LVXppsfgNb0-wJh3_YdAnTOcZQrqeLkaguSJAupy3IIhaCgYKAZQSARMSFQFWKvPlsfpcY6uxG-vsoPowhX3p-Q0163","token_type":"Bearer","refresh_token":"1//01c-s3KbSkfWzCgYIARAAGAESNwF-L9IrkIUDhEWLzb8MUJefx5INb8WAgj6tGm4QH7tvCQ-O3T-AnrztykMfFsv6KM0t9Inv7co","expiry":"2023-07-27T14:24:13.4851761-07:00"}
- team_drive:
Keep this "google drive" remote?
y) Yes this is OK (default)
e) Edit this remote
d) Delete this remote
y/e/d>y
```

**Step3. Configure Zata as a Remote Location**

3.1 Enter "n" for a new remote connection

```
e) Edit existing remote
n) New remote
d) Delete remote
r) Rename remote
c) Copy remote
s) Set configuration password
q) Quit config
e/n/d/r/c/s/q> n

```

3.2 Type in a name corresponding to Zata for your Remote location

Example :

```
Enter name for new remote.
name> zata
```

3.3 Type in/select "4" or choose Amazon S3 compliant provider

```
Option Storage.
Type of storage to configure.
Choose a number from below, or type in your own value.
 1 / 1Fichier
   \ (fichier)
 2 / Akamai NetStorage
   \ (netstorage)
 3 / Alias for an existing remote
   \ (alias)
 4 / Amazon S3 Compliant Storage Providers including AWS, Alibaba, ArvanCloud, Ceph, ChinaMobile, Cloudflare, DigitalOcean, Dreamhost, GCS, HuaweiOBS, IBMCOS, IDrive, IONOS, LyveCloud, Leviia, Liara, Linode, Magalu, Minio, Netease, Outscale, Petabox, RackCorp, Rclone, Scaleway, SeaweedFS, Selectel, StackPath, Storj, Synology, TencentCOS, Wasabi, Qiniu and others
   \ (s3)
 5 / Backblaze B2
   \ (b2)
 6 / Better checksums for other remotes
   \ (hasher)
```

3.4 Type in/select "34" or choose "Any other S3 compatible provider" from the list

```
29 / Storj (S3 Compatible Gateway)
   \ (Storj)
30 / Synology C2 Object Storage
   \ (Synology)
31 / Tencent Cloud Object Storage (COS)
   \ (TencentCOS)
32 / Wasabi Object Storage
   \ (Wasabi)
33 / Qiniu Object Storage (Kodo)
   \ (Qiniu)
34 / Any other S3 compatible provider
   \ (Other)
```

3.5 Choose Option 1 to type in your Zata Credentials in the following Steps

```
Option env_auth.
Get AWS credentials from runtime (environment variables or EC2/ECS meta data if no env vars).
Only applies if access_key_id and secret_access_key is blank.
Choose a number from below, or type in your own boolean value (true or false).
Press Enter for the default (false).
1 / Enter AWS credentials in the next step.
\ (false)
2 / Get AWS credentials from the environment (env vars or IAM).
\ (true)
env_auth> 1
```

3.6 Type in your Zata Access Key

```
Option access_key_id.
AWS Access Key ID.
Leave blank for anonymous access or runtime credentials.
Enter a value. Press Enter to leave empty.
access_key_id> xxxxxxxxxxx
```

3.7 Type if your Zata Secret Key

```
Option secret_access_key.
AWS Secret Access Key (password).
Leave blank for anonymous access or runtime credentials.
Enter a value. Press Enter to leave empty.
secret_access_key> xxxxxxxxxxxxxxxxxxx
```

3.8 Choose Option 1 for your Region selection

```
Option region.
Region to connect to.
Leave blank if you are using an S3 clone and you don't have a region.
Choose a number from below, or type in your own value.
Press Enter to leave empty.
/ Use this if unsure.
1 | Will use v4 signatures and an empty region.
\ ()
/ Use this only if v4 signatures don't work.
2 | E.g. pre Jewel/v10 CEPH.
\ (other-v2-signature)
region> 1
```

3.9 Type in your endpoint for Zata where your bucket is located.

```
Option endpoint.
Endpoint for S3 API.
Required when using an S3 clone.
Enter a value. Press Enter to leave empty.
endpoint> https://idro1.zata.ai
```

3.10 Leave Blank and Hit Enter

```
Option location_constraint.
Location constraint - must be set to match the Region.
Leave blank if not sure. Used when creating buckets only.
Enter a value. Press Enter to leave empty.
location_constraint>
```

3.11 Choose Option 1 or the ACL option you wish to use.

```
Option acl.
Canned ACL used when creating buckets and storing or copying objects.
This ACL is used for creating objects and if bucket_acl isn't set, for creating buckets too.
For more info visit https://docs.aws.amazon.com/AmazonS3/latest/dev/acl-overview.html#canned-acl
Note that this ACL is applied when server-side copying objects as S3
doesn't copy the ACL from the source but rather writes a fresh one.
If the acl is an empty string then no X-Amz-Acl: header is added and
the default (private) will be used.
Choose a number from below, or type in your own value.
Press Enter to leave empty.
/ Owner gets FULL_CONTROL.
1 | No one else has access rights (default).
\ (private)
/ Owner gets FULL_CONTROL.
2 | The AllUsers group gets READ access.
\ (public-read)
/ Owner gets FULL_CONTROL.
3 | The AllUsers group gets READ and WRITE access.
| Granting this on a bucket is generally not recommended.
\ (public-read-write)
/ Owner gets FULL_CONTROL.
4 | The AuthenticatedUsers group gets READ access.
\ (authenticated-read)
/ Object owner gets FULL_CONTROL.
5 | Bucket owner gets READ access.
| If you specify this canned ACL when creating a bucket, Amazon S3 ignores it.
\ (bucket-owner-read)
/ Both the object owner and the bucket owner get FULL_CONTROL over the object.
6 | If you specify this canned ACL when creating a bucket, Amazon S3 ignores it.
\ (bucket-owner-full-control)
acl> 1
```

3.12 Type in/Select "n" for No

```
Edit advanced config?
y) Yes
n) No (default)
y/n> n
```

3.13 Configuration of your Remote Location for Zata is now complete. Review the information for accuracy and type in/select "y" for yes and you are done.

```
Configuration complete.
Options:
- type: s3
- provider: Other
- access_key_id: XXXXXXXXXXXXXX
- secret_access_key: XXXXXXXXXXXXXXXXXXX
- endpoint: https://idro1.zata.ai
- acl: private
Keep this "Zata" remote?
y) Yes this is OK (default)
e) Edit this remote
d) Delete this remote
y/e/d> y
```

3.14 Type in/Select "q" to quit from the Remote Configuration and go back to the root level

```
e) Edit existing remote
n) New remote
d) Delete remote
r) Rename remote
c) Copy remote
s) Set configuration password
q) Quit config
e/n/d/r/c/s/q> q

c:\rclone-v1.63.1>
```

**Step4. Move Data to Zata**

**4.1 Copy Data from Drive to Zata(Without Deleting Data from Google Drive)**

If you just want to copy the data from Google Drive to Zata you have to use this command.

```
rclone move "drive": "Zata:bucket name" -P
```

Note :

1. All the variables to be written with ""(double quotes)"".
2. "drive" is just an example instead of drive you have to write name that you have given for google drive remote connection.
3. "Zata" is just an example instead of drive you have to write name that you have given for Zata remote connection.
4. "bucket name" is just an example instead of drive you have to write the name of the bucket in which you wish to copy your Google Drive data.

**4.2 Copy Data from Drive to Zata(With Deleting Data from Google Drive)**

If you just want to copy the data from Google Drive to Zata and also want to delete data from Google Drive, you have to use this command.

```
rclone move "drive": "Zata:bucket name" -P -v
```

Note :

1. All the variables to be written with ""(double quotes)"".
2. "drive" is just an example instead of drive you have to write name that you have given for google drive remote connnection.
3. "Zata" is just an example instead of drive you have to write name that you have given for Zata remote connnection.
4. "bucket name" is just an example instead of drive you have to write the name of the bucket in which you wish to copy your Google Drive data.


# Subusers

subuser Management page

The **subuser Management** page provides a centralized view to manage all users and sub-users in Zata.ai. It allows administrators to create, monitor, and control user access to storage resources. From this section, you can view user details such as username, ARN, status, and assigned role, as well as manage permissions and delete users when required. This page helps ensure secure access control by assigning appropriate roles and permissions to each user.


# Create a Subuser

**Step 1: Open the Sub-user Management**

You can create only three SubUsers.

* Log in to the Zata.ai dashboard.
* From the left sidebar, go to **Subusers → Subusers**
* You will see the **Sub-user Management** page

<figure><img src="https://2683631041-files.gitbook.io/~/files/v0/b/gitbook-x-prod.appspot.com/o/spaces%2FPPVG4W649TwXN8OejRhb%2Fuploads%2FF1lGK8WkcVFVNy3QsF9J%2Fimage.png?alt=media&amp;token=98ac121d-0786-4a2c-9dd2-7b0097a478c5" alt=""><figcaption></figcaption></figure>

**Step 2: Create a New Subuser**

* Click on **Create Subuser** (top right button)

  A popup will open: **Create Subuser**

**Required Fields**

* Username:
  * Must be unique
  * Allowed characters:
    * Letters (a–z, A–Z)
    * Numbers (0–9)
    * Dot (.)
    * Underscore (\_)
    * Dash (-)
  * Length: **1–64 characters**
* Email:
  * Enter a valid email address
* Region:
  * Select the required region from dropdown (e.g., Indore or Mumbai)

**Optional Field**

* Description
  * Add any note (optional)

<figure><img src="https://2683631041-files.gitbook.io/~/files/v0/b/gitbook-x-prod.appspot.com/o/spaces%2FPPVG4W649TwXN8OejRhb%2Fuploads%2FiyuQBAzPUxDp5QcC0wTg%2Fimage.png?alt=media&amp;token=12e9b4a5-ed63-4599-914c-3414c5d73dd8" alt=""><figcaption></figcaption></figure>

<figure><img src="https://2683631041-files.gitbook.io/~/files/v0/b/gitbook-x-prod.appspot.com/o/spaces%2FPPVG4W649TwXN8OejRhb%2Fuploads%2Fgit-blob-ac157e27970442f2af1a8b3f416c259aad96eb10%2Fbom-create-subuser.png?alt=media" alt="Create Subuser for Mumbai Region"><figcaption></figcaption></figure>

**Step 3: Create the Sub-user**

* Click on **Create Subuser**

After clicking:

* Sub-user is created successfully
* A **credentials file is automatically downloaded**

Important Note:

* This file contains:
  * Access Key
  * Secret Key
* You **cannot retrieve the Secret Key again later.**

**Step 4: Save Credentials Securely**

* Downloaded file must be stored securely
* If lost:
  * You need to **generate a new key**
  * Old key must be deleted.

**Step 5: Verify Sub-user Creation**

After creation, you will see the sub-user listed with:

* Username
* Assigned Buckets
* Status (**Active**)
* Last Active
* Actions

Status should be **Active** but Initially, no bucket is assigned

<figure><img src="https://2683631041-files.gitbook.io/~/files/v0/b/gitbook-x-prod.appspot.com/o/spaces%2FPPVG4W649TwXN8OejRhb%2Fuploads%2FMcfbaE2p2aiZpnTanvhn%2Fimage.png?alt=media&amp;token=f5d15fac-2f59-4e04-9d1e-55b00f21f9ae" alt=""><figcaption></figcaption></figure>

**Step 6: Open Sub-user Details**

* Click on the **Sub-user name**

You will open **Bucket Access Management page**

**Step 7: Assign Bucket**

* Click on **+ Assign New Bucket**

You will proceed to assign access to a bucket

<figure><img src="https://2683631041-files.gitbook.io/~/files/v0/b/gitbook-x-prod.appspot.com/o/spaces%2FPPVG4W649TwXN8OejRhb%2Fuploads%2FzsSCiEPkyh27dueTIN0O%2Fimage.png?alt=media&amp;token=d4605d2c-cf2b-447f-96e5-03941ab0b634" alt=""><figcaption></figcaption></figure>

**Step 8: Configure Access Rule**

A popup will appear: **Add Access Rule**

Select permission:

| Permission    | Description      |
| ------------- | ---------------- |
| View Only     | Read access      |
| Upload Only   | Upload only      |
| View & Upload | Read + Write     |
| Full Access   | Complete control |

For testing, select **Full Access**

* Click **Create Rule**

<figure><img src="https://2683631041-files.gitbook.io/~/files/v0/b/gitbook-x-prod.appspot.com/o/spaces%2FPPVG4W649TwXN8OejRhb%2Fuploads%2FHKWJv8Kx2iEwVNyoAuKX%2Fimage.png?alt=media&amp;token=377a81e3-b468-47c9-a066-468f64534324" alt=""><figcaption></figcaption></figure>

**Step 9: Verify Access Rule**

You will be redirected to **Manage Bucket Access Rules page**

Check:

* Permission → Full Access
* Status → Active

This confirms access is successfully configured

<figure><img src="https://2683631041-files.gitbook.io/~/files/v0/b/gitbook-x-prod.appspot.com/o/spaces%2FPPVG4W649TwXN8OejRhb%2Fuploads%2Fy7r8mfLSO4UixuQJJsM0%2Fimage.png?alt=media&amp;token=4bdce7fb-8073-466a-958f-44fbf8e842c6" alt=""><figcaption></figcaption></figure>

**Step 10: Final Verification**

Go back to **Sub-user Management page.**

Check:

* Assigned Buckets : 1
* Status : Active

Sub-user is now ready to use

<figure><img src="https://2683631041-files.gitbook.io/~/files/v0/b/gitbook-x-prod.appspot.com/o/spaces%2FPPVG4W649TwXN8OejRhb%2Fuploads%2FCuHNFQOjqgkzt1VDL7HE%2Fimage.png?alt=media&amp;token=74dc8857-afa1-43c6-bd1b-cc5eb9f32963" alt=""><figcaption></figcaption></figure>

Sub-user creation and access configuration is successfully completed.\
The user can now access assigned buckets using S3-compatible tools.

<figure><img src="https://2683631041-files.gitbook.io/~/files/v0/b/gitbook-x-prod.appspot.com/o/spaces%2FPPVG4W649TwXN8OejRhb%2Fuploads%2FRAErJXx0BbcDWXmF0qi2%2Fimage.png?alt=media&amp;token=369ea9fe-4a68-4196-a24b-fc1a7f32c987" alt=""><figcaption></figcaption></figure>


# Policies

#### Overview

Bucket policies are used to control access to objects within a bucket. These policies define **who can access the bucket and what actions they are allowed to perform**.

Using the **Policy Setup Wizard**, administrators can configure access by selecting the bucket, assigning permissions, and defining the target users.

***

#### Prerequisites

Before creating a bucket policy, ensure that:

* A bucket is already created.
* You have access to the **Zata.ai Dashboard**.
* You have permission to manage bucket policies.

***

#### Procedure

**Step 1: Navigate to Access Policies**

1. Log in to the **Zata.ai Dashboard**.
2. Open the **Object Storage** section.
3. Click **Access Policies**.
4. Click **Create Policy**.

***

**Step 2: Select Bucket and Scope**

1. Select the **bucket name** from the dropdown list.

Example:`prertest`

2. Choose the **Access Scope**:

**Entire Bucket**

* Applies the policy to all objects within the bucket.

**Specific Folders**

* Applies the policy only to selected folders inside the bucket.

3. Click **Next** to continue.

<figure><img src="https://2683631041-files.gitbook.io/~/files/v0/b/gitbook-x-prod.appspot.com/o/spaces%2FPPVG4W649TwXN8OejRhb%2Fuploads%2Fit5QhrPTtFIYbmdWQlDm%2Fimage.png?alt=media&amp;token=79d4eab9-bad1-46dd-b17c-26cfb369287b" alt=""><figcaption></figcaption></figure>

***

**Step 3: Select Grantee**

In this step, define **who will receive the permissions**.

Select the Available options include:

* **Public (Anyone)** – Allows access to all users.
* **Authenticated Users** – Allows access only to logged-in users.
* **Specific Users or Roles** – Allows access only to selected identities.

Click **Next**.

<figure><img src="https://2683631041-files.gitbook.io/~/files/v0/b/gitbook-x-prod.appspot.com/o/spaces%2FPPVG4W649TwXN8OejRhb%2Fuploads%2FPptulyDBCHMFloUzwoqj%2Fimage.png?alt=media&amp;token=b7a2d02f-2330-4dec-9773-dff2ad0da531" alt=""><figcaption></figcaption></figure>

***

**Step 4: Configure Permissions**

Permissions define **what actions users are allowed to perform**.

**A. Object Operations**

These permissions apply to files stored in the bucket.

Recommended configuration for **public read access**:

Enable: Download files

Disable:

Upload files\
Add/Edit file tags\
Remove file tags\
Cancel uploads\
Restore archived files<br>

<figure><img src="https://2683631041-files.gitbook.io/~/files/v0/b/gitbook-x-prod.appspot.com/o/spaces%2FPPVG4W649TwXN8OejRhb%2Fuploads%2FM7ALPFPjgCjgWOTCHOcx%2Fimage.png?alt=media&amp;token=201805b7-b4b7-49f8-9dac-e7a4d40d51ea" alt=""><figcaption></figcaption></figure>

***

#### Bucket Operations

These permissions control bucket-level actions.

Optional: List files (allows users to view objects in the bucket)

Disable:

List file versions\
View bucket tags\
View versioning status

Click **Next**.

<figure><img src="https://2683631041-files.gitbook.io/~/files/v0/b/gitbook-x-prod.appspot.com/o/spaces%2FPPVG4W649TwXN8OejRhb%2Fuploads%2FkQb9LptX48HGoYtwRI70%2Fimage.png?alt=media&amp;token=d060f516-2a3f-40ae-98af-f934847f48d4" alt=""><figcaption></figcaption></figure>

***

**Step 5: Review and Create Policy**

The **Review** page displays a summary of the policy configuration.

Verify the following details:

* Bucket name
* Region
* Grantee
* Scope
* Selected permissions
* Policy effect (Allow or Deny)

Enter a **Policy Name** (optional but recommended).

Example: `public-read-policy`

Click **Create Policy**.

<figure><img src="https://2683631041-files.gitbook.io/~/files/v0/b/gitbook-x-prod.appspot.com/o/spaces%2FPPVG4W649TwXN8OejRhb%2Fuploads%2FrIUzQ9q7Cgo4oB58J2sK%2Fimage.png?alt=media&amp;token=98471b70-94e7-48ba-8883-49e6396f3c97" alt=""><figcaption></figcaption></figure>

***

**Result**

After the policy is created, the defined permissions are applied to the selected bucket.

With this configuration:

* Users can **download objects**
* Users can **view files (optional)**
* Users **cannot upload, modify, or delete objects**

This ensures **secure read-only access** to bucket contents.

***

**Best Practices**

* Grant only the permissions that are required.
* Avoid enabling write or delete permissions for public access.
* Use **specific folder scope** if access should be limited to certain objects.


# Create a new access key and secret key for the specific subuser.

Remember that when a user is created, an access key is automatically generated in the **Access Keys** section. However, this access key cannot be used to access the user directly.

To access the user, you must create a new access key and secret key for the same user.

* Navigate to the **Access Keys** section from the dashboard.
* Click on **Generate Key**.
* Select the required **Subuser** from the list.
* Click on **Generate Key** to create a new access key and secret key.

After generation, a key file will be provided for download.

<figure><img src="https://2683631041-files.gitbook.io/~/files/v0/b/gitbook-x-prod.appspot.com/o/spaces%2FPPVG4W649TwXN8OejRhb%2Fuploads%2FrtSBZc1uRYMBEIgBc8P7%2Fimage.png?alt=media&amp;token=6da58e7a-cf2d-455f-88c1-0e3b8f7176c9" alt=""><figcaption></figcaption></figure>

<figure><img src="https://2683631041-files.gitbook.io/~/files/v0/b/gitbook-x-prod.appspot.com/o/spaces%2FPPVG4W649TwXN8OejRhb%2Fuploads%2FaamTDNfa0kcoPFObIMsn%2Fimage.png?alt=media&amp;token=7aba27ba-35d8-4b5d-b421-3cf25bcb436a" alt=""><figcaption></figcaption></figure>

As soon as you generate the access key, the key file is automatically downloaded. This file contains both the **Access Key** and the **Secret Key**.

Now that the subuser keys have been generated, use these Access Key and Secret Key to authenticate and access the user.

<figure><img src="https://2683631041-files.gitbook.io/~/files/v0/b/gitbook-x-prod.appspot.com/o/spaces%2FPPVG4W649TwXN8OejRhb%2Fuploads%2FIqwJkr4bHgrNqvFLWnod%2Fimage.png?alt=media&amp;token=abef391e-1d58-48a9-b5e9-0e57fa60cfe8" alt=""><figcaption></figcaption></figure>


# Roles

A role defines the permissions assigned to a user in the Zata.ai environment. It controls what actions a user is allowed to perform, such as reading data, writing data, or managing system configurations.

Roles help in maintaining security and proper access control by ensuring that each user has only the permissions required for their responsibilities.

Common roles include:

* **Read:**\
  Allows the user to view and download data. No changes can be made.
* **Write:**\
  Allows the user to upload and modify data but does not allow deletion or management of system settings.
* **Read and Write:**\
  Allows the user to both view and modify data.
* **Full Access:**\
  Provides complete control over the account, including managing users, buckets, policies, and settings.

steps to create a subuser and assign a role: [subuser](https://docs.zata.ai/user/create-a-subuser)


# Account

The Account section provides access to all account-related settings and support resources. It allows users to manage billing information, view official documentation, and get assistance when required. This section is mainly used for administrative and support purposes to ensure smooth account operations and proper usage of the platform.

It includes the following options:

* **Billing:**\
  Used to manage subscription plans, view usage details, and handle payment-related information.
* **Docs:**\
  Provides access to platform documentation, guides, and references for understanding features and functionalities.
* **Support:**\
  Allows users to raise support requests, report issues, and get help from the Zata.ai support team.

The Account section helps users manage their account efficiently and stay informed about platform usage and support resources.


# Billing

Zata.ai follows a **prepaid monthly billing** model, where customers pay in advance for a fixed amount of storage. Every subscription is valid for **30 days**, regardless of the calendar month, providing predictable billing and transparent pricing.

### Monthly Plans

> **Note:** The revised pricing shown below is **effective from 1 October 2026**. Current pricing applies to subscriptions until **30 September 2026**. See [Zata Pricing Update — October 2026](https://docs.zata.ai/announcements-and-updates/zata-pricing-update-october-2026) for details.

| Plan        |        Storage |            Price / Month (Before GST) | New Price / Month (w\.e.f. Oct 1st) |
| ----------- | -------------: | ------------------------------------: | ----------------------------------: |
| Basic       |           1 TB |                                  ₹599 |                                ₹699 |
| Standard    |           5 TB |                                ₹2,970 |                              ₹3,470 |
| Pro         |          10 TB |                                ₹5,880 |                              ₹6,880 |
| Business    |          25 TB |                               ₹14,550 |                             ₹17,050 |
| Enterprise  |          50 TB |                               ₹28,800 |                             ₹33,800 |
| Enterprise+ |         100 TB |                               ₹57,000 |                             ₹67,000 |
| Custom      | Custom Storage | Contact Solutions <solutions@zata.ai> |                              Custom |

> **Note:** Prices shown are exclusive of GST. Applicable taxes will be added during billing.

***

### Billing Cycle

* All subscriptions are billed **monthly**.
* One billing month is always **30 days**.
* The billing cycle begins on the **date of payment**.

***

### Subscription Lifecycle

If a subscription is not renewed, the account progresses through the following stages:

| Stage                 | Duration                   | Description                                                                                                                         |
| --------------------- | -------------------------- | ----------------------------------------------------------------------------------------------------------------------------------- |
| **Active**            | 30 days                    | All services function normally.                                                                                                     |
| **Grace Period**      | 5 days after expiry        | Services continue to operate, allowing time to renew without interruption.                                                          |
| **Retention**         | Up to 90 days after expiry | The account is suspended and cannot be accessed, but all stored data is safely retained. Renewing the subscription restores access. |
| **Deletion Deletion** | After 90 days              | If a subscription is not renewed within 90 days of its expiry, all stored data is permanently deleted.                              |

***

### Renewing a Subscription

Customers can renew their subscription during the **last 5 days** of the current billing period or any time after it expires. The following scenarios demonstrate how renewals, late payments, and plan upgrades & downgrades are handled under Zata.ai's billing system:

### 1. Renew Before Expiry

If the same plan is renewed before expiry:

* The new subscription is added after the current billing period.
* No remaining subscription days are lost.
* The next 30-day billing period starts immediately after the current one ends.

### 2. Renew After Expiry

If payment is made after the subscription has expired:

* A **Data Retention Fee** is charged for the number of days between the expiry date and the payment date.
* The fee is calculated using the plan's daily rate.

**Daily Rate = Monthly Plan Price ÷ 30**

After payment:

* A new 30-day subscription begins from the **payment date**.
* The Data Retention Fee is displayed as a separate line item on the invoice.

The Data Retention Fee may be charged for a maximum of **90 days** after the subscription expires.

### 3. Upgrading a Storage Plan

Customers can upgrade to a larger storage plan at any time.

When upgrading:

* The unused value of the current subscription is converted into credit.
* The credit is automatically deducted from the price of the new plan.
* A new 30-day billing period starts from the payment date.

This ensures customers only pay for the additional value of the upgraded plan.

### 4. Downgrading a Storage Plan

Downgrades are **not permitted during an active billing period**.

Once the current subscription expires, customers may switch to a smaller plan provided that:

* The total stored data fits within the storage capacity of the selected plan.

***

### Free Trial

Every new account receives a **15-day free trial** with access to all available storage locations.

If a paid subscription is not purchased, the account is suspended after the trial ends.

***

### Important Notes

* Billing is prepaid and charged monthly.
* Every billing period is exactly **30 days**.
* Renewing before expiry extends the subscription without losing any remaining days.
* Renewing after expiry starts a new 30-day billing period from the payment date and includes a Data Retention Fee for the unpaid days.
* Upgrading a plan immediately starts a new billing period, with unused subscription value automatically applied as credit.
* Stored data is never deleted immediately after expiry. Data becomes eligible for deletion only after **90 days**, and cannot be retrieved.


# Ingress and Egress Policy

#### Ingress Policy

Ingress refers to data uploaded into Zata.ai, such as files, backups, or objects transferred from applications and systems to Zata storage.

* Data uploads to Zata.ai are free and unlimited.
* There are no ingress restrictions on incoming data.
* Users can upload any amount of data without additional charges.

***

#### Egress Policy

Egress refers to data downloaded or transferred out from Zata.ai storage to external systems or users.

* Users get free egress equal to their active storage volume per month.
* If egress usage exceeds the active storage volume, the account will be temporarily suspended.
* Service will resume after upgrading the storage plan or when the next billing cycle begins.

**Example:**\
If a user has 100 TB of active storage, they can download up to 100 TB for free in a month.\
If downloads exceed 100 TB, the account will be suspended until the plan is upgraded or the next billing cycle starts.


# KnowledgeBase

The KnowledgeBase section is a centralized place for documentation, guides, and learning resources related to Zata.ai. It helps users understand features, configurations, and best practices for using the platform effectively.

This section includes:

* Step-by-step guides and tutorials
* Feature explanations and usage instructions
* Troubleshooting and common issues
* Integration setup references

The KnowledgeBase acts as a self-help resource that enables users to quickly find solutions and learn how to use Zata.ai efficiently.


# Integration

The Integration section provides options to connect Zata.ai with third-party tools and platforms. It allows users to link their existing backup systems, storage tools, and applications with Zata.ai storage for seamless data transfer and management.

This section helps in:

* Connecting external backup solutions with Zata.ai
* Enabling automated data backup and recovery
* Simplifying data movement between different platforms
* Centralizing storage operations using Zata.ai as a backend

Integrations make Zata.ai more powerful by allowing it to work smoothly with existing enterprise tools and backup solutions.


# Connect Acronis Backup Gateway With Zata.ai

#### Prerequisites <a href="#pre-requisites" id="pre-requisites"></a>

* Zata.ai S3-Storage Account
  * Zata.ai Bucket - See our Bucket Creation Guide
  * Access & Secret Key Pair - See our Access Keys Guide
* Acronis Cyber Protect Cloud Partner account - [Acronis Partner Page](https://www.acronis.com/en-us/partners/)
* Acronis Backup Gateway (VM or Bare Metal) - [Acronis Backup Gateway Guide](https://dl.acronis.com/u/storage2/html/AcronisStorage_2_quick_start_guide_en-US/index.html)
* Acronis Agent installed on a VM or Server you wish to protect - [Acronis Agent Install Guide](https://kb.acronis.com/content/55052)

***Note:** your specific backup software handles the restoration process. As many potential variables will affect your unique environment, it is strongly recommended that you seek the guidance of your backup software's technical support team if you encounter difficulty, or have application-specific inquiries.*

#### Reference Architecture <a href="#reference-architecture" id="reference-architecture"></a>

<figure><img src="https://2683631041-files.gitbook.io/~/files/v0/b/gitbook-x-prod.appspot.com/o/spaces%2FPPVG4W649TwXN8OejRhb%2Fuploads%2FFgmrpGHIxnuR5S1mq32d%2FAcronis%20_Zata.png?alt=media&amp;token=ea151519-145d-4fcc-a21d-deb083e5edbd" alt="Intregate Zata.ai to Acronis"><figcaption></figcaption></figure>

#### Create Backup Storage <a href="#id-3-create-backup-storage" id="id-3-create-backup-storage"></a>

1.1 Click “Storage Services > Backup Storage”, then click “Create backup storage”.

<figure><img src="https://2683631041-files.gitbook.io/~/files/v0/b/gitbook-x-prod.appspot.com/o/spaces%2FPPVG4W649TwXN8OejRhb%2Fuploads%2FoEBN65ANHaZ9s1IqDePX%2FScreenshot%202024-08-02%20at%207.07.10%20PM.png?alt=media&amp;token=5bc231c7-fb66-4dc8-a6e8-0995516dd630" alt=""><figcaption></figcaption></figure>

1.2 Choose “Public Cloud”, then click “Next”.

<figure><img src="https://2683631041-files.gitbook.io/~/files/v0/b/gitbook-x-prod.appspot.com/o/spaces%2FPPVG4W649TwXN8OejRhb%2Fuploads%2FSQnUPdxO0XXTMBjWCFON%2FScreenshot%202024-08-02%20at%207.07.25%20PM.png?alt=media&amp;token=12098ac5-0ca2-436f-927f-f7f64f0c7c99" alt=""><figcaption></figcaption></figure>

1.3 Check the box for your storage node, then click “Next”.

<figure><img src="https://2683631041-files.gitbook.io/~/files/v0/b/gitbook-x-prod.appspot.com/o/spaces%2FPPVG4W649TwXN8OejRhb%2Fuploads%2FG3q5jqfq8zHO1J0xe4O8%2FScreenshot%202024-08-02%20at%207.07.33%20PM.png?alt=media&amp;token=607b4f2a-d2f2-4016-a147-9ffa953b2d39" alt=""><figcaption></figcaption></figure>

1.4 Select S3 Compatible storage like `“`AuthV2 compatible (S3)`”` in the dropdown.

<figure><img src="https://2683631041-files.gitbook.io/~/files/v0/b/gitbook-x-prod.appspot.com/o/spaces%2FPPVG4W649TwXN8OejRhb%2Fuploads%2F2EjWdkkgD6WMXreapxb6%2FScreenshot%202024-08-02%20at%207.07.42%20PM.png?alt=media&amp;token=6531eb70-6f92-419b-b341-cb41fd550c60" alt=""><figcaption></figcaption></figure>

1.5 Enter the Endpoint URL, Bucket Name, Access Key, and Secret Key, then click `“Next”`.

* Endpoint URL: **<https://idr01.zata.ai>** (Central India) or **<https://bom01.zata.ai>** (Southern India)
* Bucket Name: Your bucket name.
* Access Key, and Secret Key: Create.

<figure><img src="https://2683631041-files.gitbook.io/~/files/v0/b/gitbook-x-prod.appspot.com/o/spaces%2FPPVG4W649TwXN8OejRhb%2Fuploads%2FZooYDenxnWVFY8N1zFZM%2FScreenshot%202024-08-02%20at%207.07.51%20PM.png?alt=media&amp;token=3ebac723-8444-4895-bf07-7a23db7ce94c" alt=""><figcaption></figcaption></figure>

<figure><img src="https://2683631041-files.gitbook.io/~/files/v0/b/gitbook-x-prod.appspot.com/o/spaces%2FPPVG4W649TwXN8OejRhb%2Fuploads%2Fgit-blob-6b77499f8b76c1d63e4f1df1a67cb6be95143e59%2Fconnect-acronis-backup-gateway-with-zata.png?alt=media" alt="Acronis Zata Mumbai Endpoint"><figcaption></figcaption></figure>

1.6 Choose appropriate redundancy settings in accordance with your organization’s policies, then click “Next”.

**Note:** *For the sake of this example we have chosen "No Redundancy" . Get in touch with your Acronis Representative to determine an appropriate redundancy level and hardware configuration for your Cyber Protect Infrastructure cluster.*

<figure><img src="https://2683631041-files.gitbook.io/~/files/v0/b/gitbook-x-prod.appspot.com/o/spaces%2FPPVG4W649TwXN8OejRhb%2Fuploads%2FHQR66eijsQ4PWYL534af%2FScreenshot%202024-08-02%20at%207.07.59%20PM.png?alt=media&amp;token=b41f1cee-3d0c-4455-8f7c-03b20454595e" alt=""><figcaption></figcaption></figure>

1.7 Enter a Domain Name for the backup server, then click “Next”.

***Note:** This must be a real DNS address that is resolvable to the IP of your Acronis Cyber Infrastructure gateway, also the server must be able to accept inbound connections on port 44445.*

<figure><img src="https://2683631041-files.gitbook.io/~/files/v0/b/gitbook-x-prod.appspot.com/o/spaces%2FPPVG4W649TwXN8OejRhb%2Fuploads%2FJXs6dDyeapWJT0ua2TBr%2FScreenshot%202024-08-02%20at%207.08.07%20PM.png?alt=media&amp;token=19729a4a-22b7-42ac-9ba4-ac96cbf0e637" alt=""><figcaption></figcaption></figure>

1.8 To register your Cyber Protect Infrastructure, enter your Acronis Partner Credentials, then click `“`Next”.

<figure><img src="https://2683631041-files.gitbook.io/~/files/v0/b/gitbook-x-prod.appspot.com/o/spaces%2FPPVG4W649TwXN8OejRhb%2Fuploads%2FIg3l62kArduaBKtJnIZn%2FScreenshot%202024-08-02%20at%207.08.16%20PM.png?alt=media&amp;token=182156ee-51ae-43b8-9847-b30c6452b3d5" alt=""><figcaption></figcaption></figure>

1.9 Review the “Summary”, then click “Create”.

<figure><img src="https://2683631041-files.gitbook.io/~/files/v0/b/gitbook-x-prod.appspot.com/o/spaces%2FPPVG4W649TwXN8OejRhb%2Fuploads%2Ft4YHNJlCP9dNGODjG7MT%2FScreenshot%202024-08-02%20at%207.08.24%20PM.png?alt=media&amp;token=212404d0-1fb5-44f7-8c6e-584925b1acdb" alt=""><figcaption></figcaption></figure>

1.10 You are presented with the “Backup storage Overview" page.

<figure><img src="https://docs.neevcloud.com/~gitbook/image?url=https%3A%2F%2F1876135298-files.gitbook.io%2F%7E%2Ffiles%2Fv0%2Fb%2Fgitbook-x-prod.appspot.com%2Fo%2Fspaces%252FEC5NwtFshv6EATOemuUn%252Fuploads%252FKH8aY8few6uNDPOft2nd%252Fimage.png%3Falt%3Dmedia%26token%3D055fcf86-be72-4538-984e-0c7a9e3eaa8d&#x26;width=768&#x26;dpr=4&#x26;quality=100&#x26;sign=9390005d&#x26;sv=1" alt=""><figcaption></figcaption></figure>

1.11 Confirm Registration by clicking the “Registration” Tab.

<figure><img src="https://docs.neevcloud.com/~gitbook/image?url=https%3A%2F%2F1876135298-files.gitbook.io%2F%7E%2Ffiles%2Fv0%2Fb%2Fgitbook-x-prod.appspot.com%2Fo%2Fspaces%252FEC5NwtFshv6EATOemuUn%252Fuploads%252FyPE8CR6SZfvRZfEZEgRV%252Fimage.png%3Falt%3Dmedia%26token%3Daee7ce4b-6d54-42c2-ac41-815d26d5dcdf&#x26;width=768&#x26;dpr=4&#x26;quality=100&#x26;sign=189df0b0&#x26;sv=1" alt=""><figcaption></figcaption></figure>

1.12 Log in to your Acronis Cyber Protect Cloud Partner account, and confirm that the location is available by clicking “Settings > Locations”.

<figure><img src="https://docs.neevcloud.com/~gitbook/image?url=https%3A%2F%2F1876135298-files.gitbook.io%2F%7E%2Ffiles%2Fv0%2Fb%2Fgitbook-x-prod.appspot.com%2Fo%2Fspaces%252FEC5NwtFshv6EATOemuUn%252Fuploads%252FGHTBBbCy1YgpXUuK80te%252Fimage.png%3Falt%3Dmedia%26token%3D6b6c5003-4448-45e0-abad-5337016bcf01&#x26;width=768&#x26;dpr=4&#x26;quality=100&#x26;sign=1ab4fce6&#x26;sv=1" alt=""><figcaption></figcaption></figure>

Now you are ready to attach this storage to your New Customers in Acronis Cyber Protect account and push the backup Verify the backup by checking in you Zata.ai account.


# Connect Bucket with CloudBerry

CloudBerry is a cloud-based backup and disaster recovery solution that provide a secure and reliable way to protect data across various platforms. CloudBerry offers a range of products and services, cloud backup, Disaster recovery, cloud storage management, Endpoint Backup.

**Lets connect buckets with CloudBerry**

Download the **CloudBerry** your system to follow these [link.](https://www.msp360.com/explorer/windows/)

After download and completion the installation to open your **CloudBerry**

<figure><img src="https://2683631041-files.gitbook.io/~/files/v0/b/gitbook-x-prod.appspot.com/o/spaces%2FPPVG4W649TwXN8OejRhb%2Fuploads%2Fo1soJHhgwqTojrQf6YOh%2Fimage.png?alt=media&amp;token=4ff1f9ad-4e1b-4db2-9d01-b473da464144" alt=""><figcaption></figcaption></figure>

Add the account to **enable backup and data restoration**.

Click on the file section and click on **Add New account**.

<figure><img src="https://2683631041-files.gitbook.io/~/files/v0/b/gitbook-x-prod.appspot.com/o/spaces%2FPPVG4W649TwXN8OejRhb%2Fuploads%2FSbuUK7MeMWWogRK71j68%2FScreenshot%202024-09-06%20122430.png?alt=media&amp;token=0ddde60e-fc38-4372-92c2-5082dfb24063" alt=""><figcaption></figcaption></figure>

Select the **S3 Compatible**

<figure><img src="https://2683631041-files.gitbook.io/~/files/v0/b/gitbook-x-prod.appspot.com/o/spaces%2FPPVG4W649TwXN8OejRhb%2Fuploads%2FRzszlvVkqQOLpj5QbzMl%2Fimage.png?alt=media&amp;token=cca1b2b2-9d57-4524-9d43-06a4066b2a2c" alt=""><figcaption></figcaption></figure>

New S3 Compatible Storage Account-

**Display Name :- Specify name**

**Service Point :- idr01.zata.ai** (Central India) or **bom01.zata.ai** (Southern India)

Access and secret key to follow these [link.](https://docs.zata.ai/manage/access-keys/creating-a-new-access-key)

Enter all the details and click on "Test Connection".

<figure><img src="https://2683631041-files.gitbook.io/~/files/v0/b/gitbook-x-prod.appspot.com/o/spaces%2FPPVG4W649TwXN8OejRhb%2Fuploads%2FOcUKv4mlUaTxgxEVdQOG%2Fimage.png?alt=media&amp;token=65bb3826-b28d-40d9-9b94-da49ded76dd6" alt=""><figcaption></figcaption></figure>

<figure><img src="https://2683631041-files.gitbook.io/~/files/v0/b/gitbook-x-prod.appspot.com/o/spaces%2FPPVG4W649TwXN8OejRhb%2Fuploads%2Fgit-blob-6926670d7bd9fbc50a92838a609cf0b0e95ad396%2Fconnect-bucket-with-cloudberry.png?alt=media" alt="Cloudberry Zata Mumbai Endpoint"><figcaption></figcaption></figure>

The connection was successful. **Click OK.**

<figure><img src="https://2683631041-files.gitbook.io/~/files/v0/b/gitbook-x-prod.appspot.com/o/spaces%2FPPVG4W649TwXN8OejRhb%2Fuploads%2Fmn1dqBN2HPkSUc1Ch3Kx%2Fimage.png?alt=media&amp;token=d484a1d3-a49d-4217-9e45-fe9d098fc1e3" alt=""><figcaption></figcaption></figure>

The account has been **successfully** added.

<figure><img src="https://2683631041-files.gitbook.io/~/files/v0/b/gitbook-x-prod.appspot.com/o/spaces%2FPPVG4W649TwXN8OejRhb%2Fuploads%2FyxT9jSyKr2k4w5mi2GnH%2Fimage.png?alt=media&amp;token=5607331b-201f-42d6-b917-570ff0787778" alt=""><figcaption></figcaption></figure>

Now, back to the **Cloudberry** dashboard, you can see two sections: left and right. The left section shows my local machine and the right section is configured for the **Zata.a**i account.

Go to the right section and click on the source to select the **Zata.ai** account.

<figure><img src="https://2683631041-files.gitbook.io/~/files/v0/b/gitbook-x-prod.appspot.com/o/spaces%2FPPVG4W649TwXN8OejRhb%2Fuploads%2FyG1x9YmIzdYqmBlFt8xV%2FScreenshot%202024-09-06%20125026.png?alt=media&amp;token=1a138577-7595-4874-9cca-699ec26d286d" alt=""><figcaption></figcaption></figure>

After selecting the account **Zata.ai**, we can see our buckets are visible.

If you already have buckets, they will be visible. To create a **bucket**, follow these steps [link.](https://docs.zata.ai/manage/bucket/create-bucket)

<figure><img src="https://2683631041-files.gitbook.io/~/files/v0/b/gitbook-x-prod.appspot.com/o/spaces%2FPPVG4W649TwXN8OejRhb%2Fuploads%2F3RFkm1905QTUTyw7QJzQ%2Fimage.png?alt=media&amp;token=097463f4-2d96-4d58-814a-9fb2acc0fce9" alt=""><figcaption></figcaption></figure>

Now transferring the data to each other.

Choose the folder in both section, where you want to backup and restore your data.

Here is an example: I selected **`Desktop/New Folder`** my local machine and **Zata.ai** for the bucket.

<figure><img src="https://2683631041-files.gitbook.io/~/files/v0/b/gitbook-x-prod.appspot.com/o/spaces%2FPPVG4W649TwXN8OejRhb%2Fuploads%2FqQr74NeCdXBKGqXbXHEV%2Fimage.png?alt=media&amp;token=ac6f0979-6d3c-412e-8046-a3c6aebbcec5" alt=""><figcaption></figcaption></figure>

Now transfer the data by right-clicking the item and selecting **Copy/Move**.

<figure><img src="https://2683631041-files.gitbook.io/~/files/v0/b/gitbook-x-prod.appspot.com/o/spaces%2FPPVG4W649TwXN8OejRhb%2Fuploads%2FU21NiogLiQUKeNwOodt4%2FScreenshot%202024-09-06%20131029.png?alt=media&amp;token=a98e61e8-7320-4abe-a9e6-ddc5290af1e7" alt=""><figcaption></figcaption></figure>

Now we can see data is transferring, here data is transferring depends on your data and internet speed.

<figure><img src="https://2683631041-files.gitbook.io/~/files/v0/b/gitbook-x-prod.appspot.com/o/spaces%2FPPVG4W649TwXN8OejRhb%2Fuploads%2FrUcFgFMyl9usuStFmkF2%2Fimage.png?alt=media&amp;token=61d67b3a-65dd-456e-9d24-b84c8251b386" alt=""><figcaption></figcaption></figure>

Now data have been transferred.

<figure><img src="https://2683631041-files.gitbook.io/~/files/v0/b/gitbook-x-prod.appspot.com/o/spaces%2FPPVG4W649TwXN8OejRhb%2Fuploads%2FvDyA9VFtb8aEu0XlgdlK%2Fimage.png?alt=media&amp;token=6b5a5c46-420f-4934-862a-7e1ba245d780" alt=""><figcaption></figcaption></figure>


# Connect MSP360 Backup With Zata.ai

MSP360 Backup supports multiple platforms including Windows, macOS, and Linux, as well as various databases and virtual environments. With features like file-level and image-based backups, it provides flexibility for different backup strategies. Additionally, it includes tools for monitoring and reporting, which help in maintaining transparency and compliance with data protection standards.

Follow this link to log in or create an account on MSP360 and get a free trial: [MSP360 Free Trial](https://www.msp360.com/connect/)

**Steps to Create a User and Connect to S3 Storage in MSP360**

1. **Log in**: Access your MSP360 account.
2. **Navigate to Dashboard**: Go to the MSP360 dashboard.
3. **Create User**: Set up a new user for S3 storage.
4. **Create Account**: Establish an account to connect to S3 storage.

<figure><img src="https://2683631041-files.gitbook.io/~/files/v0/b/gitbook-x-prod.appspot.com/o/spaces%2FPPVG4W649TwXN8OejRhb%2Fuploads%2FqfVJ57mqMaUOM9WnWlAM%2FScreenshot%202024-08-02%20at%206.59.44%20PM.png?alt=media&amp;token=80cacfb1-fe43-4c76-8fe1-a51a00b5b6d2" alt=""><figcaption></figcaption></figure>

Select the S3 Compatible

<figure><img src="https://2683631041-files.gitbook.io/~/files/v0/b/gitbook-x-prod.appspot.com/o/spaces%2FPPVG4W649TwXN8OejRhb%2Fuploads%2FfRcb2lT3xG7PuCujWDkz%2FScreenshot%202024-08-02%20at%207.01.58%20PM.png?alt=media&amp;token=2ec8460d-f969-4427-bd40-4a2d8575b592" alt=""><figcaption></figcaption></figure>

Give the Specify Credentials

Storage Type: Default (S3 Compatible)

Display Name: Enter\_your\_display\_name

Access and Secret Keys by following this [link](/manage/access-keys).

Signature version: **Select default >4**

Set HTTPS:- **idr01.zata.ai** (Central India) or **bom01.zata.ai** (Southern India)

<figure><img src="https://2683631041-files.gitbook.io/~/files/v0/b/gitbook-x-prod.appspot.com/o/spaces%2FPPVG4W649TwXN8OejRhb%2Fuploads%2FF4jB6ENqXrmXvLICK92V%2FScreenshot%202024-09-05%20163352.png?alt=media&amp;token=a86ebfed-a77e-41af-91fa-99325b8ae224" alt=""><figcaption></figcaption></figure>

<figure><img src="https://2683631041-files.gitbook.io/~/files/v0/b/gitbook-x-prod.appspot.com/o/spaces%2FPPVG4W649TwXN8OejRhb%2Fuploads%2Fgit-blob-39ce9ff03ae2c90b03fdf2d4eb578394d1c119bc%2Fbom-connect-msp360-backup-with-zata..png?alt=media" alt="MSP360 Zata Mumbai Endpoint"><figcaption></figcaption></figure>

Create Backup Destination

Give the Display Name:- Enter\_Display\_Name

If you already have a bucket, select it. Otherwise, create a new one.

<figure><img src="https://2683631041-files.gitbook.io/~/files/v0/b/gitbook-x-prod.appspot.com/o/spaces%2FPPVG4W649TwXN8OejRhb%2Fuploads%2Fhkbb2h8HBTHjYkqjYdk5%2FScreenshot%202024-08-02%20at%207.03.22%20PM.png?alt=media&amp;token=83769c30-1b18-403c-ae99-94e8240a4898" alt=""><figcaption></figcaption></figure>

Select the company to assign when creating an account in MSP360 Backup.

<figure><img src="https://2683631041-files.gitbook.io/~/files/v0/b/gitbook-x-prod.appspot.com/o/spaces%2FPPVG4W649TwXN8OejRhb%2Fuploads%2Fgj7eYvKEihfZ38SMDDTc%2Fimage%20(4).png?alt=media&amp;token=02ed1844-7677-4bc7-93fc-5b19f9815a16" alt=""><figcaption></figcaption></figure>

Before saving, ensure you verify the details.

<figure><img src="https://2683631041-files.gitbook.io/~/files/v0/b/gitbook-x-prod.appspot.com/o/spaces%2FPPVG4W649TwXN8OejRhb%2Fuploads%2FlssniIlR11wSVoUfEpeo%2FScreenshot%202024-09-05%20163848.png?alt=media&amp;token=dbca6359-1a55-405a-a2f6-c7d11a77c70d" alt=""><figcaption></figcaption></figure>

There are details about the attached storage with **MSP360**

<figure><img src="https://2683631041-files.gitbook.io/~/files/v0/b/gitbook-x-prod.appspot.com/o/spaces%2FPPVG4W649TwXN8OejRhb%2Fuploads%2FCrgRCpxahep1UEtSErFh%2FScreenshot%202024-08-02%20at%207.05.00%20PM.png?alt=media&amp;token=c748b334-f256-4668-9bb4-ee55ccc0629c" alt=""><figcaption></figcaption></figure>


# Connect Veeam Backup Gateway With Zata.ai

Veeam Backup and Replication is a comprehensive data protection and disaster recovery solution designed to protect virtual, physical, and cloud-based workloads.

**Adding a Backup Repository in Veeam on Windows**

1. **Download and Install** [**Veeam**](https://www.veeam.com/):
   * Visit the Veeam website and download the installer.
   * Follow the on-screen instructions to complete the installation.
2. **Add Backup Repository**:
   * Open Veeam Backup & Replication.
   * Go to **Backup Infrastructure**.
   * Follow the wizard to configure the repository settings.

<figure><img src="https://2683631041-files.gitbook.io/~/files/v0/b/gitbook-x-prod.appspot.com/o/spaces%2FPPVG4W649TwXN8OejRhb%2Fuploads%2FBpl3YcWbKfEF1YhhkeAr%2FScreenshot%202024-08-03%20at%202.54.04%20PM.png?alt=media&amp;token=d53cf662-795e-47f5-80c3-0de46d8c57e9" alt=""><figcaption></figcaption></figure>

Right-click on **Backup Repositories** and select **Add Backup Repository,** select the object storage,

<figure><img src="https://2683631041-files.gitbook.io/~/files/v0/b/gitbook-x-prod.appspot.com/o/spaces%2FPPVG4W649TwXN8OejRhb%2Fuploads%2Fh8KAUfj8DprbmV6JMuPs%2FScreenshot%202024-08-03%20at%202.55.56%20PM.png?alt=media&amp;token=a875b6a8-0b5e-40ec-9b4f-cfcd0cbb209b" alt=""><figcaption></figcaption></figure>

Select **S3 Compatible**

<figure><img src="https://2683631041-files.gitbook.io/~/files/v0/b/gitbook-x-prod.appspot.com/o/spaces%2FPPVG4W649TwXN8OejRhb%2Fuploads%2FxYLpgND9VNs8GTJGdrNL%2FScreenshot%202024-08-03%20at%202.56.36%20PM.png?alt=media&amp;token=c0eef2a5-f50c-4419-ae24-4be68b652d8c" alt=""><figcaption></figcaption></figure>

Again Select **S3 Compatible**

<figure><img src="https://2683631041-files.gitbook.io/~/files/v0/b/gitbook-x-prod.appspot.com/o/spaces%2FPPVG4W649TwXN8OejRhb%2Fuploads%2FsJPCXySMuiQFPLzHPqDa%2FScreenshot%202024-08-03%20at%202.57.37%20PM.png?alt=media&amp;token=d1f2311c-04fa-42b2-b718-c7ed05fecd28" alt=""><figcaption></figcaption></figure>

Fill in the service point and region for adding credentials: **Access Key and Secret Key**.

for Access key and secret key follow these [links](/manage/access-keys).

<figure><img src="https://2683631041-files.gitbook.io/~/files/v0/b/gitbook-x-prod.appspot.com/o/spaces%2FPPVG4W649TwXN8OejRhb%2Fuploads%2Fz6Hv7KyllxFv3EhuD0ch%2FScreenshot%202024-09-05%20164638.png?alt=media&amp;token=d9db5d70-8147-464d-8a4b-c5f80d9b9eff" alt=""><figcaption></figcaption></figure>

Provide the **bucket name**

To create a bucket, follow these [links](/manage/bucket).

<figure><img src="https://2683631041-files.gitbook.io/~/files/v0/b/gitbook-x-prod.appspot.com/o/spaces%2FPPVG4W649TwXN8OejRhb%2Fuploads%2FrFHHKP8OxfAMBXcyUOse%2FScreenshot%202024-08-03%20at%202.58.48%20PM.png?alt=media&amp;token=edc0d7e1-63bb-4d6b-afd6-e1dd512292dc" alt=""><figcaption></figcaption></figure>

Select and create a folder

<figure><img src="https://2683631041-files.gitbook.io/~/files/v0/b/gitbook-x-prod.appspot.com/o/spaces%2FPPVG4W649TwXN8OejRhb%2Fuploads%2FQzlQ5G3TfHBQosbcRpwG%2FScreenshot%202024-08-03%20at%202.59.20%20PM.png?alt=media&amp;token=637e7450-ae59-4eaa-9194-7a2e78f07bed" alt=""><figcaption></figcaption></figure>

Update the mount server configuration accordingly.

<figure><img src="https://2683631041-files.gitbook.io/~/files/v0/b/gitbook-x-prod.appspot.com/o/spaces%2FPPVG4W649TwXN8OejRhb%2Fuploads%2FnfO0qUE31NMJiW4mp8pn%2FScreenshot%202024-08-03%20at%202.59.47%20PM.png?alt=media&amp;token=c1a1208c-6902-42b1-a09d-a0ead5fb6fbd" alt=""><figcaption></figcaption></figure>

After applying all the **configurations**, you should see a message indicating success.

<figure><img src="https://2683631041-files.gitbook.io/~/files/v0/b/gitbook-x-prod.appspot.com/o/spaces%2FPPVG4W649TwXN8OejRhb%2Fuploads%2FmzJej3ohziXW1ivuuX3K%2FScreenshot%202024-08-03%20at%203.05.29%20PM.png?alt=media&amp;token=5d2fda95-af91-4015-ab40-d4dd2ef8b405" alt=""><figcaption></figcaption></figure>

You can now see a summary after completing the entire process.

<figure><img src="https://2683631041-files.gitbook.io/~/files/v0/b/gitbook-x-prod.appspot.com/o/spaces%2FPPVG4W649TwXN8OejRhb%2Fuploads%2FvS52OwJCDvhD4fu9zs74%2FScreenshot%202024-08-03%20at%203.05.52%20PM.png?alt=media&amp;token=a5e6733f-11b7-4d94-84dc-6d12bce3125d" alt=""><figcaption></figcaption></figure>


# Connect Ahsay cloud backup suite(ACBS) with Zata.ai

## Connect Ahsay cloud backup suite(ACBS) with Zata.ai

**AhsayCBS** stands for Ahsay Cloud Backup Suite, a comprehensive backup software solution designed for managed service providers and IT professionals. It provides data backup and restore capabilities for virtual machines, databases, servers, and desktops, supporting multiple platforms and storage options.

Download the ACBS in Windows by following this [link](https://www.ahsay.com/en/download).

<figure><img src="https://2683631041-files.gitbook.io/~/files/v0/b/gitbook-x-prod.appspot.com/o/spaces%2FPPVG4W649TwXN8OejRhb%2Fuploads%2Fj3r6dCF1l30lJYGprbJi%2FScreenshot%202024-08-03%20at%203.29.06%20PM.png?alt=media&amp;token=50324d4a-182a-4945-a1de-78a2be9f21b8" alt=""><figcaption></figcaption></figure>

After downloading ACBS on Windows, click on AhsayCBS to start the installation.

<figure><img src="https://2683631041-files.gitbook.io/~/files/v0/b/gitbook-x-prod.appspot.com/o/spaces%2FPPVG4W649TwXN8OejRhb%2Fuploads%2FisZ6dLuh9u0xyLhWCSmX%2FScreenshot%202024-08-03%20at%203.29.36%20PM.png?alt=media&amp;token=e1527158-d2d4-41f5-9ea9-d019c3806ef3" alt=""><figcaption></figcaption></figure>

Choose the language, and then click ok to continue

<figure><img src="https://docs.neevcloud.com/~gitbook/image?url=https%3A%2F%2F1876135298-files.gitbook.io%2F%7E%2Ffiles%2Fv0%2Fb%2Fgitbook-x-prod.appspot.com%2Fo%2Fspaces%252FEC5NwtFshv6EATOemuUn%252Fuploads%252FNgl6wAHa1z5QWk4T1saZ%252Fimage.png%3Falt%3Dmedia%26token%3D7c298172-5617-4e0f-9463-8990df395680&#x26;width=768&#x26;dpr=4&#x26;quality=100&#x26;sign=680e9e4c&#x26;sv=1" alt=""><figcaption></figcaption></figure>

Click next to continue

<figure><img src="https://2683631041-files.gitbook.io/~/files/v0/b/gitbook-x-prod.appspot.com/o/spaces%2FPPVG4W649TwXN8OejRhb%2Fuploads%2Fpah7fsYfxb4u7RIq71PP%2FScreenshot%202024-08-03%20at%203.30.20%20PM.png?alt=media&amp;token=ddfcb22a-6af2-4eec-88e5-0f5f0caf65a3" alt=""><figcaption></figcaption></figure>

Read the license agreement. Select “**I agree on the agreement**” If you agree, then click on \[Next] to continue the installation.

<figure><img src="https://2683631041-files.gitbook.io/~/files/v0/b/gitbook-x-prod.appspot.com/o/spaces%2FPPVG4W649TwXN8OejRhb%2Fuploads%2Fdp8TfOx2KAuwvuDltzPy%2FScreenshot%202024-08-03%20at%203.30.45%20PM.png?alt=media&amp;token=96d80cb3-622b-46f0-8ce3-f2cbf0a02036" alt=""><figcaption></figcaption></figure>

Choose the installation directory, then click next to **continue**.

<figure><img src="https://2683631041-files.gitbook.io/~/files/v0/b/gitbook-x-prod.appspot.com/o/spaces%2FPPVG4W649TwXN8OejRhb%2Fuploads%2F0pkbOth5dBxVTON0Czt6%2FScreenshot%202024-08-03%20at%203.31.02%20PM.png?alt=media&amp;token=b9e40199-4ed0-4f8f-b425-e50551f6c93d" alt=""><figcaption></figcaption></figure>

Click next to **continue**

<figure><img src="https://2683631041-files.gitbook.io/~/files/v0/b/gitbook-x-prod.appspot.com/o/spaces%2FPPVG4W649TwXN8OejRhb%2Fuploads%2FiIw6TgU2gbcPoqJIXLjQ%2FScreenshot%202024-08-03%20at%203.31.39%20PM.png?alt=media&amp;token=c7b10ab7-86f1-4de1-bfb2-239f3bd449ed" alt=""><figcaption></figcaption></figure>

Enter the ports to be used by **AhsayCBS**. By default, the ports are 80 and 443 (Http and Https respectively). If these ports have been used by other applications, eg. Microsoft IIS, Apache or other applications. Please use alternative ports such as 8080, 8443, then click \[Next] to continue.

<figure><img src="https://2683631041-files.gitbook.io/~/files/v0/b/gitbook-x-prod.appspot.com/o/spaces%2FPPVG4W649TwXN8OejRhb%2Fuploads%2FBRWc5asWv8ARy3qWHyI1%2FScreenshot%202024-08-03%20at%203.32.10%20PM.png?alt=media&amp;token=6fd13cef-9e74-4b1f-9c7e-cfb91f543409" alt=""><figcaption></figcaption></figure>

Click to start the installation

<figure><img src="https://2683631041-files.gitbook.io/~/files/v0/b/gitbook-x-prod.appspot.com/o/spaces%2FPPVG4W649TwXN8OejRhb%2Fuploads%2FJNgngP2WPjeI78OR2rGi%2FScreenshot%202024-08-03%20at%203.35.21%20PM.png?alt=media&amp;token=48a20fe3-1825-4ee3-a5be-6e914bc3f123" alt=""><figcaption></figcaption></figure>

Click to complete the installation.

<figure><img src="https://2683631041-files.gitbook.io/~/files/v0/b/gitbook-x-prod.appspot.com/o/spaces%2FPPVG4W649TwXN8OejRhb%2Fuploads%2FUDE2BTwz8h39DtepvDnV%2FScreenshot%202024-08-03%20at%203.42.34%20PM.png?alt=media&amp;token=30869544-6435-4b05-aea3-f917c0de285e" alt=""><figcaption></figcaption></figure>

After clicking "Finish," the service will automatically open in the browser.

Now enter the default credentials ->

**Username: system**

**Password: system**

<figure><img src="https://docs.neevcloud.com/~gitbook/image?url=https%3A%2F%2F1876135298-files.gitbook.io%2F%7E%2Ffiles%2Fv0%2Fb%2Fgitbook-x-prod.appspot.com%2Fo%2Fspaces%252FEC5NwtFshv6EATOemuUn%252Fuploads%252FhEkoFNDMk8VKvMFavTWy%252Fimage.png%3Falt%3Dmedia%26token%3D1fbec53b-8ed1-4037-a514-d86cb9e3369e&#x26;width=768&#x26;dpr=4&#x26;quality=100&#x26;sign=585ad0fd&#x26;sv=1" alt=""><figcaption></figcaption></figure>

Now enter the credentials to change password and press enter

<figure><img src="https://2683631041-files.gitbook.io/~/files/v0/b/gitbook-x-prod.appspot.com/o/spaces%2FPPVG4W649TwXN8OejRhb%2Fuploads%2F55y1tXryOz6JOxQWf4Ho%2FScreenshot%202024-08-03%20at%203.45.31%20PM.png?alt=media&amp;token=71aba3be-4201-4a4c-8d42-442e16ee3d53" alt=""><figcaption></figcaption></figure>

This is a dashboard of **AhsayCBS**

<figure><img src="https://2683631041-files.gitbook.io/~/files/v0/b/gitbook-x-prod.appspot.com/o/spaces%2FPPVG4W649TwXN8OejRhb%2Fuploads%2F6sv9fq8gMRPt5kPgvmGT%2FScreenshot%202024-08-03%20at%203.49.37%20PM.png?alt=media&amp;token=76bb39ad-0e95-4ebd-bd2e-a58405008b00" alt=""><figcaption></figcaption></figure>

Now click on the system settings > **Basic** > Click the Predefined Destinations

<figure><img src="https://2683631041-files.gitbook.io/~/files/v0/b/gitbook-x-prod.appspot.com/o/spaces%2FPPVG4W649TwXN8OejRhb%2Fuploads%2FoXnIyVyzJjUZk9cIzfgg%2FScreenshot%202024-08-03%20at%203.49.55%20PM.png?alt=media&amp;token=20135cd0-7dd7-4ef0-9f63-914c6066f6d0" alt=""><figcaption></figcaption></figure>

Now select the Predefined Destinations to add some details

Name: Specify Name accordingly

Type: Single storage destination

Destination storage: AWS S3 Compatible Cloud Storage

Host: **idr01.zata.ai** (Central India) or **bom01.zata.ai** (Southern India)

Port: **443**

Access Key and secret key to follow these [links.](https://docs.neevcloud.com/neevcloud-products/access-details/s3-ec2-credentials/create-s3-ec2-credentials)

Signature version: **Select SV4**

**Instructions**

Provide the bucket name. Make sure the [bucket](https://docs.neevcloud.com/neevcloud-products/storage/object-storage/create-bucket) has already been created on **Zata**.**ai**.

<figure><img src="https://2683631041-files.gitbook.io/~/files/v0/b/gitbook-x-prod.appspot.com/o/spaces%2FPPVG4W649TwXN8OejRhb%2Fuploads%2F9eJhpI58vGaF7tNIVktQ%2Fimage.png?alt=media&amp;token=ab929b66-7193-4962-ae03-7856af494669" alt=""><figcaption></figcaption></figure>

<figure><img src="https://2683631041-files.gitbook.io/~/files/v0/b/gitbook-x-prod.appspot.com/o/spaces%2FPPVG4W649TwXN8OejRhb%2Fuploads%2Fgit-blob-4213958f393271165b43d1bf2ac18e68f375d5ea%2Fconnect-ahsay-cloud-backup-suite-acbs-with-zata.png?alt=media" alt="Ahsay Zata Mumbai Endpoint"><figcaption></figcaption></figure>

Connect with **SSL**:- Click on the connect with **SSL**

Click **Test** to verify your details. After clicking, you will see a popup.

<figure><img src="https://2683631041-files.gitbook.io/~/files/v0/b/gitbook-x-prod.appspot.com/o/spaces%2FPPVG4W649TwXN8OejRhb%2Fuploads%2FiLGoHX9Bnvez2IotWDZY%2FScreenshot%202024-09-06%20150846.png?alt=media&amp;token=575a1f86-add4-4eae-8f6b-be22e6285ef8" alt=""><figcaption></figcaption></figure>

Now save the details

<figure><img src="https://2683631041-files.gitbook.io/~/files/v0/b/gitbook-x-prod.appspot.com/o/spaces%2FPPVG4W649TwXN8OejRhb%2Fuploads%2FNYg2bHcqUbpqlYTqaZyw%2FScreenshot%202024-09-06%20151351.png?alt=media&amp;token=a43db37a-5de2-4fbc-ad9b-68f5b364f4ea" alt=""><figcaption></figcaption></figure>

Now back to the system settings > **Basic** > Click the Predefined Destinations

<figure><img src="https://2683631041-files.gitbook.io/~/files/v0/b/gitbook-x-prod.appspot.com/o/spaces%2FPPVG4W649TwXN8OejRhb%2Fuploads%2FDWMsWcGOuxLl4pgbwJHy%2FScreenshot%202024-08-03%20at%203.51.34%20PM.png?alt=media&amp;token=628180f6-e936-4ca2-b8c5-be485b5a4666" alt=""><figcaption></figcaption></figure>

Navigate to the **Zata.ai** Dashboard, go to **Object Storage**, and select the desired bucket name.

<figure><img src="https://2683631041-files.gitbook.io/~/files/v0/b/gitbook-x-prod.appspot.com/o/spaces%2FPPVG4W649TwXN8OejRhb%2Fuploads%2F9eJhpI58vGaF7tNIVktQ%2Fimage.png?alt=media&amp;token=ab929b66-7193-4962-ae03-7856af494669" alt=""><figcaption></figcaption></figure>


# Connect Commvault Backup with Zata.ai

#### Steps to Connect Zata.ai S3 Storage with Commvault:

**1. Create an S3 Bucket in Zata.ai:**

* Log in to your Zata.ai Console.
* Navigate to the Bucket.
* Click on "Create bucket" and follow the prompts to set up your bucket.

**3. Generate Access Keys:**

* In the Zata.ai Console, go to the [Access key](/manage/access-keys).
* Generate access keys, which will be used in Commvault for authentication.

**4. Configure Commvault to Use S3 Storage:**

* Log in to your Commvault Command Center.
* Navigate to the `Storage` tab.
* Add a new cloud storage library and select S3-compatible storage as the storage type.
* Enter the S3 bucket details, access key, and secret key obtained from Zata.ai.

**5. Define Storage Policies:**

* In Commvault, create or modify storage policies to use the S3 storage library you just configured.
* Define the backup and retention policies according to your requirements.

**6. Run Backup Jobs:**

* Set up and run backup jobs, ensuring they are directed to the S3 storage.


# Connect Vembu Backup with Zata.ai

**Vembu Backup**

**Vembu Backup** is a comprehensive data protection solution that provides backup, recovery, and disaster recovery for various IT environments including physical, virtual, and cloud infrastructures. It supports all major platforms and helps in safeguarding business-critical data through advanced features like incremental backups, instant restores, and offsite replication.

Download the Vembu backup solution in Windows by following this [link](https://www.vembu.com/)

<figure><img src="https://2683631041-files.gitbook.io/~/files/v0/b/gitbook-x-prod.appspot.com/o/spaces%2FPPVG4W649TwXN8OejRhb%2Fuploads%2FIGc8awalIgB2MsOlz2vP%2FScreenshot%202024-08-03%20at%203.08.00%20PM.png?alt=media&amp;token=bf655bf8-485d-469a-b27b-f80cfb3b0bef" alt=""><figcaption></figcaption></figure>

**For the installation Guide follow these** [**link**](https://www.bdrsuite.com/guide/vembu-bdr-suite/7-0/en/bdr-installation-windows.html)

After installation, the following screen opens in the browser:

<figure><img src="https://2683631041-files.gitbook.io/~/files/v0/b/gitbook-x-prod.appspot.com/o/spaces%2FPPVG4W649TwXN8OejRhb%2Fuploads%2Fg90nk7g6To5kfFmi205B%2FScreenshot%202024-08-03%20at%203.09.21%20PM.png?alt=media&amp;token=16a423e5-6fbf-419a-979e-3cdbf5e8eff5" alt=""><figcaption></figcaption></figure>

Access the browser and configure **object storage.**

<figure><img src="https://2683631041-files.gitbook.io/~/files/v0/b/gitbook-x-prod.appspot.com/o/spaces%2FPPVG4W649TwXN8OejRhb%2Fuploads%2FD5EU9qqoUmS583BRB07G%2FScreenshot%202024-08-03%20at%203.09.47%20PM.png?alt=media&amp;token=248fce75-93f4-4444-8d49-d6f8a976eeed" alt=""><figcaption></figcaption></figure>

Select "**Create New Object Storage Repository**"

Give the Name of Repository - .........

Repository Type:- S3 compatible

Set as the default repo:- NO

Server Endpoint:- **idr01.zata.ai** (Central India) or **bom01.zata.ai** (Southern India)

DC Region:- In this section, the region is selected default.

Credential: - click on the Add New Credentials:- Set the name of Display name, Access key, Secret key

<figure><img src="https://2683631041-files.gitbook.io/~/files/v0/b/gitbook-x-prod.appspot.com/o/spaces%2FPPVG4W649TwXN8OejRhb%2Fuploads%2FE3MhZnt5n2meea3csZUq%2FScreenshot%202024-09-06%20152317.png?alt=media&amp;token=360c1322-ee34-47fc-a356-9987a27fd858" alt=""><figcaption></figcaption></figure>

After this, select the bucket and cache location.

<figure><img src="https://2683631041-files.gitbook.io/~/files/v0/b/gitbook-x-prod.appspot.com/o/spaces%2FPPVG4W649TwXN8OejRhb%2Fuploads%2FVsLzwEPsFZYCdgRWGskN%2FScreenshot%202024-09-06%20152818.png?alt=media&amp;token=d6fdf498-ff4d-4bca-baa3-4783201d87ae" alt=""><figcaption></figcaption></figure>

Create the object storage repository.

<figure><img src="https://2683631041-files.gitbook.io/~/files/v0/b/gitbook-x-prod.appspot.com/o/spaces%2FPPVG4W649TwXN8OejRhb%2Fuploads%2FVTlaobAIHvyjs4q0O5Kg%2FScreenshot%202024-09-06%20153409.png?alt=media&amp;token=e9bb73ca-bdf3-423b-9160-1fb9610aea49" alt=""><figcaption></figcaption></figure>


# Connect NetDrive 3 with Zata.ai

A comprehensive, step-by-step guide to mount your **Zata.ai** object storage as a local drive using **NetDrive 3** on macOS and Windows.

### Overview <a href="#overview" id="overview"></a>

This guide helps teams using **Zata.ai** (S3-compatible storage) set up NetDrive 3 for seamless drag-and-drop file access through Finder/Explorer and desktop applications.

**Tested with:** NetDrive v3.5.251 (macOS & Windows)

### Prerequisites <a href="#prerequisites" id="prerequisites"></a>

Before you begin, ensure you have:

* **Zata S3 credentials:** Access Key ID and Secret Access Key
* **Zata endpoint:** `https://idr01.zata.ai` (Central India) or `https://bom01.zata.ai` (Southern India)
* **Bucket name** (optional but recommended): e.g., `my-team-backups`
* **NetDrive 3 installed:** Version 3.x for macOS or Windows
* **Network access:** Outbound HTTPS (TCP 443) to your Zata endpoint
* **Correct system time:** Significant time drift can break S3 authentication

> **Tip:** If your account has restricted bucket listing permissions, prepare to enter a specific bucket name during setup.

### Step 1: Install NetDrive 3 <a href="#step-1-install-netdrive-3" id="step-1-install-netdrive-3"></a>

### Download NetDrive 3

Visit the [official NetDrive download page](https://www.netdrive.net/download/) to get the latest version.

### Windows Installation

1. Download and run the NetDrive 3 installer
2. Complete the installation process following the setup wizard

<figure><img src="https://2683631041-files.gitbook.io/~/files/v0/b/gitbook-x-prod.appspot.com/o/spaces%2FPPVG4W649TwXN8OejRhb%2Fuploads%2Fcnmu9zXzb6VvQeKVAwZ6%2Fimage.png?alt=media&amp;token=48424957-4750-4b90-8808-08eabecb0a7e" alt=""><figcaption></figcaption></figure>

1. Launch **NetDrive**
2. If prompted, allow NetDrive through Windows Defender Firewall for private networks

### macOS Installation

1. Download the NetDrive 3 installer for macOS
2. Install the application
3. Open **NetDrive** from Applications folder

### Step 2: Create New S3-Compatible Connection <a href="#step-2-create-new-s3-compatible-connection" id="step-2-create-new-s3-compatible-connection"></a>

1. In NetDrive, click the **green + button** (Add New Drive) as shown in the interface

<figure><img src="https://2683631041-files.gitbook.io/~/files/v0/b/gitbook-x-prod.appspot.com/o/spaces%2FPPVG4W649TwXN8OejRhb%2Fuploads%2FPWBBJiFoRQ6v4hQBTl84%2Fimage.png?alt=media&amp;token=10c76df8-4ca7-4487-96b1-d7ad51a27fc2" alt=""><figcaption></figcaption></figure>

1. You'll see the "Add a Personal Drive" configuration screen
2. **Storage type:** Select **S3** from the dropdown menu
3. **Label:** Enter a descriptive name (e.g., `Zata`)

<figure><img src="https://2683631041-files.gitbook.io/~/files/v0/b/gitbook-x-prod.appspot.com/o/spaces%2FPPVG4W649TwXN8OejRhb%2Fuploads%2FKKOvs5qAwGAXiMfhc2Tg%2Fimage.png?alt=media&amp;token=508cd4be-bdd9-48a1-8b1a-7b94c92d3ba3" alt=""><figcaption></figcaption></figure>

> **Note:** On macOS, NetDrive mounts drives under **Locations** in Finder sidebar. On Windows, you can assign a specific drive letter.

### Step 3: Configure Connection Details <a href="#step-3-configure-connection-details" id="step-3-configure-connection-details"></a>

Fill in the S3 account configuration form with these exact values:

<figure><img src="https://2683631041-files.gitbook.io/~/files/v0/b/gitbook-x-prod.appspot.com/o/spaces%2FPPVG4W649TwXN8OejRhb%2Fuploads%2FDwWj6iFbzDsKdrQrAHe8%2Fimage.png?alt=media&amp;token=c8d2748a-ef3e-4094-9e55-2a0bb7d339e8" alt=""><figcaption></figcaption></figure>

### Account Settings

* **Server Address:** `idr01.zata.ai` (or `bom01.zata.ai` for Mumbai)
* **Access ID:** Enter your Zata Access Key ID (e.g., `DKQLR6NUF7IYG6SFQSU0`)
* **Secret Key:** Enter your Zata Secret Access Key
* **Save account ID and secret key** (recommended)

### For Limited Bucket Access

If you have restricted permissions:

* **Bucket name:** Enter your specific bucket name (e.g., `my-team-backups`)

### Network Settings

* Click **PROXY SETTINGS** if you need to configure proxy settings for your network

> **Important:** Make sure to use the exact server address `idr01.zata.ai` (Central India) or `bom01.zata.ai` (Southern India) without the `https://` prefix.

### Step 4: Advanced Configuration <a href="#step-4-advanced-configuration" id="step-4-advanced-configuration"></a>

Before connecting, ensure these critical settings are configured:

* **Use HTTPS (SSL/TLS):** **ON**
* **Force path-style addressing:** **ON** *(prevents SSL certificate issues)*
* **Port:** `443`
* **Region:** `CentralIndia` or `SouthIndia` (case-sensitive)
* **Signature:** **V4**
* **Connect at login/Mount at boot:** **ON** (optional)
* **Background transfer:** **ON** (recommended)

Click **CONNECT** to mount the drive.

### Step 5: Verify the Connection <a href="#step-5-verify-the-connection" id="step-5-verify-the-connection"></a>

1. Open the mounted **Zata** drive in Finder (macOS) or Explorer (Windows)
2. Create a test folder (e.g., `netdrive-test`)
3. Copy a small test file into the folder
4. Verify the file appears in your Zata bucket using your preferred S3 tool

### Troubleshooting <a href="#troubleshooting" id="troubleshooting"></a>

### Authentication Issues

**Problem:** `SignatureDoesNotMatch` or authentication failures

**Solutions:**

* Verify **Signature** is set to **V4**
* Enable **Force path-style addressing**
* Double-check endpoint URL, Access Key, and Secret Key (no trailing spaces)
* Ensure system date/time is accurate with automatic sync enabled
* Verify bucket name spelling and case if specified

### SSL/Certificate Issues

**Problem:** SSL or hostname mismatch errors

**Solutions:**

* Keep **HTTPS** enabled
* Use the exact Zata endpoint: `idr01.zata.ai` or `bom01.zata.ai`
* Ensure **Force path-style** is **ON**

### Bucket Access Issues

**Problem:** Can't list buckets or see empty bucket list

**Solutions:**

* Your access key may lack `ListAllMyBuckets` permission
* Enter the bucket name explicitly in the connection settings
* Reconnect after specifying the bucket

**Problem:** `403 AccessDenied` errors

**Solutions:**

* Check bucket permissions and policies for your access key
* Verify you're connecting to the correct bucket and account
* Ensure your key has necessary permissions (list/get/put/delete)

### Performance Issues

**Problem:** Slow file operations (rename/move/copy)

**Solutions:**

* Enable background transfer in NetDrive settings
* Break large file operations into smaller batches
* For bulk uploads, consider using dedicated tools like rclone, then use NetDrive for daily operations

### Security Best Practices <a href="#security-best-practices" id="security-best-practices"></a>

* **Principle of least privilege:** Create access keys limited to required buckets and actions
* **Regular key rotation:** Update and revoke old access keys periodically
* **Always use HTTPS:** Never disable SSL/TLS encryption
* **Restrict access:** Limit key usage to authorized machines only

### Configuration Summary <a href="#configuration-summary" id="configuration-summary"></a>

Here's a complete example of the settings (replace with your actual values):

```
textStorage type: S3
Server address: idr01.zata.ai (or bom01.zata.ai)
Access Key ID: DKQLR6NUF7IYG6SFQSU0
Secret Access Key: ************************
Region: CentralIndia (or SouthIndia)
Signature: V4
Bucket: my-team-backups
Use HTTPS: ON
Force path-style URL: ON
Port: 443
Connect at login: ON
Background transfer: ON
```

***

> **Success!** You should now have Zata storage mounted as a local drive, accessible through your system's file manager for seamless file operations.


# Connect GoodSync with Zata.ai

GoodSync is a file synchronization and backup software. It can sync files between:

## Prerequisites <a href="#prerequisites" id="prerequisites"></a>

To download **GoodSync** and install it, follow these [links](https://www.goodsync.com/download).

Zata.ai Bucket - [Bucket Create Guide](https://docs.zata.ai/manage/bucket/create-bucket).

Access and Secret Key Pair - [Access Key Guide](https://docs.zata.ai/manage/access-keys/creating-a-new-access-key).

REST Endpoint to follow on [links](https://docs.zata.ai/manage/service-urls-for-zata.ai-s3).<br>

[Embedded Link](https://www.youtube.com/watch?feature=youtu.be\&v=u2E1DyTx5iA)

## Set up From Scratch with Zata.ai

After downloading and installing GoodSync, open the application and begin the configuration process.

Open the GoodSync and click on the New Job

<figure><img src="https://2683631041-files.gitbook.io/~/files/v0/b/gitbook-x-prod.appspot.com/o/spaces%2FPPVG4W649TwXN8OejRhb%2Fuploads%2FfZI4uKfaKjQsEAen4vx2%2Fimage.png?alt=media&amp;token=12ee0563-ae3e-4d0c-aaee-6803f301f5b4" alt=""><figcaption></figcaption></figure>

Type Your Folder name and choose 'Backup' or 'Synchronization'.

<figure><img src="https://2683631041-files.gitbook.io/~/files/v0/b/gitbook-x-prod.appspot.com/o/spaces%2FPPVG4W649TwXN8OejRhb%2Fuploads%2FWxZiNArx16CAxznWwNlO%2Fimage.png?alt=media&amp;token=27d80dde-825c-4de5-b38e-b8979d6d02ea" alt=""><figcaption></figcaption></figure>

Select the left folder as the local folder (e.g., `D:\Projects`).

<figure><img src="https://2683631041-files.gitbook.io/~/files/v0/b/gitbook-x-prod.appspot.com/o/spaces%2FPPVG4W649TwXN8OejRhb%2Fuploads%2FIXtPHKdZTFspomAlkIl0%2Fimage.png?alt=media&amp;token=657ecee8-cf0e-46a3-9f0d-fc08f01a36f1" alt=""><figcaption></figcaption></figure>

Select the correct folder in Amazon S3, then click *Add New Account*.

Set the following values:

* **Endpoint:** idr01.zata.ai (Central India) or bom01.zata.ai (Southern India)
* **Access Key:** Obtain from Zata.ai
* **Secret Key:** Obtain from Zata.ai

Now click on the save.

<figure><img src="https://2683631041-files.gitbook.io/~/files/v0/b/gitbook-x-prod.appspot.com/o/spaces%2FPPVG4W649TwXN8OejRhb%2Fuploads%2FIIJom3BszBKA5iQ9kjRW%2Fimage.png?alt=media&amp;token=bc8e5b05-3bcf-4378-868d-2b3416936ecd" alt=""><figcaption></figcaption></figure>

Ensure that **Auto Run** is turned **ON** for Auto Sync.

Click on the Auto Button

<figure><img src="https://2683631041-files.gitbook.io/~/files/v0/b/gitbook-x-prod.appspot.com/o/spaces%2FPPVG4W649TwXN8OejRhb%2Fuploads%2FCDFXyagY8cLNc4GDcuyD%2Fimage.png?alt=media&amp;token=ccd08b8b-61bd-495c-bf2d-3eab650c4f73" alt=""><figcaption></figcaption></figure>

Select the **Periodically** option, set the desired time interval (e.g., every 5 minutes), and click **Save**.

<figure><img src="https://2683631041-files.gitbook.io/~/files/v0/b/gitbook-x-prod.appspot.com/o/spaces%2FPPVG4W649TwXN8OejRhb%2Fuploads%2F56G0OWYJs9ZR3v2lxJuf%2Fimage.png?alt=media&amp;token=84a45aca-549b-41ff-afd1-feaa70899b7b" alt=""><figcaption></figcaption></figure>

* Run the job manually once to verify that files are uploaded to the Zata.ai bucket.
* Log in to the Zata.ai panel and confirm that the uploaded files are visible in the bucket.
* Enable Auto Schedule to automate future uploads without manual intervention.


# Connect Forklift with Zata.ai

## ForkLift for macOS

ForkLift is a powerful file manager and FTP client for macOS, offering a dual-pane interface, advanced file operations, and integration with various cloud services.

### Prerequisites <a href="#prerequisites" id="prerequisites"></a>

Zata.ai Bucket - [Bucket Create Guide](https://docs.zata.ai/manage/bucket/create-bucket).

Access and Secret Key Pair - [Access Key Guide](https://docs.zata.ai/manage/access-keys/creating-a-new-access-key).

REST Endpoint to follow these: click on [links](https://docs.zata.ai/manage/service-urls-for-zata.ai-s3).

### Installation

1. Download ForkLift from the [official website](https://binarynights.com).
2. Open the downloaded `.dmg` file.
3. Drag ForkLift to the Applications folder.
4. Launch ForkLift from the Applications folder.

## Set Up from Scratch with Zata.ai

After downloading and installing Forklift, open the application and begin the configuration process.

### Launch Forklift on your Mac.

In the top menu bar, click Go → Connect.

<figure><img src="https://2683631041-files.gitbook.io/~/files/v0/b/gitbook-x-prod.appspot.com/o/spaces%2FPPVG4W649TwXN8OejRhb%2Fuploads%2FXcM3ftHNe1E0a08gpge8%2Fimage.png?alt=media&amp;token=361818fd-ff24-4d5e-8d49-930908a03731" alt=""><figcaption></figcaption></figure>

### Configure the AWS S3 connection

#### In the **Connect** window

* Protocol: Select Amazon S3
* Server: Enter idr01.zata.ai (Central India) or bom01.zata.ai (Southern India / Mumbai)
* Username: Enter your Zata Access Key ID
* Password: Enter your Zata Secret Access Key

Now click on the connect.

<figure><img src="https://2683631041-files.gitbook.io/~/files/v0/b/gitbook-x-prod.appspot.com/o/spaces%2FPPVG4W649TwXN8OejRhb%2Fuploads%2Fsw4SKck2wOBAY9QNO8xT%2Fimage.png?alt=media&amp;token=ee53d5d8-c020-4222-9ddf-cf08a7d00e85" alt=""><figcaption></figcaption></figure>

#### Browse Your Buckets

* Once connected, your available buckets on Zata will be displayed.
* You can drag and drop files between Finder/Forklift and your Zata storage.
* Use Forklift’s dual-pane view to easily transfer files to and from Zata.

<figure><img src="https://2683631041-files.gitbook.io/~/files/v0/b/gitbook-x-prod.appspot.com/o/spaces%2FPPVG4W649TwXN8OejRhb%2Fuploads%2FZfWnjEHgrOUqm6GxufB0%2FScreenshot%202025-09-04%20at%203.57.53%E2%80%AFPM%5B1%5D.png?alt=media&amp;token=63622555-3647-4dc2-a7dd-96a279df6ae8" alt=""><figcaption></figcaption></figure>


# Connect Odrive with Zata.ai

**odrive** is a cloud storage management tool that lets you connect and manage multiple cloud storage services from one place.

#### Prerequisites <a href="#prerequisites" id="prerequisites"></a>

Zata.ai Bucket - [Bucket Create Guide](https://docs.zata.ai/manage/bucket/create-bucket).

Access and Secret Key Pair - [Access Key Guide](https://docs.zata.ai/manage/access-keys/creating-a-new-access-key).

REST Endpoint to follow these: click on [links](https://docs.zata.ai/manage/service-urls-for-zata.ai-s3).

Download the odrive by following this [link](https://docs.odrive.com/docs/odrive-usage-guide)

### Launch odrive

1. Open the odrive app on your desktop (Windows or macOS).

<figure><img src="https://2683631041-files.gitbook.io/~/files/v0/b/gitbook-x-prod.appspot.com/o/spaces%2FPPVG4W649TwXN8OejRhb%2Fuploads%2FQtGreMTmy92Nc2t97ekT%2Fimage.png?alt=media&amp;token=6eda0203-c542-4333-a8c2-11603ff0b02e" alt=""><figcaption></figcaption></figure>

After the installation is complete, click Get started to launch odrive.

<figure><img src="https://2683631041-files.gitbook.io/~/files/v0/b/gitbook-x-prod.appspot.com/o/spaces%2FPPVG4W649TwXN8OejRhb%2Fuploads%2FmkXuOVQIUxmuCq5fLXN6%2Fimage.png?alt=media&amp;token=ec5929b8-2b72-4163-8d1f-a1741d449b94" alt=""><figcaption></figcaption></figure>

When you click on *Get Started*, a prompt will automatically open in your browser, allowing you to sign up for an account using your email ID

<figure><img src="https://2683631041-files.gitbook.io/~/files/v0/b/gitbook-x-prod.appspot.com/o/spaces%2FPPVG4W649TwXN8OejRhb%2Fuploads%2FtDN5mvgezjWdNQ9itUl3%2Fimage.png?alt=media&amp;token=cdc57075-d2f8-4f65-8fb1-7ba9a62f93fe" alt=""><figcaption></figcaption></figure>

Now sync your procore documets directly to your desktop.

<figure><img src="https://2683631041-files.gitbook.io/~/files/v0/b/gitbook-x-prod.appspot.com/o/spaces%2FPPVG4W649TwXN8OejRhb%2Fuploads%2FmIXtWPFWnGV0mBU21lS7%2Fimage.png?alt=media&amp;token=43f74aff-6a5c-44d6-bfe0-616181329cd5" alt=""><figcaption></figcaption></figure>

Now click on Link Storage and select S3 Compatible.

<figure><img src="https://2683631041-files.gitbook.io/~/files/v0/b/gitbook-x-prod.appspot.com/o/spaces%2FPPVG4W649TwXN8OejRhb%2Fuploads%2FfOU3UlPUoeykB0i5h8IK%2Fimage.png?alt=media&amp;token=fccf6a10-b425-493d-91dd-871114dfe151" alt=""><figcaption></figcaption></figure>

#### Enter Zata.ai Storage Details

In the **S3 Compatible Storage** setup window, fill in the required fields as shown below:

* **Name:** `Zata` (or any identifier you prefer)
* **Host:** idr01.zata.ai (Central India) or bom01.zata.ai (Southern India)\`
* **Bucket Name:** Your Zata.ai bucket name
* **Access Key ID:** Provided by Zata.ai
* **Secret Access Key:** Provided by Zata.ai
* **Default Storage Class:** `Standard`
* **Directory Structure:** `Simple '/' Delimited`

Now click on the link.

<figure><img src="https://2683631041-files.gitbook.io/~/files/v0/b/gitbook-x-prod.appspot.com/o/spaces%2FPPVG4W649TwXN8OejRhb%2Fuploads%2FT0oQMF09t26jdslwyhch%2Fimage.png?alt=media&amp;token=bda81453-fb90-41fc-a307-654b390e03de" alt=""><figcaption></figcaption></figure>

### Verify Connection and Browse Buckets

After successfully linking your Zata.ai storage, you will see your local files on the left panel and your Zata.ai buckets on the right panel.

* The left pane**l** shows your directories.
* The right panel lists your Zata.ai buckets.

<figure><img src="https://2683631041-files.gitbook.io/~/files/v0/b/gitbook-x-prod.appspot.com/o/spaces%2FPPVG4W649TwXN8OejRhb%2Fuploads%2FcGEcc6zdlG9W0SZEnMhc%2Fimage.png?alt=media&amp;token=42931a9c-e5a9-4fba-b3e6-14506bf8af1a" alt=""><figcaption></figcaption></figure>

<figure><img src="https://2683631041-files.gitbook.io/~/files/v0/b/gitbook-x-prod.appspot.com/o/spaces%2FPPVG4W649TwXN8OejRhb%2Fuploads%2Fb1dZCpdfB0m0ci9vsiIT%2Fimage.png?alt=media&amp;token=3d534e9d-1477-4d30-8ba2-bd276ef445cc" alt=""><figcaption></figcaption></figure>


# Connect Handy Backup with Zata.ai

Handy Backup is a backup software solution designed to automate the process of copying and restoring files, folders, databases, and entire system images.

## Prerequisites <a href="#prerequisites" id="prerequisites"></a>

Zata.ai Bucket - [Bucket Create Guide](https://docs.zata.ai/manage/bucket/create-bucket).

Access and Secret Key Pair - [Access Key Guide](https://docs.zata.ai/manage/access-keys/creating-a-new-access-key).

REST Endpoint to follow on [links](https://docs.zata.ai/manage/service-urls-for-zata.ai-s3).

To download Handy Backup and install it, follow this [link](https://www.handybackup.net/).

After downloading the handy backup, follow these steps to integrate with the zata.ai

### **Launch Handy Backup**

Open the Handy Backup application and start creating a new backup task.

Choose Create a new task, select Backup task, then click Next.

<figure><img src="https://2683631041-files.gitbook.io/~/files/v0/b/gitbook-x-prod.appspot.com/o/spaces%2FPPVG4W649TwXN8OejRhb%2Fuploads%2F0I9a13DkyqTaHYWL0nEN%2Fimage.png?alt=media&amp;token=1a3a0616-96db-41f4-a3cd-8c440ef8e2f1" alt=""><figcaption></figcaption></figure>

### Select Data to Backup

Browse and select the files/folders you want to back up.

Click Next to continue.

<figure><img src="https://2683631041-files.gitbook.io/~/files/v0/b/gitbook-x-prod.appspot.com/o/spaces%2FPPVG4W649TwXN8OejRhb%2Fuploads%2FHBYxyBebEsrYcMryOeCw%2Fimage.png?alt=media&amp;token=2e0c136c-4146-43f5-8c86-88a0f2587da1" alt=""><figcaption></figcaption></figure>

### Select Storage Destination

From the list of storage options, choose S3 Cloud.

Then, Click on Create a Connection.

<figure><img src="https://2683631041-files.gitbook.io/~/files/v0/b/gitbook-x-prod.appspot.com/o/spaces%2FPPVG4W649TwXN8OejRhb%2Fuploads%2FvVPkjHELfWFdNxQ0iIT1%2Fimage.png?alt=media&amp;token=2a6d5990-9d2d-4bd6-90aa-e248b1d19552" alt=""><figcaption></figcaption></figure>

Configure Zata.ai Connection

Enter your Zata.ai details:

Service Point (Endpoint): <https://idr01.zata.ai> (or <https://bom01.zata.ai> for Mumbai)

Region: CentralIndia (or SouthIndia for Mumbai)

Access Key ID: \<your-access-key>

Secret Access Key: \<your-secret-key>

Click Test Connection to validate.

<figure><img src="https://2683631041-files.gitbook.io/~/files/v0/b/gitbook-x-prod.appspot.com/o/spaces%2FPPVG4W649TwXN8OejRhb%2Fuploads%2FyRxnW0CrRRWddlVhg8a6%2Fimage.png?alt=media&amp;token=5d161539-6db7-4128-a897-f498021f2dcb" alt=""><figcaption></figcaption></figure>

Click Next, adjust schedule/options if needed, then click Finish to save the backup job.

<figure><img src="https://2683631041-files.gitbook.io/~/files/v0/b/gitbook-x-prod.appspot.com/o/spaces%2FPPVG4W649TwXN8OejRhb%2Fuploads%2Fz4k6XtTbIjxvR83nvXRc%2Fimage.png?alt=media&amp;token=6f902d48-9cec-441c-bfd0-80f9896cf40d" alt=""><figcaption></figcaption></figure>

Run Backup

You can now run the task manually or wait for the scheduled backup. Your data will be securely uploaded to Zata.ai.


# Connect WinSCP with Zata.ai

#### WinSCP Overview

WinSCP is a free and open-source SFTP, FTP, WebDAV, Amazon S3, and SCP client for Microsoft Windows. Its primary function is to transfer files between a local and a remote computer securely. In addition to its basic file transfer capabilities, WinSCP provides scripting and basic file management functionality.

### Prerequisites <a href="#prerequisites" id="prerequisites"></a>

To download WinSCP and install it, follow this [link](https://winscp.net/eng/download.php).

Zata.ai Bucket - [Bucket Create Guide](https://docs.zata.ai/manage/bucket/create-bucket).

Access and Secret Key Pair - [Access Key Guide](https://docs.zata.ai/manage/access-keys/creating-a-new-access-key).

REST Endpoint to follow on [links](https://docs.zata.ai/manage/service-urls-for-zata.ai-s3).

### Launch WinSCP

Open the WinSCP application on your computer.

On the login windows, click on the New site.

### Select S3 Protocol

From the File protocol dropdown, select Amazon S3.

The login screen will now adjust for S3 inputs.

<figure><img src="https://2683631041-files.gitbook.io/~/files/v0/b/gitbook-x-prod.appspot.com/o/spaces%2FPPVG4W649TwXN8OejRhb%2Fuploads%2FwCGMtizaRfTH7ICffW3I%2Fimage.png?alt=media&amp;token=8eb49367-2b67-447e-8f60-29eaccca96c3" alt=""><figcaption></figcaption></figure>

### Enter Zata.ai S3 Details

Fill in the following details:

* Host name: `idr01.zata.ai` (Central India) or `bom01.zata.ai` (Southern India / Mumbai)

Port number: 443

Access key ID: Your Zata.ai Access Key

Secret access key: Your Zata.ai Secret Key

<figure><img src="https://2683631041-files.gitbook.io/~/files/v0/b/gitbook-x-prod.appspot.com/o/spaces%2FPPVG4W649TwXN8OejRhb%2Fuploads%2FsGJDJvHsKCkp3O8NqgTJ%2Fimage.png?alt=media&amp;token=9a54e4da-a107-4c46-9dff-5b0d725b9aaa" alt=""><figcaption></figcaption></figure>

### Save the Connection

Click Save to store the session for future use.

Optionally, check Save password for convenience.

#### Connect and Transfer Files

Click Login.

You will now see your Zata.ai bucket(s) listed.

You can drag-and-drop files between your PC and Zata.ai storage, just like an FTP/SFTP server.

<figure><img src="https://2683631041-files.gitbook.io/~/files/v0/b/gitbook-x-prod.appspot.com/o/spaces%2FPPVG4W649TwXN8OejRhb%2Fuploads%2F3ut7o8g9ROGbzw3lnXOl%2Fimage.png?alt=media&amp;token=189a7eee-b0e6-4555-a694-71271f8932d2" alt=""><figcaption></figcaption></figure>


# Connect Iperius Backup with Zata.ai

This guide explains the process to set up Iperius Backup with Zata.ai’s S3-compatible storage for automated, secure file backups.

***

### Prerequisites <a href="#prerequisites" id="prerequisites"></a>

To download Iperius Backup and install it, follow this [link](https://www.iperiusbackup.com/).

Zata.ai Bucket - [Bucket Create Guide](https://docs.zata.ai/manage/bucket/create-bucket).

Access and Secret Key Pair - [Access Key Guide](https://docs.zata.ai/manage/access-keys/creating-a-new-access-key).

REST Endpoint to follow on [links](https://docs.zata.ai/manage/service-urls-for-zata.ai-s3).

***

### Create a New Backup Job <a href="#step-1-create-a-new-backup-job" id="step-1-create-a-new-backup-job"></a>

1. Launch Iperius Backup.
2. Click **Create new backup job**.

<figure><img src="https://2683631041-files.gitbook.io/~/files/v0/b/gitbook-x-prod.appspot.com/o/spaces%2FPPVG4W649TwXN8OejRhb%2Fuploads%2FvB0n1qtkqMVzlCt42jDf%2Fimage.png?alt=media&amp;token=268a418b-0f7d-41bf-84d9-73b422f2efa6" alt=""><figcaption></figcaption></figure>

* Add files/folders you want to back up.

<figure><img src="https://2683631041-files.gitbook.io/~/files/v0/b/gitbook-x-prod.appspot.com/o/spaces%2FPPVG4W649TwXN8OejRhb%2Fuploads%2FgfunEQjQZvtCktTjr6SW%2Fimage.png?alt=media&amp;token=50d900db-7825-4af9-a51e-8ef32a08091f" alt=""><figcaption></figcaption></figure>

* Use filters or exclusions for file type/size as needed.

***

### Add Zata.ai as Cloud Destination <a href="#step-2-add-zataai-as-cloud-destination" id="step-2-add-zataai-as-cloud-destination"></a>

1. In the **Destinations** tab, select **Cloud**.
2. Choose **Amazon S3** (compatible with Zata.ai).
3. Click **New Account**, and fill out:

   * Name: `zata`
   * Type: `S3`
   * Access Key ID/Secret Access Key
   * Service Point (Endpoint): <https://idr01.zata.ai> (or <https://bom01.zata.ai> for Southern India)
   * Region: `CentralIndia` (or `SouthIndia` for Mumbai)
   * Enable **Use SSL** option.
   * Save the account settings.

   <figure><img src="https://2683631041-files.gitbook.io/~/files/v0/b/gitbook-x-prod.appspot.com/o/spaces%2FPPVG4W649TwXN8OejRhb%2Fuploads%2FuiaUBJbAyWO7rl8mNM2i%2Fimage.png?alt=media&amp;token=e287e500-5a83-48fb-831a-18e43372c57f" alt=""><figcaption></figcaption></figure>

<figure><img src="https://2683631041-files.gitbook.io/~/files/v0/b/gitbook-x-prod.appspot.com/o/spaces%2FPPVG4W649TwXN8OejRhb%2Fuploads%2FIBCQoB2AkDnvpaJcplom%2Fimage.png?alt=media&amp;token=2bb61ef7-c9bc-4c03-96d5-9e75f63e86c1" alt=""><figcaption></figcaption></figure>

***

### Select Bucket and Further Settings <a href="#step-3-select-bucket-and-further-settings" id="step-3-select-bucket-and-further-settings"></a>

1. Choose your Zata.ai bucket (e.g., `test`).
2. Optionally, add a subpath for organization.
3. Set backup options:

   * **Backup type:** Choose between full or incremental.
   * **Number of copies:** Set retention (e.g., 1 or more).
   * Enable zip compression and AES-256 encryption if desired.
   * Set a password for zip files for added security.
   * Choose how zip files are named and whether to create individual zip files per item.
   * Select path format inside zip files ("Full path including drive" recommended).

   <figure><img src="https://2683631041-files.gitbook.io/~/files/v0/b/gitbook-x-prod.appspot.com/o/spaces%2FPPVG4W649TwXN8OejRhb%2Fuploads%2FMyhe4R8tDNC19cmtWgsH%2Fimage.png?alt=media&amp;token=21b20b17-466c-4202-9092-2df8436948ea" alt=""><figcaption></figcaption></figure>

***

### Step Scheduling Automated Backups <a href="#step-4-scheduling-automated-backups" id="step-4-scheduling-automated-backups"></a>

1. Navigate to **Scheduling** tab.
2. Enable **Run backup automatically**.
3. Choose schedule:
   * Weekly (select days)
   * Monthly (select calendar days)
   * Custom intervals (e.g., every X days/hours/minutes)
4. Add execution times as needed (e.g., 20:00).

<figure><img src="https://2683631041-files.gitbook.io/~/files/v0/b/gitbook-x-prod.appspot.com/o/spaces%2FPPVG4W649TwXN8OejRhb%2Fuploads%2FmEycftLx7uninYyTKrrW%2Fimage.png?alt=media&amp;token=28472e47-6254-4495-b017-02cc92c3e945" alt=""><figcaption></figcaption></figure>

<figure><img src="https://2683631041-files.gitbook.io/~/files/v0/b/gitbook-x-prod.appspot.com/o/spaces%2FPPVG4W649TwXN8OejRhb%2Fuploads%2FrAjW4kd4owhHhABwPxH7%2Fimage.png?alt=media&amp;token=1053ad87-36cc-4676-b43d-865e5ea36b29" alt=""><figcaption></figcaption></figure>

***

### Review and Save Job <a href="#step-5-review-and-save-job" id="step-5-review-and-save-job"></a>

1. In the **Summary** tab:
   * Enter Job name (e.g., `Zata`), optional description.
   * Confirm items, destinations, and schedule.
   * Optionally, enable RMM console monitoring.
   * Option to shut down computer after backup completion.
2. Click **OK** to save the job.

***

### Run Backup and Verify <a href="#step-6-run-backup-and-verify" id="step-6-run-backup-and-verify"></a>

1. Execute the backup job manually for the first time.
2. Confirm backup progress and completion message.
3. Check Zata.ai Console to verify uploaded files.

<figure><img src="https://2683631041-files.gitbook.io/~/files/v0/b/gitbook-x-prod.appspot.com/o/spaces%2FPPVG4W649TwXN8OejRhb%2Fuploads%2FKP49n881PNg1zxnVVVy6%2Fimage.png?alt=media&amp;token=a957a04e-2f70-42ae-a4f9-8f2f579fff24" alt=""><figcaption></figcaption></figure>

***

### Additional Notes <a href="#additional-notes" id="additional-notes"></a>

* **Immutability:** For immutable backups, enable Object Lock on your Zata.ai bucket before configuration.
* **Security:** Use AES-256 encryption and passwords for sensitive files.
* **Performance:** Iperius supports multi-threaded, multipart uploads for large files.
* Ensure system time is synchronized for S3 signature validation.

***

### Troubleshooting <a href="#troubleshooting" id="troubleshooting"></a>

* If backups fail, check log files (from "See log" after backup completion).
* Verify credentials and endpoint accuracy in Cloud Account setup.
* Make sure your bucket exists and Object Lock is enabled if needed.

***


# Connect UpdraftPlus Backups with Zata.ai

This guide explains how to configure the UpdraftPlus WordPress Backup Plugin to store backups on Zata.ai’s S3-compatible object storage. Screenshots are included at each step for clarity.

***

### Prerequisites <a href="#prerequisites" id="prerequisites"></a>

To download UpdraftPlus and install it, follow this [link](https://teamupdraft.com/updraftplus/).

Zata.ai Bucket - [Bucket Create Guide](https://docs.zata.ai/manage/bucket/create-bucket).

Access and Secret Key Pair - [Access Key Guide](https://docs.zata.ai/manage/access-keys/creating-a-new-access-key).

REST Endpoint to follow on [links](https://docs.zata.ai/manage/service-urls-for-zata.ai-s3).

***

### Install UpdraftPlus <a href="#step-1-install-updraftplus" id="step-1-install-updraftplus"></a>

1. Go to **Plugins → Add New** in WordPress Admin.
2. Search for “UpdraftPlus” and install it.
3. Click **Activate** after installation.

<figure><img src="https://2683631041-files.gitbook.io/~/files/v0/b/gitbook-x-prod.appspot.com/o/spaces%2FPPVG4W649TwXN8OejRhb%2Fuploads%2Fj7kf3f7BistKJNYUZRDM%2Fimage.png?alt=media&amp;token=1358d2b8-8a9c-4821-b5fa-e9e008f5f1f7" alt=""><figcaption></figcaption></figure>

***

### Open UpdraftPlus Dashboard <a href="#step-2-open-updraftplus-dashboard" id="step-2-open-updraftplus-dashboard"></a>

* In the sidebar, click **UpdraftPlus** under Plugins.
* You’ll see the Backup/Restore dashboard, last log message, and scheduling info.

<figure><img src="https://2683631041-files.gitbook.io/~/files/v0/b/gitbook-x-prod.appspot.com/o/spaces%2FPPVG4W649TwXN8OejRhb%2Fuploads%2FOcXjW6TYvFHulGHblV46%2Fimage.png?alt=media&amp;token=2a1e80cd-9e2f-4999-9d55-b8101d093b93" alt=""><figcaption></figcaption></figure>

***

### Access Backup Settings <a href="#step-3-access-backup-settings" id="step-3-access-backup-settings"></a>

* In the dashboard, open the **Settings** tab.
* Choose backup schedules and the number of retained backups.
* Select **S3-Compatible (Generic)** under “Choose your remote storage” options.

<figure><img src="https://2683631041-files.gitbook.io/~/files/v0/b/gitbook-x-prod.appspot.com/o/spaces%2FPPVG4W649TwXN8OejRhb%2Fuploads%2FN0g81B7ajTjKkxTPywt3%2Fimage.png?alt=media&amp;token=4d437778-b457-468f-b45b-2e9bce97babd" alt=""><figcaption></figcaption></figure>

***

### Enter Zata.ai Storage Details <a href="#step-4-enter-zataai-storage-details" id="step-4-enter-zataai-storage-details"></a>

* Enter your Zata.ai S3 credentials:
  * **S3 access key**: (Your Zata Access Key)
  * **S3 secret key**: (Your Secret Key)
  * **S3 location**: (Your bucket, e.g., `s3generic://wp-backups`)
  * **S3 end-point**: idr01.zata.ai (Central India) or bom01.zata.ai (Southern India)
  * **Bucket access style**: Path style (recommended)
  * **Signature version**: SigV4
* Click **Test S3-Compatible (Generic) Settings** to verify.

<figure><img src="https://2683631041-files.gitbook.io/~/files/v0/b/gitbook-x-prod.appspot.com/o/spaces%2FPPVG4W649TwXN8OejRhb%2Fuploads%2F5LIv330yyEqm4vYtgRat%2Fimage.png?alt=media&amp;token=c76f6245-a496-4e9e-acc4-174463cd06b7" alt=""><figcaption></figcaption></figure>

***

### Configure Backup Schedule <a href="#step-5-configure-backup-schedule" id="step-5-configure-backup-schedule"></a>

* Use the dropdown menus to set the frequency for **Files backup** and **Database backup**.
* Adjust how many scheduled backups you want to retain.

<figure><img src="https://2683631041-files.gitbook.io/~/files/v0/b/gitbook-x-prod.appspot.com/o/spaces%2FPPVG4W649TwXN8OejRhb%2Fuploads%2FloL2Q96LrEOtleCX2PiL%2Fimage.png?alt=media&amp;token=667e86ac-3691-4fc0-9268-eb36f289d6b5" alt=""><figcaption></figcaption></figure>

***

### Run a Manual Backup <a href="#step-6-run-a-manual-backup" id="step-6-run-a-manual-backup"></a>

* Go to the **Current Status** tab.
* Click **Backup Now**.
* In the dialog, select what to include:
  * **Include your database in the backup**
  * **Include your files in the backup**
  * **Send this backup to remote storage**
* Click **Backup Now** to start.

***

### Confirm Backup and Remote Storage <a href="#step-7-confirm-backup-and-remote-storage" id="step-7-confirm-backup-and-remote-storage"></a>

* When the backup finishes, verify that your files are listed in Zata.ai’s S3 bucket (via the dashboard or S3 explorer).
* Check the status messages and logs for confirmation.

***

### Best Practices <a href="#best-practices" id="best-practices"></a>

* Always test your restore process with a test backup.
* Set retention policies for automatic old backup removal.
* Consider encryption for sensitive sites and data.

***

### Troubleshooting <a href="#troubleshooting" id="troubleshooting"></a>

* A successful “Test S3-Compatible settings” means your WordPress site can reach Zata.ai.
* If errors appear, double-check credentials, endpoint, and bucket name.
* Review UpdraftPlus logs in the dashboard for detailed error messages.

<br>


# Connect CrossFTP with Zata.ai

### Introduction <a href="#introduction" id="introduction"></a>

**CrossFTP** is a versatile FTP and cloud storage client that supports S3-compatible endpoints such as **Zata.ai**. You can use it to upload, download, and manage files in cloud storage just like with FTP servers.

### Prerequisites <a href="#prerequisites" id="prerequisites"></a>

To download CrossFTP and install it, follow this [link](https://www.crossftp.com/).

Zata.ai Bucket - [Bucket Create Guide](https://docs.zata.ai/manage/bucket/create-bucket).

Access and Secret Key Pair - [Access Key Guide](https://docs.zata.ai/manage/access-keys/creating-a-new-access-key).

REST Endpoint to follow on [links](https://docs.zata.ai/manage/service-urls-for-zata.ai-s3).

### Step-by-Step Setup <a href="#step-by-step-setup" id="step-by-step-setup"></a>

### Launch CrossFTP

Open CrossFTP after installation.

### Open Site Manager

* Navigate to **Sites → Site Manager** from the main menu.
* Click **New Site** to create a new profile.

<figure><img src="https://2683631041-files.gitbook.io/~/files/v0/b/gitbook-x-prod.appspot.com/o/spaces%2FPPVG4W649TwXN8OejRhb%2Fuploads%2FEwgFAu1F79Via2ZNoNOq%2Fimage.png?alt=media&amp;token=4f03271d-30bd-4757-84f2-fe8cc03cb7a6" alt=""><figcaption></figcaption></figure>

### Configure S3 Connection

* Set the **Protocol** dropdown to **S3/HTTPS**.

<figure><img src="https://2683631041-files.gitbook.io/~/files/v0/b/gitbook-x-prod.appspot.com/o/spaces%2FPPVG4W649TwXN8OejRhb%2Fuploads%2FpgE1j3A607PXG148qoPW%2Fimage.png?alt=media&amp;token=d870f8a8-fecb-45fe-9e57-ef73cbe6b194" alt=""><figcaption></figcaption></figure>

* Fill in these details:
  * **Host:** `idr01.zata.ai` (Central India) or `bom01.zata.ai` (Mumbai)
  * **Access ID:** Your Zata Access Key ID
  * **Secret Key:** Your Zata Secret Access Key
  * **Port:** `443` (default HTTPS port)
  * **Region:** `CentralIndia` or `SouthIndia` (as provided by Zata.ai)
* Optionally, specify a **Default Bucket name** to connect to automatically.

### Advanced & Security Settings

* Ensure **Use SSL** is enabled for secure transfer.
* Adjust additional settings as needed (proxy, firewall, etc.).

### Connect and Manage Files

* Click **Connect**.

<figure><img src="https://2683631041-files.gitbook.io/~/files/v0/b/gitbook-x-prod.appspot.com/o/spaces%2FPPVG4W649TwXN8OejRhb%2Fuploads%2FgRskW4mPKEEUhQZrxJSV%2Fimage.png?alt=media&amp;token=37b9415a-4f90-424b-8cb5-71dc82b14e7f" alt=""><figcaption></figcaption></figure>

* On successful connection, your **buckets and folders** will appear in the right-hand pane.
* Drag and drop files, or use the context menu to upload/download/manage your data.

<figure><img src="https://2683631041-files.gitbook.io/~/files/v0/b/gitbook-x-prod.appspot.com/o/spaces%2FPPVG4W649TwXN8OejRhb%2Fuploads%2Fu2Rk8sAAa6Pemm15HZnO%2Fimage.png?alt=media&amp;token=508f6b0b-1589-4e3b-af30-18237a0921e1" alt=""><figcaption></figcaption></figure>

### Tips & Troubleshooting <a href="#tips--troubleshooting" id="tips--troubleshooting"></a>

* Always use the correct **region endpoint** and ensure bucket names are accurate.
* Use the Site Manager’s **Quick History** to reconnect to recent connections easily.
* Check log messages at the bottom for connection status and errors.
* For large files or many objects, use batch upload/download features for efficiency.


# Connect Arq Backup with Zata.ai

Arq backs up your files to the cloud automatically and safeguards your digital privacy. Zata’s object storage (S3-compatible) can be used as a secure storage backend for Arq.

### Prerequisites <a href="#prerequisites" id="prerequisites"></a>

To download Arq and install it, follow this [link](https://www.arqbackup.com/download/).

Zata.ai Bucket - [Bucket Create Guide](https://docs.zata.ai/manage/bucket/create-bucket).

Access and Secret Key Pair - [Access Key Guide](https://docs.zata.ai/manage/access-keys/creating-a-new-access-key).

REST Endpoint to follow on [links](https://docs.zata.ai/manage/service-urls-for-zata.ai-s3).

### Step-by-Step Configuration <a href="#step-by-step-configuration" id="step-by-step-configuration"></a>

### 1. Launch Arq and Create Backup Plan

* Open Arq Backup.
* Click **Create a Backup Plan** in the initial dashboard.

<figure><img src="https://2683631041-files.gitbook.io/~/files/v0/b/gitbook-x-prod.appspot.com/o/spaces%2FPPVG4W649TwXN8OejRhb%2Fuploads%2FFVJcbJTaXGFPDd4ITO62%2Fimage.png?alt=media&amp;token=552024a4-5c0c-496d-8503-7585ddc72c0a" alt=""><figcaption></figcaption></figure>

<br>

***

### 2. Add Zata as a Storage Location

* When asked "Where should Arq store the backup data?", click **Add Storage Location...**

<figure><img src="https://2683631041-files.gitbook.io/~/files/v0/b/gitbook-x-prod.appspot.com/o/spaces%2FPPVG4W649TwXN8OejRhb%2Fuploads%2FoXNdTnrS7AURXG9iJzZv%2Fimage.png?alt=media&amp;token=85543344-b586-4bc0-95ca-1dee7dfcd630" alt=""><figcaption></figcaption></figure>

***

### 3. Select S3-Compatible Server

* In the "Add a Storage Location" dialog, select **S3-Compatible Server** and click **Continue**.

<figure><img src="https://2683631041-files.gitbook.io/~/files/v0/b/gitbook-x-prod.appspot.com/o/spaces%2FPPVG4W649TwXN8OejRhb%2Fuploads%2F42WgQNI2vnfrwWIVwwau%2Fimage.png?alt=media&amp;token=1bf89261-602d-4d94-bc79-98b09a88f1e3" alt=""><figcaption></figcaption></figure>

***

### 4. Enter Zata S3 Credentials

* Fill in the following details:
  * **Server URL:** `https://idr01.zata.ai:443` (or `https://bom01.zata.ai:443` for Southern India)
  * **Region:** `central India` (or `Southern India` for Mumbai)
  * **Access Key ID** and **Secret Access Key** from your Zata account
  * **Bucket Name:** (e.g., your chosen bucket like `abhatest`)
* Click **Save** to confirm.

<figure><img src="https://2683631041-files.gitbook.io/~/files/v0/b/gitbook-x-prod.appspot.com/o/spaces%2FPPVG4W649TwXN8OejRhb%2Fuploads%2F5BnUvZUb2OUHvCJUL2hn%2Fimage.png?alt=media&amp;token=d8e31159-3810-4ba3-a578-0e1688ddd0dc" alt=""><figcaption></figcaption></figure>

### 5. Confirm Zata Endpoint and Bucket

* In the "Create Backup Plan" dialog, confirm the Zata endpoint (`https://idr01.zata.ai` or `https://bom01.zata.ai`).

<figure><img src="https://2683631041-files.gitbook.io/~/files/v0/b/gitbook-x-prod.appspot.com/o/spaces%2FPPVG4W649TwXN8OejRhb%2Fuploads%2F1wnfBIJTmmY8QeUZs7xO%2Fimage.png?alt=media&amp;token=4d8bed44-5831-406e-8ff6-da4ce8d872d2" alt=""><figcaption></figcaption></figure>

***

### 6. Set Encryption Password

* Choose a strong password for encrypting backups.
* Enter and confirm it; this secures your backed up data.

<figure><img src="https://2683631041-files.gitbook.io/~/files/v0/b/gitbook-x-prod.appspot.com/o/spaces%2FPPVG4W649TwXN8OejRhb%2Fuploads%2FKVkuh0sQtHBubo3LGDef%2Fimage.png?alt=media&amp;token=9e539f00-858e-4347-b216-95ba0c26b216" alt=""><figcaption></figcaption></figure>

***

### 7. Select Files to Back Up

* Choose one of the options:
  * Back up all drives, with standard exclusions
  * Back up user data on the main drive
  * Manually select folders
* Click **Create Backup Plan** to begin.

<figure><img src="https://2683631041-files.gitbook.io/~/files/v0/b/gitbook-x-prod.appspot.com/o/spaces%2FPPVG4W649TwXN8OejRhb%2Fuploads%2FuuKt92qyLMyJaylmGuRm%2Fimage.png?alt=media&amp;token=4d17de20-0eb1-42b5-807e-06890a05b0f7" alt=""><figcaption></figcaption></figure>


# Connect ExpanDrive with Zata.ai

ExpanDrive can be configured to connect with **Zata.ai Object Storage**, allowing you to mount Zata buckets as network drives and access them seamlessly from **Finder (macOS)** or **Explorer (Windows)**.

This guide provides step-by-step instructions to set up ExpanDrive with Zata.ai.

[Embedded Link](https://youtu.be/63QTHThuyuY)

***

### Prerequisites

To download ExpanDrive and install it, follow this [link](https://www.expandrive.com/download).

Zata.ai Bucket - [Bucket Create Guide](https://docs.zata.ai/manage/bucket/create-bucket).

Access and Secret Key Pair - [Access Key Guide](https://docs.zata.ai/manage/access-keys/creating-a-new-access-key).

REST Endpoint to follow on [links](https://docs.zata.ai/manage/service-urls-for-zata.ai-s3).

***

### 1: Launch ExpanDrive

1. Open the **ExpanDrive** application.
2. Click **New Connection**.

<figure><img src="https://2683631041-files.gitbook.io/~/files/v0/b/gitbook-x-prod.appspot.com/o/spaces%2FPPVG4W649TwXN8OejRhb%2Fuploads%2FfskkOHSotB274CJlJJR6%2Fimage.png?alt=media&amp;token=1a42a93c-c37e-45d2-9046-4de3f2641591" alt=""><figcaption></figcaption></figure>

***

### 2: Select Connection Type

* For versions **v7 and later** → choose **Amazon S3**.
* If you are using a version prior to v7 → also choose **Amazon S3**.

<figure><img src="https://2683631041-files.gitbook.io/~/files/v0/b/gitbook-x-prod.appspot.com/o/spaces%2FPPVG4W649TwXN8OejRhb%2Fuploads%2F7Mqw9AKYm1mamJ4DorSf%2Fimage.png?alt=media&amp;token=4b1a4dca-fbaa-4c1a-8b07-6f42f8302869" alt=""><figcaption></figcaption></figure>

***

### 3: Enter Zata.ai Details

Fill in the following fields:

* **Server / Endpoint:** `https://idr01.zata.ai` (or `https://bom01.zata.ai` for Southern India)\
  \&#xNAN;*(replace with your assigned region endpoint if different)*
* **Access Key ID:** enter your Zata.ai access key
* **Secret Access Key:** enter your Zata.ai secret key
* **Bucket (optional):** enter the bucket name if you want to connect directly to a specific bucket.
  * Leave blank if you want to browse all buckets.

<figure><img src="https://2683631041-files.gitbook.io/~/files/v0/b/gitbook-x-prod.appspot.com/o/spaces%2FPPVG4W649TwXN8OejRhb%2Fuploads%2F7F6hjRvMK6sSeGnc8v9r%2Fimage.png?alt=media&amp;token=525d562e-ceff-46f6-9321-5ef2378abddd" alt=""><figcaption></figcaption></figure>

***

### 4: Save and Connect

1. Click **Save**.
2. ExpanDrive will mount your Zata.ai storage as a network drive.
3. You can now access your Zata.ai bucket directly from Finder (macOS) or Explorer (Windows).

<figure><img src="https://2683631041-files.gitbook.io/~/files/v0/b/gitbook-x-prod.appspot.com/o/spaces%2FPPVG4W649TwXN8OejRhb%2Fuploads%2FtOQzWK3Er0AolklsLka1%2Fimage.png?alt=media&amp;token=041953f1-eecf-4726-b943-cf85b41b7ab6" alt=""><figcaption></figcaption></figure>

***

### Notes

* For **ExpanDrive Server Edition**, always select the **Amazon S3** connection type.
* Use the correct **Zata.ai endpoint** for your region.
* Works seamlessly across both **Windows** and **macOS**.
* Once connected, you can **drag, drop, upload, and manage files on Zata.ai just like a local drive**.

<br>


# Connect qBackup with Zata.ai

qBackup is validated for use with **Zata.ai Object Storage**. This guide explains how to configure qBackup to back up your files to Zata.ai.

***

### Prerequisites

To download qBackup and install it, follow this [link](https://www.qualeed.com/en/qbackup/).

Zata.ai Bucket - [Bucket Create Guide](https://docs.zata.ai/manage/bucket/create-bucket).

Access and Secret Key Pair - [Access Key Guide](https://docs.zata.ai/manage/access-keys/creating-a-new-access-key).

REST Endpoint to follow on [links](https://docs.zata.ai/manage/service-urls-for-zata.ai-s3).

***

### Create a New Project in qBackup

* Launch qBackup.
* Go to **File > New Project**.
* Enter a project name (e.g., `ZataBackup`).

<figure><img src="https://2683631041-files.gitbook.io/~/files/v0/b/gitbook-x-prod.appspot.com/o/spaces%2FPPVG4W649TwXN8OejRhb%2Fuploads%2F8MtzuCUiJf4P94lG66Dg%2Fimage.png?alt=media&amp;token=279eb473-ae8b-4e75-b467-bb2a7bfecfb6" alt=""><figcaption></figcaption></figure>

***

### Add Backup Sources

* In the **Include** tab, add the files and folders you want to back up.
* In the **Exclude** tab, define any files or folders you do not want to back up.

<figure><img src="https://2683631041-files.gitbook.io/~/files/v0/b/gitbook-x-prod.appspot.com/o/spaces%2FPPVG4W649TwXN8OejRhb%2Fuploads%2Fl4KORYql7aIe7PnVHA88%2Fimage.png?alt=media&amp;token=20958307-b4d6-47bb-9693-c5c4fde3e8da" alt=""><figcaption></figcaption></figure>

***

### Configure Storage (Zata.ai)

* Go to the **Storage** tab.
* Select **S3 Compatible Storage**.
* Choose **Use Access Key ID and Secret Access Key**.
* Enter your credentials:

  * Access Key ID: `<your Zata Access Key>`
  * Secret Access Key: `<your Zata Secret Key>`
  * Endpoint: <https://idr01.zata.ai> (or <https://bom01.zata.ai> for Southern India)
  * Bucket name: `<your bucket name>`

  *Recommendation: Create a fresh bucket or dedicated folder for qBackup jobs to avoid "Storage is not empty" errors.*

<figure><img src="https://2683631041-files.gitbook.io/~/files/v0/b/gitbook-x-prod.appspot.com/o/spaces%2FPPVG4W649TwXN8OejRhb%2Fuploads%2FG3ZlIalnZMpZwk4sz6EN%2Fimage.png?alt=media&amp;token=fb0ae36c-4806-4490-b63b-43fed8bc81d8" alt=""><figcaption></figcaption></figure>

***

### Schedule (Optional)

* Navigate to the **Maintenance** tab.
* Configure a schedule for automated backups:
  * Daily
  * Weekly
  * Custom frequency

***

### Run the Backup

* Save the project.
* From the main screen, select your project.
* Click **Backup** to start the process.

<figure><img src="https://2683631041-files.gitbook.io/~/files/v0/b/gitbook-x-prod.appspot.com/o/spaces%2FPPVG4W649TwXN8OejRhb%2Fuploads%2FstmdrZ2TaW4RJlVmdca0%2Fimage.png?alt=media&amp;token=ff2fedf9-de83-4e73-afa4-d9cb51dcb17b" alt=""><figcaption></figcaption></figure>


# Connect SmartFTP with Zata.ai

A practical walkthrough to connect **SmartFTP** to your **Zata.ai Object Storage** (S3‑compatible) for simple drag‑and‑drop transfers, folder sync, retries, and bookmarks — all from a classic Windows FTP client UI.

***

### Who This is For

Teams using **Zata.ai** who prefer SmartFTP’s familiar interface for uploads, downloads, and sync operations.

***

### Prerequisites

To download SmartFTP and install it, follow this [link](https://www.smartftp.com/en-us/).

Zata.ai Bucket - [Bucket Create Guide](https://docs.zata.ai/manage/bucket/create-bucket).

Access and Secret Key Pair - [Access Key Guide](https://docs.zata.ai/manage/access-keys/creating-a-new-access-key).

REST Endpoint to follow on [links](https://docs.zata.ai/manage/service-urls-for-zata.ai-s3).

***

### Quick Connect (First Time)

1. Open **SmartFTP**.
2. Go to **File ▸ Connection** (or press `Ctrl+N`).
3. Fill in the fields:
   * Protocol: **S3 (Amazon)**
   * Host: `idr01.zata.ai` (or `bom01.zata.ai` for Mumbai) *(replaces `s3.amazonaws.com`)*
   * Port: **443**
   * Encryption: **TLS/SSL (default)**
   * Username: *Access Key ID*
   * Password: *Secret Access Key*
4. Click **OK / Connect**.

<figure><img src="https://2683631041-files.gitbook.io/~/files/v0/b/gitbook-x-prod.appspot.com/o/spaces%2FPPVG4W649TwXN8OejRhb%2Fuploads%2FqLb4pRgtCF3NBVAAzk13%2Fimage.png?alt=media&amp;token=70b2cb3f-60f2-40c6-be44-adab697d77ad" alt=""><figcaption></figcaption></figure>

You should now see your account and accessible buckets in the Remote Browser.

<figure><img src="https://2683631041-files.gitbook.io/~/files/v0/b/gitbook-x-prod.appspot.com/o/spaces%2FPPVG4W649TwXN8OejRhb%2Fuploads%2FbUC4MIwk9U9zIhh5EGF4%2Fimage.png?alt=media&amp;token=6c0b3f74-3f53-40e5-bbed-bb29754d6f3c" alt=""><figcaption></figcaption></figure>

***

### Open a Specific Bucket (Faster, Cleaner)

To connect directly to a bucket:

* In the **Connection** window, set **Path** = `/your-bucket-name`
* Example: `/my-team-backups`

*Note: If you don’t have List permissions on the account root, always set the Path to avoid errors.*

***

### Save as a Favorite

1. When connected, click **Favorites ▸ Add to Favorites…**
2. Name it, e.g. `Zata – Backups (idr01)` or `(bom01)`
3. In **Favorite Properties ▸ Connection**:
   * Confirm Host = `idr01.zata.ai` (or `bom01.zata.ai`)
   * Path = `/your-bucket-name`
   * Enable **Reconnect** and **Keep Alive** to avoid idle timeouts.

***

### Upload / Download Basics

* Drag‑and‑drop files/folders between **Local (left pane)** and **Remote (right pane)**
* Transfers appear in the **Transfer Queue**; you can pause, resume, or reorder
* Right‑click a folder → **Transfer ▸ Synchronize** to mirror local ↔ bucket

***

### Recommended Transfer Settings

* Retries: **5** (with backoff)
* Concurrent transfers: **3–5** (based on your uplink speed)
* Integrity: enable **Verify / Compare after transfer** for critical data
* Preserve timestamps: **On**

***

### Verify Your Connection

Perform these sanity checks:

* Create a test folder (e.g. `test-smartftp`)
* Upload a small file (e.g. `readme.txt`)
* Rename / delete the file to confirm write permissions
* Cross‑check the object in another tool (Zata Panel / Rclone)

***

### Appendix — Zata Endpoints

* **Central India**: `https://idr01.zata.ai`
* **Southern India (Mumbai)**: `https://bom01.zata.ai`
* Use other regional endpoints provided by Zata if applicable.


# Connect Plesk with Zata.ai

Zata.ai provides S3-compatible object storage that can be integrated with Plesk to back up websites, databases, and configurations directly to the cloud. This guide will walk you through setting up Zata.ai as a backup destination in Plesk.

## **Prerequisites** <a href="#prerequisites" id="prerequisites"></a>

To download Plesk and install it, follow this [link](https://docs.plesk.com/en-US/obsidian/deployment-guide/plesk-installation-and-upgrade-on-single-server/1click-plesk-installation/installing-plesk-for-windows-in-one-click.76448/).

Zata.ai Bucket - [Bucket Create Guide](https://docs.zata.ai/manage/bucket/create-bucket).

Access and Secret Key Pair - [Access Key Guide](https://docs.zata.ai/manage/access-keys/creating-a-new-access-key).

REST Endpoint to follow on [links](https://docs.zata.ai/manage/service-urls-for-zata.ai-s3).

### Log in to Plesk <a href="#log-in-to-plesk" id="log-in-to-plesk"></a>

Open your Plesk panel (`https://yourdomain:8443`).

Log in with your admin credentials.

#### Install the Amazon S3 Backup Extension <a href="#install-the-amazon-s3-backup-extension" id="install-the-amazon-s3-backup-extension"></a>

From the left menu, go to Extensions.

Search for Amazon S3 Backup.

Click Install.

*The Amazon S3 extension works with any S3-compatible storage, including Zata.ai.*

<figure><img src="https://2683631041-files.gitbook.io/~/files/v0/b/gitbook-x-prod.appspot.com/o/spaces%2FPPVG4W649TwXN8OejRhb%2Fuploads%2FlBlk5ozY1ugsTeFA5qM7%2Fimage.png?alt=media&amp;token=69f01d66-d564-49eb-aa53-4f7430c5d96e" alt=""><figcaption></figcaption></figure>

<figure><img src="https://2683631041-files.gitbook.io/~/files/v0/b/gitbook-x-prod.appspot.com/o/spaces%2FPPVG4W649TwXN8OejRhb%2Fuploads%2FwHC3mTh8fJGZkc6P6amx%2Fimage.png?alt=media&amp;token=667e57a7-685f-4cc9-bbc1-4ce16e9ffbdc" alt=""><figcaption></figcaption></figure>

### Configure Zata.ai as Backup Storage <a href="#configure-zata.ai-as-backup-storage" id="configure-zata.ai-as-backup-storage"></a>

Go to Tools & Settings → Backup Manager.

<figure><img src="https://2683631041-files.gitbook.io/~/files/v0/b/gitbook-x-prod.appspot.com/o/spaces%2FPPVG4W649TwXN8OejRhb%2Fuploads%2FLaD4dwYXcDFPNKWoLSNC%2Fimage.png?alt=media&amp;token=f91c4bd9-b89d-4f3d-a890-ebc47082e724" alt=""><figcaption></figcaption></figure>

Click Remote Storage Settings → Amazon S3 Backup.

<figure><img src="https://2683631041-files.gitbook.io/~/files/v0/b/gitbook-x-prod.appspot.com/o/spaces%2FPPVG4W649TwXN8OejRhb%2Fuploads%2FSJHcvFkngCRTbl7WCQhi%2Fimage.png?alt=media&amp;token=8c9edcd8-63f2-4049-9ff1-bfd49ea35817" alt=""><figcaption></figcaption></figure>

Fill in the following details:

* **Service Provider:** Custom.
* **Bucket Name:** `plesk-backups` (replace with your bucket name)
* **Access Key ID:** *Your Zata Access Key*
* **Secret Access Key:** *Your Zata Secret Key*
* **Endpoint:** <https://idr01.zata.ai> (or <https://bom01.zata.ai> for Southern India)

Click ok to save.

<figure><img src="https://2683631041-files.gitbook.io/~/files/v0/b/gitbook-x-prod.appspot.com/o/spaces%2FPPVG4W649TwXN8OejRhb%2Fuploads%2F2ASsyPGlsvW4WGwwlvZl%2Fimage.png?alt=media&amp;token=0c0c4cee-13b9-45a0-aefa-4f95f980a789" alt=""><figcaption></figcaption></figure>

### Test the Connection <a href="#test-the-connection" id="test-the-connection"></a>

* Once saved, Plesk will attempt to connect to Zata.ai.
* If successful, you will see Zata.ai (via Amazon S3 extension) listed as a remote backup option.

### Run a Backup <a href="#run-a-backup" id="run-a-backup"></a>

Navigate to Backup Manager.

Select Back Up.

<figure><img src="https://2683631041-files.gitbook.io/~/files/v0/b/gitbook-x-prod.appspot.com/o/spaces%2FPPVG4W649TwXN8OejRhb%2Fuploads%2FLj6SJiDVjSxwBOM7niPv%2Fimage.png?alt=media&amp;token=e29bba9b-5af3-4fe4-b2b7-d9f29f6617be" alt=""><figcaption></figcaption></figure>

Choose Store in remote storage only (or both local + remote).

<figure><img src="https://2683631041-files.gitbook.io/~/files/v0/b/gitbook-x-prod.appspot.com/o/spaces%2FPPVG4W649TwXN8OejRhb%2Fuploads%2F0fLya4kXkd6CFu2Ah4g8%2Fimage.png?alt=media&amp;token=d85a2ed5-74f9-47f8-928e-b0f0e794b87e" alt=""><figcaption></figcaption></figure>

Click on ok and start the backup.

Verify the backup files in your Zata.ai bucket.


# Connect Syncovery with zata.ai

Syncovery is a powerful backup and synchronization software for Windows, macOS, Linux, and others. It can be used to back up and sync files to **Zata.ai Object Storage (S3-compatible)** for secure and scalable cloud storage.

This guide provides step-by-step instructions to configure Syncovery with **Zata.ai**.

## Prerequisites <a href="#prerequisites" id="prerequisites"></a>

To download Syncovery and install it, follow this [link](https://www.syncovery.com/).

Zata.ai Bucket - [Bucket Create Guide](https://docs.zata.ai/manage/bucket/create-bucket).

Access and Secret Key Pair - [Access Key Guide](https://docs.zata.ai/manage/access-keys/creating-a-new-access-key).

REST Endpoint to follow on [links](https://docs.zata.ai/manage/service-urls-for-zata.ai-s3).

## Launch Syncovery and Create a New Profile

Open **Syncovery**.

From the top menu, click on Perform a Synchronization or Backup now,

<figure><img src="https://2683631041-files.gitbook.io/~/files/v0/b/gitbook-x-prod.appspot.com/o/spaces%2FPPVG4W649TwXN8OejRhb%2Fuploads%2FJ3tmmu6Un6DotLZc0grT%2Fimage.png?alt=media&amp;token=8201290f-fb9b-4d54-872e-4323d34d01c4" alt=""><figcaption></figcaption></figure>

### Select Source <a href="#select-source" id="select-source"></a>

Choose the **local folder** on your system that you want to back up or sync.

<figure><img src="https://2683631041-files.gitbook.io/~/files/v0/b/gitbook-x-prod.appspot.com/o/spaces%2FPPVG4W649TwXN8OejRhb%2Fuploads%2FmSStNwr5geLulLKdHKBf%2Fimage.png?alt=media&amp;token=d8974336-77a2-4940-bc1f-790d48f9970a" alt=""><figcaption></figcaption></figure>

### Select Destination (Zata.ai Storage) <a href="#select-destination-zata.ai-storage" id="select-destination-zata.ai-storage"></a>

Choose **S3** as the storage type.

In the S3 settings window:

* **Access Key ID**: Enter your Zata.ai Access Key.
* **Secret Access Key**: Enter your Zata.ai Secret Key.
* **S3 Endpoint**: <https://idr01.zata.ai> (or <https://bom01.zata.ai> for Southern India)
* **Bucket** : <bucketname@idr01.zata.ai> (or <bucketname@bom01.zata.ai>)

Click **OK.**

<figure><img src="https://2683631041-files.gitbook.io/~/files/v0/b/gitbook-x-prod.appspot.com/o/spaces%2FPPVG4W649TwXN8OejRhb%2Fuploads%2Fh56FxXLMJ1fyLaA7T2Ty%2Fimage.png?alt=media&amp;token=d34eeddf-f414-422e-8cc7-eb0bc371023b" alt=""><figcaption></figcaption></figure>

### Configure Profile Settings <a href="#configure-profile-settings" id="configure-profile-settings"></a>

* Set your preferred options for:
  * **Scheduling** (daily, weekly, real-time sync).
* Click **Save**.

<figure><img src="https://2683631041-files.gitbook.io/~/files/v0/b/gitbook-x-prod.appspot.com/o/spaces%2FPPVG4W649TwXN8OejRhb%2Fuploads%2F3rV3rrOWvvHgCRBA9hHp%2Fimage.png?alt=media&amp;token=5e2607c8-fe89-4b2c-a83e-35b8c5dab0a4" alt=""><figcaption></figcaption></figure>

### Run the Backup/Sync <a href="#run-the-backup-sync" id="run-the-backup-sync"></a>

1. Select your newly created profile.
2. Click **Run Profile** to start uploading files to Zata.ai.
3. Monitor the job log to ensure files are transferred successfully.

<figure><img src="https://2683631041-files.gitbook.io/~/files/v0/b/gitbook-x-prod.appspot.com/o/spaces%2FPPVG4W649TwXN8OejRhb%2Fuploads%2FxwPWUV4ai58hDKAVBMZI%2Fimage.png?alt=media&amp;token=0bd03693-56de-42b9-add9-1ec132c344ee" alt=""><figcaption></figcaption></figure>


# Connect Cloud Mounter with Zata.ai

## **Prerequisites** <a href="#prerequisites" id="prerequisites"></a>

To download **CloudMounter** and install it, follow this [link](https://mac.eltima.com/mount-cloud-drive.html).

Zata.ai Bucket - [Bucket Create Guide](https://docs.zata.ai/manage/bucket/create-bucket).

Access and Secret Key Pair - [Access Key Guide](https://docs.zata.ai/manage/access-keys/creating-a-new-access-key).

REST Endpoint to follow on [links](https://docs.zata.ai/manage/service-urls-for-zata.ai-s3).

### Connect CloudMounter (macOS)

Open **CloudMounter** → choose **Amazon S3**.

<figure><img src="https://2683631041-files.gitbook.io/~/files/v0/b/gitbook-x-prod.appspot.com/o/spaces%2FPPVG4W649TwXN8OejRhb%2Fuploads%2FLwFkcwZflVnG7jHzZFgX%2Fimage.png?alt=media&amp;token=df8f238b-09e3-428b-a55e-4d43cf634086" alt=""><figcaption></figcaption></figure>

1. In the connection panel:
   * **Connection name:** `zata`
   * **Access Key ID** / **Secret Access Key:** paste from Step 2
   * **Server endpoint:** `https://idr01.zata.ai` (Central India) or `https://bom01.zata.ai` (Southern India)
   * **Bucket:** suharclone1 *(You have type your bucket name)*
2. Click **Mount**. The drive appears in **Finder** under *Locations*.

<figure><img src="https://2683631041-files.gitbook.io/~/files/v0/b/gitbook-x-prod.appspot.com/o/spaces%2FPPVG4W649TwXN8OejRhb%2Fuploads%2F08sqjXwSYxwRLw2Bj51R%2Fimage.png?alt=media&amp;token=70d92d4e-0243-4ed4-9163-885501a28916" alt=""><figcaption></figcaption></figure>

#### Verify & Use <a href="#verify-and-use" id="verify-and-use"></a>

* Drag & drop files in Finder / File Explorer — they upload directly to Zata.
* Right‑click the connection → **Open in Browser** to confirm objects are visible in the Zata Console.
* Check the **status icon** in CloudMounter for sync/transfer progress.

<figure><img src="https://2683631041-files.gitbook.io/~/files/v0/b/gitbook-x-prod.appspot.com/o/spaces%2FPPVG4W649TwXN8OejRhb%2Fuploads%2FVVHdt1oS8frDPJBmJhzs%2Fimage.png?alt=media&amp;token=80044fb0-0075-451f-97ea-3cf1245b8643" alt=""><figcaption></figcaption></figure>


# Connect S3fs With Zata.ai

Zata.ai provides S3-compatible object storage that can be mounted as a local drive on your Linux system using s3fs-fuse.

[Embedded Link](https://youtu.be/iVdumfMFw4s)

### Prerequisites <a href="#prerequisites" id="prerequisites"></a>

Before you start, ensure you have:

* A Zata.ai account
* Access Key and Secret Key (available in Zata Console → Access Keys)
* Your Bucket Name
* Your Zata.ai S3 Endpoint (e.g., `https://idr01.zata.ai` or `https://bom01.zata.ai`)
* A Linux server (Ubuntu/Debian/CentOS supported)
* Root or sudo privileges

### Install s3fs <a href="#install-s3fs" id="install-s3fs"></a>

### Ubuntu/Debian

```
sudo apt update
sudo apt install s3fs -y
```

<figure><img src="https://2683631041-files.gitbook.io/~/files/v0/b/gitbook-x-prod.appspot.com/o/spaces%2FPPVG4W649TwXN8OejRhb%2Fuploads%2FPgCyuZCFVTvahDe9VjnU%2Fimage.png?alt=media&amp;token=f749969f-c94e-44ed-90ea-434cc9a4553e" alt=""><figcaption></figcaption></figure>

### CentOS/RHEL

```
sudo yum install s3fs-fuse -y
```

### Create Credential File <a href="#create-credential-file" id="create-credential-file"></a>

Create a password file to store your access keys:

```
echo ACCESS_KEY_ID:SECRET_ACCESS_KEY > ~/.passwd-s3fs
chmod 600 ~/.passwd-s3fs
```

<figure><img src="https://2683631041-files.gitbook.io/~/files/v0/b/gitbook-x-prod.appspot.com/o/spaces%2FPPVG4W649TwXN8OejRhb%2Fuploads%2FsSw7TVQkZc2GVuEndp9l%2Fimage.png?alt=media&amp;token=f70382f4-43ea-458d-9230-395b230abd50" alt=""><figcaption></figcaption></figure>

Replace `ACCESS_KEY_ID` and `SECRET_ACCESS_KEY` with your actual credentials.

### Create Mount Directory <a href="#create-mount-directory" id="create-mount-directory"></a>

```
sudo mkdir /mnt/s3bucket
```

<figure><img src="https://2683631041-files.gitbook.io/~/files/v0/b/gitbook-x-prod.appspot.com/o/spaces%2FPPVG4W649TwXN8OejRhb%2Fuploads%2Fwg1VvhAPlUwWO2721z5a%2Fimage.png?alt=media&amp;token=f9167d12-e221-4215-bbb8-5980022fb963" alt=""><figcaption></figcaption></figure>

### Mount the Zata.ai Bucket <a href="#mount-the-zataai-bucket" id="mount-the-zataai-bucket"></a>

Run the following command (replace placeholders):

```
s3fs BUCKET_NAME /mnt/s3bucket -o passwd_file=~/.passwd-s3fs,url=https://YOUR_S3_ENDPOINT,allow_other,use_cache=/tmp,sigv4,use_path_request_style
```

<figure><img src="https://2683631041-files.gitbook.io/~/files/v0/b/gitbook-x-prod.appspot.com/o/spaces%2FPPVG4W649TwXN8OejRhb%2Fuploads%2FvgtsGvyVXqHwhybqIGaf%2Fimage.png?alt=media&amp;token=41a79750-e733-42c6-9e5f-9f85ccbc8efe" alt=""><figcaption></figcaption></figure>

### Example

```
s3fs neevapp /mnt/s3bucket -o passwd_file=~/.passwd-s3fs,url=https://idr01.zata.ai,allow_other,use_cache=/tmp,sigv4,use_path_request_style
# For Mumbai, use url=https://bom01.zata.ai
```

### Verify Mount <a href="#verify-mount" id="verify-mount"></a>

```
df -h | grep zata
ls /mnt/zata
```

<figure><img src="https://2683631041-files.gitbook.io/~/files/v0/b/gitbook-x-prod.appspot.com/o/spaces%2FPPVG4W649TwXN8OejRhb%2Fuploads%2FxM5G7VLe7tIzzsMF1Skx%2Fimage.png?alt=media&amp;token=18d435c6-73ee-4ea2-bfee-6210f74e4e8d" alt=""><figcaption></figcaption></figure>

### Auto-mount on Boot <a href="#auto-mount-on-boot" id="auto-mount-on-boot"></a>

To automatically mount the bucket on system boot, edit `/etc/fstab` and add the following line:

```
s3fs#BUCKET_NAME /mnt/zata fuse _netdev,passwd_file=/root/data/passwd.txt,url=https://idr01.zata.ai,allow_other,use_cache=/tmp,sigv4,use_path_request_style 0 0
# For Mumbai, use url=https://bom01.zata.ai
```

Then test the configuration:

```
sudo mount -a
```

### Conclusion <a href="#conclusion" id="conclusion"></a>

Your Zata.ai Object Storage is now mounted as a local drive. You can read and write files directly to `/mnt/zata` just like a local directory.

### Example Use Cases <a href="#example-use-cases" id="example-use-cases"></a>

* Backup local folders directly to Zata.ai
* Mount in a Docker host for shared media files
* Use as a network drive in hybrid cloud setups


# Mount S3 bucket to Linux operating system

To mount an S3 bucket to a Linux machine, you can use a tool like **s3fs**

Step 1: Install dependencies

```
sudo apt-get update -y
sudo apt-get install s3fs -y
```

Step 2: Store your credentials

Create a credentials file to store your access and secret keys securely

```
echo ACCESS_KEY_ID:SECRET_ACCESS_KEY > ~/.passwd-s3fs
chmod 600 ~/.passwd-s3fs
```

Replace `ACCESS_KEY_ID` and `SECRET_ACCESS_KEY` with your actual credentials.

<figure><img src="https://2683631041-files.gitbook.io/~/files/v0/b/gitbook-x-prod.appspot.com/o/spaces%2FPPVG4W649TwXN8OejRhb%2Fuploads%2FM8FH6dYYRHuSbuKLmQ7y%2Fimage.png?alt=media&amp;token=326b5d7a-cd7e-445d-8c30-65884bdf1a22" alt=""><figcaption></figcaption></figure>

Step 3: Create a mount point

Create a directory where the S3 bucket will be mounted:

```
sudo mkdir /mnt/s3bucket
```

<figure><img src="https://2683631041-files.gitbook.io/~/files/v0/b/gitbook-x-prod.appspot.com/o/spaces%2FPPVG4W649TwXN8OejRhb%2Fuploads%2Fq3RvvSAaiXwMqjPLZmlJ%2Fimage.png?alt=media&amp;token=be19b655-7e25-4dba-8f2c-be23d2961945" alt=""><figcaption></figcaption></figure>

Step 4: Mount S3-Compatible Storage with Path-Style Addressing

```
s3fs BUCKET_NAME /mnt/s3bucket -o passwd_file=~/.passwd-s3fs,url=https://YOUR_S3_ENDPOINT,allow_other,use_cache=/tmp,sigv4,use_path_request_style

```

#### Breakdown of the Options:

* `BUCKET_NAME`: Replace this with your actual bucket name.
* `/mnt/s3bucket`: The mount point where the bucket will be mounted.
* `-o passwd_file=~/.passwd-s3fs`: Specifies the path to the file where your credentials are stored (replace with your own credentials file path if necessary).
* url=[https://idr01.zata.ai ](https://idr01.zata.ai)(or <https://bom01.zata.ai> for Southern India) with your S3-compatible service's endpoint.
* `allow_other`: Allows other users to access the mounted directory.
* `use_cache=/tmp`: Caches files locally `/tmp` to improve performance.
* `sigv4`: Forces Signature Version 4 signing (needed for most S3-compatible services).
* `use_path_request_style`: Forces path-style addressing, which is required for some S3-compatible service

Step 5: Verify the mount

```
sudo df -h
```

<figure><img src="https://2683631041-files.gitbook.io/~/files/v0/b/gitbook-x-prod.appspot.com/o/spaces%2FPPVG4W649TwXN8OejRhb%2Fuploads%2FdWs21h13TwJ0ErHSBsNL%2Fimage.png?alt=media&amp;token=3f63e361-a9e4-4da5-9010-512270cf0199" alt=""><figcaption></figcaption></figure>

Now check to mount to navigate to the directory and create a new file on your system.

<figure><img src="https://2683631041-files.gitbook.io/~/files/v0/b/gitbook-x-prod.appspot.com/o/spaces%2FPPVG4W649TwXN8OejRhb%2Fuploads%2Fy91XO6WE9m1Ep63wbRD8%2Fimage.png?alt=media&amp;token=8687304b-fe43-46ef-9445-fbdfe591b34e" alt=""><figcaption></figcaption></figure>

Now back to the Zata.ai dashboard click on the bucket section, select the bucket, and check the content

<figure><img src="https://2683631041-files.gitbook.io/~/files/v0/b/gitbook-x-prod.appspot.com/o/spaces%2FPPVG4W649TwXN8OejRhb%2Fuploads%2FdMIxHgRJNsbaThEanePL%2Fimage.png?alt=media&amp;token=3733bf46-f920-4e4a-b4dd-2841f88390f5" alt=""><figcaption></figcaption></figure>

**Lets see file has been created.**

<figure><img src="https://2683631041-files.gitbook.io/~/files/v0/b/gitbook-x-prod.appspot.com/o/spaces%2FPPVG4W649TwXN8OejRhb%2Fuploads%2FI0EDmkZh7MIhxpqT3dWa%2Fimage.png?alt=media&amp;token=5e18a535-0708-4a57-94c0-4b0e5584a87b" alt=""><figcaption></figcaption></figure>

**To mount an S3-compatible bucket with path-style addressing** **permanently** (so that it is automatically mounted at boot), you can add an entry to your **/etc/fstab** file. Here’s how to configure that:

Open **/etc/fstab** in an editor

```
sudo vi /etc/fstab
```

Add an entry to mount your S3 bucket. The format should look like this:

```
s3fs#Bucket_Name /mnt/s3bucket fuse _netdev,nonempty,allow_other,url=https://idr01.zata.ai,use_path_request_style,passwd_file=/root/.passwd-s3fs 0 0
# For Mumbai, use url=https://bom01.zata.ai
```

Replace **`BUCKET_NAME`** with your S3 bucket name.

<figure><img src="https://2683631041-files.gitbook.io/~/files/v0/b/gitbook-x-prod.appspot.com/o/spaces%2FPPVG4W649TwXN8OejRhb%2Fuploads%2FzIkL6z50yK1KHvrkNAQt%2Fimage.png?alt=media&amp;token=96e3240b-ae49-45dc-99de-b9597c8d341f" alt=""><figcaption></figcaption></figure>

Now, check if the mount entry in /etc/fstab works properly by running the following command

```
sudo mount -a
```

Now, reload the daemon service

```
sudo systemctl daemon-reload
```

Now, reboot the system and check the mount directory.

```
df -h
```

<figure><img src="https://2683631041-files.gitbook.io/~/files/v0/b/gitbook-x-prod.appspot.com/o/spaces%2FPPVG4W649TwXN8OejRhb%2Fuploads%2FU1q5UEME4hUKVcBrMhdy%2Fimage.png?alt=media&amp;token=1800b999-dea3-46b8-baa0-0f4d3483f900" alt=""><figcaption></figcaption></figure>

Verify the Mount:- To confirm that the bucket is mounted, list the contents of your mount point.

<pre><code><strong>sudo ls /mnt/s3bucket
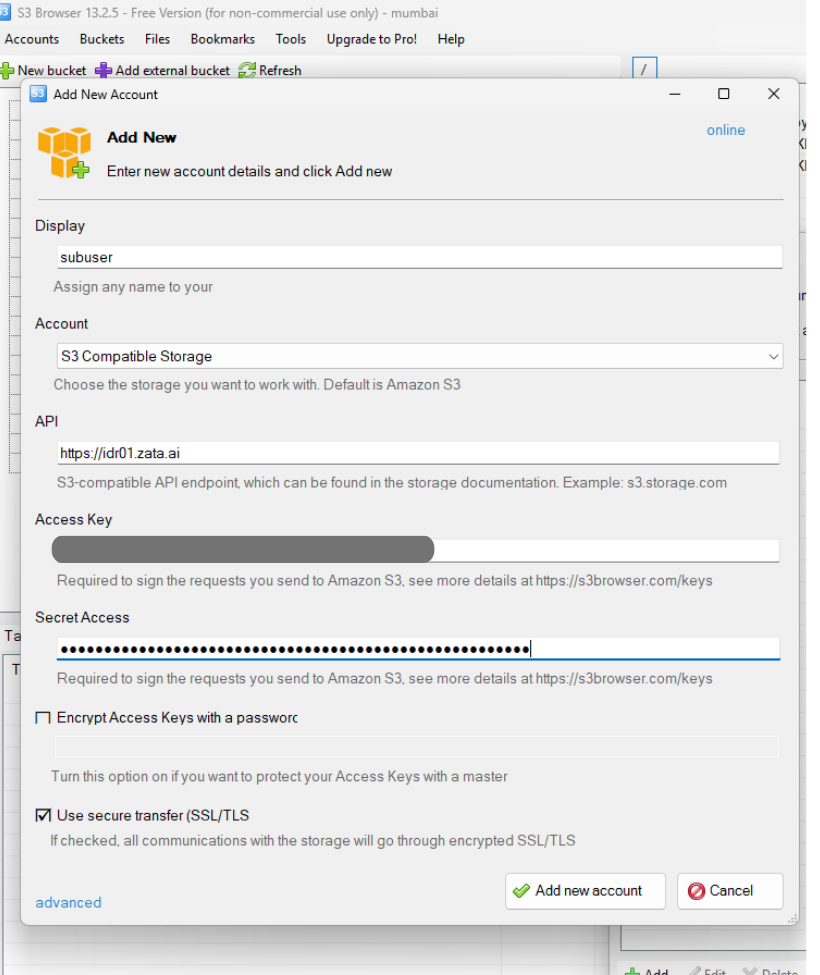
</strong></code></pre>

<figure><img src="https://2683631041-files.gitbook.io/~/files/v0/b/gitbook-x-prod.appspot.com/o/spaces%2FPPVG4W649TwXN8OejRhb%2Fuploads%2FtdPDWpsfShP2hRXONwkn%2Fimage.png?alt=media&amp;token=c8155091-1a7a-4c2a-8f01-6be005451b35" alt=""><figcaption></figcaption></figure>


# Connect Bucket with S3 Browser

Object storage configuration with Buckets

Navigate to Zata.ai and click on the bucket section to [create the bucket](https://docs.zata.ai/manage/bucket/create-bucket).

Now click on the Access key section to create the [access and secret key](https://docs.zata.ai/manage/access-keys/creating-a-new-access-key).

[Embedded Link](https://youtu.be/snJqhHzkvGo)

After completing this step, proceed to the[ **browser**](https://s3browser.com/)**.**

<figure><img src="https://2683631041-files.gitbook.io/~/files/v0/b/gitbook-x-prod.appspot.com/o/spaces%2FPPVG4W649TwXN8OejRhb%2Fuploads%2F3fsfv84VC5ywQmTdmukg%2FScreenshot%202024-08-02%20at%206.51.59%20PM.png?alt=media&amp;token=d6bb16fa-9dc9-403c-b93e-fc0964825ab5" alt=""><figcaption></figcaption></figure>

To add a new account, click **Add New Account**.

<figure><img src="https://2683631041-files.gitbook.io/~/files/v0/b/gitbook-x-prod.appspot.com/o/spaces%2FPPVG4W649TwXN8OejRhb%2Fuploads%2FueZKLwFsWHPeGGhs54JJ%2FScreenshot%202024-08-02%20at%206.52.26%20PM.png?alt=media&amp;token=7560b9e1-58bf-4a1b-ae91-0b677113f0a5" alt=""><figcaption></figcaption></figure>

* Fill in the Information:- **Display name** - Set a display name of your choice.
* **Account type**- Select S3 Compatible Storage
* **REST Endpoint**- Set it to - **<https://idr01.zata.ai>** (Central India) or **<https://bom01.zata.ai>** (Southern India)
* **Access\_Key** -[ Access key](/manage/access-keys) that you created above.
* **Secret\_key** - The secret key that you created above.

Click on the advanced settings.

<figure><img src="https://2683631041-files.gitbook.io/~/files/v0/b/gitbook-x-prod.appspot.com/o/spaces%2FPPVG4W649TwXN8OejRhb%2Fuploads%2FcWctQytEtlNRkORrs204%2Fimage.png?alt=media&amp;token=25e2b1a3-51f1-4a2b-a7d4-2f24a19fe07c" alt=""><figcaption></figcaption></figure>

* After filling in the details, continue the process.
* Click the **Advanced Settings ->**
* Select the Signature Version:- **Signature V2**
* Addressing model:- **Path style/ Virtual Hosted Style**

<figure><img src="https://2683631041-files.gitbook.io/~/files/v0/b/gitbook-x-prod.appspot.com/o/spaces%2FPPVG4W649TwXN8OejRhb%2Fuploads%2Fx96mBDDiIjk3gzEOri4v%2Fimage.png?alt=media&amp;token=1fd41055-6256-41f0-b8c9-0e65c226b6ca" alt=""><figcaption></figcaption></figure>

` After this click the`` `` `**`Add new account` ->**

<figure><img src="https://2683631041-files.gitbook.io/~/files/v0/b/gitbook-x-prod.appspot.com/o/spaces%2FPPVG4W649TwXN8OejRhb%2Fuploads%2FTni0O6PbjTBmlqfbe4Nb%2FScreenshot%202024-08-02%20at%206.54.34%20PM.png?alt=media&amp;token=6b4ea431-a09e-4026-a762-7f09f450cfd8" alt=""><figcaption></figcaption></figure>

* Now go to the **S3 Browser** ->

<figure><img src="https://2683631041-files.gitbook.io/~/files/v0/b/gitbook-x-prod.appspot.com/o/spaces%2FPPVG4W649TwXN8OejRhb%2Fuploads%2F9x4If8iKSHFVD3ElPIQ7%2Fimage.png?alt=media&amp;token=c9de0024-fdb7-4bbf-9f5f-780aeec4dd40" alt=""><figcaption></figcaption></figure>

* Now you can see details of **Buckets and uploaded files ->**
* Click any Bucket and see details about the uploaded files ->

<figure><img src="https://2683631041-files.gitbook.io/~/files/v0/b/gitbook-x-prod.appspot.com/o/spaces%2FPPVG4W649TwXN8OejRhb%2Fuploads%2FNTfkguqaj2HeaAUowvv7%2Fimage.png?alt=media&amp;token=851434f5-808f-4d5d-8fc0-68e27d1bae7c" alt=""><figcaption></figcaption></figure>

* To upload new files, first click on the **bucket,** and then click on the upload button.

<figure><img src="https://2683631041-files.gitbook.io/~/files/v0/b/gitbook-x-prod.appspot.com/o/spaces%2FPPVG4W649TwXN8OejRhb%2Fuploads%2FypPR09MhCHTggkNAteXJ%2Fimage.png?alt=media&amp;token=c4372493-4a86-4c7c-92c9-8dca063f0566" alt=""><figcaption></figcaption></figure>

We can see uploading and status are running

<figure><img src="https://2683631041-files.gitbook.io/~/files/v0/b/gitbook-x-prod.appspot.com/o/spaces%2FPPVG4W649TwXN8OejRhb%2Fuploads%2F7KPnRHo9Soavskk2tvJc%2Fimage.png?alt=media&amp;token=4db59ed5-6909-4f90-9be5-1dce47c07b55" alt=""><figcaption></figcaption></figure>

<figure><img src="https://2683631041-files.gitbook.io/~/files/v0/b/gitbook-x-prod.appspot.com/o/spaces%2FPPVG4W649TwXN8OejRhb%2Fuploads%2Fzg3Ccmh7hkZuKvU24qCr%2Fimage.png?alt=media&amp;token=a59a51c9-707a-4abe-bd52-8018d7957fc5" alt=""><figcaption></figcaption></figure>

Now back to your Zata account the check the bucket->

<figure><img src="https://2683631041-files.gitbook.io/~/files/v0/b/gitbook-x-prod.appspot.com/o/spaces%2FPPVG4W649TwXN8OejRhb%2Fuploads%2F6YUmSyaN4fa14YSFHRJk%2Fimage.png?alt=media&amp;token=5390bc95-51e7-4142-95d6-d023423ab6bf" alt=""><figcaption></figcaption></figure>

You can now download the object from the bucket to your local machine.
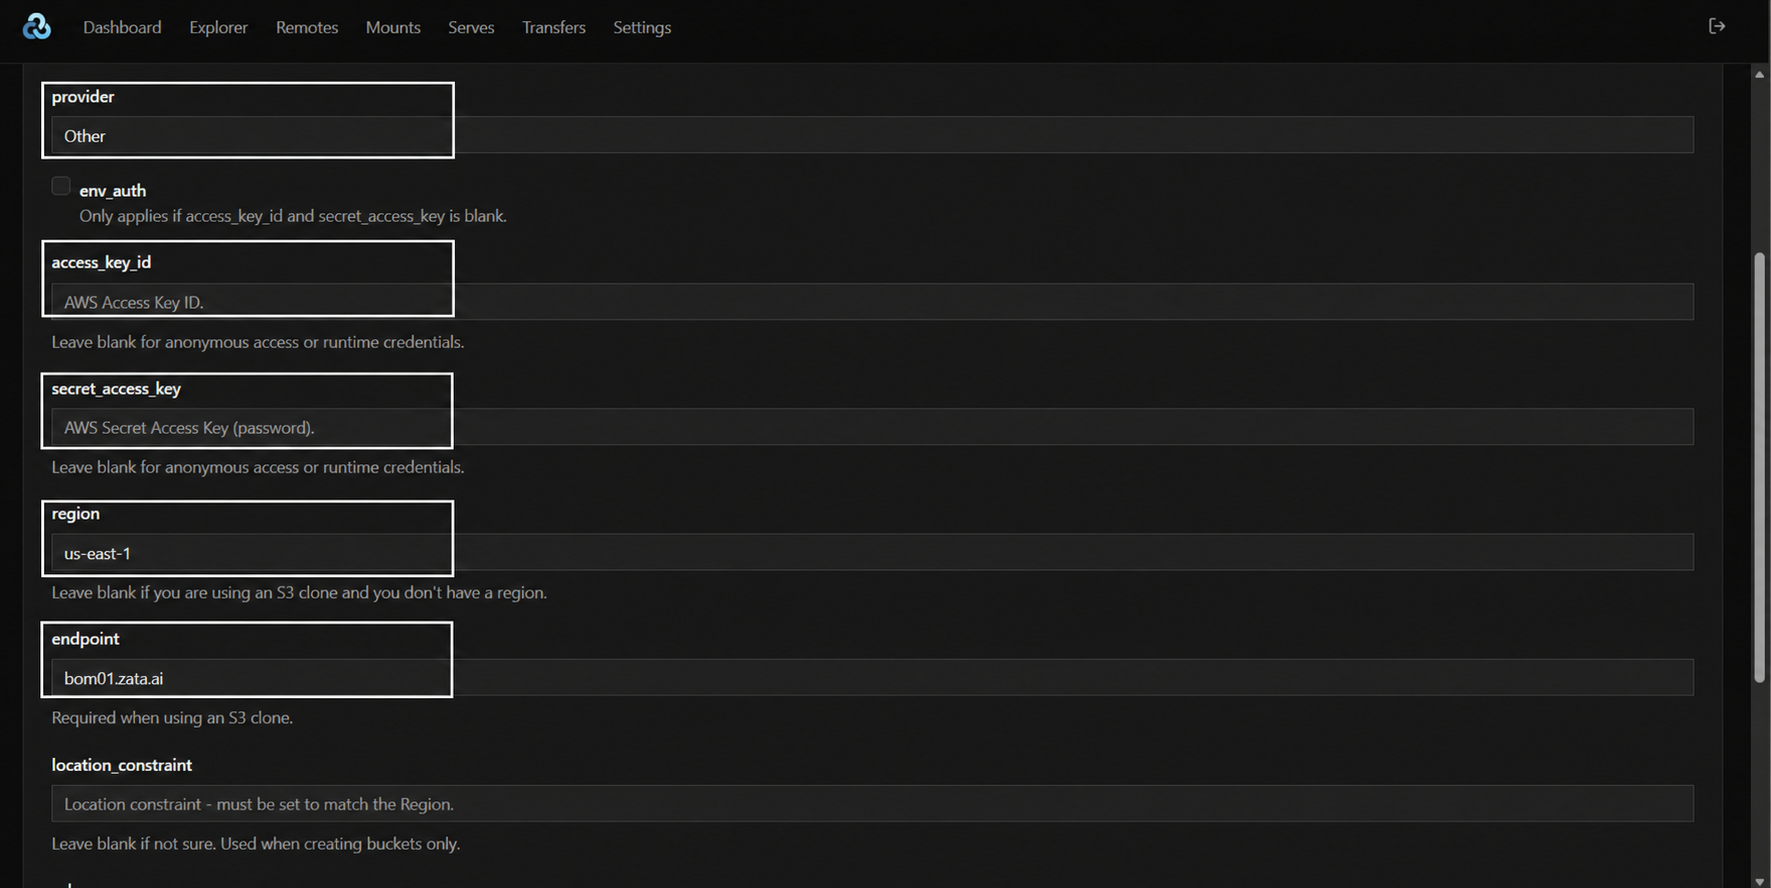
Select bucket and choose object, and click on the download section.

<figure><img src="https://2683631041-files.gitbook.io/~/files/v0/b/gitbook-x-prod.appspot.com/o/spaces%2FPPVG4W649TwXN8OejRhb%2Fuploads%2FmnjK11QEqCpTKaovGV54%2Fimage.png?alt=media&amp;token=94dabd53-ab5c-47f3-98ce-db1f05415c4c" alt=""><figcaption></figcaption></figure>

Now Processing are running

<figure><img src="https://2683631041-files.gitbook.io/~/files/v0/b/gitbook-x-prod.appspot.com/o/spaces%2FPPVG4W649TwXN8OejRhb%2Fuploads%2FdvVbxqShV1feIFDQOilL%2Fimage.png?alt=media&amp;token=6a0f5b90-4efc-4eab-afd7-12c6a06fbe92" alt=""><figcaption></figcaption></figure>

Do you know more details about the S3 credentials follow these [**link**](/manage/access-keys) ->


# Access Specific Bucket through Subuser in S3 Browser

## Step 1: Download and Install S3 Browser

* Go to the official S3 Browser website and download the application.
* Install S3 Browser on your system (Windows).
* Open S3 Browser after installation is complete.

<figure><img src="https://2683631041-files.gitbook.io/~/files/v0/b/gitbook-x-prod.appspot.com/o/spaces%2FPPVG4W649TwXN8OejRhb%2Fuploads%2Fgit-blob-a0dd100c1871250be524bb76126797b3433259a7%2Fsubuser-s3browser-1.png?alt=media" alt="S3 Browser Download Page"><figcaption></figcaption></figure>

## Step 2: Get Subuser Credentials from Zata.ai

* Log in to the Zata.ai dashboard.
* Go to **Subusers → Subusers** from the left sidebar.
* Locate the Subuser you want to connect and open the downloaded credentials file (Access Key and Secret Key).

<figure><img src="https://2683631041-files.gitbook.io/~/files/v0/b/gitbook-x-prod.appspot.com/o/spaces%2FPPVG4W649TwXN8OejRhb%2Fuploads%2Fgit-blob-9868b8e068661f60c5719e402edb07df951767bf%2Fsubuser-s3browser-2.png?alt=media" alt="Download Subuser Credentials"><figcaption></figcaption></figure>

> **Note:** If the credentials file is lost, a new key must be generated and the old key deleted, as the Secret Key cannot be retrieved again.

* On the same Subuser Management page, look under the **ASSIGNED BUCKETS** column. Make sure to note down the exact name of the bucket assigned to this subuser, as you will need it later.

<figure><img src="https://2683631041-files.gitbook.io/~/files/v0/b/gitbook-x-prod.appspot.com/o/spaces%2FPPVG4W649TwXN8OejRhb%2Fuploads%2Fgit-blob-57b1ade8100090824dae286a65b0396ecfb35495%2Fsubuser-s3browser-bucketcheck.png?alt=media" alt="Check Assigned Bucket Name"><figcaption></figcaption></figure>

## Step 3: Add a New Account in S3 Browser

* Open S3 Browser.
* Click on **Accounts → Add New Account**.
* A popup will open: Add New Account.

<figure><img src="https://2683631041-files.gitbook.io/~/files/v0/b/gitbook-x-prod.appspot.com/o/spaces%2FPPVG4W649TwXN8OejRhb%2Fuploads%2Fgit-blob-c1c04fbe666b5067a80bce524e609ed8fb35788e%2Fsubuser-s3browser-3.png?alt=media" alt="Add New Account Menu"><figcaption></figcaption></figure>

## Step 4: Configure Account Settings

**Required Fields**

* **Account Name:** Enter any recognizable name for this connection.
* **Account Type:** Select “S3 Compatible Storage”.
* **REST Endpoint:** Enter the Zata.ai S3-compatible endpoint URL (region: Indore).
* **Access Key ID:** Enter the Access Key from the Subuser credentials file.
* **Secret Access Key:** Enter the Secret Key from the Subuser credentials file.

<figure><img src="https://2683631041-files.gitbook.io/~/files/v0/b/gitbook-x-prod.appspot.com/o/spaces%2FPPVG4W649TwXN8OejRhb%2Fuploads%2Fgit-blob-de8d7f207f3abf966b208963fd99728cbbbf879f%2Fsubuser-s3browser-4.png?alt=media" alt="Account Settings Configuration"><figcaption></figcaption></figure>

## Step 5: Test and Save the Connection

* Click on **Test Connection** to verify the credentials and endpoint are correct.
* Once the connection is successful, click **Save/OK** to add the account.

## Step 6: Add the Bucket as an External Bucket

> **Note:** A Subuser does not have permission to list all buckets. The bucket list will appear empty, so the specific bucket must be added manually as an External Bucket.

* In S3 Browser, right-click on the buckets (or go to Buckets menu) and select **Add External Bucket**.
* A popup will open asking for the bucket name.
* Enter the exact bucket name that was assigned to the Subuser in Zata.ai.
* Click **Add/OK**.

<figure><img src="https://2683631041-files.gitbook.io/~/files/v0/b/gitbook-x-prod.appspot.com/o/spaces%2FPPVG4W649TwXN8OejRhb%2Fuploads%2Fgit-blob-eb7b5913d284770c2d2e3cf185f7ef0e5af56272%2Fsubuser-s3browser-5.png?alt=media" alt="Add External Bucket"><figcaption></figcaption></figure>

## Step 7: Select the Bucket to Access

* Click on the bucket name from the list to open it.
* The bucket contents (folders/files) will be displayed based on the permission assigned to the Subuser.

<figure><img src="https://2683631041-files.gitbook.io/~/files/v0/b/gitbook-x-prod.appspot.com/o/spaces%2FPPVG4W649TwXN8OejRhb%2Fuploads%2Fgit-blob-ac7ba5b3e1d155f65488281b3a4d697258bcaafd%2Fsubuser-s3browser-6.png?alt=media" alt="Bucket Opened in S3 Browser"><figcaption></figcaption></figure>

## Step 8: Perform Actions Based on Assigned Permission

The available actions depend on the permission set for the Subuser on this bucket:

| Permission    | Allowed Action in S3 Browser                       |

| ------------- | -------------------------------------------------- |
| View Only     | Browse and download files only                     |
| Upload Only   | Upload files to the bucket only                    |
| View & Upload | Browse, download, and upload files                 |
| Full Access   | Upload, download, rename, and delete files/folders |

## Step 9: Troubleshooting Common Connection Issues

* **Access Denied error:** Verify the correct bucket is assigned to the Subuser in Zata.ai.
* **Connection failed:** Re-check the REST Endpoint URL and region (Indore).
* **Invalid credentials:** Re-confirm Access Key and Secret Key are copied correctly with no extra spaces.

## Step 10: Final Verification

* Confirm the bucket is visible and accessible in S3 Browser.
* Confirm actions (view/upload/full access) work as per the assigned permission.
* Subuser access through S3 Browser is now successfully configured.

*Bucket access via Subuser using S3 Browser (integrated with Zata.ai, S3-compatible) is now successfully completed.*


# Connect Bucket with Cyberduck

Cyberduck is a free and open-source application designed for file transfer and cloud storage management. it simplifies the process of connecting your local computer to remote servers or cloud storage services.

[Embedded Link](https://youtu.be/GgBAAkjVFWI)

## Prerequisites

To download the **Cyberduck** and installation follow these [links](https://cyberduck.io/download/).

Zata.ai Bucket - [Bucket Create Guide](https://docs.zata.ai/manage/bucket/create-bucket).

Access and Secret Key Pair - [Access Key Guide](https://docs.zata.ai/manage/access-keys/creating-a-new-access-key).

REST Endpoint to follow these click on [links](https://docs.zata.ai/manage/service-urls-for-zata.ai-s3).

Now open the Cyberduck.

Click on the Open connection to add the new account.

<figure><img src="https://2683631041-files.gitbook.io/~/files/v0/b/gitbook-x-prod.appspot.com/o/spaces%2FPPVG4W649TwXN8OejRhb%2Fuploads%2F97oOf1EQnIfkIORA8RyT%2Fimage.png?alt=media&amp;token=73b890fb-057a-447e-b3d5-5f1157d429ce" alt=""><figcaption></figcaption></figure>

Click on the option, select the S3-compatible storage, and click on the more option.

<figure><img src="https://2683631041-files.gitbook.io/~/files/v0/b/gitbook-x-prod.appspot.com/o/spaces%2FPPVG4W649TwXN8OejRhb%2Fuploads%2FU3jbt0VvsBKsIfh4gbOP%2Fimage.png?alt=media&amp;token=949ae13d-b327-4321-a101-371fb2ce08fe" alt=""><figcaption></figcaption></figure>

After these, search the S3-Compatible storage and choose the option.

<figure><img src="https://2683631041-files.gitbook.io/~/files/v0/b/gitbook-x-prod.appspot.com/o/spaces%2FPPVG4W649TwXN8OejRhb%2Fuploads%2FYpXU75zlzz7Zgroftd3J%2Fimage.png?alt=media&amp;token=a9763c7c-5125-47b1-8aa8-bd4b8da6607f" alt=""><figcaption></figcaption></figure>

Choose the S3(Deprecated path style requests)

<figure><img src="https://2683631041-files.gitbook.io/~/files/v0/b/gitbook-x-prod.appspot.com/o/spaces%2FPPVG4W649TwXN8OejRhb%2Fuploads%2FlDZBmukeGIWlpvqoVFev%2Fimage.png?alt=media&amp;token=d807fedb-52da-4c85-86ca-b72a17bf9fc6" alt=""><figcaption></figcaption></figure>

After these now back to the main console the add some details about the S3 account.

Set the Server :- [REST the Endpoint](https://docs.zata.ai/manage/service-urls-for-zata.ai-s3)

Access\_key: Access key that you created above.

Secret\_key:- The secret key that you created above.

Click on the connect.

<figure><img src="https://2683631041-files.gitbook.io/~/files/v0/b/gitbook-x-prod.appspot.com/o/spaces%2FPPVG4W649TwXN8OejRhb%2Fuploads%2F2QylEkZd6PSAsjLgnhYp%2Fimage.png?alt=media&amp;token=816710d4-2303-4cb7-9e0c-f677d6349457" alt=""><figcaption></figcaption></figure>

Let's see the bucket is visible that we created in the Zata.ai bucket section.

<figure><img src="https://2683631041-files.gitbook.io/~/files/v0/b/gitbook-x-prod.appspot.com/o/spaces%2FPPVG4W649TwXN8OejRhb%2Fuploads%2F54KaT8OMhEb4vxT53vvm%2Fimage.png?alt=media&amp;token=2c8b0471-d303-4d79-920a-73a4d226cf6f" alt=""><figcaption></figcaption></figure>

Now click on the upload option and upload the file. Alternatively, you can simply drag and drop it.

<figure><img src="https://2683631041-files.gitbook.io/~/files/v0/b/gitbook-x-prod.appspot.com/o/spaces%2FPPVG4W649TwXN8OejRhb%2Fuploads%2FvvOOmeB2rkMj63tB6DNp%2Fimage.png?alt=media&amp;token=dc3f9ef1-6a8a-4706-874e-90d5fdf233a0" alt=""><figcaption></figcaption></figure>

Lets see the data has been transferred from the local system to the bucket.

<figure><img src="https://2683631041-files.gitbook.io/~/files/v0/b/gitbook-x-prod.appspot.com/o/spaces%2FPPVG4W649TwXN8OejRhb%2Fuploads%2Fbngdp2Emo9T7SjCZn3sW%2Fimage.png?alt=media&amp;token=048019d0-1304-49ef-a609-39bcba391173" alt=""><figcaption></figcaption></figure>

Navigate to the Zata.ai dashboard, select the Object storage section, choose the bucket, and check the data.

<figure><img src="https://2683631041-files.gitbook.io/~/files/v0/b/gitbook-x-prod.appspot.com/o/spaces%2FPPVG4W649TwXN8OejRhb%2Fuploads%2FX31tSB7TcpEfjsFMHHeY%2Fimage.png?alt=media&amp;token=a6cc241e-f86a-4df5-8ffc-2f6608d07318" alt=""><figcaption></figcaption></figure>


# Integration of Zata.ai with Rclone GUI

**1. Introduction**

Zata.ai provides **S3-compatible object storage** that allows users to store and manage unstructured data such as files, images, backups, and logs.

Rclone is an open-source command-line program used to manage files on cloud storage systems.

In this setup, we connect **Zata Object Storage with Rclone GUI** to manage buckets and objects through a graphical interface.

***

**2. Prerequisites**

Before starting the configuration, ensure the following resources are available:

| Requirement     | Description                                  |
| --------------- | -------------------------------------------- |
| Zata.ai Account | Active account with access to object storage |
| Bucket          | At least one bucket created                  |
| Access Keys     | Access Key ID and Secret Access Key          |
| S3 Endpoint     | Zata S3 service URL                          |

***

**3. Create Zata Object Storage Bucket**

Login to **Zata.ai dashboard** and create a new bucket.

Steps:

1. Open Zata Storage Dashboard
2. Navigate to **Buckets**
3. Click **Create Bucket**
4. Enter bucket name
5. Select region
6. Create bucket

Example bucket name:

```
testing-bucket-001
```

***

**4. Generate Access Keys**

To allow external tools like Rclone to connect, access keys must be generated.

Steps:

1. Go to **Access Keys**
2. Click **Create Access Key**
3. Copy the following credentials:

```
Access Key ID
Secret Access Key
```

These credentials are used for **authentication with the S3 API**.

***

**5. Identify Zata S3 Service Endpoint**

Zata provides region-specific S3 endpoints.

For this setup the endpoint used is:

```
https://idr01.zata.ai (Central India) or https://bom01.zata.ai (Southern India)
```

Region:

```
us-east-1
```

This endpoint is required to connect S3-compatible clients like **Rclone**.

***

**6. Install Rclone**

Download and install the latest version of Rclone from the official website:

<https://rclone.org/downloads/>

#### Step 1: Verify the Installation

Open **Windows PowerShell** or any **Terminal** and run:

```
rclone version
```

If Rclone is installed successfully, the installed version will be displayed.

#### Step 2: Launch the Rclone Web GUI

Run the following command in **Windows PowerShell** or **Terminal**:

```
rclone gui
```

<figure><img src="https://2683631041-files.gitbook.io/~/files/v0/b/gitbook-x-prod.appspot.com/o/spaces%2FPPVG4W649TwXN8OejRhb%2Fuploads%2FHFEtTICoR6JP5ajKIqNw%2FScreenshot%202026-06-27%20110749.png?alt=media&amp;token=77888fcb-497b-4922-8724-c5207915b4f8" alt=""><figcaption></figcaption></figure>

This starts the Rclone Web GUI locally and automatically opens it in your default web browser.

#### Step 3: Create a New Remote

1. Open the **Remotes** tab.

<figure><img src="https://2683631041-files.gitbook.io/~/files/v0/b/gitbook-x-prod.appspot.com/o/spaces%2FPPVG4W649TwXN8OejRhb%2Fuploads%2F1tUundSrf4UjC6hYgwEt%2Frdash.png?alt=media&amp;token=d04951dd-affd-4826-a12b-95bbcd8838a0" alt=""><figcaption></figcaption></figure>

2. Click **Add New Remote**.

<figure><img src="https://2683631041-files.gitbook.io/~/files/v0/b/gitbook-x-prod.appspot.com/o/spaces%2FPPVG4W649TwXN8OejRhb%2Fuploads%2FIn4SzuHYaUikQgK0kQ53%2Faddremo.png?alt=media&amp;token=96d06128-848b-4515-9c96-95e8518d9276" alt=""><figcaption></figcaption></figure>

#### Step 4: Configure the Remote

Fill in the following fields:

| Field    | Value        |
| -------- | ------------ |
| **Name** | `Zata Cloud` |
| **Type** | `s3`         |

When you choose **Type = s3**, a list of S3-compatible providers will appear. Select Amazon S3 Compliant Storage Providers from the list.

<figure><img src="https://2683631041-files.gitbook.io/~/files/v0/b/gitbook-x-prod.appspot.com/o/spaces%2FPPVG4W649TwXN8OejRhb%2Fuploads%2FKRfqAqJSGqSgMygjlvdA%2Fnewremo.png?alt=media&amp;token=a8c30bbe-b1ab-4f82-a066-07ca25137f08" alt=""><figcaption></figcaption></figure>

#### Step 5: Enter Your Credentials

Provide your Zata Cloud credentials.

| Field                 | Value                                |
| --------------------- | ------------------------------------ |
| **Provider**          | Select Other                         |
| **Access Key ID**     | Your Zata Access Key                 |
| **Secret Access Key** | Your Zata Secret Key                 |
| **Region**            | `us-east-1`                          |
| **Endpoint**          | `idr01.zata.ai` (or `bom01.zata.ai`) |

<figure><img src="https://2683631041-files.gitbook.io/~/files/v0/b/gitbook-x-prod.appspot.com/o/spaces%2FPPVG4W649TwXN8OejRhb%2Fuploads%2FG2E8W2meQI5TSAY9ZT35%2Fother-provider.png?alt=media&amp;token=5042c8c3-66f8-4c5b-9b93-cf25020de052" alt=""><figcaption></figcaption></figure>

<figure><img src="https://2683631041-files.gitbook.io/~/files/v0/b/gitbook-x-prod.appspot.com/o/spaces%2FPPVG4W649TwXN8OejRhb%2Fuploads%2Fgit-blob-eece61cef6c5abd15cab46bf9aed91f939204bec%2Fbom-integration-of-zata.ai-with-rclone-gui.png?alt=media" alt="Rclone GUI Zata Mumbai Endpoint"><figcaption></figcaption></figure>

#### Step 6: Configure Advanced Options

Scroll down and expand **More Options**.

Enable the following options:

* ✅ **force\_path\_style**
* ✅ **v2\_auth**

> **Important**
>
> These two options **must be enabled** for successful integration with Zata Cloud.

<figure><img src="https://2683631041-files.gitbook.io/~/files/v0/b/gitbook-x-prod.appspot.com/o/spaces%2FPPVG4W649TwXN8OejRhb%2Fuploads%2FGYxNa9wrsplSNfI02ayU%2Fpathv2remo.png?alt=media&amp;token=3e979957-e584-441e-8944-afd76f615b3d" alt=""><figcaption></figcaption></figure>

#### Step 7: Create the Remote

Scroll to the bottom of the page and click **Create Remote**.

<figure><img src="https://2683631041-files.gitbook.io/~/files/v0/b/gitbook-x-prod.appspot.com/o/spaces%2FPPVG4W649TwXN8OejRhb%2Fuploads%2FHepwVMq8JfijhYGAJGRp%2Fcreateremo.png?alt=media&amp;token=986fc998-84fc-400c-9e1e-589091eec6b7" alt=""><figcaption></figcaption></figure>

#### Step 8: Verify the Connection

If the configuration is correct, the new remote named **Zata Cloud** will appear in the **Remotes** list.

Your Rclone integration with Zata Cloud is now complete and ready to use.

<figure><img src="https://2683631041-files.gitbook.io/~/files/v0/b/gitbook-x-prod.appspot.com/o/spaces%2FPPVG4W649TwXN8OejRhb%2Fuploads%2FKrrXH6GGQZSTzLWhOI80%2Ffinremo.png?alt=media&amp;token=eb7a018e-07e7-441c-bf7a-c13064424fa2" alt=""><figcaption></figcaption></figure>

#### Configuration Summary

<table data-search="false"><thead><tr><th>Setting</th><th>Value</th></tr></thead><tbody><tr><td>Name</td><td>Zata Cloud</td></tr><tr><td>Type</td><td>s3</td></tr><tr><td>Provider</td><td>Other</td></tr><tr><td>Access Key</td><td>Your Access Key</td></tr><tr><td>Secret Key</td><td>Your Secret Key</td></tr><tr><td>Region</td><td>us-east-1</td></tr><tr><td>Endpoint</td><td>idr01.zata.ai (or bom01.zata.ai)</td></tr><tr><td>force_path_style</td><td>Enabled ✅</td></tr><tr><td>v2_auth</td><td>Enabled ✅</td></tr></tbody></table>

***

**7.** Create a Bucket and Upload Files

After successfully configuring the **Zata Cloud** remote, you can create buckets and upload files directly from the Rclone Web GUI.

#### Step 1: Open the Zata Cloud Remote

Under **Remotes**, click **Zata Cloud**.

<figure><img src="https://2683631041-files.gitbook.io/~/files/v0/b/gitbook-x-prod.appspot.com/o/spaces%2FPPVG4W649TwXN8OejRhb%2Fuploads%2FKrrXH6GGQZSTzLWhOI80%2Ffinremo.png?alt=media&amp;token=eb7a018e-07e7-441c-bf7a-c13064424fa2" alt=""><figcaption></figcaption></figure>

The existing buckets in your Zata Object Storage will be displayed.

<figure><img src="https://2683631041-files.gitbook.io/~/files/v0/b/gitbook-x-prod.appspot.com/o/spaces%2FPPVG4W649TwXN8OejRhb%2Fuploads%2FeY94ajxEWlQlMbRRTpHO%2FScreenshot%202026-06-29%20105911.png?alt=media&amp;token=a2291275-e03d-4d0d-8de7-19ab97b49557" alt=""><figcaption></figcaption></figure>

#### Step 2: Create a New Bucket

* Click **New Folder**.

<figure><img src="https://2683631041-files.gitbook.io/~/files/v0/b/gitbook-x-prod.appspot.com/o/spaces%2FPPVG4W649TwXN8OejRhb%2Fuploads%2FTeJxoVcL7ytzn5aRFt59%2Fnew-bucket-1.png?alt=media&amp;token=a45f04e1-fa5f-48a1-be8c-b129ff363738" alt=""><figcaption></figcaption></figure>

* Enter a unique bucket name (for example, `testing-bucket-002`).
* Click **OK**.

<figure><img src="https://2683631041-files.gitbook.io/~/files/v0/b/gitbook-x-prod.appspot.com/o/spaces%2FPPVG4W649TwXN8OejRhb%2Fuploads%2F2y0j1Ofwzt8RhV8iP7eX%2Fcreate-bucket-2.png?alt=media&amp;token=e5fc960b-4a54-4f75-b5c2-60bc3b50dfe0" alt=""><figcaption></figcaption></figure>

#### Step 3: Verify Bucket Creation

After the bucket is created successfully, it will appear in the Explorer.

<figure><img src="https://2683631041-files.gitbook.io/~/files/v0/b/gitbook-x-prod.appspot.com/o/spaces%2FPPVG4W649TwXN8OejRhb%2Fuploads%2FlQN581krxp5jNFdlm1pO%2Ftest-bucket-3.png?alt=media&amp;token=bd3f428f-643b-4d3b-85d9-288a431630f7" alt=""><figcaption></figcaption></figure>

#### Step 4: Open the Bucket

Click the newly created bucket to open it.

Since it is a new bucket, it will initially be empty.

<figure><img src="https://2683631041-files.gitbook.io/~/files/v0/b/gitbook-x-prod.appspot.com/o/spaces%2FPPVG4W649TwXN8OejRhb%2Fuploads%2FvSzNkjNrzNSUA0AAGhyZ%2Fimage.png?alt=media&amp;token=8dcace85-2e01-46cf-b2cc-76ff04c5c535" alt=""><figcaption></figcaption></figure>

#### Step 5: Upload Files

* Inside the bucket, click **Upload**.

<figure><img src="https://2683631041-files.gitbook.io/~/files/v0/b/gitbook-x-prod.appspot.com/o/spaces%2FPPVG4W649TwXN8OejRhb%2Fuploads%2FhmeZlVuCeW0nbjPHYQEc%2Fupload-bucket-4.png?alt=media&amp;token=7e8ca4f9-8050-4d07-b7b6-f783088d93ab" alt=""><figcaption></figcaption></figure>

* Select the file(s) you want to upload from your local system.
* Click **Open** to begin the upload.

<figure><img src="https://2683631041-files.gitbook.io/~/files/v0/b/gitbook-x-prod.appspot.com/o/spaces%2FPPVG4W649TwXN8OejRhb%2Fuploads%2FAu0nzeLn7O5ipvFKBzrr%2Fupload-bucket-5.png?alt=media&amp;token=cb9c7dae-940d-4434-aa47-6c84de842b7b" alt=""><figcaption></figcaption></figure>

#### Step 6: Verify the Uploaded File

After the upload completes successfully, the uploaded file will appear inside the bucket.

<figure><img src="https://2683631041-files.gitbook.io/~/files/v0/b/gitbook-x-prod.appspot.com/o/spaces%2FPPVG4W649TwXN8OejRhb%2Fuploads%2F1KLhEStJHMDgsgJ23ikF%2Fcomplete-bucket-6.png?alt=media&amp;token=6fa5efd1-a8d5-4110-9b00-d64864f3d5f1" alt=""><figcaption></figcaption></figure>

***

**8. Verify in Zata Dashboard**

Now go to your **Zata dashboard**

Open: Buckets → testing-bucket-002

You should see the uploaded file.

This confirms: Rclone, Zata Object Storage working

<figure><img src="https://2683631041-files.gitbook.io/~/files/v0/b/gitbook-x-prod.appspot.com/o/spaces%2FPPVG4W649TwXN8OejRhb%2Fuploads%2FJqH8X0oLUpF5Xg9EipNX%2FScreenshot%202026-06-29%20111800.png?alt=media&amp;token=e3ce4e90-01e6-4365-8ed0-74e647198acb" alt=""><figcaption></figcaption></figure>

***

**9. Conclusion**

In this setup, **Zata Object Storage was successfully integrated with Rclone GUI**.

This integration enables:

* Easy file uploads
* Bucket management
* Backup storage

Using Rclone with Zata provides a flexible and efficient way to interact with S3-compatible storage systems.


# How to Transfer Data to Zata.ai Bucket Using Rclone


# For Linux Server

Rclone is an open-source command-line program that helps you manage, sync, and transfer files and directories across different cloud storage services and local systems.

[Embedded Link](https://youtu.be/UojhD_jVZX8)

## **Prerequisites:**

Select any Linux Operating system to perform these processes.

We have chosen the operating system Ubuntu 22.04

Click on the link to Launch [instance](https://docs.neevcloud.com/neevcloud-products/computes/getting-started-launch-vms).

For Zata.ai configuration:

* Click on the Zata [login page](https://auth.zata.ai/realms/zata/protocol/openid-connect/auth?client_id=zatacloud_client\&redirect_uri=https%3A%2F%2Fmy.zata.ai%2F\&state=dd2b5305-f7f5-4922-8639-4b0c62060c2f\&response_mode=fragment\&response_type=code\&scope=openid\&nonce=646d8811-0870-469c-9045-9e13d0fdd1b3\&code_challenge=wRG6I1qb9wdmY4unvHhPYaYq5WWM-801w72AYyLi8xY\&code_challenge_method=S256).
* Zata Bucket - See our [Bucket Creation Guide](https://docs.zata.ai/manage/bucket/create-bucket)
* Zata Access & Secret Key Pair - See our [Access Keys Guid](https://docs.zata.ai/manage/access-keys/creating-a-new-access-key)e
* For more information about the [zata.ai](https://zata.ai/)

After successfully launching the instance, follow these steps:

### Update && Upgrade the system.

```
sudo apt-get update -y
sudo apt-get upgrade -y
```

Transfer Data to Zaat.ai Bucket Using Rclone on Ubuntu.

## Install and configure the rclone. <a href="#install-the-configure-the-rclone" id="install-the-configure-the-rclone"></a>

Install the rclone.

```
sudo apt-get install rclone -y
```

### To configure rclone for Zata.ai.

Run the following command to configure ' **rclone** '

When you run the command above, follow these steps:

Choose 'n' to create a new remote

Name: Zata (Give the name of the remote)

<figure><img src="https://2683631041-files.gitbook.io/~/files/v0/b/gitbook-x-prod.appspot.com/o/spaces%2FPPVG4W649TwXN8OejRhb%2Fuploads%2FtCnA1mldbor3wh8RpSLd%2Fimage.png?alt=media&amp;token=0493ebbb-0798-438d-b938-b63f44d9ebe7" alt=""><figcaption></figcaption></figure>

Type of storage to configure: '4'; these values vary depending on the rclone version.

<figure><img src="https://2683631041-files.gitbook.io/~/files/v0/b/gitbook-x-prod.appspot.com/o/spaces%2FPPVG4W649TwXN8OejRhb%2Fuploads%2Fn3cTbMovYGXNhGclWguN%2Fimage.png?alt=media&amp;token=107e5281-eec0-44b2-86da-11c5ae993cf3" alt=""><figcaption></figcaption></figure>

Choose your S3 Provider to choose '13' for Zata object storage(if there is no zata then you can select other), these numbers are very dependent on the rclone versions.

<figure><img src="https://2683631041-files.gitbook.io/~/files/v0/b/gitbook-x-prod.appspot.com/o/spaces%2FPPVG4W649TwXN8OejRhb%2Fuploads%2F7qtJUrUBbUlj68UQ6yMJ%2Fimage.png?alt=media&amp;token=bcfcc4b6-f540-476f-92e5-95b7926c6b80" alt=""><figcaption></figcaption></figure>

Get credentials from runtime (environment variables or metadata if no env vars). This only applies if access\_key\_id and secret\_access\_key are blank. Enter a boolean value (true or false). Press Enter for the default ("false"). Choose a number from below, or type in your value

**env\_auth: true**

<figure><img src="https://2683631041-files.gitbook.io/~/files/v0/b/gitbook-x-prod.appspot.com/o/spaces%2FPPVG4W649TwXN8OejRhb%2Fuploads%2FtotMxrt94hR6erMDzVwA%2Fimage.png?alt=media&amp;token=aa4239ff-077d-447e-a59a-74a33499d357" alt=""><figcaption></figcaption></figure>

**Access & Secret key** - We have created the above in the zata.ai section.

<figure><img src="https://2683631041-files.gitbook.io/~/files/v0/b/gitbook-x-prod.appspot.com/o/spaces%2FPPVG4W649TwXN8OejRhb%2Fuploads%2FsHBFBE0AbTZE1z7OGbro%2Fimage.png?alt=media&amp;token=2d1864fd-ecbe-43bd-b21d-40d59f8adc3f" alt=""><figcaption></figcaption></figure>

Region to connect to. Leave blank if you are using an S3 clone and you don't have an area. Enter a string value. Press Enter for the default. Choose a number from below, or type in your value

<figure><img src="https://2683631041-files.gitbook.io/~/files/v0/b/gitbook-x-prod.appspot.com/o/spaces%2FPPVG4W649TwXN8OejRhb%2Fuploads%2FD9isRv1p2QINSJa8DQon%2Fimage.png?alt=media&amp;token=a0ed3a59-b517-40ad-930e-877ee8dae2b2" alt=""><figcaption></figcaption></figure>

Endpoint for S3 API. Required when using an S3 clone. Enter a string value. Press Enter for the default. Choose a number from below, or type in your value

<figure><img src="https://2683631041-files.gitbook.io/~/files/v0/b/gitbook-x-prod.appspot.com/o/spaces%2FPPVG4W649TwXN8OejRhb%2Fuploads%2FVCh2tH4dMAfbPzIbQLgc%2Fimage.png?alt=media&amp;token=9c83d13a-347f-43ee-884f-97b045b4bf7c" alt=""><figcaption></figcaption></figure>

Note that this ACL is applied when server-side copying objects as S3

<figure><img src="https://2683631041-files.gitbook.io/~/files/v0/b/gitbook-x-prod.appspot.com/o/spaces%2FPPVG4W649TwXN8OejRhb%2Fuploads%2F2W6DwvApXBXz7kIH6WmK%2Fimage.png?alt=media&amp;token=9ee7555f-e2a1-4355-b298-56c42a49c50c" alt=""><figcaption></figcaption></figure>

Note that this ACL is applied only when creating buckets.

After completing these processes, simply press Enter at each step

<figure><img src="https://2683631041-files.gitbook.io/~/files/v0/b/gitbook-x-prod.appspot.com/o/spaces%2FPPVG4W649TwXN8OejRhb%2Fuploads%2FrGspmI9SIvVl0puDIB3f%2Fimage.png?alt=media&amp;token=7aed8476-797a-4071-9167-ec5ad49e087a" alt=""><figcaption></figcaption></figure>

After this, all processes use the default configuration, so press Enter to continue.

This is the remote configuration completed after following these steps:

<figure><img src="https://2683631041-files.gitbook.io/~/files/v0/b/gitbook-x-prod.appspot.com/o/spaces%2FPPVG4W649TwXN8OejRhb%2Fuploads%2F4m4HOKRTz5ZB3zpaWYdB%2Fimage.png?alt=media&amp;token=2db60980-d231-401f-bfb2-f1190c841a78" alt=""><figcaption></figcaption></figure>

Now complete the configuration to run these commands.

### To copy and move your data <a href="#to-copy-and-move-your-data" id="to-copy-and-move-your-data"></a>

You can run it accordingly.

```
 rclone copy   <file-name> zata:(bucket-name) --progress
```

```
 rclone move  <file-name> zata:(bucket-name) --progress
```

<figure><img src="https://2683631041-files.gitbook.io/~/files/v0/b/gitbook-x-prod.appspot.com/o/spaces%2FPPVG4W649TwXN8OejRhb%2Fuploads%2FavreYnabEYgUoHxSRBdp%2Fimage.png?alt=media&amp;token=27474c74-cd8f-494c-8452-48c421c1c5b3" alt=""><figcaption></figcaption></figure>

Zaat. Now, navigate to the zata.ai bucket section, open the bucket, and check if the data has been transferred.

<figure><img src="https://2683631041-files.gitbook.io/~/files/v0/b/gitbook-x-prod.appspot.com/o/spaces%2FPPVG4W649TwXN8OejRhb%2Fuploads%2FZObJUwtZk46FkgsGFgpt%2Fimage.png?alt=media&amp;token=e9c96e09-336f-40a8-b61b-bfd61ef1e2be" alt=""><figcaption></figcaption></figure>

Download or restore your server files from Zata to your local system.

```
rclone copy zata:(bucket_name) /path/to/local/directory
```

* `zata` Your rclone remote
* `your-bucket-name`The name of the bucket in Zata.ai.
* `/path/to/local/directory`Where do you want to restore the files

<figure><img src="https://2683631041-files.gitbook.io/~/files/v0/b/gitbook-x-prod.appspot.com/o/spaces%2FPPVG4W649TwXN8OejRhb%2Fuploads%2FxU07U5qCKWzCsW3FLVXu%2Fimage.png?alt=media&amp;token=67ba19e6-e475-45c5-a62c-7767ca6a1fcc" alt=""><figcaption></figcaption></figure>


# For Windows Server

[Embedded Link](https://youtu.be/SJLgph5giME)

### **Prerequisites:** <a href="#prerequisites" id="prerequisites"></a>

Select any Window Operating system to perform these processes.

We have chosen the operating system Windows Server 2022

Click on the link to launch the [instance](https://docs.neevcloud.com/neevcloud-products/computes/getting-started-launch-vms).

Download rclone from the following [link](https://rclone.org/downloads/)

<figure><img src="https://2683631041-files.gitbook.io/~/files/v0/b/gitbook-x-prod.appspot.com/o/spaces%2FPPVG4W649TwXN8OejRhb%2Fuploads%2F3kZPXLU50HoMX6XZE5Eg%2Fimage.png?alt=media&amp;token=242b9f8c-f30f-4b3b-ad62-dc7241926a2e" alt=""><figcaption></figcaption></figure>

For Zata.ai configuration:

* Click on the Zata [login page](https://auth.zata.ai/realms/zata/protocol/openid-connect/auth?client_id=zatacloud_client\&redirect_uri=https%3A%2F%2Fmy.zata.ai%2F\&state=dd2b5305-f7f5-4922-8639-4b0c62060c2f\&response_mode=fragment\&response_type=code\&scope=openid\&nonce=646d8811-0870-469c-9045-9e13d0fdd1b3\&code_challenge=wRG6I1qb9wdmY4unvHhPYaYq5WWM-801w72AYyLi8xY\&code_challenge_method=S256).
* Zata Bucket - See our [Bucket Creation Guide](https://docs.zata.ai/manage/bucket/create-bucket)
* Zata Access & Secret Key Pair - See our [Access Keys Guid](https://docs.zata.ai/manage/access-keys/creating-a-new-access-key)e
* For more information about the [zata.ai](https://zata.ai/)

After successfully launching the instance, follow these steps:

After successfully downloading rclone, extract the file.

<figure><img src="https://2683631041-files.gitbook.io/~/files/v0/b/gitbook-x-prod.appspot.com/o/spaces%2FPPVG4W649TwXN8OejRhb%2Fuploads%2FUekYZMu6RGvzpVV0brkO%2Fimage.png?alt=media&amp;token=b12f5635-4864-4e5d-a6a4-3433828c5643" alt=""><figcaption></figcaption></figure>

Now navigate to the `C:\Let's` directory and create an `rclone` folder.

<figure><img src="https://2683631041-files.gitbook.io/~/files/v0/b/gitbook-x-prod.appspot.com/o/spaces%2FPPVG4W649TwXN8OejRhb%2Fuploads%2FYcNLVS1mnkUiX2Dn1Ss4%2Fimage.png?alt=media&amp;token=15753b60-183a-4a60-952f-95954b1216b7" alt=""><figcaption></figcaption></figure>

Now, move the downloaded content to the rclone directory.

<figure><img src="https://2683631041-files.gitbook.io/~/files/v0/b/gitbook-x-prod.appspot.com/o/spaces%2FPPVG4W649TwXN8OejRhb%2Fuploads%2F8UhH2C7SKiTJMMrR95Dn%2Fimage.png?alt=media&amp;token=519bc660-0a4b-48d0-9152-70ebfe06c444" alt=""><figcaption></figcaption></figure>

Let's see if the content has been moved to the rclone directory.

<figure><img src="https://2683631041-files.gitbook.io/~/files/v0/b/gitbook-x-prod.appspot.com/o/spaces%2FPPVG4W649TwXN8OejRhb%2Fuploads%2FTNhP9kmBqRa1NApLDLEn%2Fimage.png?alt=media&amp;token=d7041311-2299-4c1c-b507-0e0eb126bcc0" alt=""><figcaption></figcaption></figure>

**Add Rclone to the System PATH**

Open Environment Variables Settings

* Right-click This PC or My Computer → Click Properties
* Click Advanced system settings
* In the System Properties window, click Environment Variables

Edit the PATH Variable

* Under System variables, scroll and find Path, then click Edit
* Click New and paste the folder path (not the `.exe`, just the folder).

```
C:\rclone
```

Click OK to close all windows

Restart Command Prompt

Close and reopen the Command Prompt, then test:

Open your command prompt, navigate to the rclone directory, and run the command.

<figure><img src="https://2683631041-files.gitbook.io/~/files/v0/b/gitbook-x-prod.appspot.com/o/spaces%2FPPVG4W649TwXN8OejRhb%2Fuploads%2FgeYhNNt62IbZAAMnkpzy%2Fimage.png?alt=media&amp;token=53403f55-0386-4651-8f7c-1edbee0c8216" alt=""><figcaption></figcaption></figure>

```
rclone version 
```

Now, configure the rclone for Zata.ai

Run the following command to configure ' **rclone** '

When you run the command above, follow these steps:

Choose 'n' to create a new remote

Name: Zata (Give the name of the remote)

<figure><img src="https://2683631041-files.gitbook.io/~/files/v0/b/gitbook-x-prod.appspot.com/o/spaces%2FPPVG4W649TwXN8OejRhb%2Fuploads%2F1pucz27ag2KFTFagIhzo%2Fimage.png?alt=media&amp;token=636a0736-ca2a-48eb-a996-34639066fd44" alt=""><figcaption></figcaption></figure>

Type of storage to configure: '4'; these values vary depending on the rclone version.

<figure><img src="https://2683631041-files.gitbook.io/~/files/v0/b/gitbook-x-prod.appspot.com/o/spaces%2FPPVG4W649TwXN8OejRhb%2Fuploads%2FbSNIxYpXKm8J2O6LBMGo%2Fimage.png?alt=media&amp;token=a4a4a6e3-b76b-40de-859a-a567cb772f65" alt=""><figcaption></figcaption></figure>

Choose your S3 compatible version to choose '34' for object storage, these numbers are very dependent on the rclone versions.

<figure><img src="https://2683631041-files.gitbook.io/~/files/v0/b/gitbook-x-prod.appspot.com/o/spaces%2FPPVG4W649TwXN8OejRhb%2Fuploads%2FxX0lN3fOdjn0IZ6gxObG%2Fimage.png?alt=media&amp;token=29738cad-03a7-4d75-be84-cffa7b5785b5" alt=""><figcaption></figcaption></figure>

Get credentials from runtime (environment variables or metadata if no env vars). This only applies if access\_key\_id and secret\_access\_key are blank. Enter a boolean value (true or false). Press Enter for the default ("false"). Choose a number from below, or type in your value

**env\_auth: true**

<figure><img src="https://2683631041-files.gitbook.io/~/files/v0/b/gitbook-x-prod.appspot.com/o/spaces%2FPPVG4W649TwXN8OejRhb%2Fuploads%2FDdgQ5tjUdNpdx3Lwh2fS%2Fimage.png?alt=media&amp;token=554c68d0-ea9d-4e19-99f2-ada97087b2f8" alt=""><figcaption><p><br></p></figcaption></figure>

**Access & Secret key** - We have created the above in the zata.ai section.

<figure><img src="https://2683631041-files.gitbook.io/~/files/v0/b/gitbook-x-prod.appspot.com/o/spaces%2FPPVG4W649TwXN8OejRhb%2Fuploads%2FWSqYupMKxGBOnG1x5Uo6%2Fimage.png?alt=media&amp;token=5aed074f-d5db-476a-bbc1-f3b79fa0a41f" alt=""><figcaption></figcaption></figure>

Region to connect to. Leave blank if you are using an S3 clone and you don't have an area. Enter a string value. Press Enter for the default. Choose a number from below, or type in your value

<figure><img src="https://2683631041-files.gitbook.io/~/files/v0/b/gitbook-x-prod.appspot.com/o/spaces%2FPPVG4W649TwXN8OejRhb%2Fuploads%2FXxAxRTA5IKRCMO0qEtOU%2Fimage.png?alt=media&amp;token=f6f6cbfe-1be3-4c17-894d-da5256b17bb4" alt=""><figcaption></figcaption></figure>

Endpoint for S3 API. Required when using an S3 clone. Enter a string value. Press Enter for the default. Choose a number from below, or type in your value

<figure><img src="https://2683631041-files.gitbook.io/~/files/v0/b/gitbook-x-prod.appspot.com/o/spaces%2FPPVG4W649TwXN8OejRhb%2Fuploads%2FDVUHKt59IARlhu5NbuCj%2Fimage.png?alt=media&amp;token=ed076cf7-44f2-4800-8aca-ae221361e201" alt=""><figcaption></figcaption></figure>

Note that this ACL is applied when server-side copying objects in S3

<figure><img src="https://2683631041-files.gitbook.io/~/files/v0/b/gitbook-x-prod.appspot.com/o/spaces%2FPPVG4W649TwXN8OejRhb%2Fuploads%2FyuXctzAkbiXP6cSJzaNx%2Fimage.png?alt=media&amp;token=f3af7ffe-724b-4a48-b4c6-460a169a8e40" alt=""><figcaption></figcaption></figure>

Note that this ACL is applied only when creating buckets.

After completing these processes, **simply press Enter at each step...**

<figure><img src="https://2683631041-files.gitbook.io/~/files/v0/b/gitbook-x-prod.appspot.com/o/spaces%2FPPVG4W649TwXN8OejRhb%2Fuploads%2FEqhTEPBsCyv9K1lJZVaD%2Fimage.png?alt=media&amp;token=d4a58bd1-f025-4064-8124-a0efc82f6c07" alt=""><figcaption></figcaption></figure>

After this, all processes use the default configuration, so press Enter to continue.

This is the remote configuration completed after following these steps:

<figure><img src="https://2683631041-files.gitbook.io/~/files/v0/b/gitbook-x-prod.appspot.com/o/spaces%2FPPVG4W649TwXN8OejRhb%2Fuploads%2F2uVdl5Ft2YnybJW3tTGO%2Fimage.png?alt=media&amp;token=dd386940-c717-43c9-a364-f3e8b3f5f189" alt=""><figcaption></figcaption></figure>

Now, complete the configuration to run these commands.

#### To copy and move your data <a href="#to-copy-and-move-your-data" id="to-copy-and-move-your-data"></a>

You can run it accordingly.

```
 rclone copy   <file-name> zata:(bucket-name) --progress
```

```
 rclone move  <file-name> zata:(bucket-name) --progress
```

<figure><img src="https://2683631041-files.gitbook.io/~/files/v0/b/gitbook-x-prod.appspot.com/o/spaces%2FPPVG4W649TwXN8OejRhb%2Fuploads%2FDR9DtVNTF3ooDsBpIZnw%2Fimage.png?alt=media&amp;token=8b6c2bc8-b7ab-4098-bd03-997f01ab1196" alt=""><figcaption></figcaption></figure>

Now, navigate to the Zata.ai bucket section and check the bucket.

<figure><img src="https://2683631041-files.gitbook.io/~/files/v0/b/gitbook-x-prod.appspot.com/o/spaces%2FPPVG4W649TwXN8OejRhb%2Fuploads%2F1uyYuXlRyKJFizLcJsjd%2Fimage.png?alt=media&amp;token=5a40bc8c-999e-467c-b411-4594e359d6b1" alt=""><figcaption></figcaption></figure>

Download or restore your server files from Zata to your local system.

* `zata` Your rclone remote
* `your-bucket-name`The name of the bucket in Zata.ai.
* `/path/to/local/directory`Where do you want to restore the files?

<figure><img src="https://2683631041-files.gitbook.io/~/files/v0/b/gitbook-x-prod.appspot.com/o/spaces%2FPPVG4W649TwXN8OejRhb%2Fuploads%2FXAHH9LD9uzHuyk81k7SB%2Fimage.png?alt=media&amp;token=579cdb8b-18fc-4059-b0d1-f52c1537c1e1" alt=""><figcaption></figcaption></figure>

Now, check the restore folder on your local system.

<figure><img src="https://2683631041-files.gitbook.io/~/files/v0/b/gitbook-x-prod.appspot.com/o/spaces%2FPPVG4W649TwXN8OejRhb%2Fuploads%2Faj1MrMcpEWmoaRkuXCya%2Fimage.png?alt=media&amp;token=71e17d6a-b88e-4e36-b0e0-35d73da122b0" alt=""><figcaption></figcaption></figure>


# Connect S3 storage to CPanel

## Connect s3 storage to CPanel

1. Click to install cPanel on the VM.
2. Configure cPanel after installation.

For access and secret access key Navigate to the Zata.ai panel and click on the Access section

Create the [Access and secret keys](https://docs.zata.ai/manage/access-keys/creating-a-new-access-key).

#### Creating a Bucket in Zata.ai <a href="#creating-a-bucket-in-neevcloud" id="creating-a-bucket-in-neevcloud"></a>

Navigate to the dashboard to click the bucket and create the bucket.

<figure><img src="https://2683631041-files.gitbook.io/~/files/v0/b/gitbook-x-prod.appspot.com/o/spaces%2FPPVG4W649TwXN8OejRhb%2Fuploads%2FJoRwGhJGP7KsJrX4RDZx%2Fimage.png?alt=media&amp;token=5a0baca5-8a12-4a0f-bee0-f3bec5de695b" alt=""><figcaption></figcaption></figure>

Navigate to WHM portal > Backup configuration > Additional Destinations

<figure><img src="https://2683631041-files.gitbook.io/~/files/v0/b/gitbook-x-prod.appspot.com/o/spaces%2FPPVG4W649TwXN8OejRhb%2Fuploads%2F1raFj0nQrxzMqwDFM7WU%2FScreenshot%202024-08-03%20at%203.14.36%20PM.png?alt=media&amp;token=f0d791b1-38f8-45d4-89be-62d1e88bb026" alt=""><figcaption></figcaption></figure>

<figure><img src="https://2683631041-files.gitbook.io/~/files/v0/b/gitbook-x-prod.appspot.com/o/spaces%2FPPVG4W649TwXN8OejRhb%2Fuploads%2FmDnawkSGbpZkkWi5HZwG%2Fimage.png?alt=media&amp;token=fd6b57aa-dd9d-4d2f-b67f-7c6043cbd4fc" alt=""><figcaption></figcaption></figure>

<figure><img src="https://2683631041-files.gitbook.io/~/files/v0/b/gitbook-x-prod.appspot.com/o/spaces%2FPPVG4W649TwXN8OejRhb%2Fuploads%2F9eebRKysKGU1oGMyqrSU%2Fimage.png?alt=media&amp;token=c9bf3431-e887-4fe9-956b-6d21c2eb6521" alt=""><figcaption></figcaption></figure>

After to set the key, Click Save Destination

<figure><img src="https://2683631041-files.gitbook.io/~/files/v0/b/gitbook-x-prod.appspot.com/o/spaces%2FPPVG4W649TwXN8OejRhb%2Fuploads%2FahDnWyJ5K6n13Ofb42ck%2Fimage.png?alt=media&amp;token=ff52d807-430c-477f-8bf6-0f20fc855102" alt=""><figcaption></figcaption></figure>


# Backup your WordPress Site to Zata.ai S3 storage with using Updraft plugin.

After installing and configuring your **WordPress**.

To connect install and activate the **Updraft backup** follow these steps.

Navigate to the WordPress dashboard, click on "**Plugins**," and then click on "**Add New**."

<figure><img src="https://2683631041-files.gitbook.io/~/files/v0/b/gitbook-x-prod.appspot.com/o/spaces%2FPPVG4W649TwXN8OejRhb%2Fuploads%2F4fTxhqA8266ZOjf1LKsx%2FScreenshot%202024-08-03%20at%203.23.49%20PM.png?alt=media&amp;token=4cfc3e11-7eca-4488-8831-906653fc5b3d" alt=""><figcaption></figcaption></figure>

Search for Updraft and click "**Install Now**".

<figure><img src="https://2683631041-files.gitbook.io/~/files/v0/b/gitbook-x-prod.appspot.com/o/spaces%2FPPVG4W649TwXN8OejRhb%2Fuploads%2FP4TW2yuYwS8Q5rmQl4pT%2FScreenshot%202024-08-03%20at%203.24.30%20PM.png?alt=media&amp;token=7bda5db8-8a94-4fcb-b850-409cad16e82f" alt=""><figcaption></figcaption></figure>

After installing to activate the **Updraft .**

<figure><img src="https://2683631041-files.gitbook.io/~/files/v0/b/gitbook-x-prod.appspot.com/o/spaces%2FPPVG4W649TwXN8OejRhb%2Fuploads%2FFFCKMvtwbKJ4OqTDh3SB%2FScreenshot%202024-08-03%20at%203.24.53%20PM.png?alt=media&amp;token=1893cb56-0c4d-4485-bf7f-9e0cc5e8c79f" alt=""><figcaption></figcaption></figure>

Click the button and open the settings.

<figure><img src="https://2683631041-files.gitbook.io/~/files/v0/b/gitbook-x-prod.appspot.com/o/spaces%2FPPVG4W649TwXN8OejRhb%2Fuploads%2FYaRv8NjPNSKwvOKYO1Fz%2FScreenshot%202024-08-03%20at%203.25.17%20PM.png?alt=media&amp;token=0dabf459-3cf8-4a1e-a933-da80dc249046" alt=""><figcaption></figcaption></figure>

Next, click on the settings and select the **S3 compatible option.**

<figure><img src="https://2683631041-files.gitbook.io/~/files/v0/b/gitbook-x-prod.appspot.com/o/spaces%2FPPVG4W649TwXN8OejRhb%2Fuploads%2FFxfuuZvr0XKcoV9HGaar%2FScreenshot%202024-08-03%20at%203.25.38%20PM.png?alt=media&amp;token=2a0b7fb4-8bce-4c4e-928a-c173c6f32a98" alt=""><figcaption></figcaption></figure>

Now fill in the **S3/EC2 credentials** for accessing the storage bucket

For **access and secret keys** follow this [**link**](/manage/access-keys)**.**

S3 Location: Give the name of the bucket to create a bucket to follow below these [**steps**](/manage/bucket/create-bucket)**.**

1. Navigate to the **Object Storage section.**
2. Select "**Create Bucket**" and enter your desired bucket name.
3. Confirm to create the bucket.

S3 End point: - **idr01.zata.ai** (Central India) or **bom01.zata.ai** (Southern India)

Bucket access style: Default - **path style**

Signature version: default- **SigV4**

After fill all the details click on the **save changes.**

<figure><img src="https://2683631041-files.gitbook.io/~/files/v0/b/gitbook-x-prod.appspot.com/o/spaces%2FPPVG4W649TwXN8OejRhb%2Fuploads%2FiAUTmJ9G38ygKISOMOcb%2Fimage.png?alt=media&amp;token=f4df4bbe-4748-4e11-8ad3-78f2a793dea5" alt=""><figcaption></figcaption></figure>

Now, go back to **Updraft Backup/Restore** and click on "**Backup Now"**.

<figure><img src="https://docs.neevcloud.com/~gitbook/image?url=https%3A%2F%2F1876135298-files.gitbook.io%2F%7E%2Ffiles%2Fv0%2Fb%2Fgitbook-x-prod.appspot.com%2Fo%2Fspaces%252FEC5NwtFshv6EATOemuUn%252Fuploads%252FG5EdY43k117YGCRbtsaY%252Fimage.png%3Falt%3Dmedia%26token%3D0810160b-5f21-4959-9e97-398c3ecaea89&#x26;width=768&#x26;dpr=4&#x26;quality=100&#x26;sign=93f59b0c&#x26;sv=1" alt=""><figcaption></figcaption></figure>

The backup has been successfully created.

<figure><img src="https://2683631041-files.gitbook.io/~/files/v0/b/gitbook-x-prod.appspot.com/o/spaces%2FPPVG4W649TwXN8OejRhb%2Fuploads%2Fp9G0JVIoKmQEq0qDFHkn%2FScreenshot%202024-08-03%20at%203.27.05%20PM.png?alt=media&amp;token=43e14bca-9c81-4b30-a38d-488d5bd5e53b" alt=""><figcaption></figcaption></figure>


# Connect S3 Drive to Zata.ai

S3 Drive allows users to transform compatible storage backends, such as S3 and WebDAV, into personal encrypted file storage solutions. It offers drive mounting, syncing, backup, file versioning, and search capabilities.

Install and configuration

To Install the S3 drive follow these links

Now we are performing on the Windows operating system

After installation of the S3 drive to mount on the zata.ai

Create an account using mail and password

<figure><img src="https://2683631041-files.gitbook.io/~/files/v0/b/gitbook-x-prod.appspot.com/o/spaces%2FPPVG4W649TwXN8OejRhb%2Fuploads%2FHoRsER4dEycyhWPvQJcR%2Fimage.png?alt=media&amp;token=44e9c9aa-ba4f-4651-b4bc-8487e22e5a95" alt=""><figcaption></figcaption></figure>

After login the S3 drive click on the manage account

<figure><img src="https://2683631041-files.gitbook.io/~/files/v0/b/gitbook-x-prod.appspot.com/o/spaces%2FPPVG4W649TwXN8OejRhb%2Fuploads%2FyqdF98SQUx6YoIfn8ZIu%2Fimage.png?alt=media&amp;token=7133c608-fd8a-4dfc-8c46-7edb7df1a789" alt=""><figcaption></figcaption></figure>

In the account section, we have two options the first is s3 (remote basic) and the second is Rclone, where we define the cloud provider details

<figure><img src="https://2683631041-files.gitbook.io/~/files/v0/b/gitbook-x-prod.appspot.com/o/spaces%2FPPVG4W649TwXN8OejRhb%2Fuploads%2F6dEn5TCZNmzibYBVNTPC%2Fimage.png?alt=media&amp;token=d3554b09-1d37-4a75-912b-6cf3d6700250" alt=""><figcaption></figcaption></figure>

Now configure the Rclone and set the cloud storage details

<figure><img src="https://2683631041-files.gitbook.io/~/files/v0/b/gitbook-x-prod.appspot.com/o/spaces%2FPPVG4W649TwXN8OejRhb%2Fuploads%2FxspObLesKjWLbzwOW1J7%2Fimage.png?alt=media&amp;token=2d69e1a8-e503-451f-9cee-aa490382277e" alt=""><figcaption></figcaption></figure>

Rclone config and click on the add/

```
"s3": {
    "access_key_id": "<accessKeyId>",
    "secret_access_key": "<secret>",
    "endpoint": "https://idr01.zata.ai",
    "provider": "Other",
    "region": "CentralIndia",
    "type": "s3"
},
```

> **Note:** For Mumbai region, use `"endpoint": "https://bom01.zata.ai"` and `"region": "SouthIndia"`.

Now that the account has been added, click on the account and see the cloud buckets.

<figure><img src="https://2683631041-files.gitbook.io/~/files/v0/b/gitbook-x-prod.appspot.com/o/spaces%2FPPVG4W649TwXN8OejRhb%2Fuploads%2FhwyajkSmhYsRHJ2SUrow%2Fimage.png?alt=media&amp;token=3ff467be-bd64-4443-af25-31129e2da584" alt=""><figcaption></figcaption></figure>

<figure><img src="https://2683631041-files.gitbook.io/~/files/v0/b/gitbook-x-prod.appspot.com/o/spaces%2FPPVG4W649TwXN8OejRhb%2Fuploads%2F003coQS4QnBNU5lmI20k%2Fimage.png?alt=media&amp;token=35fea429-c240-4583-b6c7-33dc9a290eaa" alt=""><figcaption></figcaption></figure>

Now click on the sync to connect the zata.ai

<figure><img src="https://2683631041-files.gitbook.io/~/files/v0/b/gitbook-x-prod.appspot.com/o/spaces%2FPPVG4W649TwXN8OejRhb%2Fuploads%2FSdnnYXsaVm5vHaBIYzdk%2Fimage.png?alt=media&amp;token=5421df2f-188f-4517-9ece-863e2eca3ea8" alt=""><figcaption></figcaption></figure>

Now click on the ( + ) to add the account

<figure><img src="https://2683631041-files.gitbook.io/~/files/v0/b/gitbook-x-prod.appspot.com/o/spaces%2FPPVG4W649TwXN8OejRhb%2Fuploads%2FCDUbtYG7WjqXQDRXPnUS%2Fimage-1.png?alt=media&amp;token=5094da31-06e2-4ab2-8ffc-874ac0649e78" alt=""><figcaption></figcaption></figure>

Now configure the sync remote host to the destination host

Now click on the source remote

<figure><img src="https://2683631041-files.gitbook.io/~/files/v0/b/gitbook-x-prod.appspot.com/o/spaces%2FPPVG4W649TwXN8OejRhb%2Fuploads%2FUwQSMouInanNb5K8RWFi%2Fimage.png?alt=media&amp;token=3cd9331c-9ca9-4838-b9d7-dbce77b34455" alt=""><figcaption></figcaption></figure>

Now select the source path and local folders

<figure><img src="https://2683631041-files.gitbook.io/~/files/v0/b/gitbook-x-prod.appspot.com/o/spaces%2FPPVG4W649TwXN8OejRhb%2Fuploads%2F110kY0BOoCIW5HE4KUUQ%2Fimage.png?alt=media&amp;token=29d13350-8e97-4651-954c-e45704fbc75d" alt=""><figcaption></figcaption></figure>

After selecting the remote and local you will get the source path

<figure><img src="https://2683631041-files.gitbook.io/~/files/v0/b/gitbook-x-prod.appspot.com/o/spaces%2FPPVG4W649TwXN8OejRhb%2Fuploads%2FdyP1rwZAo9QNvGA7ZBNn%2Fimage.png?alt=media&amp;token=f06ba657-7de9-46db-9d9a-d6c38b82f436" alt=""><figcaption></figcaption></figure>

Now, the destination configuration path for selecting the 'TO'

<figure><img src="https://2683631041-files.gitbook.io/~/files/v0/b/gitbook-x-prod.appspot.com/o/spaces%2FPPVG4W649TwXN8OejRhb%2Fuploads%2FW8FtC5gZHdVlXuIry6vj%2Fimage.png?alt=media&amp;token=d0fa1f6e-83a1-42f6-a848-595a08ce0b2e" alt=""><figcaption></figcaption></figure>

Choose S3 and select the bucket.

<figure><img src="https://2683631041-files.gitbook.io/~/files/v0/b/gitbook-x-prod.appspot.com/o/spaces%2FPPVG4W649TwXN8OejRhb%2Fuploads%2Fiir3r4ydyNOfKJBCrovR%2Fimage.png?alt=media&amp;token=1b3fa93c-8821-4a70-affc-9a04bf2d454b" alt=""><figcaption></figcaption></figure>

After selecting the destination path, you will get the destination path with the s3 bucket name

<figure><img src="https://2683631041-files.gitbook.io/~/files/v0/b/gitbook-x-prod.appspot.com/o/spaces%2FPPVG4W649TwXN8OejRhb%2Fuploads%2F98qbyk86ksXRf3hiZOaq%2Fimage.png?alt=media&amp;token=226e50b8-727c-4d48-9f73-6f11175e15fd" alt=""><figcaption></figcaption></figure>

In this section, you have to configure the mode and sync timing and click on the save

<figure><img src="https://2683631041-files.gitbook.io/~/files/v0/b/gitbook-x-prod.appspot.com/o/spaces%2FPPVG4W649TwXN8OejRhb%2Fuploads%2FWylqi9i4wXaVQkTifAiG%2Fimage.png?alt=media&amp;token=91a9a6d3-3489-4f08-b361-edf5b4b2f57c" alt=""><figcaption></figcaption></figure>

Now completed the configuration to check the sync process

<figure><img src="https://2683631041-files.gitbook.io/~/files/v0/b/gitbook-x-prod.appspot.com/o/spaces%2FPPVG4W649TwXN8OejRhb%2Fuploads%2Fx3FYJywEAcbfEX4agW1K%2Fimage.png?alt=media&amp;token=d4181bb2-4d17-4b34-902d-cea403d38d93" alt=""><figcaption></figcaption></figure>

Let's see all the data copied into the s3 storage bucket

Now bucket the local folder

<figure><img src="https://2683631041-files.gitbook.io/~/files/v0/b/gitbook-x-prod.appspot.com/o/spaces%2FPPVG4W649TwXN8OejRhb%2Fuploads%2FPU6sGFCNhSyRwoKgcSKc%2Fimage.png?alt=media&amp;token=1e6b318e-80c5-4cd1-8768-3605ea0af788" alt=""><figcaption></figcaption></figure>

Now check the destination host

<figure><img src="https://2683631041-files.gitbook.io/~/files/v0/b/gitbook-x-prod.appspot.com/o/spaces%2FPPVG4W649TwXN8OejRhb%2Fuploads%2FCBpD04scdPsME280q3Al%2Fimage.png?alt=media&amp;token=e9fb17ea-7d25-4725-9b86-8f470de85694" alt=""><figcaption></figcaption></figure>


# Mount Bucket to Local system using the TntDrive

TntDrive is a software tool that allows you to mount S3 Buckets as a network or removable drive on Windows. This means you can access your S3 files as if they were stored on your local computer. It's designed to simplify working with S3 buckets, making managing and accessing your cloud storage easier.

## **Prerequisite** <a href="#prerequisite" id="prerequisite"></a>

Zata.ai Cloud storgae account

* Zata.ai Bucket - See our [Bucket Creation Guide](https://docs.zata.ai/manage/bucket/create-bucket)
* Access & Secret Kye Pair - [See our Access Keys Guide](https://docs.zata.ai/manage/access-keys/creating-a-new-access-key)

Setup the TntDrive on the Windows server

Download the TntDrive following the [link.](https://tntdrive.com/download/tntdrive-6-0-9.exe)

Now follow the Download the instructions

Navigate to the download folder and Install the TntDrive

<figure><img src="https://2683631041-files.gitbook.io/~/files/v0/b/gitbook-x-prod.appspot.com/o/spaces%2FPPVG4W649TwXN8OejRhb%2Fuploads%2FxQRqTUyBrO5sK2YrjTfA%2Fimage.png?alt=media&amp;token=3bfe0673-81a7-4838-bf59-b17fb9294aa2" alt=""><figcaption></figcaption></figure>

Click for Accept the agreement to click on the next

<figure><img src="https://2683631041-files.gitbook.io/~/files/v0/b/gitbook-x-prod.appspot.com/o/spaces%2FPPVG4W649TwXN8OejRhb%2Fuploads%2Frl5X1nEoRTN60ZspOHsj%2Fimage.png?alt=media&amp;token=87c8348c-8c73-4c9b-bece-519fb31e8710" alt=""><figcaption></figcaption></figure>

Select the destination location and click on the next

<figure><img src="https://2683631041-files.gitbook.io/~/files/v0/b/gitbook-x-prod.appspot.com/o/spaces%2FPPVG4W649TwXN8OejRhb%2Fuploads%2FQlEmvsx2gCg8sAywxVri%2Fimage-1.png?alt=media&amp;token=7bbe171b-682f-4d11-a2ad-9d9320799634" alt=""><figcaption></figcaption></figure>

Select the additional task you would like to perform while installing Tntdrive and click on the next

<figure><img src="https://2683631041-files.gitbook.io/~/files/v0/b/gitbook-x-prod.appspot.com/o/spaces%2FPPVG4W649TwXN8OejRhb%2Fuploads%2Fdu7S6fKJnbgyTewaTRcO%2Fimage.png?alt=media&amp;token=33d05969-0068-41ca-8381-cf255538a8f2" alt=""><figcaption></figcaption></figure>

To complete the installation to set TntDrive

Open the TntDrive and set the configuration

Click on the Account section to add a new account

<figure><img src="https://2683631041-files.gitbook.io/~/files/v0/b/gitbook-x-prod.appspot.com/o/spaces%2FPPVG4W649TwXN8OejRhb%2Fuploads%2F1wucfkqfKrJLpat3GpUD%2Fimage.avif?alt=media&amp;token=5244a89c-c08f-4ca8-9a15-6cff65555e1e" alt=""><figcaption></figcaption></figure>

Enter the new account details and click on the Add new account

Account Name: zata.ai

Account Type: Amazon S3 Compatible Storage

REST Endpoint: <https://idr01.zata.ai> (Central India) or <https://bom01.zata.ai> (Southern India)

Access & Secret Key:- Follow these [link](https://docs.zata.ai/manage/access-keys/creating-a-new-access-key)

Click on the Use Secure transfer (SSL/TLS)

<figure><img src="https://2683631041-files.gitbook.io/~/files/v0/b/gitbook-x-prod.appspot.com/o/spaces%2FPPVG4W649TwXN8OejRhb%2Fuploads%2Fxo8gtBT0Tknf2nMLEuOR%2Fimage.png?alt=media&amp;token=4a511d4a-6a1a-481f-8856-adc743358f49" alt=""><figcaption></figcaption></figure>

Now process to click on the Advances S3-Compatible storage settings

Select the signature version: Signature V2

Addressing model: Path style

Now click on the close

And now click on the Add new account

Now check the account has been created

<figure><img src="https://2683631041-files.gitbook.io/~/files/v0/b/gitbook-x-prod.appspot.com/o/spaces%2FPPVG4W649TwXN8OejRhb%2Fuploads%2FU1gxHxkPMM3LMIrnPRPL%2Fimage.png?alt=media&amp;token=49138e09-f18f-4487-8d8e-c131ffb860c3" alt=""><figcaption></figcaption></figure>

Now next process is to Add a new Drive

<figure><img src="https://2683631041-files.gitbook.io/~/files/v0/b/gitbook-x-prod.appspot.com/o/spaces%2FPPVG4W649TwXN8OejRhb%2Fuploads%2FeZjqu5EPevxC5jdBZcYy%2Fimage.avif?alt=media&amp;token=1d2d5d3b-e32a-4de4-a03f-0f8856690e61" alt=""><figcaption></figcaption></figure>

Specify the drive properties and click the Create Account Zata.ai. Select the bucket and give the folder a name similar to the map

<figure><img src="https://2683631041-files.gitbook.io/~/files/v0/b/gitbook-x-prod.appspot.com/o/spaces%2FPPVG4W649TwXN8OejRhb%2Fuploads%2FMwIo41heykAagRGHlgpq%2Fimage.png?alt=media&amp;token=cfa00161-e701-4686-a95d-d42647aebe79" alt=""><figcaption></figcaption></figure>

When you click on the bucket area, you will see lists of buckets you have created within the zata.ai

<figure><img src="https://2683631041-files.gitbook.io/~/files/v0/b/gitbook-x-prod.appspot.com/o/spaces%2FPPVG4W649TwXN8OejRhb%2Fuploads%2F7aKalrVNjym6f6fT6ZGL%2Fimage.png?alt=media&amp;token=ca5d6096-c041-44f9-aea3-27cf64a00f61" alt=""><figcaption></figcaption></figure>

After selecting the Account, Bucket Name, and Mapped driver and click on the Add New Drive

<figure><img src="https://2683631041-files.gitbook.io/~/files/v0/b/gitbook-x-prod.appspot.com/o/spaces%2FPPVG4W649TwXN8OejRhb%2Fuploads%2FwTw6zRmsGtSooFrJskH4%2Fimage.png?alt=media&amp;token=14b9a557-0b8e-4cb3-ae8a-ad74c7e7e8c7" alt=""><figcaption></figcaption></figure>

Now you can see that the driver has been mapped correctly

<figure><img src="https://2683631041-files.gitbook.io/~/files/v0/b/gitbook-x-prod.appspot.com/o/spaces%2FPPVG4W649TwXN8OejRhb%2Fuploads%2Fdw9OXM1TRHc3y2bXrWkW%2Fimage.png?alt=media&amp;token=69c4f923-174e-4a98-9bfe-4ef377a62b04" alt=""><figcaption></figcaption></figure>

Check that the driver has been connected by navigating to Windows on this computer.

<figure><img src="https://2683631041-files.gitbook.io/~/files/v0/b/gitbook-x-prod.appspot.com/o/spaces%2FPPVG4W649TwXN8OejRhb%2Fuploads%2FNvn9gVVCBwApQtEXGXHx%2Fimage.png?alt=media&amp;token=955ae5b7-328e-4416-a246-8562c0efec4e" alt=""><figcaption></figcaption></figure>

Navigate to the Zata.ai storage panel to check the bucket is empty

<figure><img src="https://2683631041-files.gitbook.io/~/files/v0/b/gitbook-x-prod.appspot.com/o/spaces%2FPPVG4W649TwXN8OejRhb%2Fuploads%2F57raCnK1zPggiKjw0slu%2Fimage.png?alt=media&amp;token=8448ca17-5d07-430a-a8bd-34a0a823b8f8" alt=""><figcaption></figcaption></figure>

Now transfer data locally to Zata.ai bucket

I have stored the data on the locally attached drive. Please check the Zata.ai bucket now

<figure><img src="https://2683631041-files.gitbook.io/~/files/v0/b/gitbook-x-prod.appspot.com/o/spaces%2FPPVG4W649TwXN8OejRhb%2Fuploads%2FWlW7tB1aGLEirL0pugB2%2Fimage.png?alt=media&amp;token=d191a0e5-3ad8-40c0-a56d-58f03e29cd6f" alt=""><figcaption></figcaption></figure>

Now navigate to the Zata.ai storage and check the bucket

<figure><img src="https://2683631041-files.gitbook.io/~/files/v0/b/gitbook-x-prod.appspot.com/o/spaces%2FPPVG4W649TwXN8OejRhb%2Fuploads%2Ffn4gta8IgKElpI9s8kYS%2Fimage.png?alt=media&amp;token=6b7f938b-d393-4fcb-88fa-8014c4059a91" alt=""><figcaption></figcaption></figure>


# How to Integrate QNAP NAS storage and Backup to Zata.ai

A QNAP NAS (Network Attached Storage) is a specialized device made by QNAP Systems. It's designed to store, manage, and share data over a network.

Prerequisites

Zata.ai Bucket - [Bucket Create Guide](https://docs.zata.ai/manage/bucket/create-bucket).

Access and Secret Key Pair - [Access Key Guide](https://docs.zata.ai/manage/access-keys/creating-a-new-access-key).

REST Endpoint to follow these, click on the [links](https://docs.zata.ai/manage/service-urls-for-zata.ai-s3).

After successfully setting up the QNAP system, log in with your username and password.

<figure><img src="https://2683631041-files.gitbook.io/~/files/v0/b/gitbook-x-prod.appspot.com/o/spaces%2FPPVG4W649TwXN8OejRhb%2Fuploads%2FXy2ebN74GLbjddTbwRNB%2Fimage.png?alt=media&amp;token=ecb7a460-8317-4a61-86f6-6bac82120ddb" alt=""><figcaption></figcaption></figure>

You may now proceed with the following steps to configure the backup and restoration process.

Navigate to the App Center and install **HBS 3 Hybrid Backup Sync** to proceed with backup configuration.

<figure><img src="https://2683631041-files.gitbook.io/~/files/v0/b/gitbook-x-prod.appspot.com/o/spaces%2FPPVG4W649TwXN8OejRhb%2Fuploads%2FRiRLAjti4RyYtft7Ij9v%2Fimage.png?alt=media&amp;token=09c750ef-484b-47c6-ae9b-0b154cf94a4a" alt=""><figcaption></figcaption></figure>

Open the App Center, search for **HBS 3 Hybrid Backup Sync**, and proceed with the installation.

<figure><img src="https://2683631041-files.gitbook.io/~/files/v0/b/gitbook-x-prod.appspot.com/o/spaces%2FPPVG4W649TwXN8OejRhb%2Fuploads%2FYMnNzpgwM0xBJLEzLG8z%2Fimage.png?alt=media&amp;token=1ec85269-d695-4d3b-9694-13b483fcf885" alt=""><figcaption></figcaption></figure>

Now, back to the **Backup/Sync** section and launch **HBS 3 Hybrid Backup Sync** to begin configuration.

<figure><img src="https://2683631041-files.gitbook.io/~/files/v0/b/gitbook-x-prod.appspot.com/o/spaces%2FPPVG4W649TwXN8OejRhb%2Fuploads%2FhQpFumD6fve8xxKCRUDi%2Fimage.png?alt=media&amp;token=66fd71b3-b760-436f-a9c7-af2c863f54bb" alt=""><figcaption></figcaption></figure>

<figure><img src="https://2683631041-files.gitbook.io/~/files/v0/b/gitbook-x-prod.appspot.com/o/spaces%2FPPVG4W649TwXN8OejRhb%2Fuploads%2FnL0OzbR7luIkBGVDzEz7%2Fimage.png?alt=media&amp;token=d2d2c6c8-9a30-4e45-81ac-97168357bf7d" alt=""><figcaption></figcaption></figure>

Navigate to **Storage Spaces**, then select and create a new storage space as needed.

<figure><img src="https://2683631041-files.gitbook.io/~/files/v0/b/gitbook-x-prod.appspot.com/o/spaces%2FPPVG4W649TwXN8OejRhb%2Fuploads%2FQHyWz5kafenwlpewIUkj%2Fimage.png?alt=media&amp;token=31d422bf-7a16-4e11-9a0c-92edf47911c9" alt=""><figcaption></figcaption></figure>

Select **S3-compatible storage** from the available storage options.

<figure><img src="https://2683631041-files.gitbook.io/~/files/v0/b/gitbook-x-prod.appspot.com/o/spaces%2FPPVG4W649TwXN8OejRhb%2Fuploads%2FbV2u9nPNYtXUJCTbHj9C%2Fimage.png?alt=media&amp;token=bdc5eb6a-b502-494c-bfae-fdae33f2ddf6" alt=""><figcaption></figcaption></figure>

Complete the process of creating a storage space as shown in the interface:

**Fill in the Required Details:**

* **Name:** Enter a descriptive name for your storage space (e.g., "Amazon S3 & S3 Compatible 1").
* **Service Provider:** Select "S3 Compatible" from the dropdown menu.
* **Server Address:** Input the server address (e.g., `idr01.zata.ai` or `bom01.zata.ai`)
* **Signature Version:** Choose the appropriate signature version (e.g., `v2`).
* **Access Key:** Enter your access key.
* **Secret Key:** Enter your secret key.

<figure><img src="https://2683631041-files.gitbook.io/~/files/v0/b/gitbook-x-prod.appspot.com/o/spaces%2FPPVG4W649TwXN8OejRhb%2Fuploads%2FUFrccM4RRkzzSMbTtlgD%2Fimage.png?alt=media&amp;token=446abb7d-cc60-4051-8b7b-478966f45ae0" alt=""><figcaption></figcaption></figure>

Now back to the **Backup & Restore** or **Backup/Sync** section in your application interface.

Click on **Create** and then select **New Backup Job**. This will open the backup job creation wizard

<figure><img src="https://2683631041-files.gitbook.io/~/files/v0/b/gitbook-x-prod.appspot.com/o/spaces%2FPPVG4W649TwXN8OejRhb%2Fuploads%2FnLl0y7rxlKenyiZA8jqF%2Fimage.png?alt=media&amp;token=fd47314c-ba83-4e19-ad03-a3d1921700d7" alt=""><figcaption></figcaption></figure>

Choose the folders or files you wish to back up. When selecting a folder, all files and subfolders within it will be included automatically.

<figure><img src="https://2683631041-files.gitbook.io/~/files/v0/b/gitbook-x-prod.appspot.com/o/spaces%2FPPVG4W649TwXN8OejRhb%2Fuploads%2Fp09OsnPQbyzZiXM5YDRQ%2Fimage.png?alt=media&amp;token=7d955975-926e-4a5c-a008-822191161e69" alt=""><figcaption></figcaption></figure>

Select the storage space you previously configured (e.g., your S3-compatible storage). Click **Select** to confirm your choice.

<figure><img src="https://2683631041-files.gitbook.io/~/files/v0/b/gitbook-x-prod.appspot.com/o/spaces%2FPPVG4W649TwXN8OejRhb%2Fuploads%2FAAAEvoj9ZsLosLGLzDVh%2Fimage.png?alt=media&amp;token=ecda0177-aa96-412a-8368-ade721f878db" alt=""><figcaption></figcaption></figure>

While setting up a bucket on the Zata.ai dashboard, specify and select the bucket name accordingly.

<figure><img src="https://2683631041-files.gitbook.io/~/files/v0/b/gitbook-x-prod.appspot.com/o/spaces%2FPPVG4W649TwXN8OejRhb%2Fuploads%2F461h98Hhviz6zOhoU6nX%2Fimage.png?alt=media&amp;token=8d5de2fc-15eb-41bc-ad89-dc11a883af7c" alt=""><figcaption></figcaption></figure>

Now select the destination folder

<figure><img src="https://2683631041-files.gitbook.io/~/files/v0/b/gitbook-x-prod.appspot.com/o/spaces%2FPPVG4W649TwXN8OejRhb%2Fuploads%2Fq2zXyci3R5duCNeuAekl%2Fimage.png?alt=media&amp;token=921e5e3e-a5a7-4f04-aca7-984db8fcc42f" alt=""><figcaption></figcaption></figure>

Verify the details, and then proceed to the next step by clicking Next.

<figure><img src="https://2683631041-files.gitbook.io/~/files/v0/b/gitbook-x-prod.appspot.com/o/spaces%2FPPVG4W649TwXN8OejRhb%2Fuploads%2F7GSRJ3KFa5CuTDjVkhOd%2Fimage.png?alt=media&amp;token=1fe9585f-a27c-423a-a9e0-fb8d7de57227" alt=""><figcaption></figcaption></figure>

Set up your preferred schedule in the schedule section, and click 'Next' to continue.

<figure><img src="https://2683631041-files.gitbook.io/~/files/v0/b/gitbook-x-prod.appspot.com/o/spaces%2FPPVG4W649TwXN8OejRhb%2Fuploads%2FqaqDiAeCmxBNyZcJRi3t%2Fimage.png?alt=media&amp;token=698b105e-d67a-43d5-8160-ef5dc79c3568" alt=""><figcaption></figcaption></figure>

Configure the rules, such as enabling filters.

<figure><img src="https://2683631041-files.gitbook.io/~/files/v0/b/gitbook-x-prod.appspot.com/o/spaces%2FPPVG4W649TwXN8OejRhb%2Fuploads%2FTspKcuwvGbWwnV79oJQc%2Fimage.png?alt=media&amp;token=8148ba29-af23-48d6-a22f-ef676430f5d7" alt=""><figcaption></figcaption></figure>

Carefully review the settings, and then click Create.

<figure><img src="https://2683631041-files.gitbook.io/~/files/v0/b/gitbook-x-prod.appspot.com/o/spaces%2FPPVG4W649TwXN8OejRhb%2Fuploads%2FFgrbf2OmloEMJdmdlF7S%2Fimage.png?alt=media&amp;token=178bd6d7-e701-41b7-8d6c-2a888e920ecd" alt=""><figcaption></figcaption></figure>

Backup is now successful.

<figure><img src="https://2683631041-files.gitbook.io/~/files/v0/b/gitbook-x-prod.appspot.com/o/spaces%2FPPVG4W649TwXN8OejRhb%2Fuploads%2FkgUCYRbcq2Ci6zCbMKl5%2Fimage.png?alt=media&amp;token=d7972cff-0440-4a36-988d-1ad2354b6268" alt=""><figcaption></figcaption></figure>


# Proxmox Backup Server Integration with Zata.ai S3 Storage

**Overview**

This document describes the procedure to configure **Proxmox Backup Server (PBS)** to store backups on **Zata.ai S3-compatible Object Storage**.

The integration allows virtual machine and container backups from Proxmox environments to be securely stored in scalable object storage.

**Prerequisites**

Before starting the setup, ensure the following requirements are met:

* Proxmox VE installed and running
* Proxmox Backup Server installed
* Internet connectivity
* Zata.ai object storage account
* S3 bucket created
* Access Key and Secret Key generated

1. **Create Object Storage Bucket**

**Step 1:** Login to the Zata.ai dashboard.

**Step 2:** Navigate to:

```
Object Storage → Buckets
```

**Step 3:** Click **Create Bucket**

**Step 4:** Enter bucket name

Example:

```
proxmox-backups
```

**Step 5:** Click **Create**

**5. Generate Access Credentials**

**Step 1:** Navigate to:

```
Object Storage → Access Keys
```

**Step 2:** Click **Create Key**

**Step 3:** Copy the generated credentials:

```
Access Key ID
Secret Access Key
```

These credentials will be used to authenticate PBS with S3 storage.

2. **Access Proxmox Backup Server**

Open the PBS web interface in a browser:

```
https://<PBS-IP>:8007
```

Login using:

```
Username: root@<PBS-IP>
Password: server password
```

<figure><img src="https://2683631041-files.gitbook.io/~/files/v0/b/gitbook-x-prod.appspot.com/o/spaces%2FPPVG4W649TwXN8OejRhb%2Fuploads%2Fx5j5tdNo1gHtCKz4yyIB%2Fimage.png?alt=media&amp;token=d31bbf73-adfd-4e9f-b285-8b75310aea61" alt=""><figcaption></figcaption></figure>

3. **Configure S3 Endpoint**

**Step 1:** Navigate to:

```
Configuration → S3 Endpoints
```

**Step 2:** Click **Add**

**Step 3:** Enter the following configuration:

```
S3 Endpoint ID : zata-reg
Endpoint       : idr01.zata.ai (or bom01.zata.ai for Southern India)
Port           : 443
Region         : us-east-1
Access Key     : <Access Key>
Secret Key     : <Secret Key>
Path Style     : Enabled
```

**Step 4:** Click **OK**

<figure><img src="https://2683631041-files.gitbook.io/~/files/v0/b/gitbook-x-prod.appspot.com/o/spaces%2FPPVG4W649TwXN8OejRhb%2Fuploads%2FHMIS4Vo2EhHbOKuJa4qb%2Fimage.png?alt=media&amp;token=91f0799a-c940-4d6b-a259-d945fa0b900b" alt=""><figcaption></figcaption></figure>

4. **Create Local Cache Directory**\
   PBS requires a local cache directory when using S3 storage.

**Step 1**

Open:

```
Administration → Shell
```

**Step 2:** Run the following command:

```
mkdir -p /mnt/pbs-cache
```

**Step 3:** Verify directory creation:

```
ls /mnt
```

Expected output:

```
pbs-cache
```

<figure><img src="https://2683631041-files.gitbook.io/~/files/v0/b/gitbook-x-prod.appspot.com/o/spaces%2FPPVG4W649TwXN8OejRhb%2Fuploads%2FMNZX2KTRwtMp5FqdpVSn%2Fimage.png?alt=media&amp;token=47260193-7a9c-4295-be9b-373889ce7dad" alt=""><figcaption></figcaption></figure>

***

5. **Create Datastore**

**Step 1**

Navigate to:

```
Datastore → Add
```

**Step 2**

Configure datastore settings:

```
Name           : zata-backups
Datastore Type : S3 (tech preview)
Local Cache    : /mnt/pbs-cache
S3 Endpoint ID : zata-reg
Bucket         : proxmox-backups
GC Schedule    : daily
Prune Schedule : daily
```

<figure><img src="https://2683631041-files.gitbook.io/~/files/v0/b/gitbook-x-prod.appspot.com/o/spaces%2FPPVG4W649TwXN8OejRhb%2Fuploads%2F2okC35EEfDOsrXMnCWRy%2Fimage.png?alt=media&amp;token=01b70100-b9f5-4e43-9872-53beb8228cb3" alt=""><figcaption></figcaption></figure>

6\. **Verify Datastore Configuration**

After successful configuration, the datastore will appear under:

```
Datastore → zata-backups
```

The PBS dashboard will display storage usage.

<figure><img src="https://2683631041-files.gitbook.io/~/files/v0/b/gitbook-x-prod.appspot.com/o/spaces%2FPPVG4W649TwXN8OejRhb%2Fuploads%2FeZfGZdS6NCXkQud9nUVD%2Fimage.png?alt=media&amp;token=6cf7006a-e4eb-49f9-93c3-b15ed7528612" alt=""><figcaption></figcaption></figure>

***

**11. Conclusion**

The Proxmox Backup Server has been successfully integrated with Zata.ai S3-compatible object storage. This setup enables secure, scalable, and centralized backup storage for Proxmox environments.

Backups can now be scheduled and stored in object storage for disaster recovery and long-term retention.


# FAQ


# What are the regions of Zata.ai?

| Zone Description    | State          | Status      | Country |
| ------------------- | -------------- | ----------- | ------- |
| Central India Zone  | Madhya Pradesh | Active      | India   |
| Southern India Zone | Maharashtra    | Active      | India   |
| Northern India Zone | Uttar Pradesh  | Coming Soon | India   |


# What is the billing process for Zata.ai ?

Our billing cycle is based on a date-to-date system, where storage upgrades are processed within the same billing cycle. However, to ensure a seamless transition and avoid any transaction gaps, we adhere to the following guidelines:

Upgrade storage: Storage upgrades are allowed during the billing cycle, and the changes will be reflected in the next billing cycle.

Transaction Gap: To prevent any discrepancies, a 48-hour transaction gap will be maintained between the storage upgrade and the new billing cycle. This ensures that all transactions are accurately accounted for and billed accordingly.

No Downgrade During Billing Cycle: Once the storage upgrade is processed, it is not possible to downgrade during the same billing cycle.

Upgrade Process: When upgrading your storage plan, we understand that you shouldn't be charged for the entire upgraded plan for the remaining days of the billing cycle. To ensure a fair and transparent process, we prorate the upgraded storage plan charges based on the remaining days of the billing cycle


# What happens if I miss a Payment ?

Service Suspension:- If the payment is not received within the specific deadline, your account may be temporarily suspended, and access to our services may be restricted

Account Re-Activation: Once the payment is received, you account will be re-activated, and access to our services will be restored.


# How do I request access to use storage endpoints in a browser or SDK?

### Using Our Storage Endpoints From SDKs or Browsers

We support customers who want to connect directly to our S3-compatible storage endpoints from their own applications or SDKs. Because this involves CORS and security considerations, we don’t allow all external domains by default.

How to request access

If you need your application or SDK to call our storage endpoints directly (for example, from a browser or mobile app):

#### Open a support ticket with the following details:

The domain(s) or subdomain(s) your application will use (e.g., <https://app.example.com>). Whether you require read-only access (GET/HEAD) or read/write access (PUT/POST/DELETE). Any specific headers your SDK or app sends in requests (if different from standard AWS SDK headers).

Our team will review your request and configure the necessary CORS rules and access controls for your tenant.

#### Security notes

We do not recommend embedding long-lived access keys in browser or mobile apps. Please use temporary credentials or presigned URLs whenever possible.

CORS rules will only be opened for the exact origins you request (wildcards such as \* are not permitted without review).

Each customer must use their own isolated credentials/policies — shared keys are not supported.


# How can I get support for billing-related issue?

Having any issues? Reach out to us by email at **<solutions@zata.ai> .**


# What are the terms and conditions for using Zata.ai services?

For information regarding the usage of Zata.ai services, please refer to the [Legal ](https://zata.ai/zataprivacypolicies.pdf)section on their website.


# Where can I find additional information on pricing and billing?

You can check the information related to pricing and billing on the Zata.ai dashboard


# Support

The Support section helps users get assistance with technical, billing, and account-related issues. It allows users to search for solutions, submit new support requests, and track existing tickets.

If you have any inquiries or need technical assistance, please contact us at [**solutions@zata.ai**](https://mail.google.com/mail/?view=cm\&fs=1\&to=solutions@zata.ai\&su=Custom%20Plan%20Request\&body=Hi%20there). Our dedicated support team is always available to help you.


# Raise a Support Ticket

The **Submit a Ticket** page is used to raise a new support request.

Users can:

* Enter their email in the **Requester** field.
* Add a clear **Subject** describing the issue.
* Select the **Type** of issue (Technical, Billing, Account, etc.).
* Choose the **Priority** based on urgency.
* Select the **Product** (e.g., Zata AI).
* Describe the issue in detail in the **Description** box.

After submitting, the ticket is sent to the support team for review and resolution.


# View and Track Tickets

The **Tickets** page allows users to manage and track all their submitted support tickets.

Users can:

* View all existing tickets.
* Check ticket status such as *Open*, *Pending*, or *Closed*.
* Search tickets using keywords.
* Filter tickets based on status.
* Sort tickets by creation date.
* Export tickets for record keeping or reporting.

This page helps users stay updated on the progress of their issues and communicate effectively with the support team.


# Announcements and Updates

The Announcements and Updates section keeps you informed about changes to the Zata.ai platform. It is the official place to find pricing revisions, new feature releases, service notices, and other updates that may affect your account.

This section includes:

* Pricing and plan changes
* New feature and region announcements
* Planned maintenance and service notices
* Policy updates

Announcements are listed with their effective dates so you can review what is changing and when it takes effect.


# Zata Pricing Update — October 2026

Revised pricing for Zata Object Storage, effective 1 October 2026

This announcement outlines the upcoming pricing changes for Zata Object Storage, effective October 1, 2026. The revised pricing reflects the evolving costs of infrastructure and operations while allowing us to continue investing in the reliability, performance, security, and scalability of our storage services. A summary of the current and new pricing is provided below. Customers can review the current and revised pricing below.

## Updated Storage Pricing

| Plan            | Storage Capacity | Current Price / Month | New price (w\.e.f. Oct 1st) |
| --------------- | ---------------- | --------------------- | --------------------------- |
| **Basic**       | 1 TB             | ₹599                  | **₹699**                    |
| **Standard**    | 5 TB             | ₹2,970                | **₹3,470**                  |
| **Pro**         | 10 TB            | ₹5,880                | **₹6,880**                  |
| **Business**    | 25 TB            | ₹14,550               | **₹17,050**                 |
| **Enterprise**  | 50 TB            | ₹28,800               | **₹33,800**                 |
| **Enterprise+** | 100 TB           | ₹57,000               | **₹67,000**                 |
| **Custom**      | 100 TB+          | Custom                | Custom                      |

> **Note** All prices are exclusive of GST. An 18% GST will be applicable separately.

## When Does the New Pricing Take Effect?

The revised pricing will be **effective from October 1, 2026**.

The current pricing will remain applicable until **September 30, 2026**.

## Frequently Asked Questions

### 1. When will the new pricing become effective?

The revised Zata storage pricing will be effective **October 1, 2026**.

### 2. Which plans are affected?

The pricing update applies to the **Basic**, **Standard**, **Pro**, **Business**, **Enterprise** and **Enterprise+** storage plans. Custom plans for 100 TB+ continue to be quoted separately.

### 3. Are the prices inclusive of GST?

No. All prices listed above are **exclusive of GST**. An 18% GST will be applicable separately.

### 4. What if I require more than 100 TB?

For storage requirements above 100 TB, Zata offers custom plans. Please contact us at <solutions@zata.ai> for more details.

## Need Help?

For pricing enquiries or storage requirements:

* **Email:** <solutions@zata.ai>
* **Phone:** 1800-309-1433