> For the complete documentation index, see [llms.txt](https://docs.zata.ai/llms.txt). Markdown versions of documentation pages are available by appending `.md` to page URLs; this page is available as [Markdown](https://docs.zata.ai/manage/bucket/access-control/bucket-acl.md).
# Bucket ACL
Set who can see your file list and who can upload to your bucket
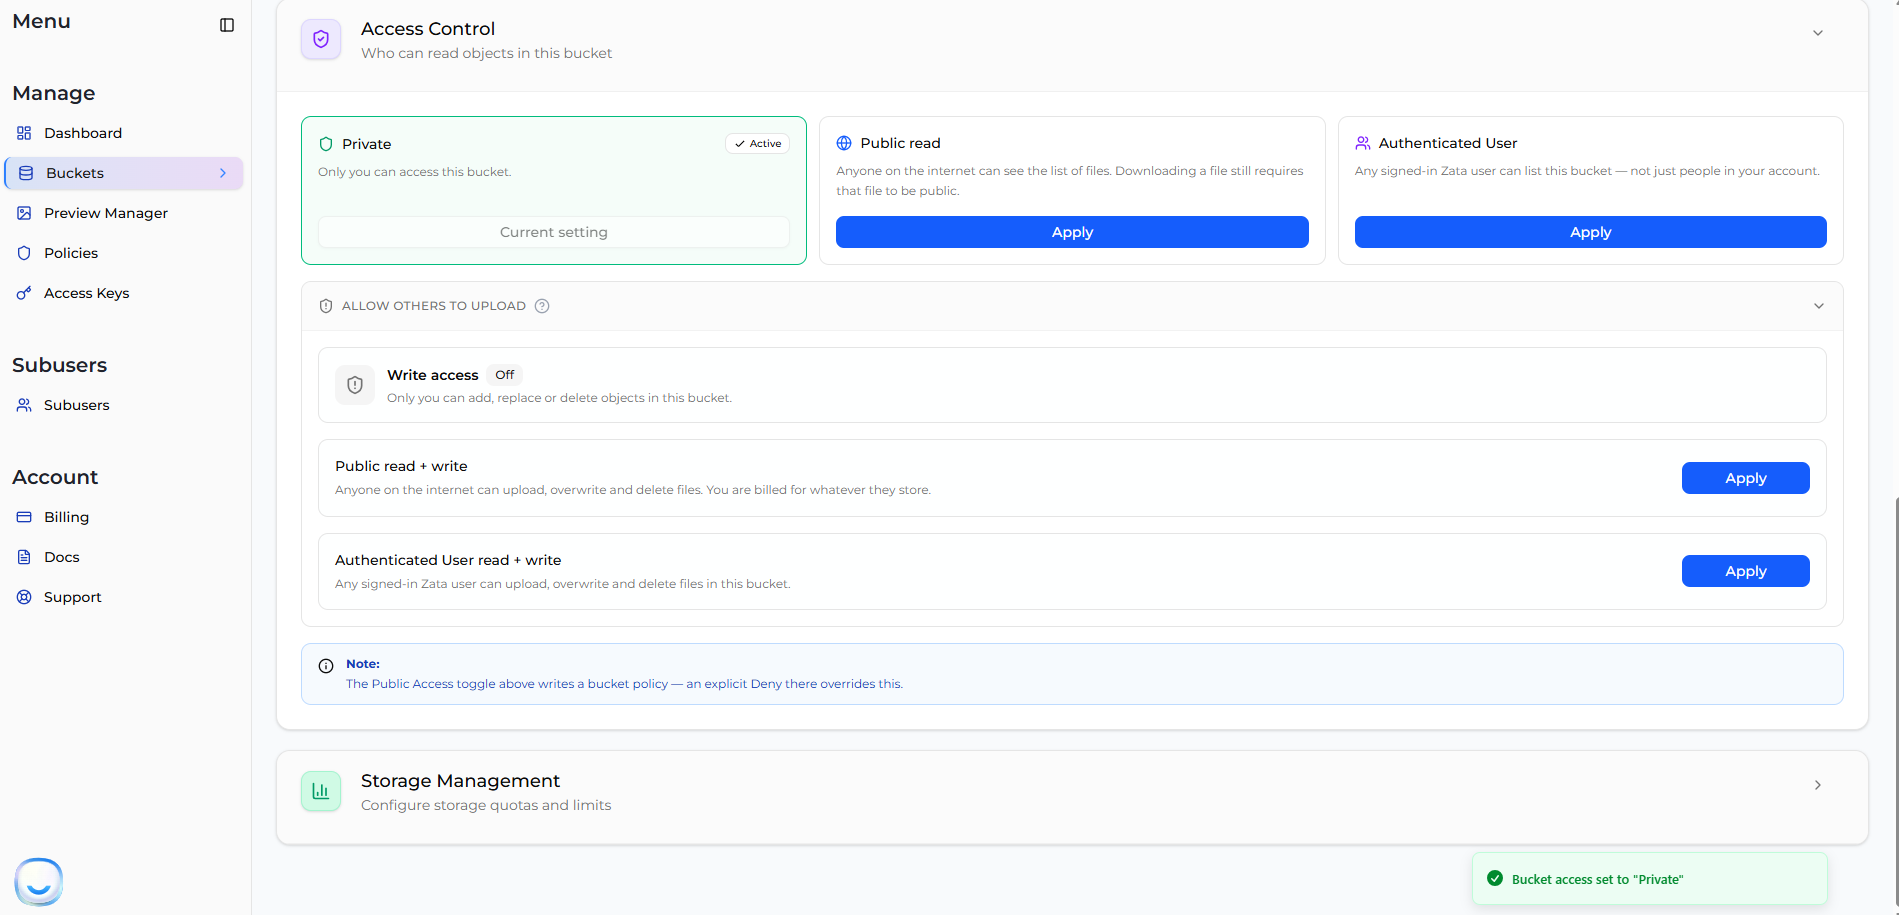
The Bucket ACL controls two things:
* **Who can see the list of files** in your bucket — the file names, their sizes and when they were last changed.
* **Who can upload, overwrite and delete** files in your bucket.
It does **not** control who can download your files. That is set on each file separately, on the [Object ACL](/manage/bucket/access-control/object-acl.md) page.
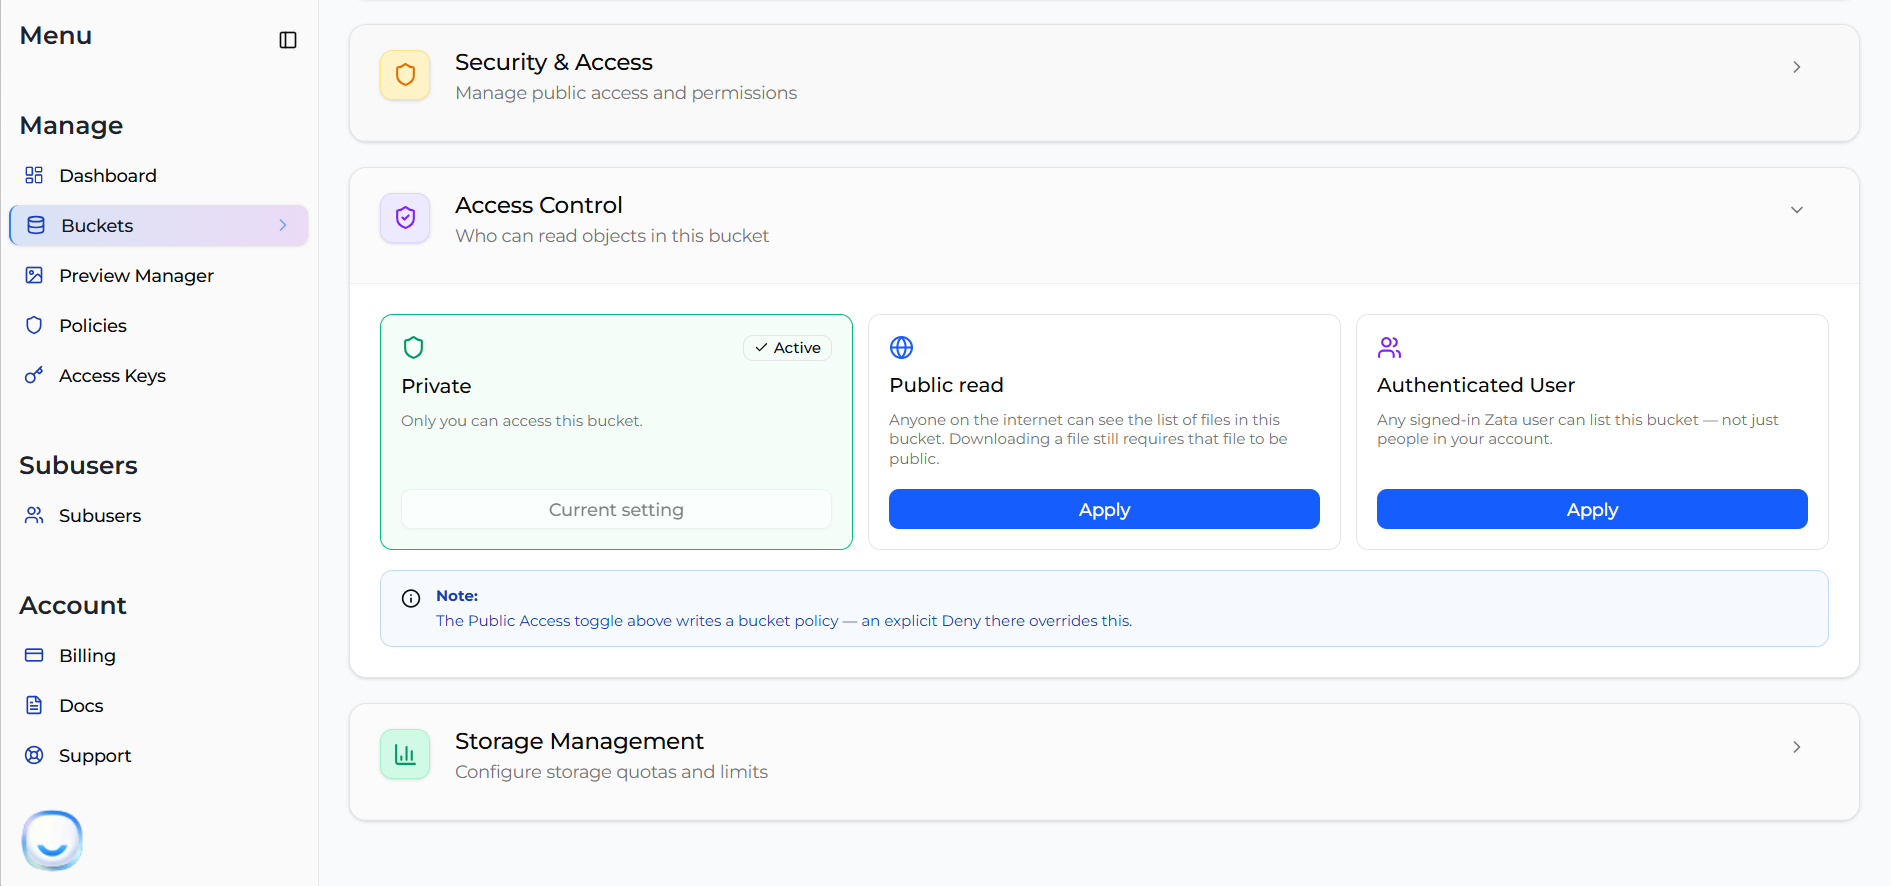
To change it, open your bucket, click **Bucket Settings**, and open the **Access Control** section.
***
## The five settings
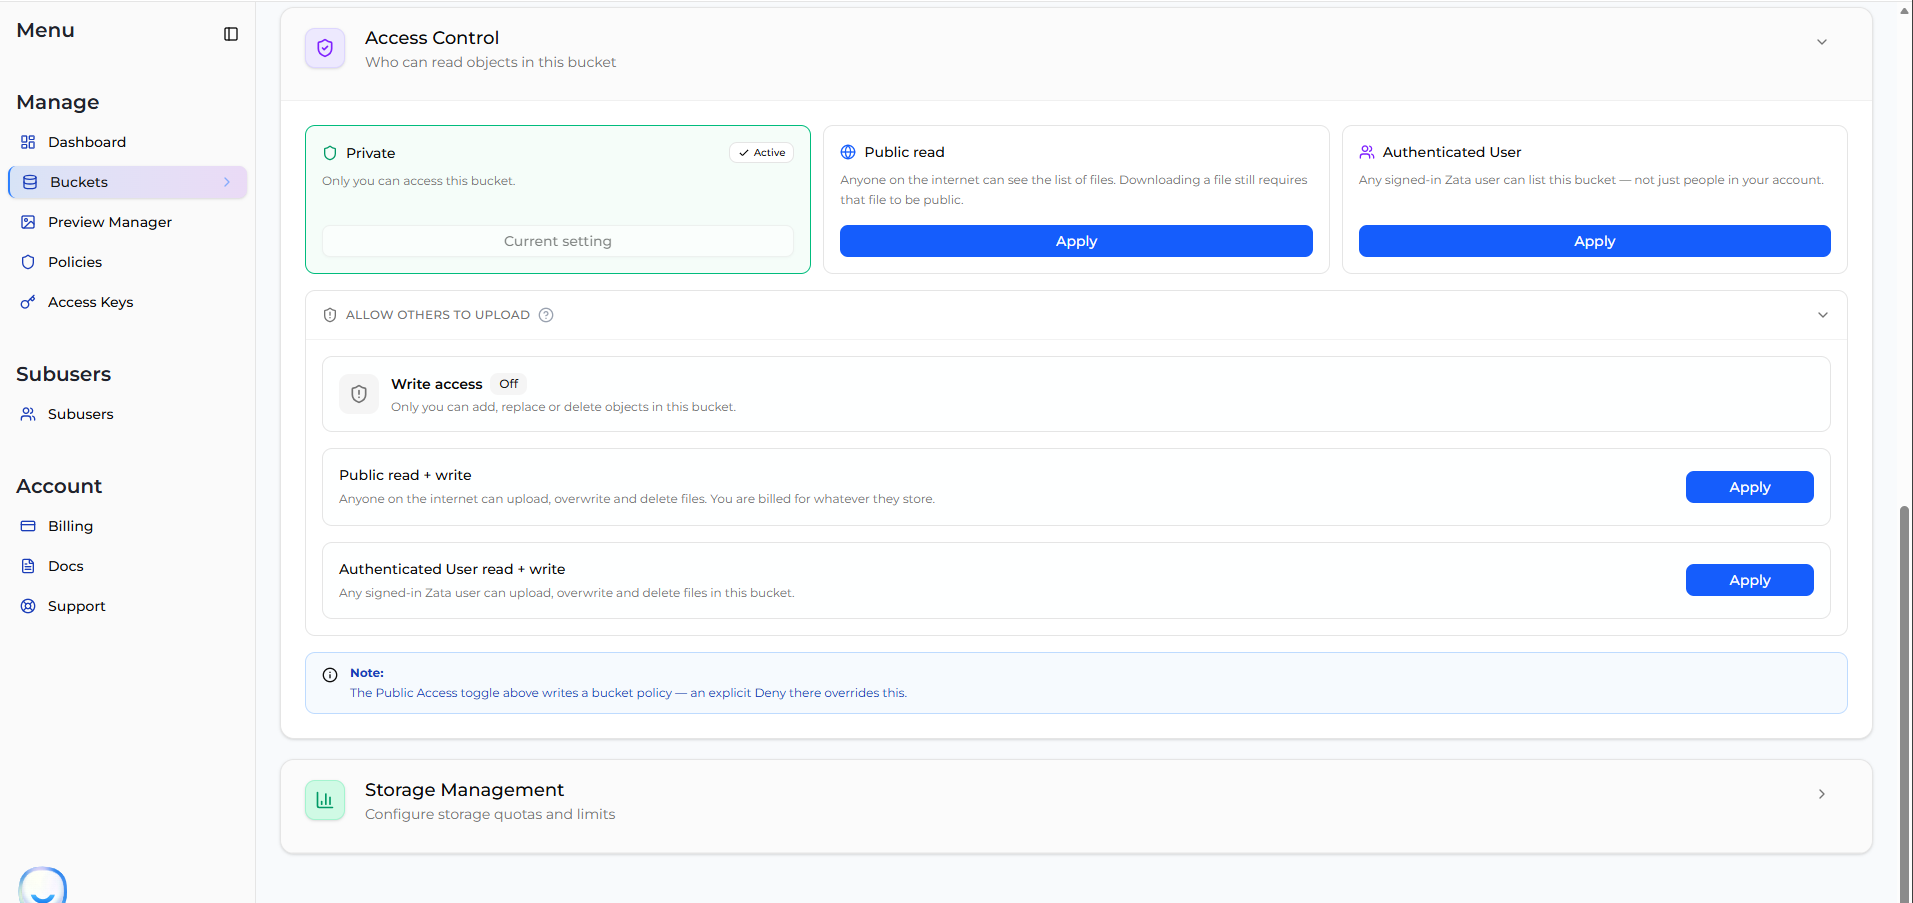
Your bucket uses **one** setting at a time. Three of them are read-only. The other two also let other people upload.
| Setting | Who can see the file list | Who can upload, overwrite and delete |
| ----------------------------------- | -------------------------- | ------------------------------------ |
| **Private** | Only you | Only you |
| **Public read** | Anyone on the internet | Only you |
| **Authenticated User** | Any signed-in Zata.ai user | Only you |
| **Public read + write** | Anyone on the internet | Anyone on the internet |
| **Authenticated User read + write** | Any signed-in Zata.ai user | Any signed-in Zata.ai user |
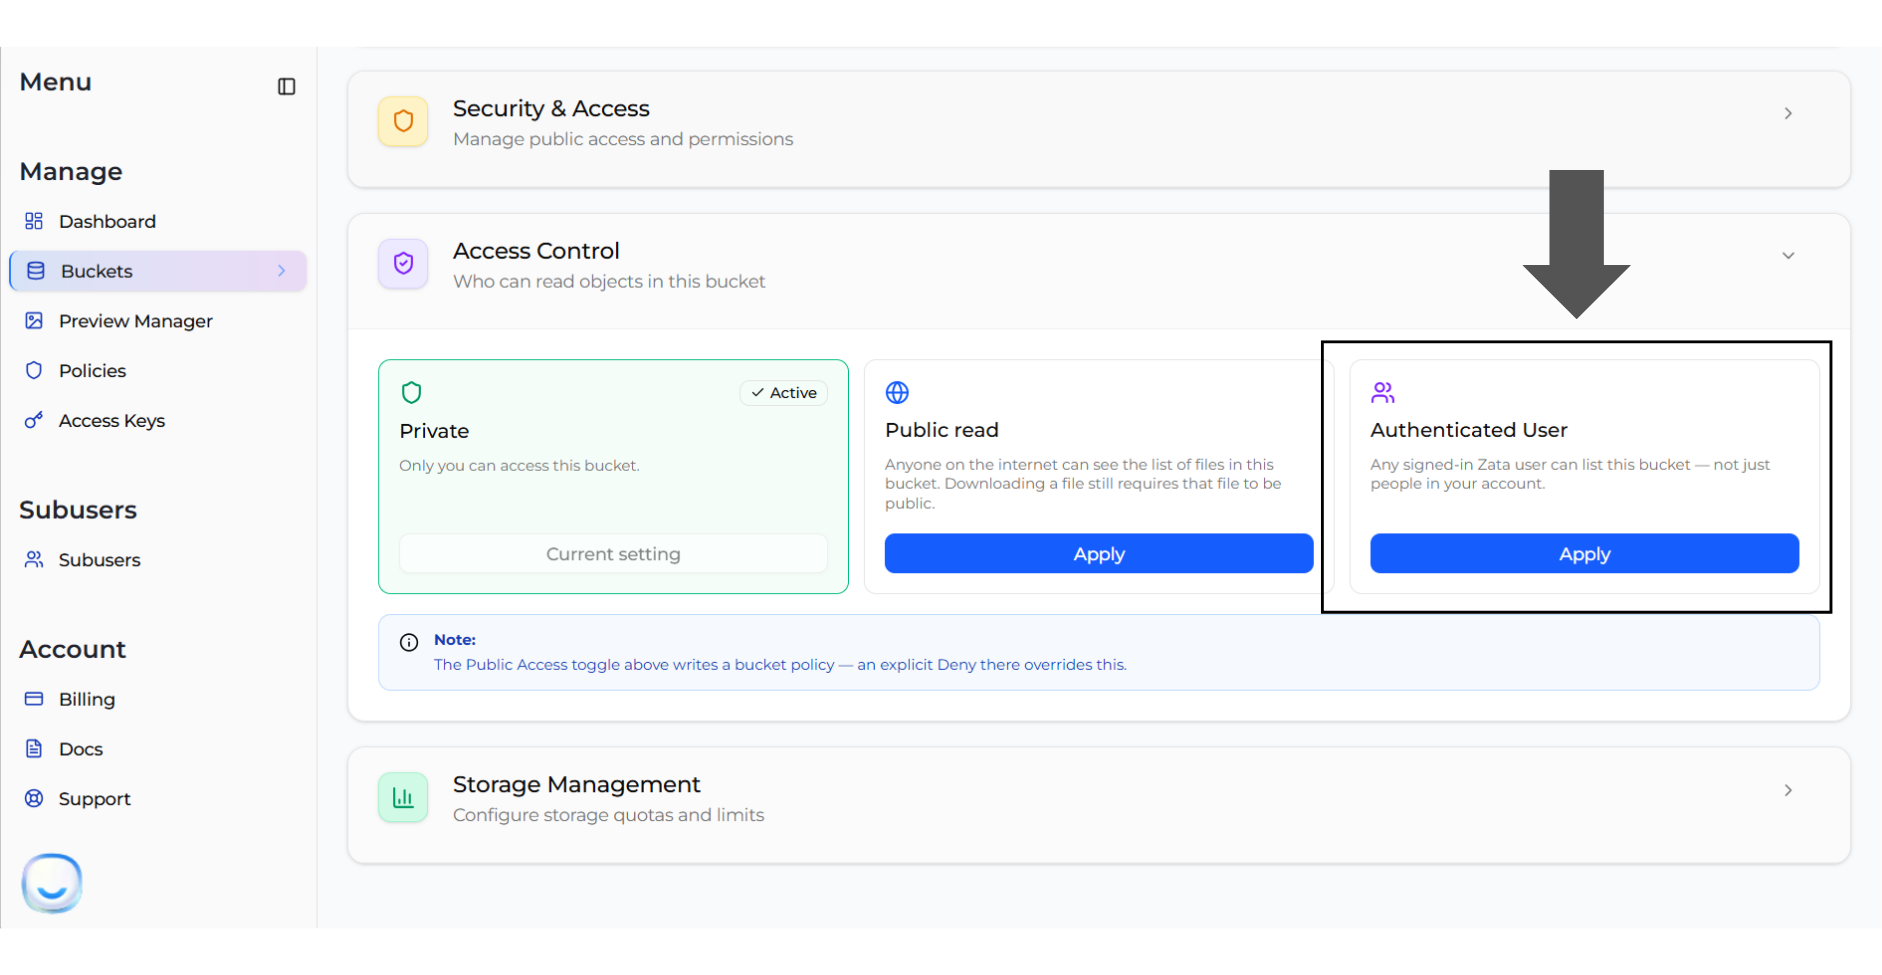
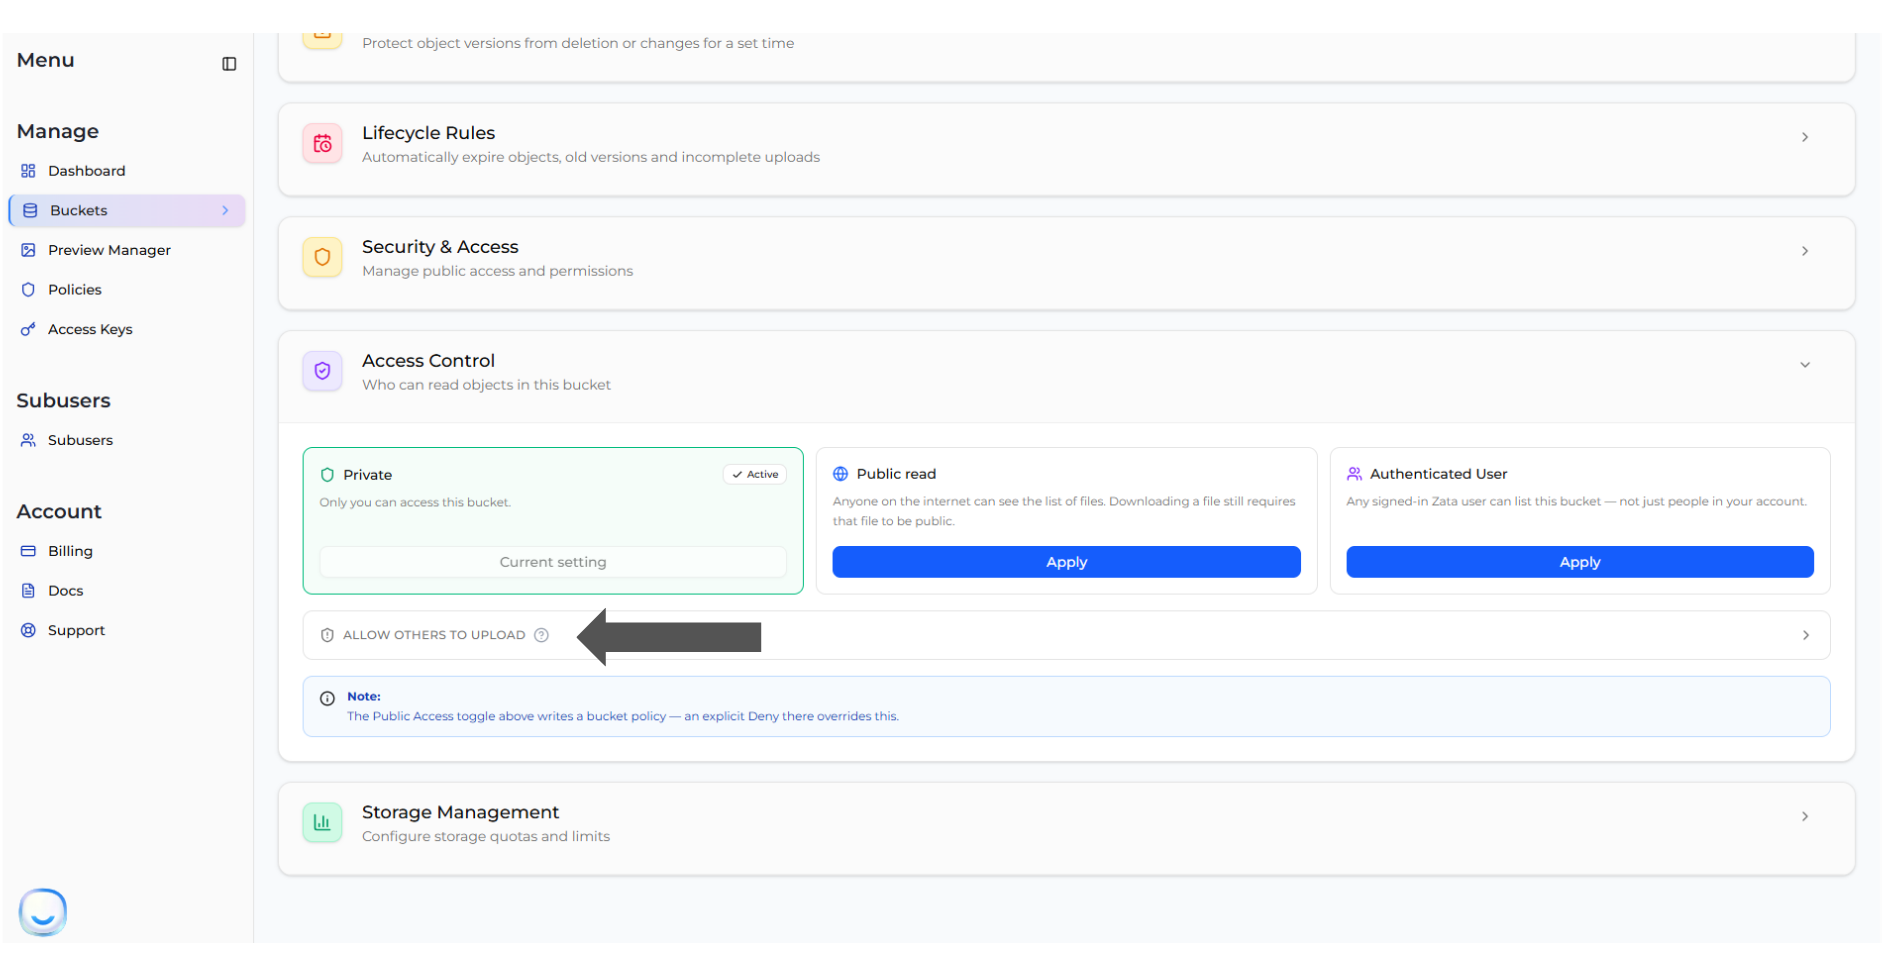
The three read-only settings appear as cards at the top of the section. The two write settings are inside **ALLOW OTHERS TO UPLOAD** just below them.
Whichever setting you are using is marked **Active**, and its button reads **Current setting**. The others have an **Apply** button.
> **INFO** These five settings are alternatives, not layers. When you turn on a write setting, it replaces your read setting — which is why the cards at the top stop showing **Active** once **Public read + write** or **Authenticated User read + write** is in use.
***
## Read-only settings
### Private
*Only you can access this bucket.*
Every new bucket starts here. Nobody else can see what is inside, and nobody else can upload.
You can still share individual files while the bucket stays private — either by making a file public, or with a [presigned URL](https://docs.zata.ai/manage/bucket/storing-objects-in-a-bucket/sharing-an-object-using-presigned-url).
**Choose this** unless you have a specific reason not to.
### Public read
*Anyone on the internet can see the list of files. Downloading a file still requires that file to be public.*
Anyone can open your bucket URL and read the file names, with no sign-in. Downloads are still blocked until you make each file public, and nobody else can upload.
**Choose this** when you want visitors to browse a set of files you are publishing on purpose.
### Authenticated User
*Any signed-in Zata user can list this bucket — not just people in your account.*
This one is easy to misread. It does **not** mean "people in my company". It means **every Zata.ai account in existence**, including strangers who signed up on their own.
**Do not choose this** to share with your team. Create a [subuser](https://docs.zata.ai/subusers/create-a-subuser) and give it a policy instead — that way you decide exactly who gets in.
***
## Setting a bucket to Public read
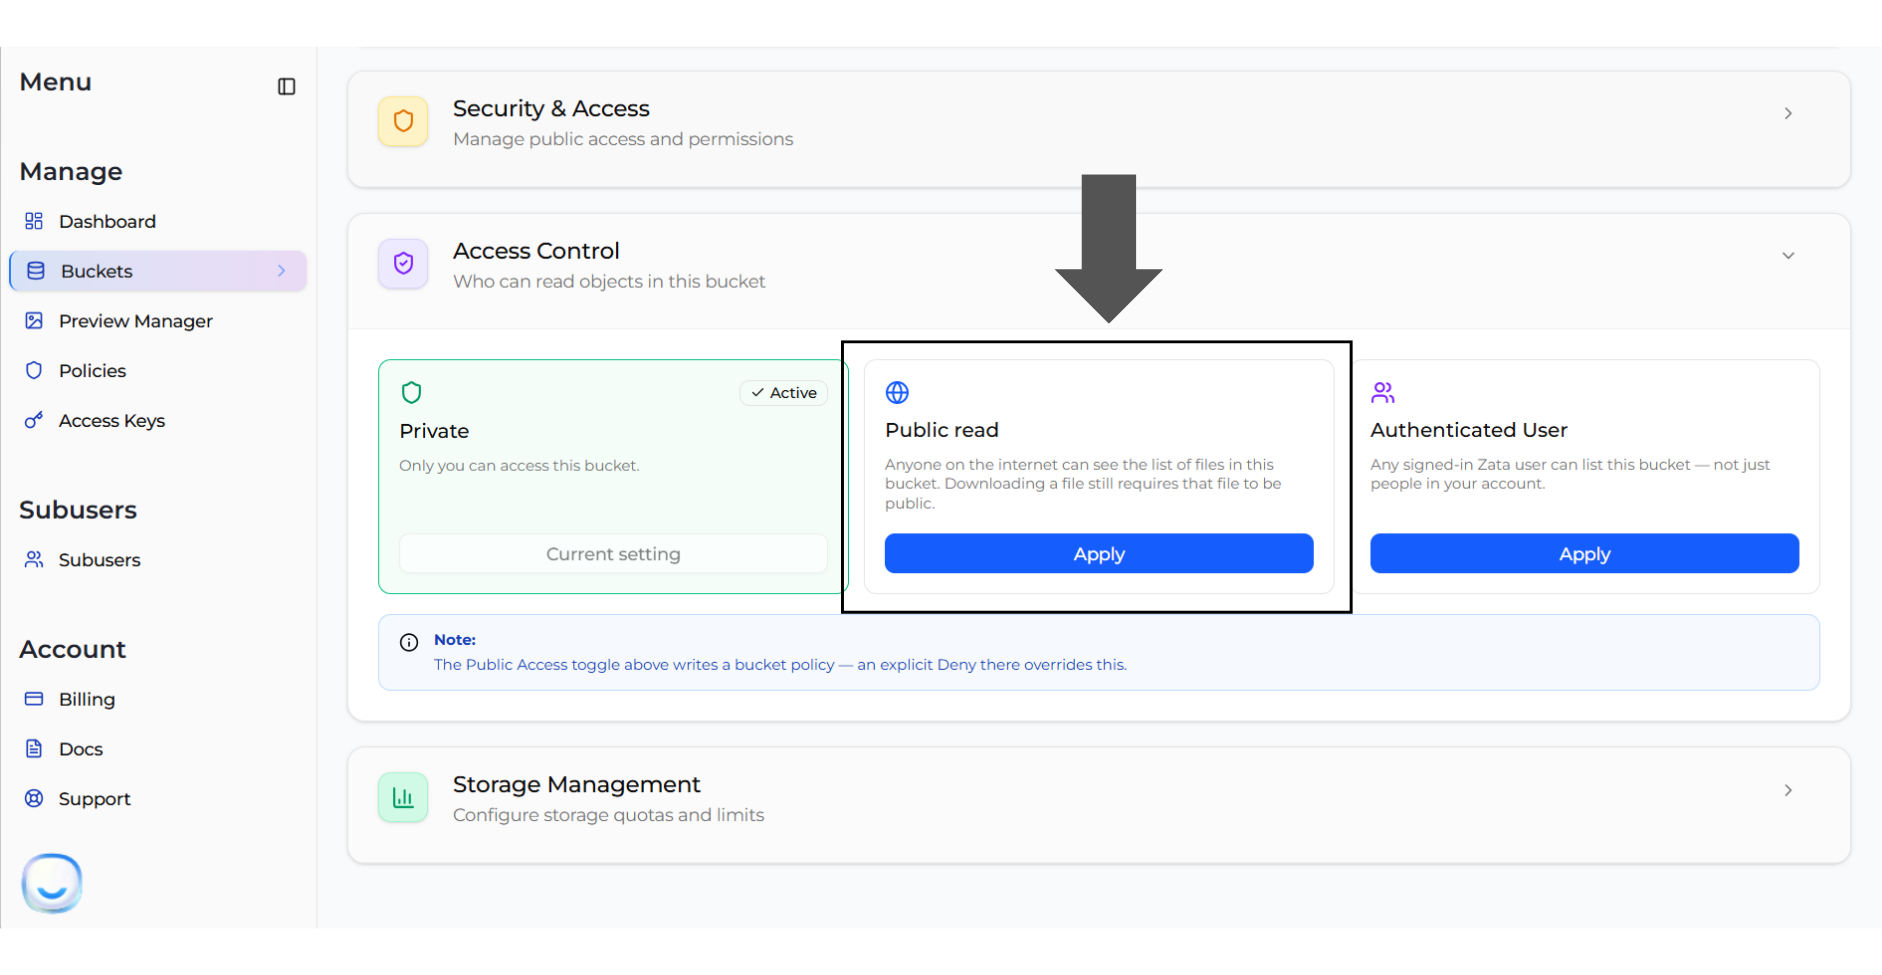
1. In **Bucket Settings > Access Control**, click **Apply** on the **Public read** card.
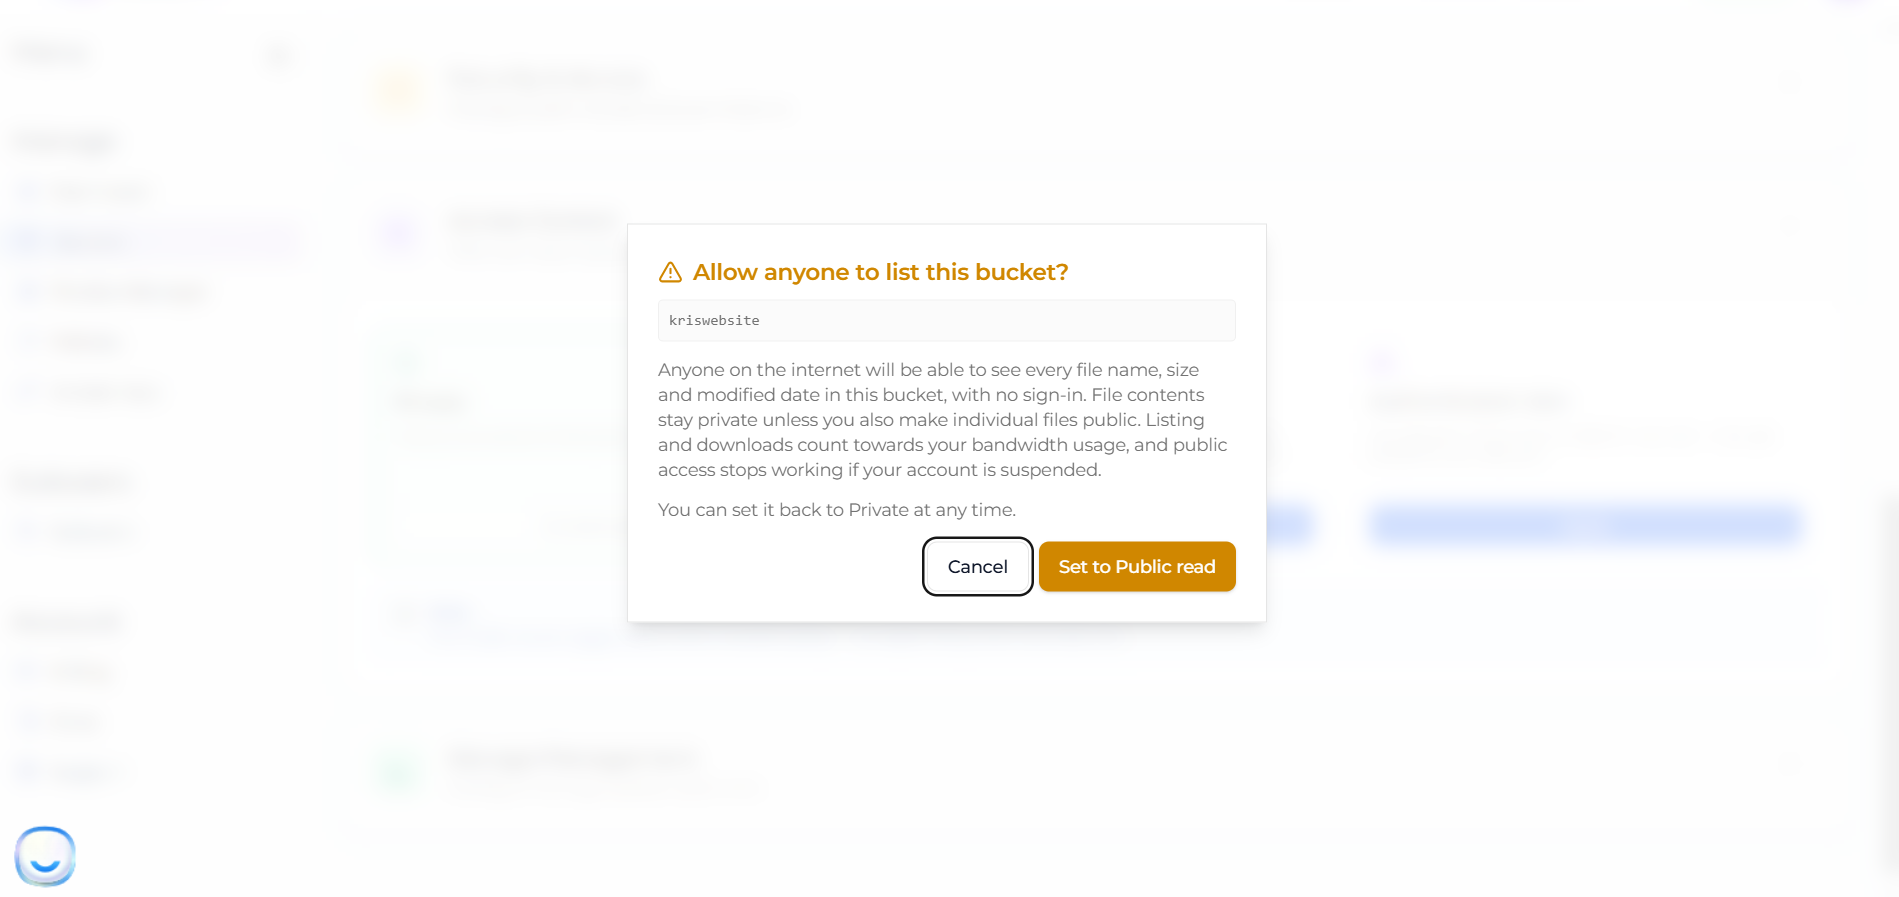
2. A box appears asking **Allow anyone to list this bucket?**. It shows the bucket name and explains what will change. Read it, then click **Set to Public read**.
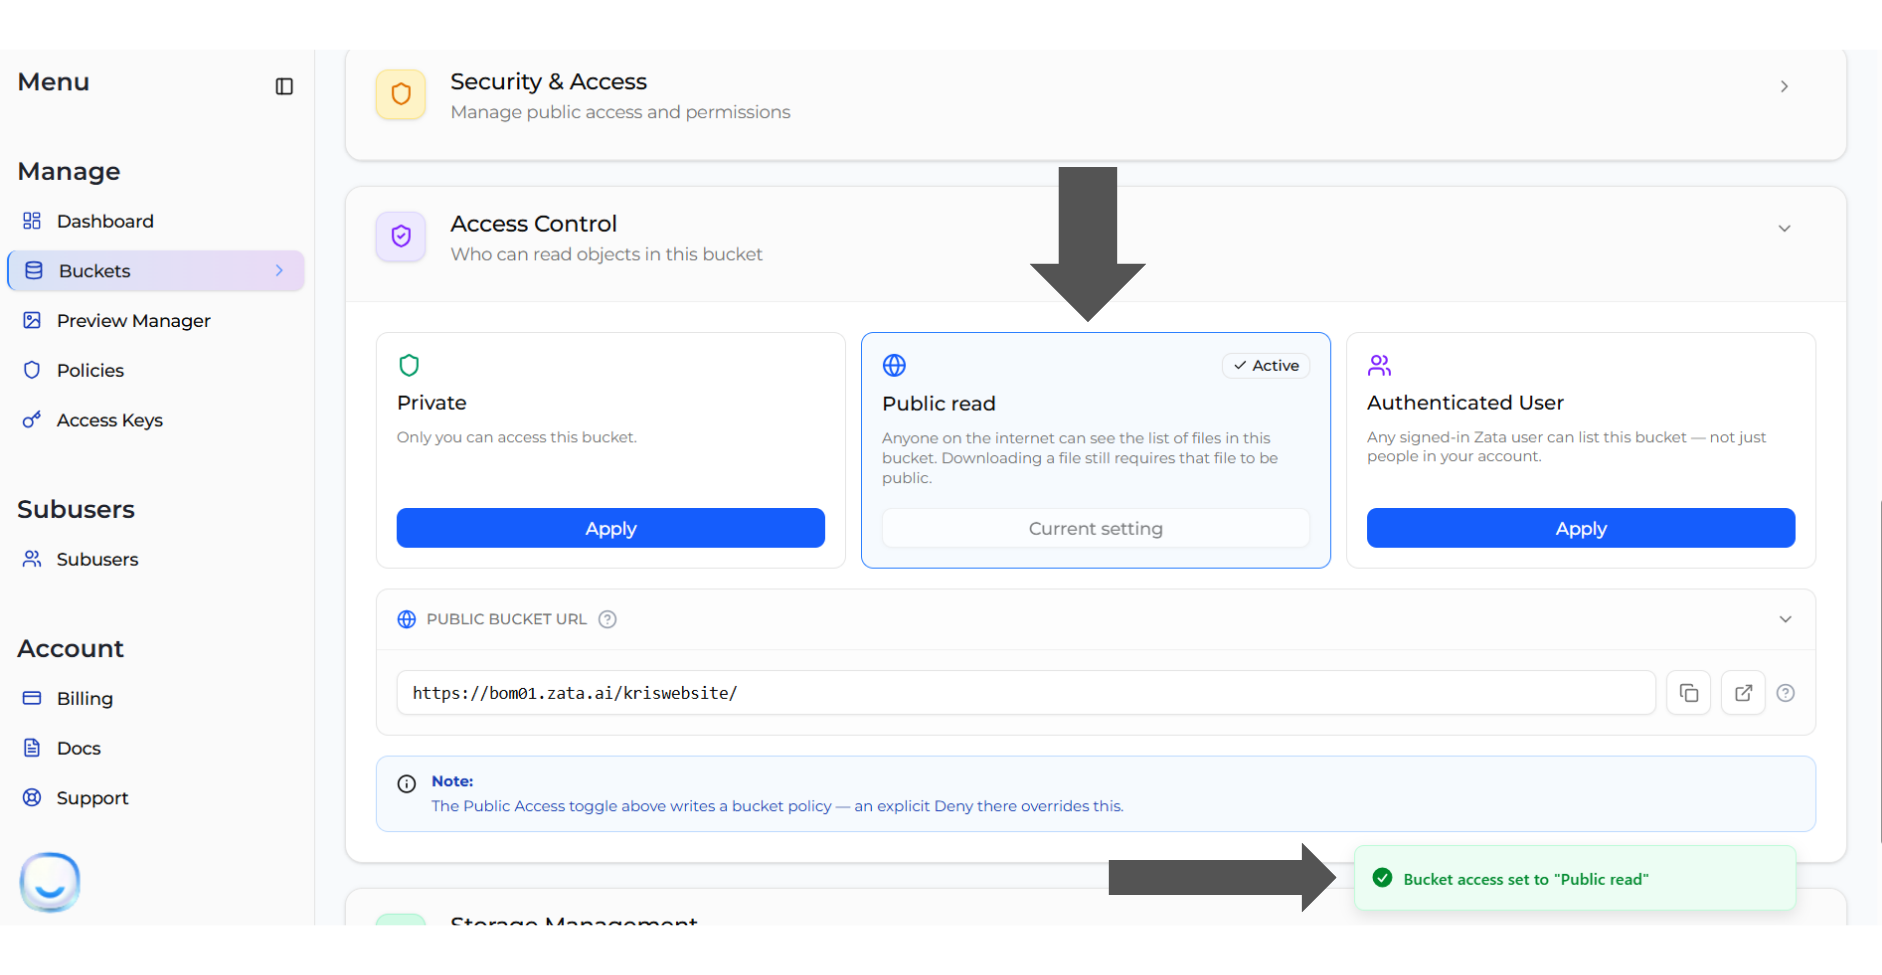
3. The **Public read** card is now marked **Active** and a message confirms *Bucket access set to "Public read"*. A new **PUBLIC BUCKET URL** field appears, with buttons to copy the link or open it in a new tab.
To undo this, click **Apply** on the **Private** card.
### Your public bucket URL
The link looks like this:
```
https:////
```
Use the service URL for the region your bucket is in:
| Region | Public bucket URL |
| ----------------------- | -------------------------------------- |
| Central India (Indore) | `https://idr01.zata.ai//` |
| Southern India (Mumbai) | `https://bom01.zata.ai//` |
The `kriswebsite` bucket above is in Mumbai, so its link is `https://bom01.zata.ai/kriswebsite/`. Opening it shows the file list.
For the full list of regions, see [Service URLs for Zata.ai S3](https://docs.zata.ai/manage/service-urls-for-zata.ai-s3).
***
## Setting a bucket to Authenticated User
1. In **Bucket Settings > Access Control**, click **Apply** on the **Authenticated User** card.
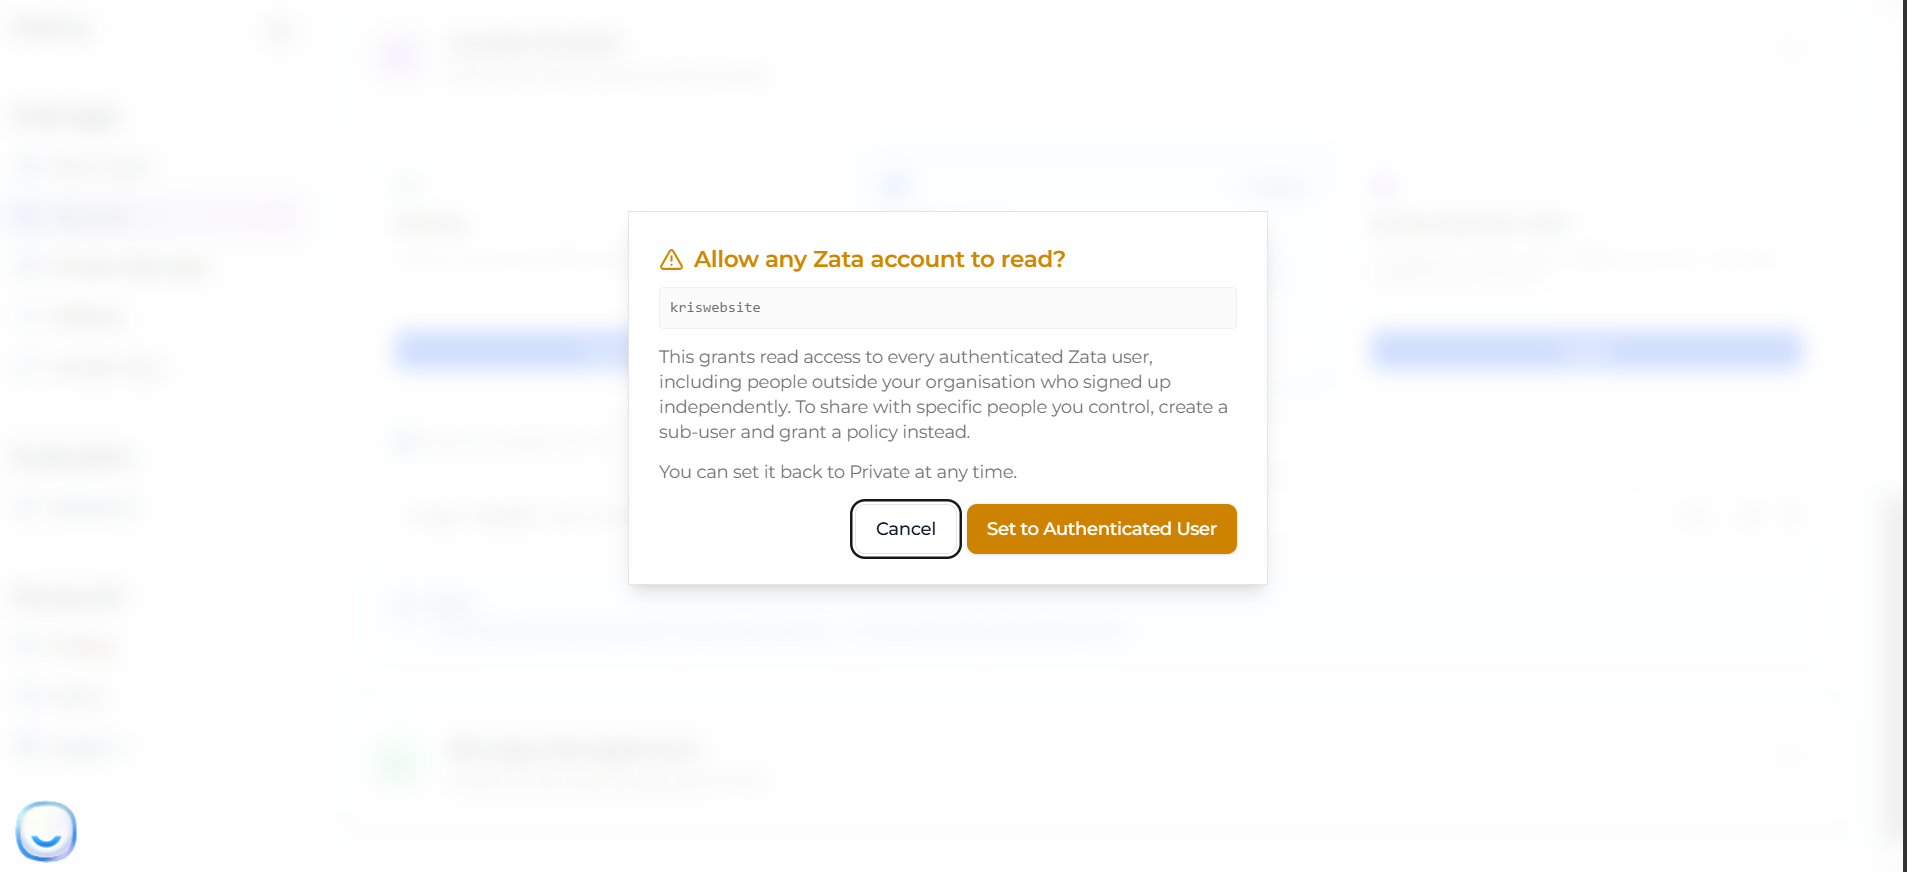
2. A box appears asking **Allow any Zata account to read?**. It warns you that this includes people outside your organisation, and suggests subusers as the safer option. Click **Set to Authenticated User** if you are sure.
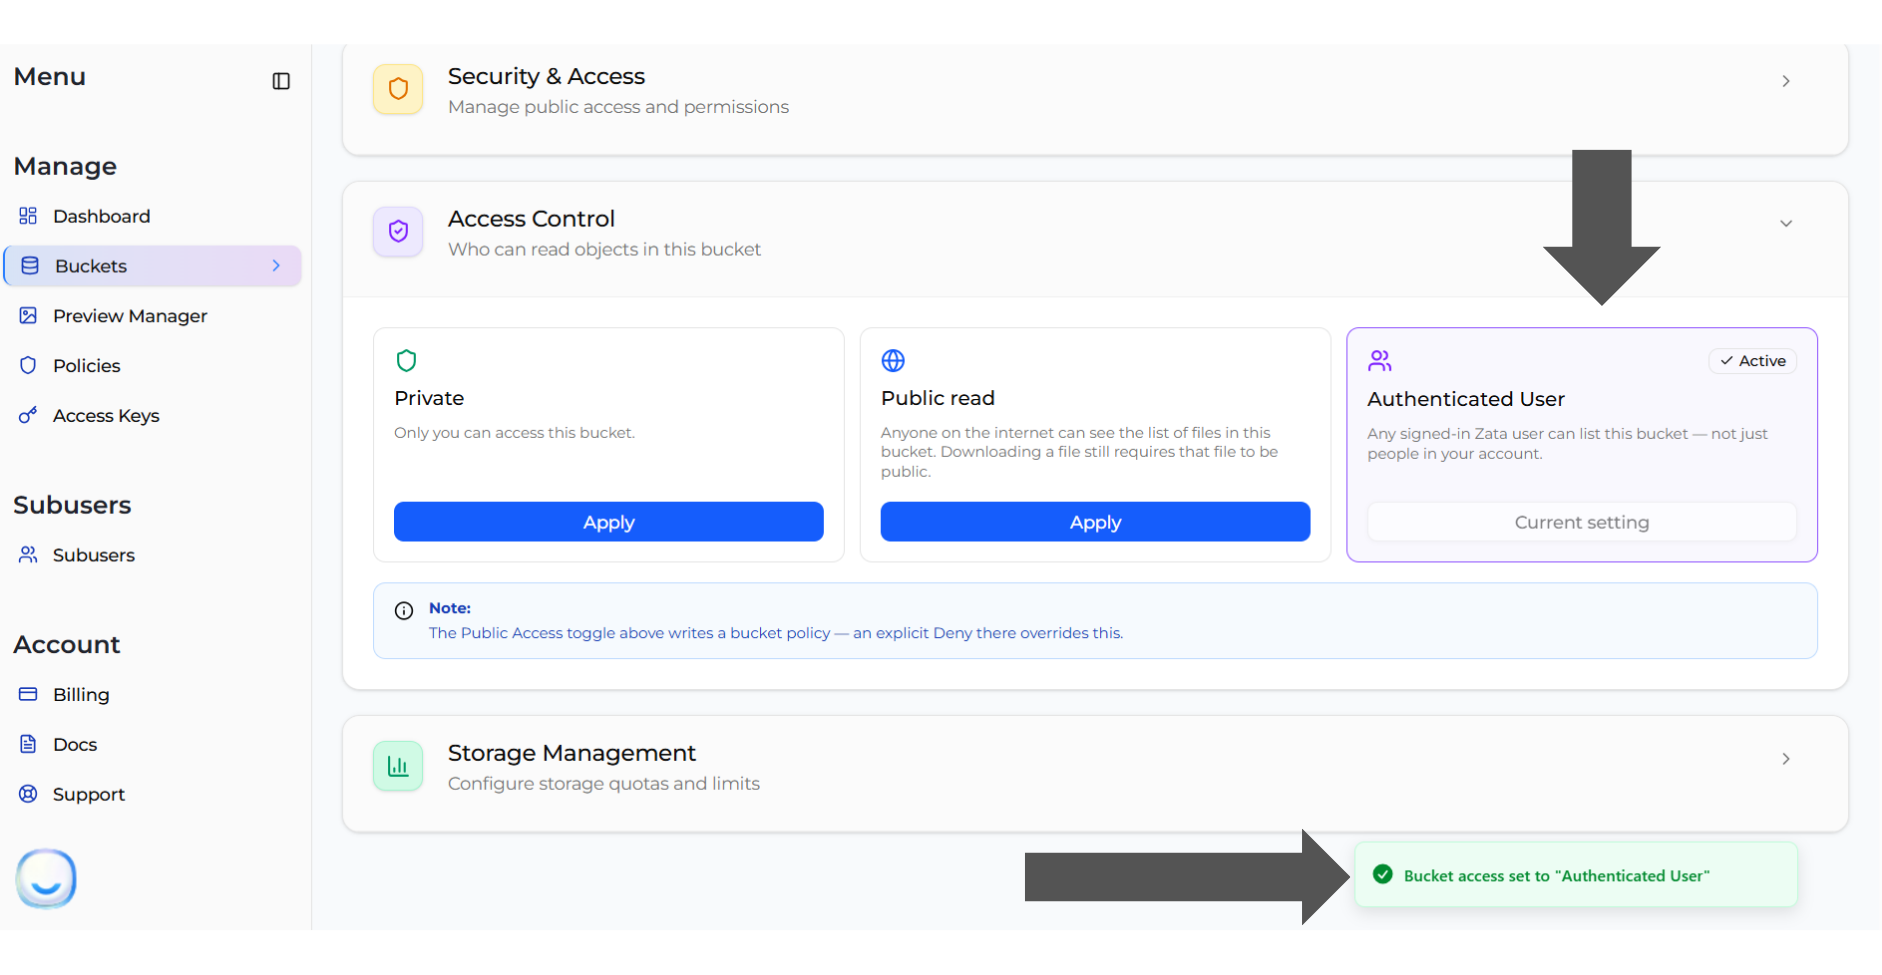
3. The **Authenticated User** card is now marked **Active** and a message confirms *Bucket access set to "Authenticated User"*.
There is no public bucket URL for this option. Visitors without an account still get turned away — only a signed-in Zata.ai user can see the list.
***
## Write access
Everything above is read-only. If you want other people to **put files into** your bucket, open the **ALLOW OTHERS TO UPLOAD** row underneath the three cards.
Inside you will find a **Write access** status line and the two write settings.
**Write access** shows whether anyone else can write to the bucket at the moment:
* **Off** — *Only you can add, replace or delete objects in this bucket.* This is the default.
* **On** — other people can write to it right now, and the line tells you who.
The two settings you can apply are:
| Setting | Who can upload, overwrite and delete |
| ----------------------------------- | ----------------------------------------------------------------------- |
| **Public read + write** | Anyone on the internet. *You are billed for whatever they store.* |
| **Authenticated User read + write** | Any signed-in Zata.ai user, including people outside your organisation. |
Each one also grants the matching read access, so those visitors can list the bucket as well as write to it.
### Before you turn this on
> **IMPORTANT** Upload, overwrite and delete are a **single S3 permission**. There is no upload-only option. Anyone you allow to add files can also replace and permanently delete the files you already have.
The dashboard makes the same point when you apply either setting:
> **NOTE** Upload, overwrite and delete are a single S3 permission — there is no upload-only option. Turn on versioning first if you need to recover a file someone overwrites.
So if the files in this bucket matter, turn on [Versioning](https://docs.zata.ai/manage/bucket/create-bucket/bucket-settings) first. With versioning on, an overwrite creates a new version instead of destroying the old one, so you can go back.
Two more things to know before you decide:
* **You pay for what other people do.** Whatever they upload is stored on your account, and their downloads generate egress billed to you. See [Ingress and Egress Policy](https://docs.zata.ai/account/ingress-and-egress-policy).
* **Turning it off later is not a rewind.** Setting the bucket back to Private stops further access, but it does not undo anything that was already uploaded or deleted.
***
## Setting a bucket to Public read + write
This is the most open setting Zata.ai offers. Anyone who knows the bucket name can write to it, with no account and no sign-in.
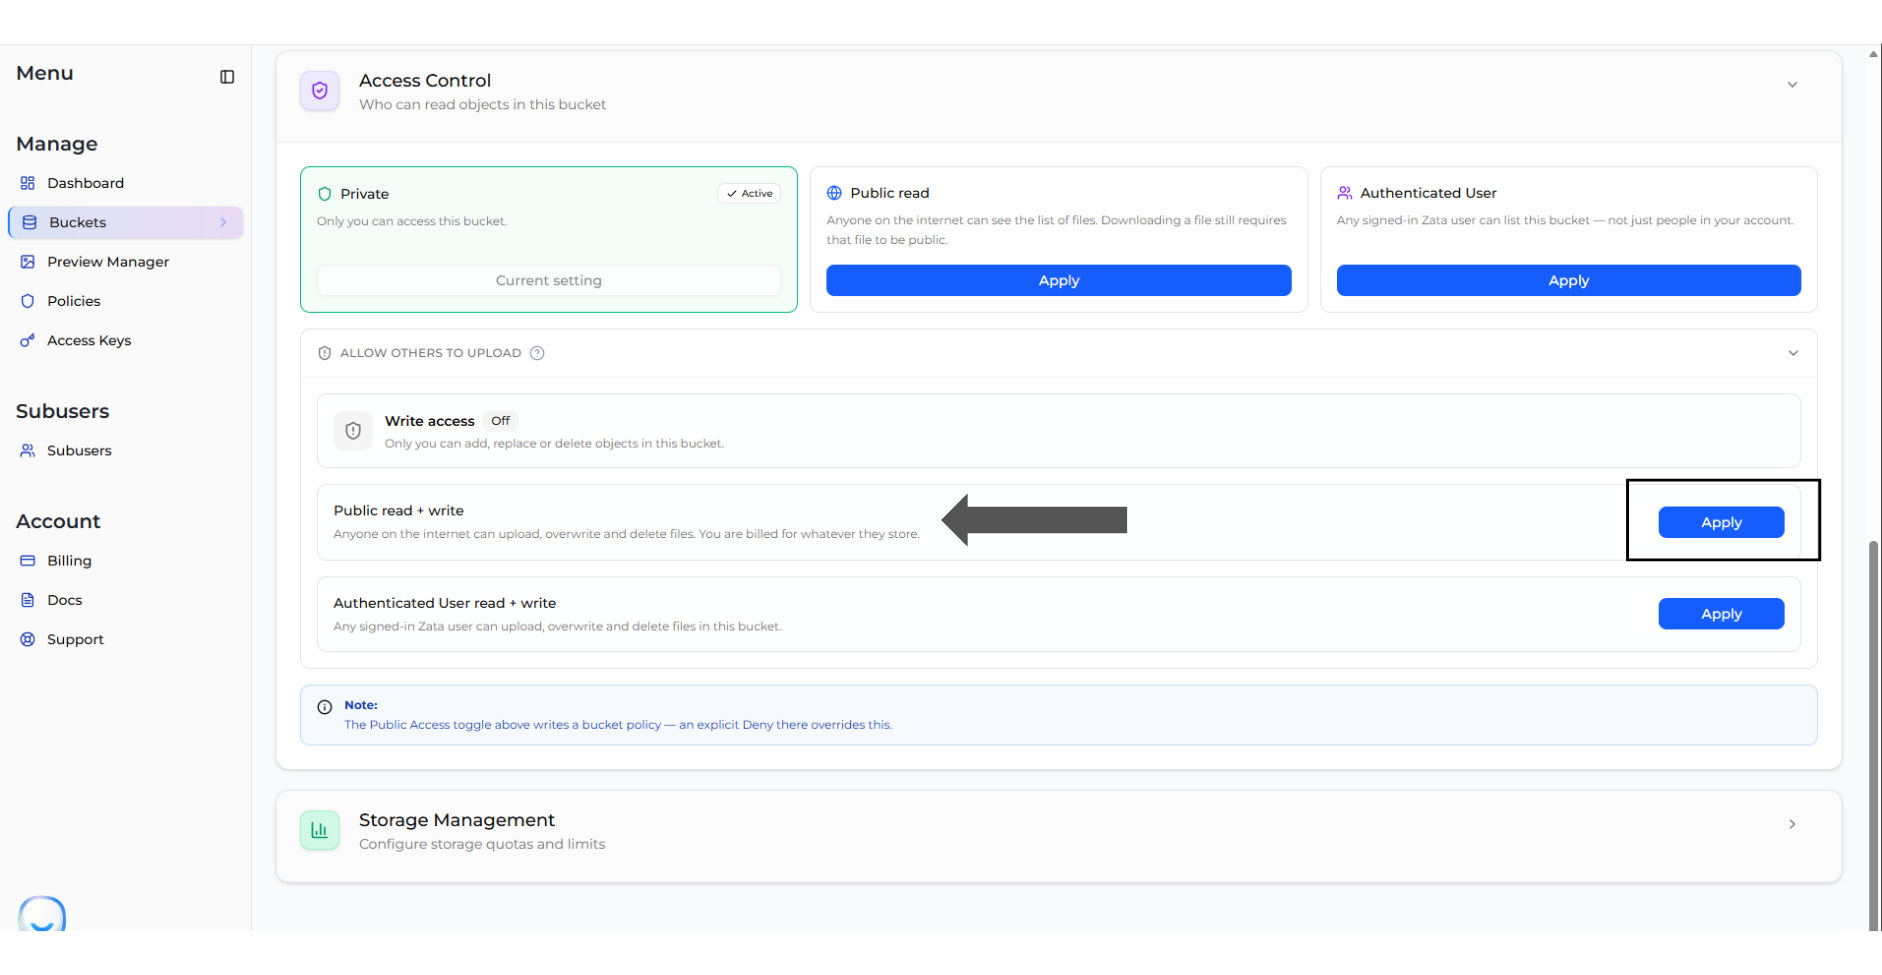
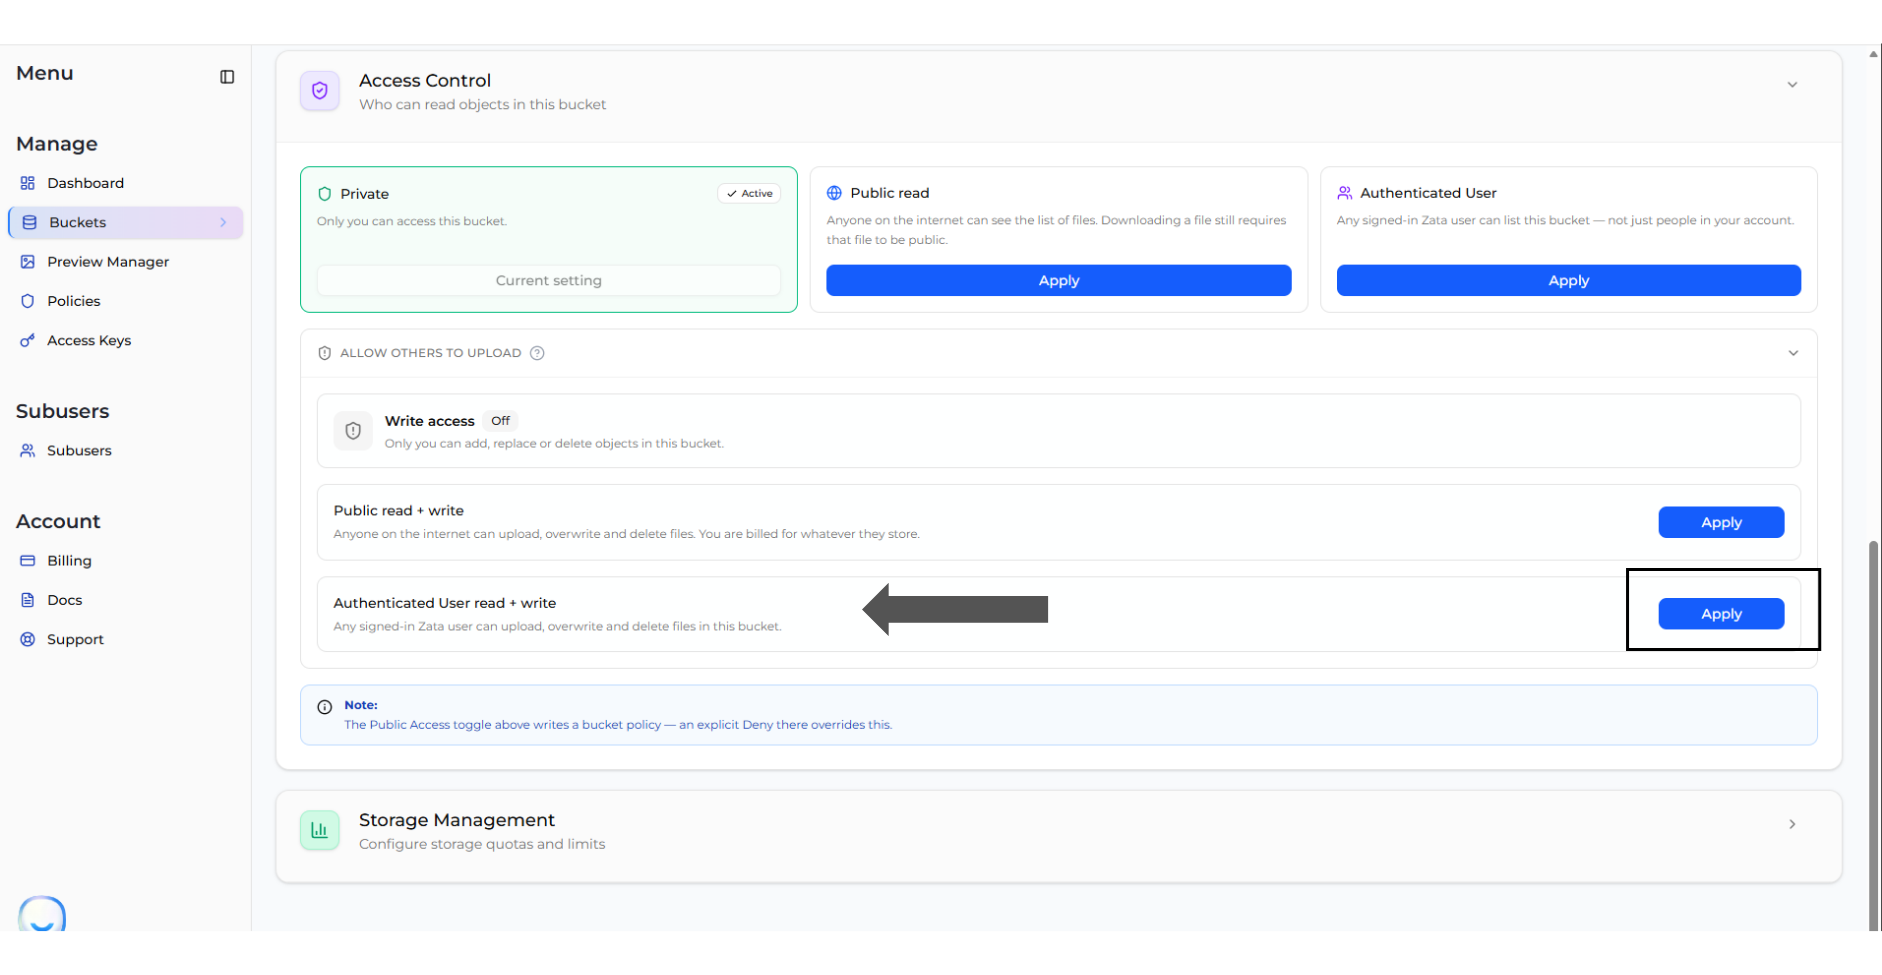
1. Expand **ALLOW OTHERS TO UPLOAD** and click **Apply** on the **Public read + write** row.
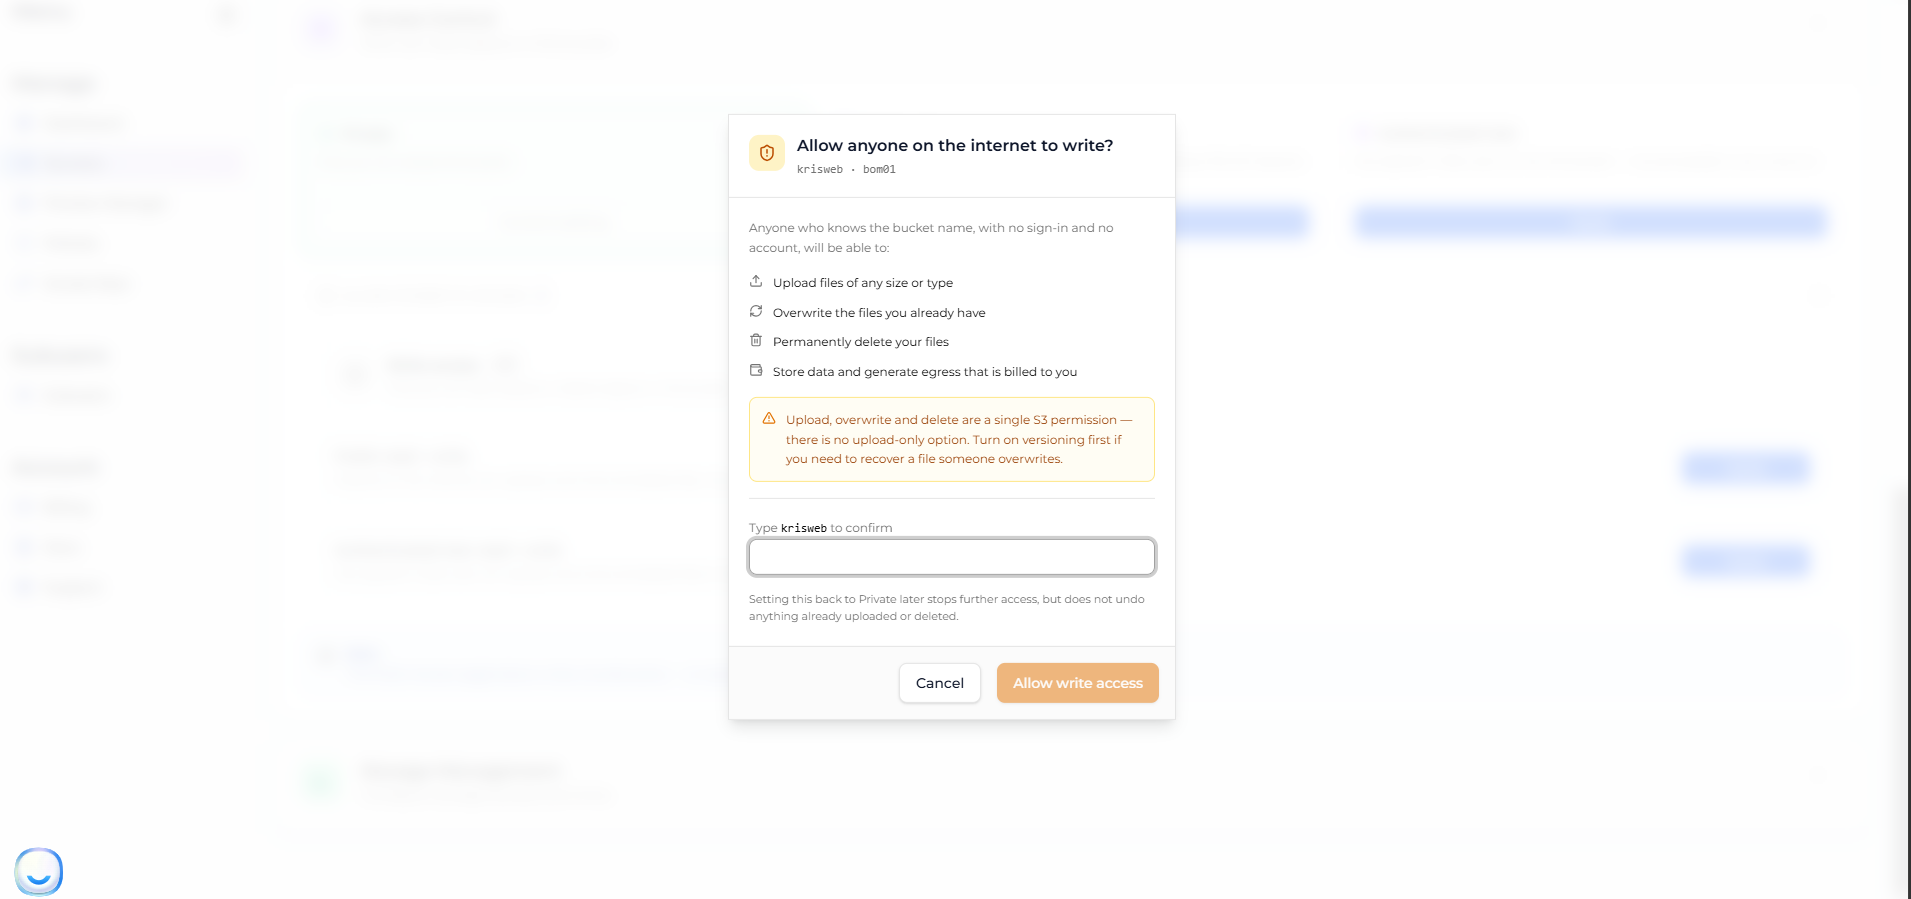
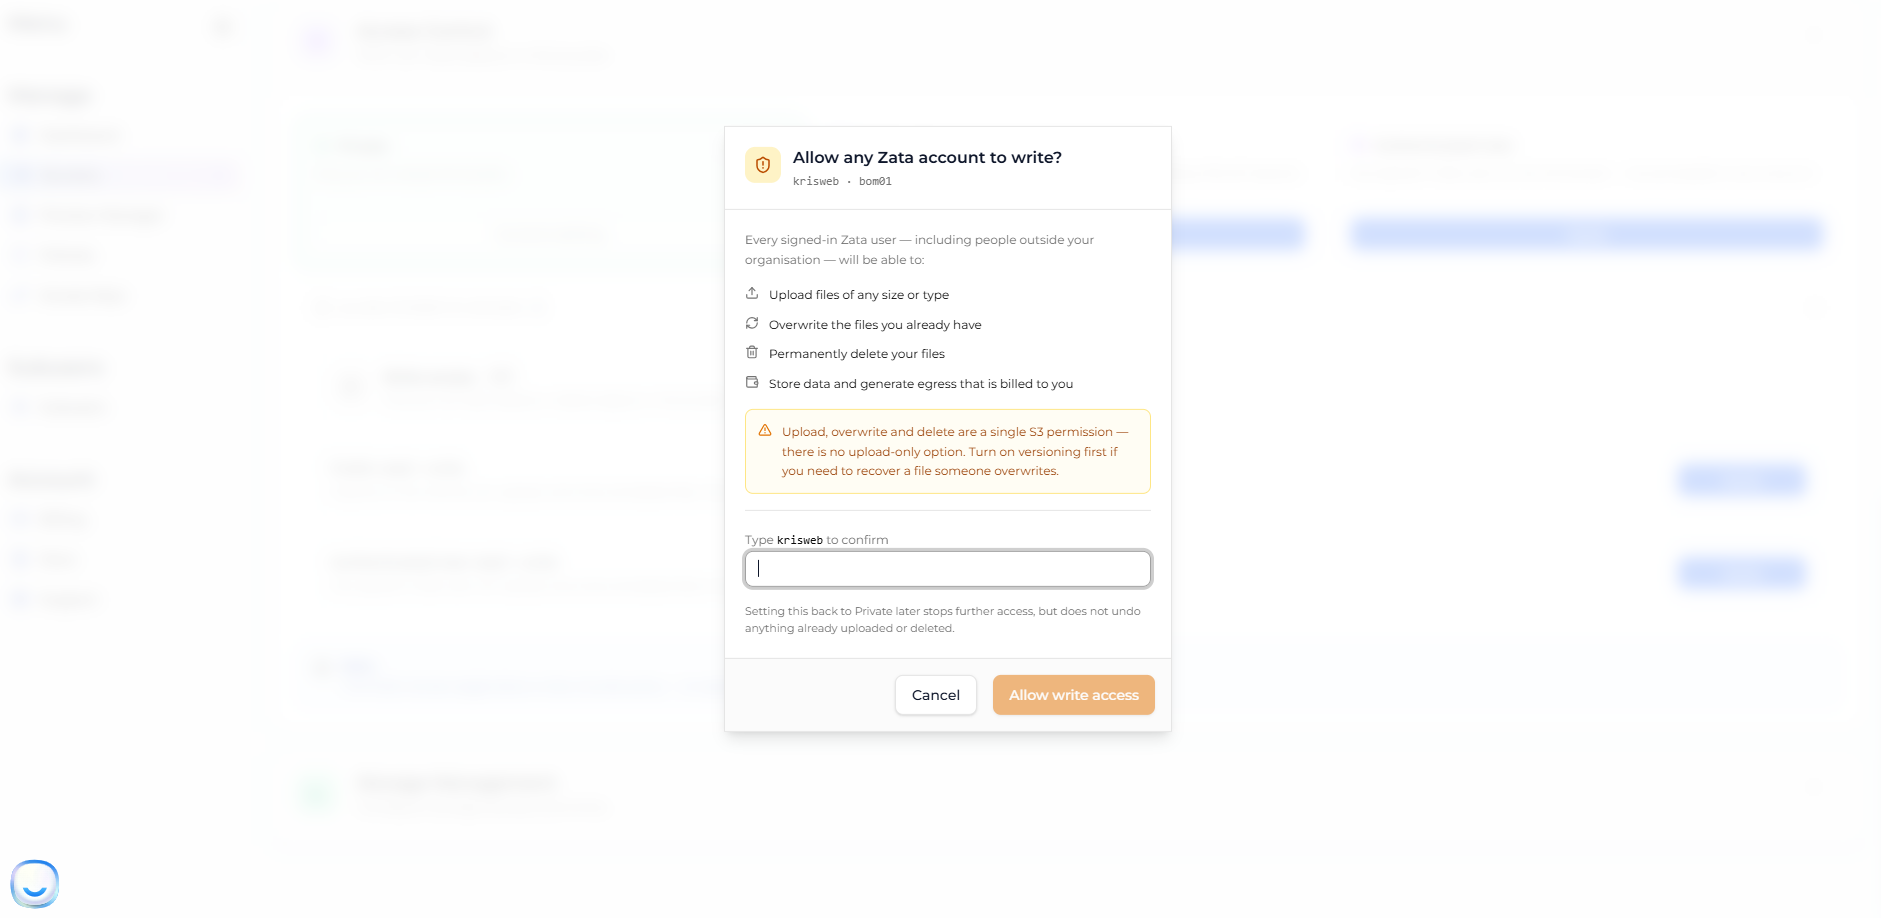
2. A box appears asking **Allow anyone on the internet to write?**. It names the bucket and its region, and lists exactly what strangers will be able to do:
* Upload files of any size or type
* Overwrite the files you already have
* Permanently delete your files
* Store data and generate egress that is billed to you
Because of that, the dashboard asks you to **type the bucket name to confirm**. The **Allow write access** button stays greyed out until you do.
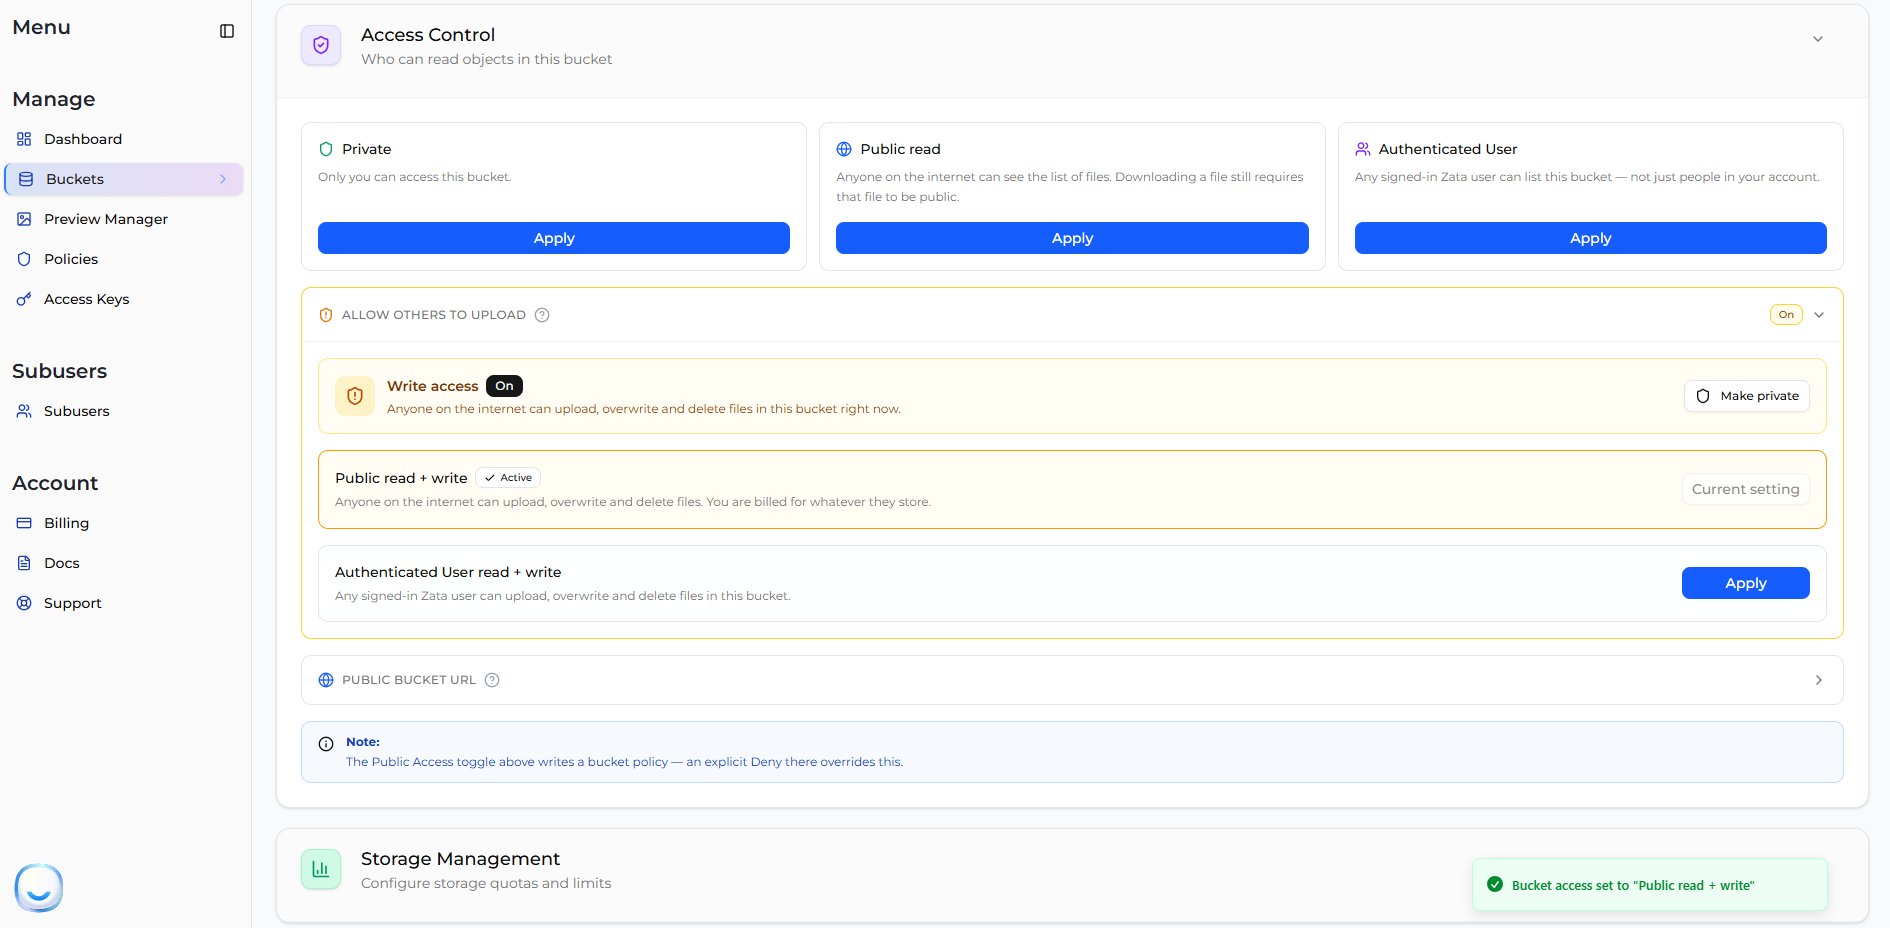
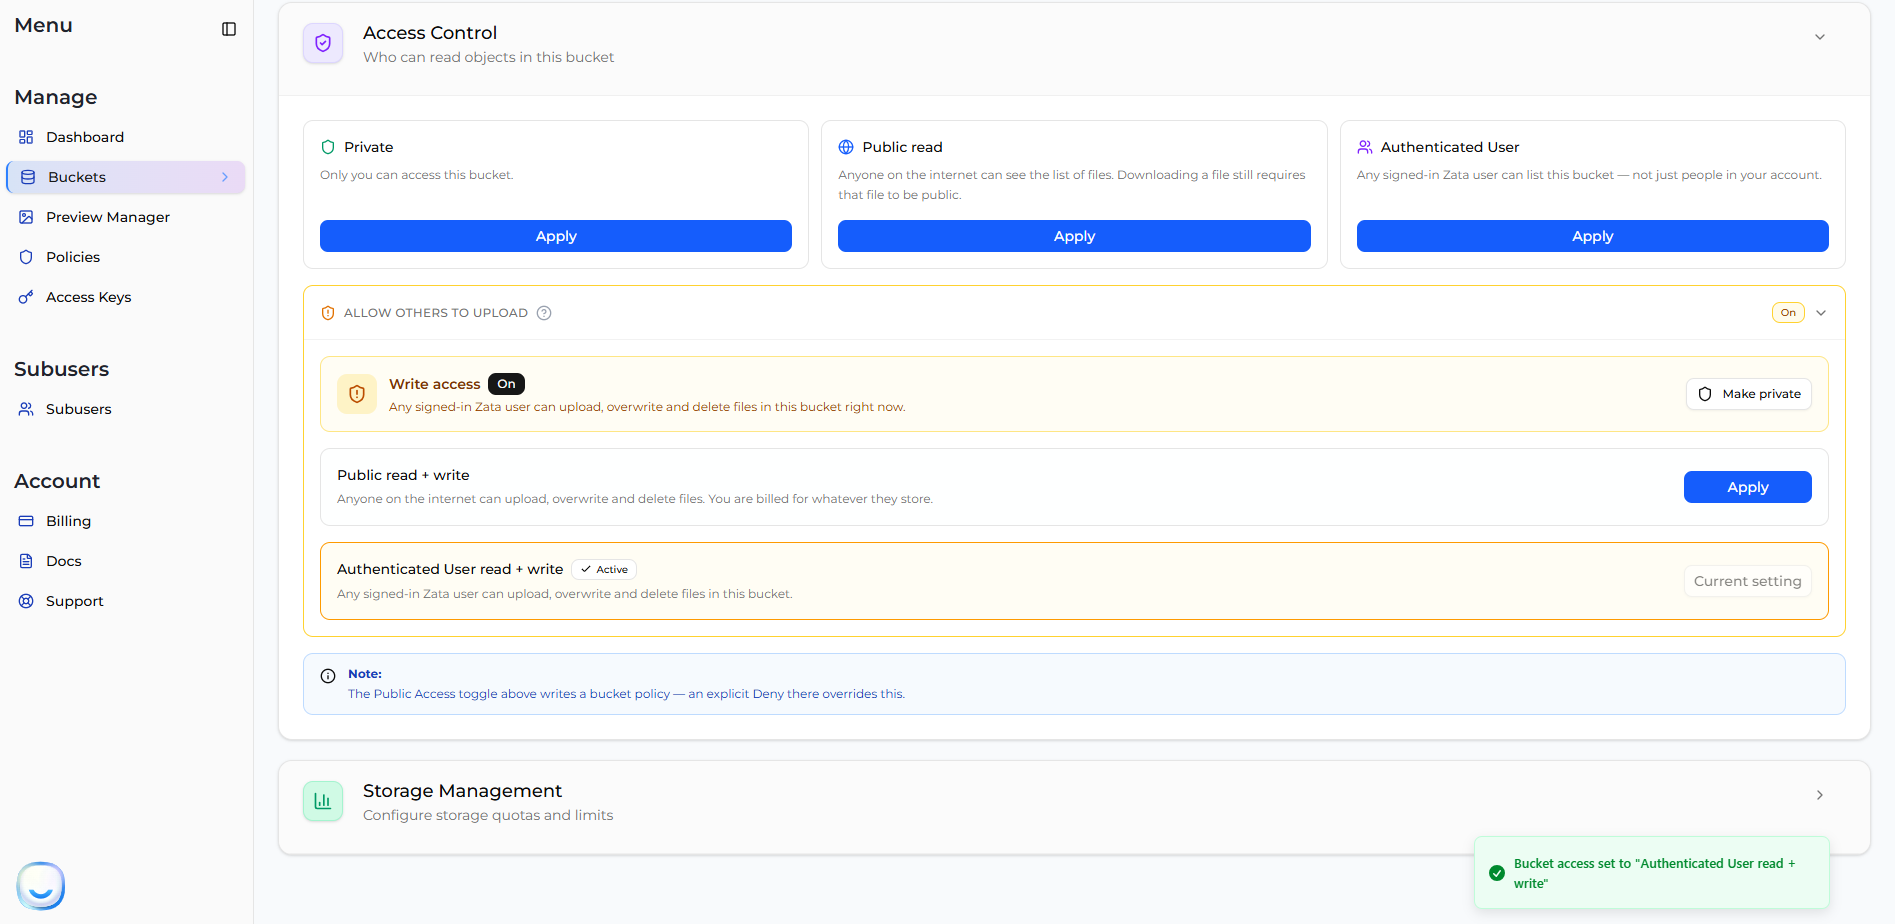
3. Type the bucket name and click **Allow write access**. The **ALLOW OTHERS TO UPLOAD** row now shows a yellow **On** badge, **Write access** reads *On — Anyone on the internet can upload, overwrite and delete files in this bucket right now*, and **Public read + write** is marked **Active**. A message confirms *Bucket access set to "Public read + write"*.
Notice that the three cards at the top no longer show **Active** — the write setting has replaced your read setting. A **PUBLIC BUCKET URL** row appears as well, because this setting includes public read.
> **IMPORTANT** Only use this for a bucket you would not mind losing. A publicly writable bucket can be filled with other people's data, used to host content you did not choose, or emptied by anyone who finds the name. If you need a drop-box where people send you files, use a [subuser](https://docs.zata.ai/subusers/create-a-subuser) with a write policy instead, so you know who is uploading.
***
## Setting a bucket to Authenticated User read + write
This is narrower than Public read + write, because a visitor has to be signed in to a Zata.ai account. It still covers **every** Zata.ai account, though — not only your own team.
1. Expand **ALLOW OTHERS TO UPLOAD** and click **Apply** on the **Authenticated User read + write** row.
2. A box appears asking **Allow any Zata account to write?**. It spells out that this includes people outside your organisation, lists the same four abilities, and asks you to type the bucket name to confirm.
3. Type the bucket name and click **Allow write access**. **Write access** now reads *On — Any signed-in Zata user can upload, overwrite and delete files in this bucket right now*, and **Authenticated User read + write** is marked **Active**. A message confirms *Bucket access set to "Authenticated User read + write"*.
There is no public bucket URL here, because anonymous visitors are still turned away.
***
## Turning write access off
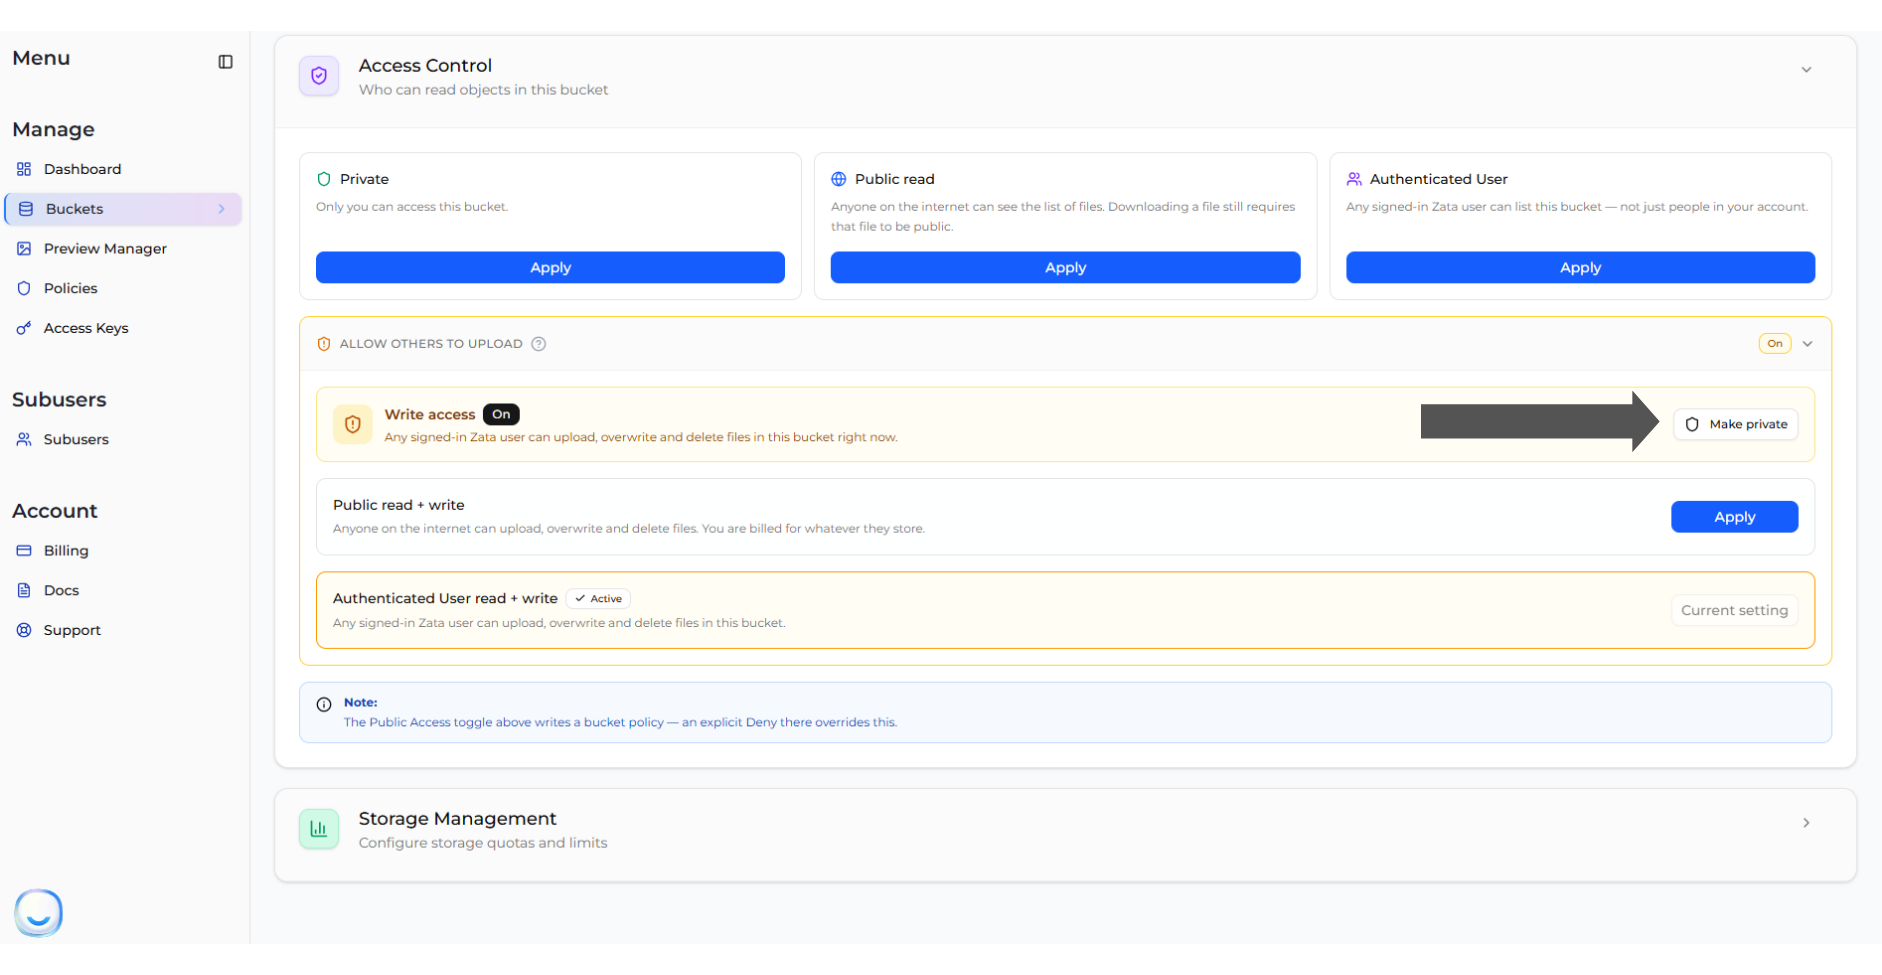
1. In the **ALLOW OTHERS TO UPLOAD** section, click **Make private** on the **Write access** row.
2. **Write access** goes back to **Off**, the **Private** card is marked **Active**, and a message confirms *Bucket access set to "Private"*.
**Make private** returns the bucket to Private in one step — it switches off write access and public listing together. If you wanted to keep the file list public, apply **Public read** again afterwards.
Remember that this stops future access only. Files other people already uploaded stay in your bucket, and files they deleted are gone.
***
## Good to know
> **IMPORTANT** A public file list shows your file names to everyone. File names often contain customer names, invoice numbers or project names, so treat the list itself as information worth protecting — even when the files stay private.
* **Changing this setting never changes your files.** A file you made public earlier stays downloadable, even after you set the bucket back to Private. To stop that, make the file private.
* **A bucket policy can block public access.** If a setting seems to do nothing, check the **Security & Access** section and the **Policies** page. See [ACL and bucket policies](/manage/bucket/access-control.md#acl-and-bucket-policies).
* Browsing and downloading both count towards your egress usage.
* Public access stops working if your account is suspended.